Solved Disk Management- Partition Advice


trevo

Well-known member
Member
VIP
Local time
8:36 AM
Posts
288
Location
USA
OS
windows 11 Pro
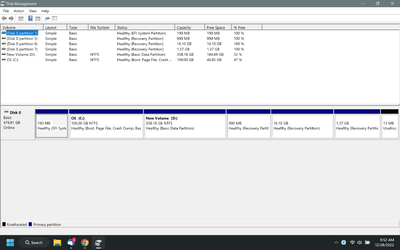
When I first got this Laptop I created a separate data partition and a couple of months ago, changed the sizes as C was too large.
Looking at disk management now, I have 7 partitions and I would like to tidy things up.
What would be the best method to get rid of partitions 6 and 7 and use the space to add to my data partition D?
Any advice would be appreciated, I'm a novice at this.diskmgment.png
 
Windows Build/Version
22H2

My Computer

System One

  • OS
    windows 11 Pro
    Computer type
    Laptop
    Manufacturer/Model
    Dell XPS 15 9510
    CPU
    11th Gen Intel(R) Core(TM) i7-11800H @ 2.30GHz (16 CPUs
    Memory
    16 GB
    Graphics Card(s)
    NVIDIA GeForce RTX 3050 Ti
    Hard Drives
    512GB Solid State Drive
    Browser
    Chrome
Your problem is that at least one of those recovery partitions is current and lies after the partition you want to increase (extend).
A 3rd party solution would be able to achieve what you want by moving the partitions around, some are free, some paid, there will be recommendations in posts on these forums if you search.
There is an easier Windows method if you want, open an admin command and type reagentc /disable then reboot the machine, open an admin command and type reagentc /enable this will place the recovery files into a Recovery folder in the root of the C:\ drive, it will be a hidden, system, protected folder, Treesize or similar free apps can show it (download install or portable versions from developer sites or the MS Store).
You can then delete all the recovery partitions and extend D:\ to use all the now available space.
I suggest you research the benefits, drawbacks and methods posted throughout these forums as to the results to be expected and the methods used.
One thing nearly all users of these forums agree on is to use an app like Macrium Reflect (tutorials on these forums, and for others) to create an image of your current drive to an external device so that should anything go wrong you can easily recover without data loss (things can go wrong and most likely will when you can least afford to have them go wrong).
Also make and test the imaging apps rescue/ boot drive, usually a USB device to make sure you can restore the image when/ if needed.
If you search the tutorial section of these forums you will find many different methods for how to remove, create and move partitions, before diving in I suggest you view several to understand the process involved and the pitfalls before deciding on a method.
You can always ask again for more detail if you feel lost.
 

My Computer

System One

  • OS
    Windows 11 Pro 22H2, build: 22621.521
    Computer type
    PC/Desktop
    Manufacturer/Model
    Scan 3XS Custom 1700
    CPU
    Intel i7-12700K 3.6GHz Base (5.0GHz Turbo)
    Motherboard
    Asus ProArt Creator B660 D4
    Memory
    64GB DDR 3600Mhz
    Graphics Card(s)
    Asus Tuff RTX 3080 10GB OC
    Sound Card
    Onboard Realtek
    Monitor(s) Displays
    Gigabyte G32QC 32inch 16:9 curved @2560 x 1440p 165Hz Freesync Premium Pro/ Dell SE2422H 24inch 16:9 1920 x 1080p 75Hz Freesync
    Screen Resolution
    2560 x 1440p & 1920 x 1080p
    Hard Drives
    WD SN570 1TB NVME (Boot), Samsung 870QVO 1TB (SSD), SanDisk 3D Ultra 500Gb (SSD) x2, Seagate 3Tb Expansion Desk (Ext HDD), 2x Toshiba 1Tb P300 (Ext HDD)
    PSU
    Corsair RM1000X Modular
    Case
    Corsair 4000D Airflow Desktop
    Cooling
    Corsair Hydro H150i RGB Pro XT 360mm Liquid Cooler, 3 x 120mm fans, 1x Exhaust
    Keyboard
    Microsoft Ergonomic
    Mouse
    Logitech G402
    Internet Speed
    800Mbs
    Browser
    Edge Chromium
    Antivirus
    Defender, Malwarebytes
There is an easier Windows method if you want, open an admin command and type reagentc /disable then reboot the machine, open an admin command and type reagentc /enable this will place the recovery files into a Recovery folder in the root of the C:\ drive, it will be a hidden, system, protected folder, Treesize or similar free apps can show it (download install or portable versions from developer sites or the MS Store).
You can then delete all the recovery partitions and extend D:\ to use all the now available space.
The order of the steps is a bit incorrect in the above post.

1. Run reagentc /disable in a command prompt with admin privileges.
2. Reboot - don't know if it is necessary, but won't hurt.
3. Delete all the recovery partitions. Note one of them (16.1 GB recovery) is likely a factory recovery partition and you won't be able to do a reset back to factory software after deleting it.
4. Then run reagentc /enable after the recovery partitions are deleted.

If you run reagentc /disable and then reagentc /enable without deleting the recovery partition(s) first, it will just put the Windows Recovery Environment files right back into the recovery partition that they came from.
 

My Computers

System One System Two

  • OS
    Windows 11
    Computer type
    PC/Desktop
    Manufacturer/Model
    Homebuilt
    CPU
    AMD Ryzen 7 3800XT
    Motherboard
    ASUS ROG Crosshair VII Hero (WiFi)
    Memory
    32GB
    Graphics Card(s)
    EVGA GeForce GTX 1080 Ti
  • Operating System
    Windows 11 Education
    Computer type
    Laptop
    Manufacturer/Model
    Dell Inspiron 7773
    CPU
    Intel i7-8550U
    Memory
    32GB
    Graphics card(s)
    Nvidia Geforce MX150
    Sound Card
    Realtek
    Monitor(s) Displays
    17"
    Screen Resolution
    1920 x 1080
    Hard Drives
    Toshiba 512GB NVMe SSD
    SK Hynix 512GB SATA SSD
    Internet Speed
    Fast!
If it were me, I'd get rid of everything after the D: partition and start using backup software. :-)


Oh wait, that's what I did...

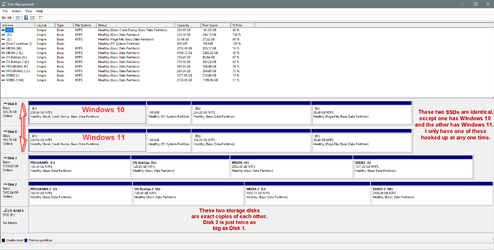
000000 Disk Management.png
 

My Computers

System One System Two

  • OS
    Win 11 Home ♦♦♦22631.3374 ♦♦♦♦♦♦♦23H2
    Computer type
    PC/Desktop
    Manufacturer/Model
    Built by Ghot® [May 2020]
    CPU
    AMD Ryzen 7 3700X
    Motherboard
    Asus Pro WS X570-ACE (BIOS 4702)
    Memory
    G.Skill (F4-3200C14D-16GTZKW)
    Graphics Card(s)
    EVGA RTX 2070 (08G-P4-2171-KR)
    Sound Card
    Realtek ALC1220P / ALC S1220A
    Monitor(s) Displays
    Dell U3011 30"
    Screen Resolution
    2560 x 1600
    Hard Drives
    2x Samsung 860 EVO 500GB,
    WD 4TB Black FZBX - SATA III,
    WD 8TB Black FZBX - SATA III,
    DRW-24B1ST CD/DVD Burner
    PSU
    PC Power & Cooling 750W Quad EPS12V
    Case
    Cooler Master ATCS 840 Tower
    Cooling
    CM Hyper 212 EVO (push/pull)
    Keyboard
    Ducky DK9008 Shine II Blue LED
    Mouse
    Logitech Optical M-100
    Internet Speed
    300/300
    Browser
    Firefox (latest)
    Antivirus
    Bitdefender Internet Security
    Other Info
    Speakers: Klipsch Pro Media 2.1
  • Operating System
    Windows XP Pro 32bit w/SP3
    Computer type
    PC/Desktop
    Manufacturer/Model
    Built by Ghot® (not in use)
    CPU
    AMD Athlon 64 X2 5000+ (OC'd @ 3.2Ghz)
    Motherboard
    ASUS M2N32-SLI Deluxe Wireless Edition
    Memory
    TWIN2X2048-6400C4DHX (2 x 1GB, DDR2 800)
    Graphics card(s)
    EVGA 256-P2-N758-TR GeForce 8600GT SSC
    Sound Card
    Onboard
    Monitor(s) Displays
    ViewSonic G90FB Black 19" Professional (CRT)
    Screen Resolution
    up to 2048 x 1536
    Hard Drives
    WD 36GB 10,000rpm Raptor SATA
    Seagate 80GB 7200rpm SATA
    Lite-On LTR-52246S CD/RW
    Lite-On LH-18A1P CD/DVD Burner
    PSU
    PC Power & Cooling Silencer 750 Quad EPS12V
    Case
    Generic Beige case, 80mm fans
    Cooling
    ZALMAN 9500A 92mm CPU Cooler
    Mouse
    Logitech Optical M-BT96a
    Keyboard
    Logitech Classic Keybooard 200
    Internet Speed
    300/300
    Browser
    Firefox 3.x ??
    Antivirus
    Symantec (Norton)
    Other Info
    Still assembled, still runs. Haven't turned it on for 13 years?
If it were me, I'd get rid of everything after the D: partition and start using backup software. :-)
I'm a long time user of Macrium Home and take regular images, this is more of a housekeeping issue, I'm not short of space.
 

My Computer

System One

  • OS
    windows 11 Pro
    Computer type
    Laptop
    Manufacturer/Model
    Dell XPS 15 9510
    CPU
    11th Gen Intel(R) Core(TM) i7-11800H @ 2.30GHz (16 CPUs
    Memory
    16 GB
    Graphics Card(s)
    NVIDIA GeForce RTX 3050 Ti
    Hard Drives
    512GB Solid State Drive
    Browser
    Chrome
I'm a long time user of Macrium Home and take regular images, this is more of a housekeeping issue, I'm not short of space.


Well, here's what I really did... OCD rulz !!

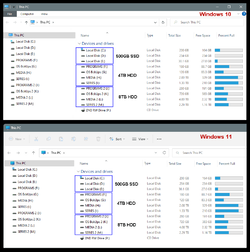
000000 Disk Management.png

00000 Hard Drives.png
 
Last edited:

My Computers

System One System Two

  • OS
    Win 11 Home ♦♦♦22631.3374 ♦♦♦♦♦♦♦23H2
    Computer type
    PC/Desktop
    Manufacturer/Model
    Built by Ghot® [May 2020]
    CPU
    AMD Ryzen 7 3700X
    Motherboard
    Asus Pro WS X570-ACE (BIOS 4702)
    Memory
    G.Skill (F4-3200C14D-16GTZKW)
    Graphics Card(s)
    EVGA RTX 2070 (08G-P4-2171-KR)
    Sound Card
    Realtek ALC1220P / ALC S1220A
    Monitor(s) Displays
    Dell U3011 30"
    Screen Resolution
    2560 x 1600
    Hard Drives
    2x Samsung 860 EVO 500GB,
    WD 4TB Black FZBX - SATA III,
    WD 8TB Black FZBX - SATA III,
    DRW-24B1ST CD/DVD Burner
    PSU
    PC Power & Cooling 750W Quad EPS12V
    Case
    Cooler Master ATCS 840 Tower
    Cooling
    CM Hyper 212 EVO (push/pull)
    Keyboard
    Ducky DK9008 Shine II Blue LED
    Mouse
    Logitech Optical M-100
    Internet Speed
    300/300
    Browser
    Firefox (latest)
    Antivirus
    Bitdefender Internet Security
    Other Info
    Speakers: Klipsch Pro Media 2.1
  • Operating System
    Windows XP Pro 32bit w/SP3
    Computer type
    PC/Desktop
    Manufacturer/Model
    Built by Ghot® (not in use)
    CPU
    AMD Athlon 64 X2 5000+ (OC'd @ 3.2Ghz)
    Motherboard
    ASUS M2N32-SLI Deluxe Wireless Edition
    Memory
    TWIN2X2048-6400C4DHX (2 x 1GB, DDR2 800)
    Graphics card(s)
    EVGA 256-P2-N758-TR GeForce 8600GT SSC
    Sound Card
    Onboard
    Monitor(s) Displays
    ViewSonic G90FB Black 19" Professional (CRT)
    Screen Resolution
    up to 2048 x 1536
    Hard Drives
    WD 36GB 10,000rpm Raptor SATA
    Seagate 80GB 7200rpm SATA
    Lite-On LTR-52246S CD/RW
    Lite-On LH-18A1P CD/DVD Burner
    PSU
    PC Power & Cooling Silencer 750 Quad EPS12V
    Case
    Generic Beige case, 80mm fans
    Cooling
    ZALMAN 9500A 92mm CPU Cooler
    Mouse
    Logitech Optical M-BT96a
    Keyboard
    Logitech Classic Keybooard 200
    Internet Speed
    300/300
    Browser
    Firefox 3.x ??
    Antivirus
    Symantec (Norton)
    Other Info
    Still assembled, still runs. Haven't turned it on for 13 years?
The order of the steps is a bit incorrect in the above post.

1. Run reagentc /disable in a command prompt with admin privileges.
2. Reboot - don't know if it is necessary, but won't hurt.
3. Delete all the recovery partitions. Note one of them (16.1 GB recovery) is likely a factory recovery partition and you won't be able to do a reset back to factory software after deleting it.
4. Then run reagentc /enable after the recovery partitions are deleted.

If you run reagentc /disable and then reagentc /enable without deleting the recovery partition(s) first, it will just put the Windows Recovery Environment files right back into the recovery partition that they came from.
If you run reagentc /disable then the reference to the partition ID used for the recovery files becomes invalid, reagentc /enable with no partition ID arguments will populate the Recovery folder in the root of C:\ by default, this is how it worked on my Win11 22h2 system.
The reboot I just assume is a good idea after changing such an environmental variable.
 

My Computer

System One

  • OS
    Windows 11 Pro 22H2, build: 22621.521
    Computer type
    PC/Desktop
    Manufacturer/Model
    Scan 3XS Custom 1700
    CPU
    Intel i7-12700K 3.6GHz Base (5.0GHz Turbo)
    Motherboard
    Asus ProArt Creator B660 D4
    Memory
    64GB DDR 3600Mhz
    Graphics Card(s)
    Asus Tuff RTX 3080 10GB OC
    Sound Card
    Onboard Realtek
    Monitor(s) Displays
    Gigabyte G32QC 32inch 16:9 curved @2560 x 1440p 165Hz Freesync Premium Pro/ Dell SE2422H 24inch 16:9 1920 x 1080p 75Hz Freesync
    Screen Resolution
    2560 x 1440p & 1920 x 1080p
    Hard Drives
    WD SN570 1TB NVME (Boot), Samsung 870QVO 1TB (SSD), SanDisk 3D Ultra 500Gb (SSD) x2, Seagate 3Tb Expansion Desk (Ext HDD), 2x Toshiba 1Tb P300 (Ext HDD)
    PSU
    Corsair RM1000X Modular
    Case
    Corsair 4000D Airflow Desktop
    Cooling
    Corsair Hydro H150i RGB Pro XT 360mm Liquid Cooler, 3 x 120mm fans, 1x Exhaust
    Keyboard
    Microsoft Ergonomic
    Mouse
    Logitech G402
    Internet Speed
    800Mbs
    Browser
    Edge Chromium
    Antivirus
    Defender, Malwarebytes
I decided to go for the @Ghot nuclear option, so marking Thread as solved.
Thanks for all contributions. (y)
 

My Computer

System One

  • OS
    windows 11 Pro
    Computer type
    Laptop
    Manufacturer/Model
    Dell XPS 15 9510
    CPU
    11th Gen Intel(R) Core(TM) i7-11800H @ 2.30GHz (16 CPUs
    Memory
    16 GB
    Graphics Card(s)
    NVIDIA GeForce RTX 3050 Ti
    Hard Drives
    512GB Solid State Drive
    Browser
    Chrome
If you run reagentc /disable then the reference to the partition ID used for the recovery files becomes invalid, reagentc /enable with no partition ID arguments will populate the Recovery folder in the root of C:\ by default, this is how it worked on my Win11 22h2 system.
The reboot I just assume is a good idea after changing such an environmental variable.
You would be mistaken. See below. First I disabled RE, then re-enabled it. It went right back into the existing recovery partition. Then I disabled RE, rebooted the computer and re-enabled it. It went right back into the existing recovery partition. In order to move the Recovery Environment into C:\Recovery, the user must delete the existing recovery partition before re-enabling RE.

Code:
C:\Windows\System32>diskpart

Microsoft DiskPart version 10.0.22621.1

Copyright (C) Microsoft Corporation.
On computer: DESKTOP-8FMKR4G

DISKPART> sel dis 0

Disk 0 is now the selected disk.

DISKPART> lis par

  Partition ###  Type              Size     Offset
  -------------  ----------------  -------  -------
  Partition 1    System             100 MB  1024 KB
  Partition 2    Reserved            16 MB   101 MB
  Partition 3    Primary            126 GB   117 MB
  Partition 4    Recovery           625 MB   126 GB

DISKPART> exit

Leaving DiskPart...

C:\Windows\System32>reagentc /info
Windows Recovery Environment (Windows RE) and system reset configuration
Information:

    Windows RE status:         Enabled
    Windows RE location:       \\?\GLOBALROOT\device\harddisk0\partition4\Recovery\WindowsRE
    Boot Configuration Data (BCD) identifier: c571a573-87aa-11ed-b33b-f1b28219d331
    Recovery image location:
    Recovery image index:      0
    Custom image location:
    Custom image index:        0

REAGENTC.EXE: Operation Successful.


C:\Windows\System32>reagentc /disable
REAGENTC.EXE: Operation Successful.


C:\Windows\System32>reagentc /enable
REAGENTC.EXE: Operation Successful.


C:\Windows\System32>reagentc /info
Windows Recovery Environment (Windows RE) and system reset configuration
Information:

    Windows RE status:         Enabled
    Windows RE location:       \\?\GLOBALROOT\device\harddisk0\partition4\Recovery\WindowsRE
    Boot Configuration Data (BCD) identifier: c571a575-87aa-11ed-b33b-f1b28219d331
    Recovery image location:
    Recovery image index:      0
    Custom image location:
    Custom image index:        0

REAGENTC.EXE: Operation Successful.


C:\Windows\System32>reagentc /disable
REAGENTC.EXE: Operation Successful.


C:\Windows\System32>

Rebooted computer

Code:
Microsoft Windows [Version 10.0.22621.525]
(c) Microsoft Corporation. All rights reserved.

C:\Windows\System32>reagentc /enable
REAGENTC.EXE: Operation Successful.


C:\Windows\System32>reagentc /info
Windows Recovery Environment (Windows RE) and system reset configuration
Information:

    Windows RE status:         Enabled
    Windows RE location:       \\?\GLOBALROOT\device\harddisk0\partition4\Recovery\WindowsRE
    Boot Configuration Data (BCD) identifier: c571a577-87aa-11ed-b33b-f1b28219d331
    Recovery image location:
    Recovery image index:      0
    Custom image location:
    Custom image index:        0

REAGENTC.EXE: Operation Successful.


C:\Windows\System32>
 

My Computers

System One System Two

  • OS
    Windows 11
    Computer type
    PC/Desktop
    Manufacturer/Model
    Homebuilt
    CPU
    AMD Ryzen 7 3800XT
    Motherboard
    ASUS ROG Crosshair VII Hero (WiFi)
    Memory
    32GB
    Graphics Card(s)
    EVGA GeForce GTX 1080 Ti
  • Operating System
    Windows 11 Education
    Computer type
    Laptop
    Manufacturer/Model
    Dell Inspiron 7773
    CPU
    Intel i7-8550U
    Memory
    32GB
    Graphics card(s)
    Nvidia Geforce MX150
    Sound Card
    Realtek
    Monitor(s) Displays
    17"
    Screen Resolution
    1920 x 1080
    Hard Drives
    Toshiba 512GB NVMe SSD
    SK Hynix 512GB SATA SSD
    Internet Speed
    Fast!
You would be mistaken. See below. First I disabled RE, then re-enabled it. It went right back into the existing recovery partition. Then I disabled RE, rebooted the computer and re-enabled it. It went right back into the existing recovery partition. In order to move the Recovery Environment into C:\Recovery, the user must delete the existing recovery partition before re-enabling RE.

Code:
C:\Windows\System32>diskpart

Microsoft DiskPart version 10.0.22621.1

Copyright (C) Microsoft Corporation.
On computer: DESKTOP-8FMKR4G

DISKPART> sel dis 0

Disk 0 is now the selected disk.

DISKPART> lis par

  Partition ###  Type              Size     Offset
  -------------  ----------------  -------  -------
  Partition 1    System             100 MB  1024 KB
  Partition 2    Reserved            16 MB   101 MB
  Partition 3    Primary            126 GB   117 MB
  Partition 4    Recovery           625 MB   126 GB

DISKPART> exit

Leaving DiskPart...

C:\Windows\System32>reagentc /info
Windows Recovery Environment (Windows RE) and system reset configuration
Information:

    Windows RE status:         Enabled
    Windows RE location:       \\?\GLOBALROOT\device\harddisk0\partition4\Recovery\WindowsRE
    Boot Configuration Data (BCD) identifier: c571a573-87aa-11ed-b33b-f1b28219d331
    Recovery image location:
    Recovery image index:      0
    Custom image location:
    Custom image index:        0

REAGENTC.EXE: Operation Successful.


C:\Windows\System32>reagentc /disable
REAGENTC.EXE: Operation Successful.


C:\Windows\System32>reagentc /enable
REAGENTC.EXE: Operation Successful.


C:\Windows\System32>reagentc /info
Windows Recovery Environment (Windows RE) and system reset configuration
Information:

    Windows RE status:         Enabled
    Windows RE location:       \\?\GLOBALROOT\device\harddisk0\partition4\Recovery\WindowsRE
    Boot Configuration Data (BCD) identifier: c571a575-87aa-11ed-b33b-f1b28219d331
    Recovery image location:
    Recovery image index:      0
    Custom image location:
    Custom image index:        0

REAGENTC.EXE: Operation Successful.


C:\Windows\System32>reagentc /disable
REAGENTC.EXE: Operation Successful.


C:\Windows\System32>

Rebooted computer

Code:
Microsoft Windows [Version 10.0.22621.525]
(c) Microsoft Corporation. All rights reserved.

C:\Windows\System32>reagentc /enable
REAGENTC.EXE: Operation Successful.


C:\Windows\System32>reagentc /info
Windows Recovery Environment (Windows RE) and system reset configuration
Information:

    Windows RE status:         Enabled
    Windows RE location:       \\?\GLOBALROOT\device\harddisk0\partition4\Recovery\WindowsRE
    Boot Configuration Data (BCD) identifier: c571a577-87aa-11ed-b33b-f1b28219d331
    Recovery image location:
    Recovery image index:      0
    Custom image location:
    Custom image index:        0

REAGENTC.EXE: Operation Successful.


C:\Windows\System32>
I trust your results of course, I stand corrected. What I don't trust now is my memory (wet ware, not RAM).
I could have sworn I didn't delete the recovery partition until after the Recovery folder was populated because I was unsure what would happen and didn't want to mess up.
But obviously I must remember wrong. Too much Xmas spirit perhaps. 🤔
Thanks for testing it and posting the results. 👍
Have your self a happy new year!
 

My Computer

System One

  • OS
    Windows 11 Pro 22H2, build: 22621.521
    Computer type
    PC/Desktop
    Manufacturer/Model
    Scan 3XS Custom 1700
    CPU
    Intel i7-12700K 3.6GHz Base (5.0GHz Turbo)
    Motherboard
    Asus ProArt Creator B660 D4
    Memory
    64GB DDR 3600Mhz
    Graphics Card(s)
    Asus Tuff RTX 3080 10GB OC
    Sound Card
    Onboard Realtek
    Monitor(s) Displays
    Gigabyte G32QC 32inch 16:9 curved @2560 x 1440p 165Hz Freesync Premium Pro/ Dell SE2422H 24inch 16:9 1920 x 1080p 75Hz Freesync
    Screen Resolution
    2560 x 1440p & 1920 x 1080p
    Hard Drives
    WD SN570 1TB NVME (Boot), Samsung 870QVO 1TB (SSD), SanDisk 3D Ultra 500Gb (SSD) x2, Seagate 3Tb Expansion Desk (Ext HDD), 2x Toshiba 1Tb P300 (Ext HDD)
    PSU
    Corsair RM1000X Modular
    Case
    Corsair 4000D Airflow Desktop
    Cooling
    Corsair Hydro H150i RGB Pro XT 360mm Liquid Cooler, 3 x 120mm fans, 1x Exhaust
    Keyboard
    Microsoft Ergonomic
    Mouse
    Logitech G402
    Internet Speed
    800Mbs
    Browser
    Edge Chromium
    Antivirus
    Defender, Malwarebytes
I trust your results of course, I stand corrected. What I don't trust now is my memory (wet ware, not RAM).
I could have sworn I didn't delete the recovery partition until after the Recovery folder was populated because I was unsure what would happen and didn't want to mess up.
But obviously I must remember wrong. Too much Xmas spirit perhaps. 🤔
Thanks for testing it and posting the results. 👍
Have your self a happy new year!
Running reagentc /disable moves the Recovery Environment into Windows/System32/Recovery regardless of the existence of a recovery partition or not. Perhaps that is what you were thinking.
 

My Computers

System One System Two

  • OS
    Windows 11
    Computer type
    PC/Desktop
    Manufacturer/Model
    Homebuilt
    CPU
    AMD Ryzen 7 3800XT
    Motherboard
    ASUS ROG Crosshair VII Hero (WiFi)
    Memory
    32GB
    Graphics Card(s)
    EVGA GeForce GTX 1080 Ti
  • Operating System
    Windows 11 Education
    Computer type
    Laptop
    Manufacturer/Model
    Dell Inspiron 7773
    CPU
    Intel i7-8550U
    Memory
    32GB
    Graphics card(s)
    Nvidia Geforce MX150
    Sound Card
    Realtek
    Monitor(s) Displays
    17"
    Screen Resolution
    1920 x 1080
    Hard Drives
    Toshiba 512GB NVMe SSD
    SK Hynix 512GB SATA SSD
    Internet Speed
    Fast!
Running reagentc /disable moves the Recovery Environment into Windows/System32/Recovery regardless of the existence of a recovery partition or not. Perhaps that is what you were thinking.
Possibly, it was the first time I had ever used the command, to be honest I can't even remember why I wanted to remove the recovery partition in the first place.
 

My Computer

System One

  • OS
    Windows 11 Pro 22H2, build: 22621.521
    Computer type
    PC/Desktop
    Manufacturer/Model
    Scan 3XS Custom 1700
    CPU
    Intel i7-12700K 3.6GHz Base (5.0GHz Turbo)
    Motherboard
    Asus ProArt Creator B660 D4
    Memory
    64GB DDR 3600Mhz
    Graphics Card(s)
    Asus Tuff RTX 3080 10GB OC
    Sound Card
    Onboard Realtek
    Monitor(s) Displays
    Gigabyte G32QC 32inch 16:9 curved @2560 x 1440p 165Hz Freesync Premium Pro/ Dell SE2422H 24inch 16:9 1920 x 1080p 75Hz Freesync
    Screen Resolution
    2560 x 1440p & 1920 x 1080p
    Hard Drives
    WD SN570 1TB NVME (Boot), Samsung 870QVO 1TB (SSD), SanDisk 3D Ultra 500Gb (SSD) x2, Seagate 3Tb Expansion Desk (Ext HDD), 2x Toshiba 1Tb P300 (Ext HDD)
    PSU
    Corsair RM1000X Modular
    Case
    Corsair 4000D Airflow Desktop
    Cooling
    Corsair Hydro H150i RGB Pro XT 360mm Liquid Cooler, 3 x 120mm fans, 1x Exhaust
    Keyboard
    Microsoft Ergonomic
    Mouse
    Logitech G402
    Internet Speed
    800Mbs
    Browser
    Edge Chromium
    Antivirus
    Defender, Malwarebytes
Is there any advantage to relocating the Recovery Partition/Environment?
 

My Computer

System One

  • OS
    Windows 11 RP
    Computer type
    PC/Desktop
    Manufacturer/Model
    Lenovo ThinkCentre M75Q-1
    CPU
    AMD Ryzen 5 Pro 3400GE @3.30 GHz (4.0 GHz Turbo)
    Motherboard
    Lenovo 3151
    Memory
    20 GB DDR4 2666 (1x16GB + 1x4GB)
    Graphics Card(s)
    AMD Radeon Vega 11
    Sound Card
    Integrated
    Monitor(s) Displays
    AOC 2369
    Screen Resolution
    1920 x 1080
    Hard Drives
    WD 512 GB NVME + SPCC 240GB SATA SSD
    PSU
    External 65W
    Case
    Mini (1L)
Is there any advantage to relocating the Recovery Partition/Environment?
One less partition on the disk. But that is more of a concern on an MBR disk limited to 4 primary partitions than it is on a GPT disk.
 

My Computers

System One System Two

  • OS
    Windows 11
    Computer type
    PC/Desktop
    Manufacturer/Model
    Homebuilt
    CPU
    AMD Ryzen 7 3800XT
    Motherboard
    ASUS ROG Crosshair VII Hero (WiFi)
    Memory
    32GB
    Graphics Card(s)
    EVGA GeForce GTX 1080 Ti
  • Operating System
    Windows 11 Education
    Computer type
    Laptop
    Manufacturer/Model
    Dell Inspiron 7773
    CPU
    Intel i7-8550U
    Memory
    32GB
    Graphics card(s)
    Nvidia Geforce MX150
    Sound Card
    Realtek
    Monitor(s) Displays
    17"
    Screen Resolution
    1920 x 1080
    Hard Drives
    Toshiba 512GB NVMe SSD
    SK Hynix 512GB SATA SSD
    Internet Speed
    Fast!
If the disk drive has a recovery partition then the drive architecture is important during Windows upgrades.
Windows may create a second recovery partition leaving an orphaned partition.


Code:
The recovery tools should be in a separate partition than the Windows partition 
to support automatic failover and to support booting partitions encrypted with Windows 
BitLocker Drive Encryption.

We recommend that you place this partition immediately after the Windows partition. 
This allows Windows to modify and recreate the partition later if future updates require a 
larger recovery image.


My Computer

System One

  • OS
    Windows 10
    Computer type
    Laptop
    Manufacturer/Model
    HP
    CPU
    Intel(R) Core(TM) i7-4800MQ CPU @ 2.70GHz
    Motherboard
    Product : 190A Version : KBC Version 94.56
    Memory
    16 GB Total: Manufacturer : Samsung MemoryType : DDR3 FormFactor : SODIMM Capacity : 8GB Speed : 1600
    Graphics Card(s)
    NVIDIA Quadro K3100M; Intel(R) HD Graphics 4600
    Sound Card
    IDT High Definition Audio CODEC; PNP Device ID HDAUDIO\FUNC_01&VEN_111D&DEV_76E0
    Hard Drives
    Model Hitachi HTS727575A9E364
    Antivirus
    Microsoft Defender
    Other Info
    Mobile Workstation
A bit of info here about multiple Recovery partitions, including a link to Kari's excellent explanation.
 

My Computers

System One System Two

  • OS
    Windows 11 Pro
    Computer type
    PC/Desktop
    Manufacturer/Model
    Stigg's Build
    CPU
    Intel Core i9-10900X
    Motherboard
    GIGABYTE X299X DESIGNARE 10G
    Memory
    Corsair 64 GB (4 x 16 GB) CMW64GX4M4C3000C15 Vengeance RGB Pro 3000Mhz DDR4
    Graphics Card(s)
    GIGABYTE GeForce GTX 1660 Super Mini ITX 6 GB OC
    Sound Card
    Realtek ALC1220
    Monitor(s) Displays
    Samsung 27" FHD LED FreeSync Gaming Monitor (LS27F350FHEXXY)
    Screen Resolution
    1920 x 1080
    Hard Drives
    Samsung 970 Pro Series 1TB M.2 2280 NVMe SSD
    Western Digital Red Pro WD8003FFBX-68B9AN0 8 TB, 7200 RPM, SATA-III
    Western Digital Red Pro WD8003FFBX-68B9AN0 8 TB, 7200 RPM, SATA-III
    PSU
    Corsair HX1200 1200W 80 Plus Platinum
    Case
    Fractal Design Define 7 Black Solid Case
    Cooling
    Noctua NH-D15 Chromax Black
    Keyboard
    Razer Ornata V2
    Mouse
    Razer DeathAdder Essential
    Internet Speed
    FTTN 100Mbps / 40Mbps
    Browser
    Mozilla Firefox
    Antivirus
    N/A
    Other Info
    Logitech BRIO 4k Ultra HD USB-C Webcam
  • Operating System
    Windows 10 Pro
    Computer type
    Laptop
    Manufacturer/Model
    ASUS ROG Zephyrus M GM501GS
    CPU
    Core i7-8750H
    Motherboard
    Zephyrus M GM501GS
    Memory
    SK Hynix 32 GB (2 x 16 GB) HMA82GS6CJR8N-VK 16 GB DDR4-2666 DDR4 SDRAM
    Graphics card(s)
    NVIDIA GeForce GTX 1070
    Sound Card
    Realtek ALC294
    Monitor(s) Displays
    AU Optronics B156HAN07.1 [15.6" LCD]
    Screen Resolution
    1920 x 1080
    Hard Drives
    Samsung MZVKW512HMJP-00000 512 GB, PCI-E 3.0 x4
    Samsung SSD 860 QVO 4TB 4 TB, SATA-III
    PSU
    N/A
    Case
    N/A
    Cooling
    N/A
    Mouse
    Razer DeathAdder Essential
    Keyboard
    PC/AT Enhanced PS2 Keyboard (101/102-Key)
    Internet Speed
    FTTN 100Mbps / 40Mbps
    Browser
    Mozilla Firefox
    Antivirus
    N/A
    Other Info
    USB2.0 HD UVC Webcam

Latest Support Threads

Back
Top Bottom