This tutorial will show you how to turn on or off Auto HDR to enhance eligible games from SDR to HDR in Windows 11.
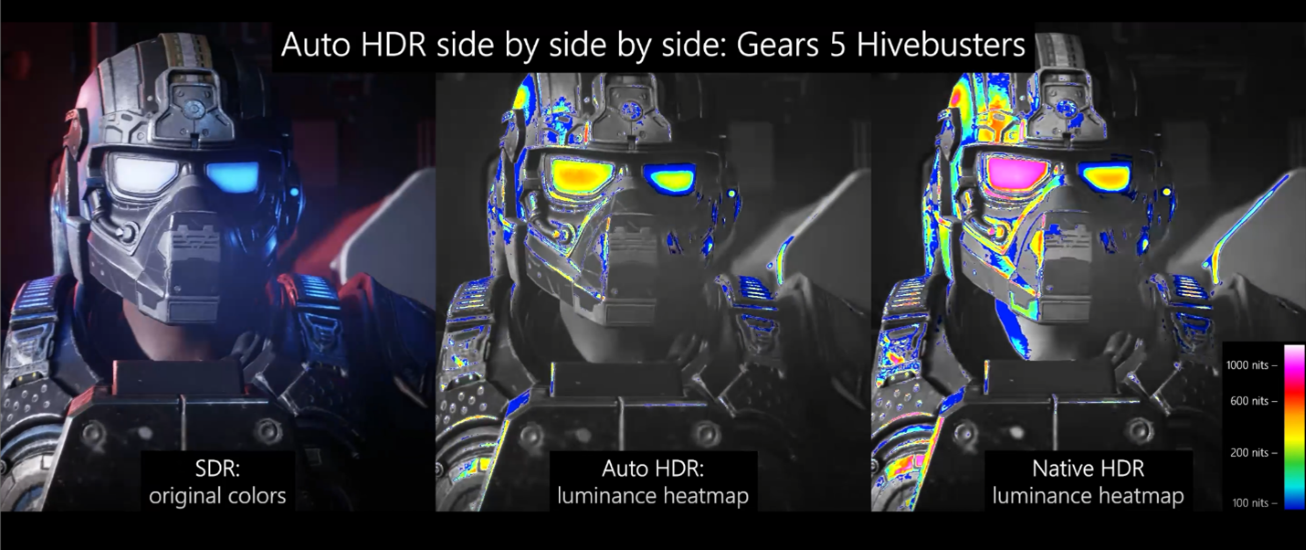
HDR content offers better brightness and color capabilities compared to traditional content (sometimes called standard dynamic range [SDR] content). Traditional content typically shows details in a bright part of a scene or a darker part of a scene but not in both parts at the same time. For example, if the shot focuses on a bright window in the scene, details in the shadow are lost.
Whereas HDR can show a wider range of colors and light and more details in between the extremes. Colors are more vivid and unique in HDR content. Additionally, bright parts of a scene are brighter while dark parts can be darker, and you don’t lose any details.
In HDR video games, the increased color range and brightness compared to SDR games gives you a more detailed and immersive gaming experience on your Windows PC. When you’re playing HDR games, you’ll see all the details in them—ranging from everything in the dark shadows in dimly-lit rooms to amazing brightness and reflections on things in those bright sunny scenes.
Though many newer games are developed for HDR, some older games are SDR only, such as games that use DirectX 11 or DirectX 12. But with Auto HDR, that changes. When you turn on Auto HDR, the color range and brightness is automatically increased to HDR. It’s a feature that lets you play and see your older games in a new light with HDR on your HDR-capable display. All you need to do is turn on Auto HDR.
References:

Navigating the Redesigned Graphics Settings page - DirectX Developer Blog
In the settings app, the graphics page lets you adjust settings related to ‘GPU Preference,’ ‘Auto HDR,’ ‘Optimizations for windowed games’, and more to get the most out of your graphics experience on your PC. Aligning with the new Windows 11 UI design,
 devblogs.microsoft.com
What is HDR in Windows 11? - Microsoft Support
Learn about HDR capabilities in Windows 11 to bring a wider range of colors and details to your display.
 support.microsoft.com
Use Auto HDR for better gaming in Windows - Microsoft Support
Learn how to use Auto HDR for a better gaming experience and color range in Windows.
support.microsoft.com
Auto HDR Preview for PC Available Today - DirectX Developer Blog
Today we’re excited to bring you a preview of Auto HDR for your PC gaming experience and we’re looking for your help to test it out. When enabled on your HDR capable gaming PC, you will automatically get awesome HDR visuals on an additional 1000+ DirectX 11 and DirectX 12 games!
devblogs.microsoft.com
Exciting additions to your Auto HDR experience on PC - DirectX Developer Blog
Last year, we brought Auto High Dynamic Range (HDR) to your PC gaming experience, letting you breathe new life into your existing games by giving them an entirely new range of vibrant colors. Today, we’re excited to talk about the additional improvements to your Auto HDR experience on PC that...
devblogs.microsoft.com
High Dynamic Range (HDR) in Surface displays
Learn how HDR enhances watching videos, playing games, or creating content by showing more accurate colors, contrasts, and brightness, along with clearer..
techcommunity.microsoft.com
It is required to turn on Use HDR for Auto HDR to be available.
Turning on or off Auto HDR will affect all displays you have Use HDR turned on.
Contents
- Option One: Turn On or Off Auto HDR on Xbox Game Bar
- Option Two: Turn On or Off Auto HDR in Settings
- Option Three: Turn On or Off Auto HDR in Graphics Settings
- Option Four: Turn On or Off Auto HDR in Registry Editor
- Option Five: Turn On or Off Auto HDR Per-App in Settings
- Option Six: Turn On or Off Auto HDR Per-App in Registry Editor
1 Press the Win + G keys to open the Xbox Game Bar.
2 Click/tap on the Settings (gear) icon on the game bar. (see screenshot below)
3 Click/tap on Gaming features in Settings.
4 Check (on - default) or uncheck (off) Use Auto HDR with supported games for what you want.
1 Open Settings (Win+I).
2 Click/tap on System on the left side, and click/tap on Display on the right side. (see screenshot below)
3 Click/tap on Use HDR on the right side. (see screenshot below)
4 Turn On (default) or Off Auto HDR for what you want.
Turning on Auto HDR will automatically turn on Optimizations for windowed games.
5 You can now close Settings if you like.
This option is only available starting with Windows 11 build 25281.
1 Open Settings (Win+I).
2 Click/tap on System on the left side, and click/tap on Display on the right side. (see screenshot below)
3 Click/tap on Graphics on the right side. (see screenshot below)
4 Turn On (default) or Off Auto HDR for what you want. (see screenshot below)
Turning on Auto HDR will automatically turn on Optimizations for windowed games.
5 You can now close Settings if you like.
1 Open Registry Editor (regedit.exe).
2 Navigate to the key below in the left pane of Registry Editor. (see screenshot below step 3)
HKEY_CURRENT_USER\Software\Microsoft\DirectX\UserGpuPreferences3 In the right pane of the UserGpuPreference key, double click/tap on the DirectXUserGlobalSettings string value (REG_SZ) in the right pane to modify it. (see screenshot below)
4 Do step 5 (enable) or step 6 (disable) below for what you want.
5 Enable Auto HDR
This is the default setting.
A) Change the value of both SwapEffectUpgradeEnable and AutoHDREnable to 1. (see screenshot below)
SwapEffectUpgradeEnable is for turning on Optimizations for windowed games.
B) Click/tap on OK, and go to step 7.
6 Disable Auto HDR
A) Change the value of only AutoHDREnable to 0. (see screenshot below)
B) Click/tap on OK, and go to step 7.
7 You can now close Registry Editor if you like.
1 Open Settings (Win+I).
2 Click/tap on System on the left side, and click/tap on Display on the right side. (see screenshot below)
3 Click/tap on Graphics on the right side. (see screenshot below)
4 Click/tap on an app (ex: "Movies & TV"), and click/tap on Options. (see screenshot below)
5 Check (off) or uncheck (on) Don't use Auto HDR for what you want for this specific app, and click/tap on Save. (see screenshots below)
6 When finished, you can close Settings if you like.
This option makes the same changes as Option Five.
1 Open Registry Editor (regedit.exe).
2 Navigate to the key below in the left pane of Registry Editor. (see screenshot below step 3)
HKEY_CURRENT_USER\Software\Microsoft\DirectX\UserGpuPreferences3 In the right pane of the UserGpuPreference key, double click/tap on the string value (REG_SZ) for the app (ex: "Camera") you want in the right pane to modify it. (see screenshot below)
4 Do step 5 (on) or step 6 (off) below for what you want.
5. Turn On Auto HDR for Specific App
This is the default setting.
A) Change the value of SwapEffectUpgradeEnable to 1. (see screenshot below)
SwapEffectUpgradeEnable is for turning on Optimizations for windowed games.
B) Change the value of AutoHDREnable to 4147.
C) Click/tap on OK, and go to step 7.
6. Turn Off Auto HDR for Specific App
A) Change the value of only AutoHDREnable to 48. (see screenshot below)
B) Click/tap on OK, and go to step 7.
7 You can now close Registry Editor if you like.
That's it,
Shawn Brink
Related Tutorials
- Backup and Restore Graphics Preferences for Apps and Games in Windows 11
- Reset Graphics Preferences for Apps and Games to Default in Windows 11
- Check Display Capabilities for HDR in Windows 11
- Turn On or Off HDR for Display in Windows 11
- Turn On or Off HDR on Battery in Windows 11
- Turn On or Off HDR Video Streaming in Windows 11
- Change HDR or SDR Content Brightness for HDR Display in Windows 11
- Calibrate Built-in Display for HDR Video in Windows 11
- Calibrate HDR display using Windows HDR Calibration app in Windows 11
- Enable or Disable Variable Refresh Rate for Games in Windows 11
Attachments

Last edited: