This tutorial will show you how to add or remove users as member of groups in Windows 10 and Windows 11.
Having different user accounts on a shared PC lets multiple people use the same device, all while giving everyone their own sign-in info, plus access to their own files, browser favorites, and desktop settings.
You can limit the ability of users to perform certain actions by adding or removing the user from being a member of groups. Each group has its own default rights and permissions. When a user is a member of a group, the user will be assigned the rights and permissions of the group to them.
A right authorizes a user to perform certain actions on a computer, such as backing up files and folders or shutting down a computer.
A permission is a rule that is associated with an object (usually a file, folder, or printer), and it regulates which users can have access to the object and in what manner.
Group | Description |
|---|---|
| Access Control Assistance Operators | Members of this group can remotely query authorization attributes and permissions for resources on this computer. |
| Administrators | Administrators have complete and unrestricted access to the computer/domain |
| Backup Operators | Backup Operators can override security restrictions for the sole purpose of backing up or restoring files |
| Cryptographic Operators | Members of this group are authorized to perform cryptographic operations. |
| Device Owners | Members of this group can change system-wide settings. |
| Distributed COM Users | Members are allowed to launch, activate and use Distributed COM objects on this machine. |
| Event Log Readers | Members of this group can read event logs from local machine. |
| Guests | Guests have the same access as members of the Users group by default, except for the Guest account which is further restricted |
| Hyper-V Administrators | Members of this group have complete and unrestricted access to all features of Hyper-V. |
| IIS_IUSRS | This is a built-in group that is used by Internet Information Services (IIS). |
| Network Configuration Operators | Members in this group can have some administrative privileges to manage configuration of networking features |
| OpenSSH Users | Members of this group may connect to this computer using SSH. |
| Performance Log Users | Members of this group may schedule logging of performance counters, enable trace providers, and collect event traces both locally and via remote access to this computer |
| Performance Monitor Users | Members of this group can access performance counter data locally and remotely |
| Power Users | Power Users are included for backwards compatibility and possess limited administrative powers |
| Remote Desktop Users | Members in this group are granted the right to logon remotely |
| Remote Management Users | Members of this group can access WMI resources over management protocols (such as WS-Management via the Windows Remote Management service). This applies only to WMI namespaces that grant access to the user. |
| Replicator | Supports file replication in a domain |
| System Managed Accounts Group | Members of this group are managed by the system. |
| User Mode Hardware Operators | Members of this group may operate hardware from user mode. |
| Users (standard user) | Users are prevented from making accidental or intentional system-wide changes and can run most applications |
References:

Manage Local Groups
Default local groups
You must be signed in as an administrator to add or remove users as members of groups.
- Option One: Add or Remove Users as Member of Groups from Users folder in Local Users and Groups
- Option Two: Add or Remove Users as Member of Groups from Groups folder in Local Users and Groups
- Option Three: Add or Remove Users as Member of Groups using "net localgroup" Command
- Option Four: Add or Remove Users as Member of Groups using PowerShell Command
Local Users and Groups is only available in the Windows 10/11 Pro, Enterprise, and Education editions.
All editions can use Option Three or Option Four below.
1 Open Local Users and Groups (lusrmgr.msc).
2 Perform either action below: (see screenshot below)
- Click/tap on Users in the left pane, and double click/tap on the account (ex: "Brink2") you want to add or remove as a member of a group in the middle pane.
- Click/tap on Users in the left pane, select the account (ex: "Brink2") you want to add or remove as a member of a group in the middle pane, click/tap on Action on the menu bar, and click/tap on Properties.
- Click/tap on Users in the left pane, select the account (ex: "Brink2") you want to add or remove as a member of a group in the middle pane, click/tap on More Actions under that account name (ex: "Brink2") in the right pane, and click/tap on Properties.
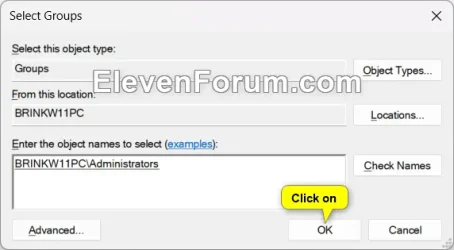
3 Do step 4 (add) or step 5 (remove) below for what you want.
You can press and hold the Ctrl key to select more than one group at a time.
You can press and hold the Ctrl key to select more than one group at a time.
6 When finished, you can close Local Users and Groups if you like.
Local Users and Groups is only available in the Windows 10/11 Pro, Enterprise, and Education editions.
All editions can use Option Three or Option Four below.
1 Open Local Users and Groups (lusrmgr.msc).
2 Perform either action below: (see screenshot below)
- Click/tap on Groups in the left pane, and double click/tap on the group (ex: "Administrators") you want to add or remove a user as a member in the middle pane.
- Click/tap on Groups in the left pane, select the group (ex: "Administrators") you want to add or remove a user as a member in the middle pane, click/tap on Action on the menu bar, and click/tap on Properties.
- Click/tap on Groups in the left pane, select the group (ex: "Administrators") you want to add or remove a user as a member in the middle pane, click/tap on More Actions under that account name (ex: "Brink2") in the right pane, and click/tap on Properties.
3 Do step 4 (add) or step 5 (remove) below for what you want.
You can press and hold the Ctrl key to select more than one user at a time.
You can press and hold the Ctrl key to select more than one user at a time.
6 When finished, you can close Local Users and Groups if you like.
Net localgroup
1 Open an elevated Windows Terminal, and select either Windows PowerShell or Command Prompt.
2 Type the command below you want to use into Terminal (admin), and press Enter. (see screenshots below)
net localgroup "Group" "User" /addnet localgroup "Group" "User" /deleteSubstitute Group in the command above with the actual name of the group (ex: "Administrators") you want to add or remove the user as a member of.
Substitute User in the command above with the actual name of the user account (ex: "Brink2") you want to add or remove as a member of the group.
For example:
net localgroup "Administrators" "Brink2" /add
net localgroup "Administrators" "Brink2" /delete

Add-LocalGroupMember (Microsoft.PowerShell.LocalAccounts) - PowerShell
Remove-LocalGroupMember (Microsoft.PowerShell.LocalAccounts) - PowerShell
1 Open an elevated Windows Terminal, and select Windows PowerShell.
2 Type the command below you want to use into Terminal (admin), and press Enter. (see screenshots below)
Add-LocalGroupMember -Group "Group" -Member "User"Remove-LocalGroupMember -Group "Group" -Member "User"Substitute Group in the command above with the actual name of the group (ex: "Administrators") you want to add or remove the user as a member of.
Substitute User in the command above with the actual name of the user account (ex: "Brink2") you want to add or remove as a member of the group.
For example:
Add-LocalGroupMember -Group "Administrators" -Member "Brink2"
Remove-LocalGroupMember -Group "Administrators" -Member "Brink2"
That's it,
Shawn Brink