Can't Run Custom Script through `autounattend.xml`.


harshkapadia

New member
Local time
8:31 PM
Posts
15
Location
Austin, Texas, USA
OS
Windows 11
Hello,

I am creating Windows 11 Pro VMs the unattended way using autounattend.xml. I am able to successfully install Windows. I am now trying to map a NAS/network share persistently on startup and am also trying to install some software on startup, but am unable to. I either get an error or the commands just silently fail to run, without any errors in setuperr.log or setupact.log. Any help to be able to run these commands would be appreciated. Thank you!

My user is part of the 'Administrators' group and the 'EnableLUA' registry setting is set to disable (0).

I tried various things with varying levels of success:
  • I ran a script (mk-dir-test-2.cmd) from a network share which just creates a directory in the Downloads directory.
    • This works fine and I am able to see a new directory in the Downloads directory after the first log on completes.
  • I ran a script (system-setup-test.cmd) from the same network share as above which downloads PuTTY from Winget and then uses PuTTY to scpa file from the network share to the Windows VM.
    • This gives me a 'Open File - Security Warning' which asks the user to allow the script to run. On giving permission, the script runs fine, but I don't want to have user interaction.
      open-file-security-warning-edited.png
    • The weird part is that I run this script after the script mentioned in the previous bullet point (the script that just creates a directory in the Downloads directory) and even thought the previous script runs fine, this one has issues.
      • So the issue in my understanding should not be that Windows does not trust the network share. If it had trust issues, then why would the first directory script fetched from the same network share succeed?
  • I also ran a script (copy-file.cmd) that first persistently maps a network share and then copies a file from the mapped drive to the VM for execution.
    • This has the same issue as the previous bullet point.
autounattend.xml:
XML:
<?xml version="1.0" encoding="utf-8"?>
<unattend xmlns="urn:schemas-microsoft-com:unattend">
    <settings pass="windowsPE">
        <component name="Microsoft-Windows-International-Core-WinPE" processorArchitecture="amd64" publicKeyToken="31bf3856ad364e35" language="neutral" versionScope="nonSxS" xmlns:wcm="http://schemas.microsoft.com/WMIConfig/2002/State" xmlns:xsi="http://www.w3.org/2001/XMLSchema-instance">
            <SetupUILanguage>
                <UILanguage>en-US</UILanguage>
            </SetupUILanguage>
            <InputLocale>en-US</InputLocale>
            <SystemLocale>en-US</SystemLocale>
            <UILanguage>en-US</UILanguage>
            <UserLocale>en-US</UserLocale>
        </component>
        <component name="Microsoft-Windows-Setup" processorArchitecture="amd64" publicKeyToken="31bf3856ad364e35" language="neutral" versionScope="nonSxS" xmlns:wcm="http://schemas.microsoft.com/WMIConfig/2002/State" xmlns:xsi="http://www.w3.org/2001/XMLSchema-instance">
            <DiskConfiguration>
                <Disk wcm:action="add">
                    <CreatePartitions>
                        <CreatePartition wcm:action="add">
                            <Order>1</Order>
                            <Type>Primary</Type>
                            <Size>450</Size>
                        </CreatePartition>
                        <CreatePartition wcm:action="add">
                            <Order>2</Order>
                            <Size>100</Size>
                            <Type>EFI</Type>
                        </CreatePartition>
                        <CreatePartition wcm:action="add">
                            <Order>3</Order>
                            <Size>16</Size>
                            <Type>MSR</Type>
                        </CreatePartition>
                        <CreatePartition wcm:action="add">
                            <Order>4</Order>
                            <Extend>true</Extend>
                            <Type>Primary</Type>
                        </CreatePartition>
                    </CreatePartitions>
                    <ModifyPartitions>
                        <ModifyPartition wcm:action="add">
                            <Order>1</Order>
                            <PartitionID>1</PartitionID>
                            <TypeID>DE94BBA4-06D1-4D40-A16A-BFD50179D6AC</TypeID>
                            <Format>NTFS</Format>
                            <Label>WinRE</Label>
                        </ModifyPartition>
                        <ModifyPartition wcm:action="add">
                            <Format>FAT32</Format>
                            <Label>System</Label>
                            <Order>2</Order>
                            <PartitionID>2</PartitionID>
                        </ModifyPartition>
                        <ModifyPartition wcm:action="add">
                            <PartitionID>3</PartitionID>
                            <Order>3</Order>
                        </ModifyPartition>
                        <ModifyPartition wcm:action="add">
                            <Order>4</Order>
                            <Letter>C</Letter>
                            <PartitionID>4</PartitionID>
                            <Label>Windows</Label>
                            <Format>NTFS</Format>
                        </ModifyPartition>
                    </ModifyPartitions>
                    <DiskID>0</DiskID>
                    <WillWipeDisk>true</WillWipeDisk>
                </Disk>
                <WillShowUI>OnError</WillShowUI>
            </DiskConfiguration>
            <ImageInstall>
                <OSImage>
                    <InstallTo>
                        <DiskID>0</DiskID>
                        <PartitionID>4</PartitionID>
                    </InstallTo>
                    <InstallFrom>
                        <MetaData wcm:action="add">
                            <Key>/IMAGE/INDEX</Key>
                            <Value>6</Value>
                        </MetaData>
                    </InstallFrom>
                    <WillShowUI>OnError</WillShowUI>
                </OSImage>
            </ImageInstall>
            <UserData>
                <ProductKey>
                    <Key></Key>
                    <WillShowUI>Never</WillShowUI>
                </ProductKey>
                <AcceptEula>true</AcceptEula>
                <FullName>redacted</FullName>
                <Organization>redacted</Organization>
            </UserData>
        </component>
    </settings>
    <settings pass="offlineServicing">
        <component name="Microsoft-Windows-LUA-Settings" processorArchitecture="amd64" publicKeyToken="31bf3856ad364e35" language="neutral" versionScope="nonSxS" xmlns:wcm="http://schemas.microsoft.com/WMIConfig/2002/State" xmlns:xsi="http://www.w3.org/2001/XMLSchema-instance">
            <EnableLUA>false</EnableLUA>
        </component>
    </settings>
    <settings pass="generalize">
        <component name="Microsoft-Windows-Security-SPP" processorArchitecture="amd64" publicKeyToken="31bf3856ad364e35" language="neutral" versionScope="nonSxS" xmlns:wcm="http://schemas.microsoft.com/WMIConfig/2002/State" xmlns:xsi="http://www.w3.org/2001/XMLSchema-instance">
            <SkipRearm>1</SkipRearm>
        </component>
    </settings>
    <settings pass="specialize">
        <component name="Microsoft-Windows-Security-SPP-UX" processorArchitecture="amd64" publicKeyToken="31bf3856ad364e35" language="neutral" versionScope="nonSxS" xmlns:wcm="http://schemas.microsoft.com/WMIConfig/2002/State" xmlns:xsi="http://www.w3.org/2001/XMLSchema-instance">
            <SkipAutoActivation>true</SkipAutoActivation>
        </component>
        <component name="Microsoft-Windows-SQMApi" processorArchitecture="amd64" publicKeyToken="31bf3856ad364e35" language="neutral" versionScope="nonSxS" xmlns:wcm="http://schemas.microsoft.com/WMIConfig/2002/State" xmlns:xsi="http://www.w3.org/2001/XMLSchema-instance">
            <CEIPEnabled>0</CEIPEnabled>
        </component>
        <component name="Microsoft-Windows-Shell-Setup" processorArchitecture="amd64" publicKeyToken="31bf3856ad364e35" language="neutral" versionScope="nonSxS" xmlns:wcm="http://schemas.microsoft.com/WMIConfig/2002/State" xmlns:xsi="http://www.w3.org/2001/XMLSchema-instance">
            <ComputerName>redacted</ComputerName>
        </component>
    </settings>
    <settings pass="oobeSystem">
        <component name="Microsoft-Windows-Shell-Setup" processorArchitecture="amd64" publicKeyToken="31bf3856ad364e35" language="neutral" versionScope="nonSxS" xmlns:wcm="http://schemas.microsoft.com/WMIConfig/2002/State" xmlns:xsi="http://www.w3.org/2001/XMLSchema-instance">
            <AutoLogon>
                <Password>
                    <Value>redacted</Value>
                    <PlainText>false</PlainText>
                </Password>
                <Username>redacted</Username>
                <Enabled>true</Enabled>
            </AutoLogon>
            <OOBE>
                <HideEULAPage>true</HideEULAPage>
                <HideOEMRegistrationScreen>true</HideOEMRegistrationScreen>
                <HideOnlineAccountScreens>true</HideOnlineAccountScreens>
                <HideWirelessSetupInOOBE>true</HideWirelessSetupInOOBE>
                <ProtectYourPC>3</ProtectYourPC>
                <UnattendEnableRetailDemo>false</UnattendEnableRetailDemo>
            </OOBE>
            <UserAccounts>
                <LocalAccounts>
                    <LocalAccount wcm:action="add">
                        <Password>
                            <Value>redacted</Value>
                            <PlainText>false</PlainText>
                        </Password>
                        <Description>Primary Local Account</Description>
                        <DisplayName>redacted</DisplayName>
                        <Group>Administrators</Group>
                        <Name>redacted</Name>
                    </LocalAccount>
                </LocalAccounts>
            </UserAccounts>
            <FirstLogonCommands>
                <SynchronousCommand wcm:action="add">
                    <CommandLine>\\redacted\copy-file.cmd</CommandLine>
                    <Description>system-setup</Description>
                    <Order>2</Order>
                    <RequiresUserInput>false</RequiresUserInput>
                </SynchronousCommand>
                <SynchronousCommand wcm:action="add">
                    <Order>1</Order>
                    <RequiresUserInput>false</RequiresUserInput>
                    <Description>mkdir-test</Description>
                    <CommandLine>\\redacted\mk-dir-test-2.cmd</CommandLine>
                </SynchronousCommand>
            </FirstLogonCommands>
        </component>
        <component name="Microsoft-Windows-International-Core" processorArchitecture="amd64" publicKeyToken="31bf3856ad364e35" language="neutral" versionScope="nonSxS" xmlns:wcm="http://schemas.microsoft.com/WMIConfig/2002/State" xmlns:xsi="http://www.w3.org/2001/XMLSchema-instance">
            <InputLocale>en-US</InputLocale>
            <SystemLocale>en-US</SystemLocale>
            <UILanguage>en-US</UILanguage>
            <UserLocale>en-US</UserLocale>
        </component>
    </settings>
    <cpi:offlineImage cpi:source="wim:c:/users/redacted/downloads/windows-iso-files/win11_23h2_english_x64v2-10/sources/install.wim#Windows 11 Pro" xmlns:cpi="urn:schemas-microsoft-com:cpi" />
</unattend>

copy-file.cmd:
Batch:
mkdir C:\Users\redacted\Downloads\test-dir-3

NET USE X: \\redacted /persistent:yes

mkdir C:\Users\redacted\Downloads\test-dir-4

cp X:/redacted/system-setup-test.cmd C:/Users/redacted/Downloads

mkdir C:\Users\redacted\Downloads\test-dir-5

C:/Users/redacted/Downloads/system-setup-test.cmd

mkdir C:\Users\redacted\Downloads\test-dir-6

mk-dir-test-2.cmd:
Batch:
mkdir C:\Users\redacted\Downloads\test-dir-2

system-setup-test.cmd:
Batch:
winget install PuTTY --source msstore --accept-source-agreements --accept-package-agreements

echo y | C:\"Program Files"\PuTTY\pscp.exe -pw redacted -r redacted@redacted:/mnt/redacted/kvm-scripts C:\Users\redacted\Downloads
 

My Computer

System One

  • OS
    Windows 11
    Computer type
    Laptop
    Manufacturer/Model
    Dell Vostro
Some feedback:

1. It's considered bad practice to turn off EnableLUA. Yes, some users will brag how they can do everything w/o any harm. But for education, you should learn why each step requires elevation, and the correct way to get around them. One day, you will encounter some unexplained error because part of Windows or an app installer stops working because it's expecting LUA to be enabled. I know several programs that break this way.

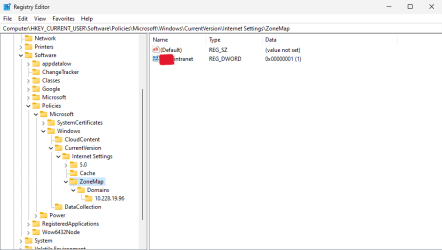
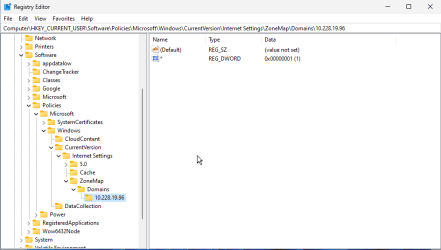
2. By default, Windows considers network shares not to be in the same Security Zone as local files, and distrusts them. Normally, you need to create a GPO to make an exception for the remote server (which is too much work), or just include the PS script provided here:
Two ways to set trusted locations and UNC paths using Intune

Update the script and add your trusted server's IP address. Then call the PS script from Unattended with "powershell -NoProfile -ExecutionPolicy Bypass -f \path\scriptname.ps1"
Now, scripts from the remote share are trusted.

3. EnableLUA would not have solved this problem for you.
 

My Computer

System One

  • OS
    Windows 7
Thank you for your advice, @garlin!

The trusted location IP address script added the NAS IP to the registry, but I got the same error as in the first post in this thread, the 'Open File - Security Warning' dialog.

In fact, this time I was not able to run both, the mk-dir-test-2.cmd script as well as the copy-file.cmd script. Before implementing the registry script, only the copy-file.cmd script was getting blocked, not the mk-dir-test-2.cmd script.

Any ideas on what might be going wrong?
 

My Computer

System One

  • OS
    Windows 11
    Computer type
    Laptop
    Manufacturer/Model
    Dell Vostro
This might be caused by one of two problems:

1. The CMD files hosted on the share have the alternate data stream enabled, marking them as "suspect". Run this one-time command to clear their state:
Code:
powershell Unblock-File "\\redacted\mk-dir-test-2.cmd"
powershell Unblock-File "\\redacted\copy-file.cmd"

Alternatively, run the Unblock-File from the server host.

2. You need SEE_MASK_NOZONECHECKS enabled in your environment. Run this FirstLogonCommand before using any of the scripts.
Code:
setx see_mask_nozonechecks 1 /m

This one is riskier, since you're granting universal approval to any executable found on a local network share.
 

My Computer

System One

  • OS
    Windows 7
Where exactly do I have to run the Unblock-File commands?

I tried putting them as individual steps directly in the SynchronousCommand section after the trusted zone addition script and before actually calling the two scripts, but that didn't work. I got the same security warning dialog.

Alternatively, run the Unblock-File from the server host.

Uhh, what does this mean? Sorry!
 

My Computer

System One

  • OS
    Windows 11
    Computer type
    Laptop
    Manufacturer/Model
    Dell Vostro
Sorry, forgot this was a NAS. The security behavior matches what's reported here:

What happens when you run a CMD script from the NAS, on the physical host (not the VM)? Does it behave differently from the VM?
 

My Computer

System One

  • OS
    Windows 7
What happens when you run a CMD script from the NAS, on the physical host (not the VM)? Does it behave differently from the VM?

I tried all the following in a command prompt with Admin permissions, i.e., an elevated command prompt.

  • I checked both the VM and my physical machine by executing the mk-dir-test-2.cmd file (as shown in the first post) directly from the NAS using the \\redacted\mk-dir-test-2.cmd command and it worked fine on both.
  • I also ran the \\redacted\copy-file.cmd on my physical machine and it worked fine.

NOTE: My physical machine is a Windows 11 laptop. My host machine is an Ubuntu server on which I'm running the Windows VMs using KVM/QEMU.
 

My Computer

System One

  • OS
    Windows 11
    Computer type
    Laptop
    Manufacturer/Model
    Dell Vostro
2. You need SEE_MASK_NOZONECHECKS enabled in your environment. Run this FirstLogonCommand before using any of the scripts.
Code:
setx see_mask_nozonechecks 1 /m

This one is riskier, since you're granting universal approval to any executable found on a local network share.

I just tried the 2nd method mentioned above (post #5) and that didn't work as well. I still get the 'Open File - Security Warning' dialog.
 

My Computer

System One

  • OS
    Windows 11
    Computer type
    Laptop
    Manufacturer/Model
    Dell Vostro
Sorry for the slow response. Just seeing your message now.

I have to admit that I have not done much in the way of having the system automatically run things after the initial Windows setup.

However, I do seem to recall a discussion about using the task schedular from a command line to run tasks that get around the UAC prompts.

The bottom line is that task schedular can be used to run a task with highest privileges without resulting in a UAC prompt.

Normally I would offer to perform some testing but I just honestly don't think that I will have enough time over the next few days. Hopefully this helps, but if you do still need help, let me know and I'll see if I can get some time for testing over the next few days.
 

My Computers

System One System Two

  • OS
    Win11 Pro 23H2
    Computer type
    PC/Desktop
    Manufacturer/Model
    Home Built
    CPU
    Intel i7-11700K
    Motherboard
    ASUS Prime Z590-A
    Memory
    128GB Crucial Ballistix 3200MHz DRAM
    Graphics Card(s)
    No GPU - CPU graphics only (for now)
    Sound Card
    Realtek (on motherboard)
    Monitor(s) Displays
    HP Envy 32
    Screen Resolution
    2560 x 1440
    Hard Drives
    1 x 1TB NVMe Gen 4 x 4 SSD
    1 x 2TB NVMe Gen 3 x 4 SSD
    2 x 512GB 2.5" SSDs
    2 x 8TB HD
    PSU
    Corsair HX850i
    Case
    Corsair iCue 5000X RGB
    Cooling
    Noctua NH-D15 chromax.black cooler + 10 case fans
    Keyboard
    CODE backlit mechanical keyboard
    Mouse
    Logitech MX Master 3
    Internet Speed
    1Gb Up / 1 Gb Down
    Browser
    Edge
    Antivirus
    Windows Defender
    Other Info
    Additional options installed:
    WiFi 6E PCIe adapter
    ASUS ThunderboltEX 4 PCIe adapter
  • Operating System
    Win11 Pro 23H2
    Computer type
    Laptop
    Manufacturer/Model
    Lenovo ThinkBook 13x Gen 2
    CPU
    Intel i7-1255U
    Memory
    16 GB
    Graphics card(s)
    Intel Iris Xe Graphics
    Sound Card
    Realtek® ALC3306-CG codec
    Monitor(s) Displays
    13.3-inch IPS Display
    Screen Resolution
    WQXGA (2560 x 1600)
    Hard Drives
    2 TB 4 x 4 NVMe SSD
    PSU
    USB-C / Thunderbolt 4 Power / Charging
    Mouse
    Buttonless Glass Precision Touchpad
    Keyboard
    Backlit, spill resistant keyboard
    Internet Speed
    1Gb Up / 1Gb Down
    Browser
    Edge
    Antivirus
    Windows Defender
    Other Info
    WiFi 6e / Bluetooth 5.1 / Facial Recognition / Fingerprint Sensor / ToF (Time of Flight) Human Presence Sensor
Perhaps this can help in another way.....

I install Windows via unattend.xml ,too

but I also use the $OEM$ in my "Sources-Folder" (the one with the install.wim)


usb-stick:\sources\$OEM$
in that folder put those two folders
$$
$1

everything in $$ is copyed over to the Windows folder during installation
everything in $1 is copyed over to C:

in $OEM$\$$\Setup\Scripts\
you can create a file "SetupComplete.cmd" .. it is run during the Windows installation.

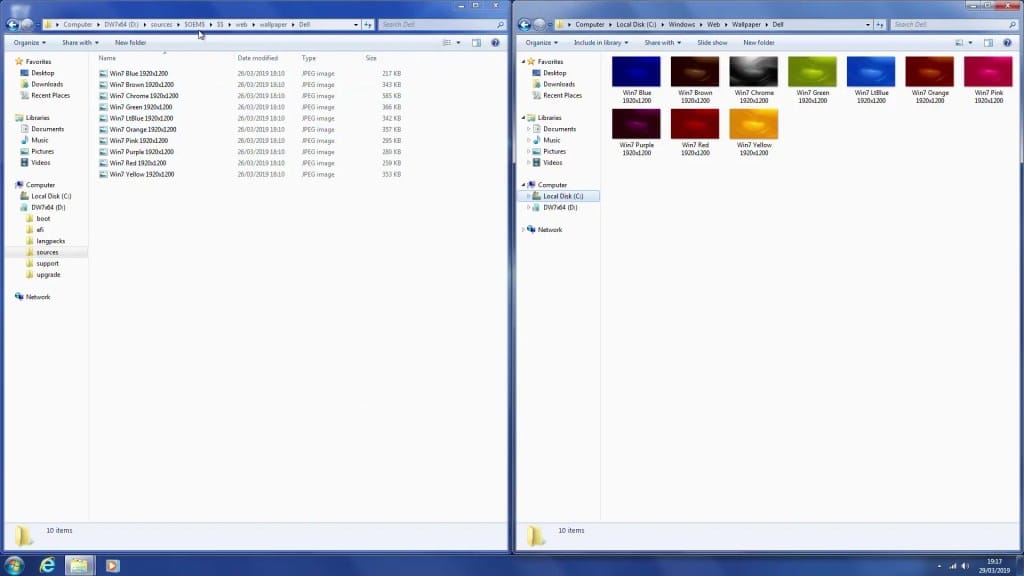
Some SystemBuilders like DELL install Software during the Windows setup like you can see in this DELL Article:


For the netuse you could use:

net use /persistent:yes X: \\server\share password /user:Domain\Username
startet from a .bat file that you put in the autorun
with persistent:yes you could let the .bat file delete itself after run
just put "del %0" in the last line of the batch.

you could put that .bat in
$OEM$\$1\users\Default\AppData\Roaming\Microsoft\Windows\Start Menu\Programs\Startup

So every newly created user would run your batch once.
 

My Computer

System One

  • OS
    Windows 10
    Computer type
    PC/Desktop
    Manufacturer/Model
    Custom
    CPU
    Ryzen 7 5700X
    Motherboard
    Gigabyte B550 Aorus Elite V2
    Memory
    2 x 16 GB DDR 4 - 3200 - G.Skill RipJaws V
    Graphics Card(s)
    ASUS TUF Gaming GeForce RTX 4070
    Sound Card
    OnBoard Realtek
    Monitor(s) Displays
    2 x Dell S2721DGF
    Screen Resolution
    2560 x 1440 @ 165 MHZ
    Hard Drives
    1 TB Kingston KC3000 M.2PCIe 4.0
    PSU
    be quiet! Pure Power 12 M Modular 80+ Gold
    Case
    Phanteks Eclipse P600s
    Cooling
    be quit! Dark Rock Pro 4
    Keyboard
    Logitech G213 Prodigy
    Mouse
    Logitech G502 Hero
    Internet Speed
    1000 MBit Cable DSL
    Browser
    Firefox
    Antivirus
    Microsoft Defender

Latest Support Threads

Back
Top Bottom