This tutorial will show you how to change the type of network your PC is connected to as a domain, public, or private location for all users in Windows 11.
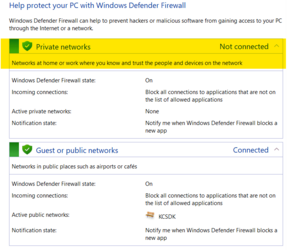
A network location identifies the type of network that a PC is connected to with a network adapter and automatically sets the appropriate Windows Defender Firewall settings for that location.
By default, the first time you connect to a new network (wired or wireless), you will be prompted "Do you want to allow your PC to be discoverable by other PCs and devices on this network?" by the Network Location wizard. Turning on this setting prepares your PC for sharing files and devices on a network. Based on the network location you choose, Windows will automatically assign a network discovery state to the network and automatically sets the appropriate Windows Firewall and security settings for the type of network that you connected to. You can change the network location anytime.
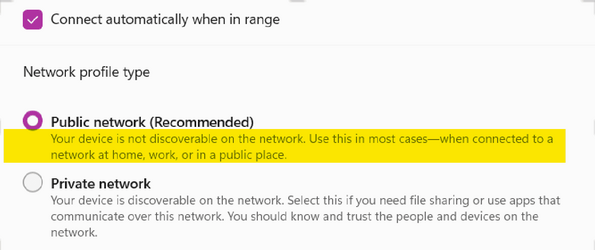
Public network = Your device is not discoverable on the network. By default, the public network location type is assigned to any new networks when they are first connected. A public network is considered to be shared with the world, with no protection between the local computer and any other computer. Therefore, the Windows Firewall rules associated with the public profile are the most restrictive. This blocks the following apps and services from working: PlayTo, file sharing, network discovery, and automatic setup of network printers, TVs, and other devices.
Private network = Your device is discoverable on the network. Select this if you need file sharing or use apps that communicate over this network. You should know and trust the people or devices on the network.
Domain network = The domain network location type is detected when the local computer is a member of an Active Directory domain, and the local computer can authenticate to a domain controller for that domain through one of its network connections.
References:
Essential Network Settings and Tasks in Windows | Microsoft Support
 support.microsoft.com

Network List Manager policies - Windows 10
You must be signed in as an administrator to change the network location of a network adapter.
- Option One: Change Network Location of Specific Network Connection in Settings
- Option Two: Change Network Location of a Ethernet Network Connection in Settings
- Option Three: Change Network Location of a Wi-Fi Network Connection in Settings
- Option Four: Change Network Location of Known Wi-Fi Network in Settings
- Option Five: Change Network Location of Current Wi-Fi Network in Quick Settings
- Option Six: Change Network Location of Specific Network Connection using Command
- Option Seven: Change Network Location of Current Network Connection using Command
- Option Eight: Change Network Location of Specific Network Connection in Registry Editor
- Option Nine: Specify Network Location of Specific Network Connection in Local Security Policy
This option requires you to currently be connected to the network you want to change its location type.
1 Open Settings (Win+I).
2 Click/tap on Network & internet on the left side, and click/tap on Properties at the top for the network connection you want. (see screenshot below)
3 Select Public or Private for the network profile type you want. (see screenshots below)
4 You can now close Settings if you like.
This option requires you to currently be connected to the network you want to change its location type.
1 Open Settings (Win+I).
2 Click/tap on Network & internet on the left side, and click/tap on Ethernet on the right side. (see screenshot below)
3 Under the Ethernet network connection (ex: "Brink-Router2") you want, select Public or Private for the network profile type you want. (see screenshot below)
4 You can now close Settings if you like.
This option requires you to currently be connected to the network you want to change its location type.
1 Open Settings (Win+I).
2 Click/tap on Network & internet on the left side, and click/tap on Wi-Fi on the right side. (see screenshot below)
3 Click/tap on the properties of the Wi-Fi connection (ex: "Brink-Router2") you want. (see screenshot below)
4 Select Public or Private for the network profile type you want. (see screenshots below)
5 You can now close Settings if you like.
This option does not require you to currently be connected to the network you want to change its location type.
1 Open Settings (Win+I).
2 Click/tap on Network & internet on the left side, and click/tap on Wi-Fi on the right side. (see screenshot below)
3 Click/tap on Manage known networks on the right side. (see screenshot below)
4 Click/tap on the known Wi-Fi network (ex: "Brink-Router2") you want. (see screenshot below)
5 Select Public or Private for the network profile type you want. (see screenshot below)
6 You can now close Settings if you like.
1 Open Quick Settings (Win+A).
2 Click/tap on the carrot on the current Wi-Fi connection button. (see screenshot below)
3 Click/tap on Properties
 button on the current Wi-Fi connection. (see screenshot below)
4 Select Public network or Private network for the network profile type you want. (see screenshot below)
5 You can now close Settings if you like.
This option requires you to currently be connected to the network you want to change its location type.
1 Open Windows Terminal (Admin), and select either Windows PowerShell or Command Prompt.
2 Copy and paste the appropriate command into Terminal (Admin), and press Enter. (see screenshot below step 3)
Get-NetConnectionProfilepowershell -command "Get-NetConnectionProfile"3 Make note of the network name (ex: "Brink-Router2") you want. (see screenshot below)
If you have more than one network connection with the same name (ex: "Brink-Router2"), then the network location type you set will be applied to all networks with the same name.
4 Do step 5 (Private), step 6 (Public), step 7 (Domain) below for what you want.
Set-NetConnectionProfile -Name "Brink-Router2" -NetworkCategory Privatepowershell -command "Set-NetConnectionProfile -Name "Brink-Router2" -NetworkCategory Private"Substitute Brink-Router2 in the command above with your network name from step 3 above instead.
Set-NetConnectionProfile -Name "Brink-Router2" -NetworkCategory Publicpowershell -command "Set-NetConnectionProfile -Name "Brink-Router2" -NetworkCategory Public"Substitute Brink-Router2 in the command above with your network name from step 3 above instead.
This requires your PC to be joined to a domain.
Set-NetConnectionProfile -Name "Brink-Router2" -NetworkCategory DomainAuthenticatedpowershell -command "Set-NetConnectionProfile -Name "Brink-Router2" -NetworkCategory DomainAuthenticated"Substitute Brink-Router2 in the command above with your network name from step 3 above instead.
8 You can now close Windows Terminal (Admin) if you like.
This option requires you to currently be connected to the network you want to change its location type.
1 Open Windows Terminal (Admin), and select either Windows PowerShell or Command Prompt.
2 Do step 3 (Private), step 4 (Public), or step 5 (Domain) below for what you want.
$net = get-netconnectionprofile;Set-NetConnectionProfile -Name $net.Name -NetworkCategory Privatepowershell -command "$net = get-netconnectionprofile;Set-NetConnectionProfile -Name $net.Name -NetworkCategory Private"$net = get-netconnectionprofile;Set-NetConnectionProfile -Name $net.Name -NetworkCategory Publicpowershell - command "$net = get-netconnectionprofile;Set-NetConnectionProfile -Name $net.Name -NetworkCategory Public"This requires your PC to be joined to a domain.
$net = get-netconnectionprofile;Set-NetConnectionProfile -Name $net.Name -NetworkCategory DomainAuthenticatedpowershell -command "$net = get-netconnectionprofile;Set-NetConnectionProfile -Name $net.Name -NetworkCategory DomainAuthenticated"6 You can now close Windows Terminal (Admin) if you like.
This option does not require you to currently be connected to the network you want to change its location type.
1 Open Registry Editor (regedit.exe).
2 Navigate to the registry key location below in the left pane of Registry Editor. (see screenshot below)
3 Double click/tap on the Profiles key in the left pane to expand it open. Click/tap on each long GUID number subkey, and look at its ProfileName string value in the right pane until it is the network name (ex: "Brink-Router2") you want. (see screenshot below)
4 When you find the correct ProfileName for the network name (ex: "Brink-Router2") you want, double click/tap on the Category DWORD value in the same right pane to modify it. (see screenshot below)
5 Type the data value number for the network location you want from the table below, and click/tap on OK. (see screenshot below)
| Network Location | Data Value |
|---|---|
| Public | 0 |
| Private | 1 |
| Domain | 2 |
6 You can now close Registry Editor if you like.
7 Sometimes you may need to sign out and sign in to apply.
This option requires you to currently be connected to the network you want to change its location type.
Local Security Policy is only available in the Windows 11 Pro, Enterprise, and Education editions.
This option will override and prevent the use of Option One, Option Two, Option Three, Option Four, Option Five, Option Six, and Option Seven.
1 Open Local Security Policy (secpol.msc).
2 Click/tap on Network List Manager Policies in the left pane of Local Security Policy. (see screenshot below step 3)
3 In the right pane of Network List Manager Policies, double click/tap on the network name (ex: "Brink-Router2") you want. (see screenshot below)
Network List Manager policies - Windows 10
4 Do step 5 (Not configured), step 6 (Private), or step 7 (Public) below for what you want.
This is the default setting to allow the use of Option One, Option Two, Option Three, Option Four, Option Five, Option Six, and Option Seven.
The Network Location tab will not be available if your PC is currently set to have a Domain network location.
This option will override and prevent the use of Option One, Option Two, Option Three, Option Four, Option Five, Option Six, and Option Seven.
The Network Location tab will not be available if your PC is currently set to have a Domain network location.
This option will override and prevent the use of Option One, Option Two, Option Three, Option Four, Option Five, Option Six, and Option Seven.
The Network Location tab will not be available if your PC is currently set to have a Domain network location.
8 You can now close Local Security Policy if you like.
That's it,
Shawn Brink
- Add Change Network Location Context Menu in Windows 11
- Change Network Name in Windows 11
- See Computers on Network in Windows 11
- Turn On or Off Network Discovery in Windows 11
- Turn On or Off File and Printer Sharing in Windows 11
- Change Encryption Level for File Sharing Connections in Windows 11
- Turn On or Off Password Protected Sharing in Windows 11
- Change Wi-Fi Network Profile Connection and Security Settings in Windows 11
")