This tutorial will show you how to change the workgroup on your Windows 10 and Windows 11 PC to join an existing workgroup on a network or create a new one.
When you connect to a network, Windows automatically creates a new workgroup and gives it the name WORKGROUP by default. You can join any existing workgroup on a network or create a new one. Workgroups provide a basis for file and printer sharing, but a workgroup doesn't actually set up sharing for you.
A workgroup is a group of PCs connected to a local area network on the same subnet that share resources, such as printers and files. Each PC that is a member of the same workgroup can access the resources being shared by the others, and can share its own resources.
- All PCs are peers; no PC has control over another PC.
- Each PC has its own user accounts. To log on to any PC in the workgroup, you must have an account on that PC.
- A workgroup is not protected by a password.
- All PCs in the same workgroup must have a different computer name.
- If your PC was a member of a domain before you joined the workgroup, it will be removed from the domain.
You must be signed in as an administrator to change the workgroup.
A workgroup name cannot contain special characters such as the following:
` ~ @ # $ % ^ & ( ) = + [ ] { } | ; : , ‘ “ . < > / ?
Contents
- Option One: Change Workgroup in Settings
- Option Two: Change Workgroup in Command Prompt
- Option Three: Change Workgroup in PowerShell
1 Open Settings.
2 Click/tap on System on the right side, click/tap on About on the right side. (see screenshot below)
3 Click/tap on the Advanced system settings link to open System Properties (sysdm.cpl). (see screenshot below)
4 Click/tap on the Computer Name tab, and click/tap on the Change button. (see screenshot below)
5 Perform the following steps: (see screenshot below)
- Select (dot) Workgroup.
- Type the name (ex: "BRINKGROUP") of the workgroup you want to join or create.
- Click/tap on OK.
6 Click/tap on OK when prompted. (see screenshot below)
7 Click/tap on OK. (see screenshot below)
This does not restart the computer yet.
8 Click/tap on Close. (see screenshot below)
9 Click/tap on Restart now when ready to restart the computer. (see screenshot below)

Add or Remove WMIC command Feature in Windows 11
This tutorial will show you how to add or remove the WMIC command as an optional feature for all users in Windows 11. The WMI command-line (WMIC) utility provides a command-line interface for Windows Management Instrumentation (WMI). WMIC is compatible with existing shells and utility commands...
 www.elevenforum.com
1 Open an elevated Windows Terminal, and select Command Prompt.
2 Type the command below into the elevated command prompt, and press Enter. (see screenshot below)
wmic computersystem where name="%computername%" call joindomainorworkgroup name="Workgroup-Name"Substitute Workgroup-Name in the command above with the actual name of the workgroup you want to join or create.
For example: wmic computersystem where name="%computername%" call joindomainorworkgroup name="BrinkGroup"
3 When successfully finished, close the elevated command prompt.
4 Restart the computer. to apply.
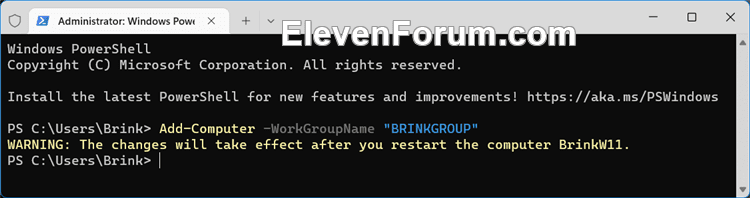
1 Open an elevated Windows Terminal, and select Windows PowerShell.
2 Type the command below into the elevated PowerShell, and press Enter. (see screenshot below)
Add-Computer -WorkGroupName "Workgroup-Name"Substitute Workgroup-Name in the command above with the actual name of the workgroup you want to join or create.
For example: Add-Computer -WorkGroupName "BRINKGROUP"
3 When successfully finished, close the elevated PowerShell.
4 Restart the computer. to apply.
That's it,
Shawn Brink
Attachments
Last edited: