This tutorial will show you step by step on how to clean install Windows 11 at boot on your PC with or without an Internet connection and setup with a local account or Microsoft account.
Windows 11 has all the power and security of Windows 10 with a redesigned and refreshed look. It also comes with new tools, sounds, and apps. Every detail has been considered. All of it comes together to bring you a refreshing experience on your PC.
A clean install of Windows 11 will wipe out everything on the drive you select to install Windows 11 on giving you a completely new default installation of Windows 11.
Starting with Windows 11 build 25905, Microsoft have adjusted the prerequisites (removal of Modern Standby/HSTI validation and untrusted DMA ports check) for enabling device encryption so that it is automatically enabled when doing clean installs of Windows 11.
References:

Windows 11 overview for administrators
Windows 11 Specs and System Requirements | Microsoft Windows
Windows 11 Clean Installation
What does it mean if Windows isn't supported? - Microsoft Support
If you’d like to see if your current PC meets the minimum requirements, download and run the PC Health Check app.
- Processor: 1 gigahertz (GHz) or faster with 2 or more cores on a compatible 64-bit processor or System on a Chip (SoC)
- RAM: 4 gigabyte (GB)
- Storage: 64 GB or larger
- System firmware: UEFI, Secure Boot capable
- TPM: Trusted Platform Module (TPM) version 2.0
- Graphics card: Compatible with DirectX 12 or later with WDDM 2.0 driver or higher
- Display: High definition (720p) display that is greater than 9” diagonally, 8 bits per color channel
It is required to be connected to the Internet if you want to set up a Microsoft account during Windows Setup.
It is not required to be connected to the Internet if you want to set up a local account during Windows Setup.
If you set up a Microsoft account during Windows Setup, it will get linked to OneDrive to backup and sync your files by default. You can either set up a local account instead to avoid this, or stop the backup and sync your files to OneDrive when the installation is complete.
If you set up a Microsoft account during Windows Setup, your user profile folder in the "C:\Users" folder will be named with the first 5 characters of the email address used for your Microsoft account. If you want to specify the name of your user profile folder in the "C:\Users" folder, then you will need to set up a local account during Windows Setup instead of a Microsoft account so your user profile folder will have the same name you enter as the local account name. When Windows 11 has finished installing, you can switch to a Microsoft account from the local account (if wanted) without the user profile folder name getting changed.
Here's How:
1 If you have not already, you will need to create a bootable Windows 11 installation USB that supports UEFI mode.
2 It is recommended to temporarily disconnect or disable all non OS hard drives until Windows installation has finished for the following reasons:
- To avoid you mistakenly deleting or formatting the wrong disk or drive.
- To prevent Windows Setup from installing the boot configuration files (bootloader) to a different connected hard drive instead of on the disk Windows will be installed on.
Usually it will be set to UEFI mode by default if supported. You may need to read your PC's or motherboard's manual for its specific instructions on how to change this setting.
4 Boot from the Windows 11 installation USB flash drive on your computer.
5 Perform an available step below: (see screenshots below)
- (OLD) Select your language, time and currency format, and keyboard or input method preferences, and click/tap on Next.
- (NEW) Select your Language to install and Time and currency format, click/tap on Next, select Keyboard or input method, and click/tap on Next.
6 Select (dot) Install Windows 11, check I agree everything will be deleted including files, apps, an settings, and click/tap on Next.
7 Enter your Windows 11 product key, and click/tap on Next. (see screenshot below)
The product key you enter will determine which edition of Windows 11 gets installed, and is required to activate Windows 11 unless you activate with a digital license instead. If you don't enter a product key and click/tap on I don't have a product key, you will be able to select the Windows 11 edition you want to install at step 8 below, but Windows 11 will not be activated.
You can enter an official Windows 7, Windows 8.1, or Windows 10 retail product key (OEM keys will not work) not currently used to activate Windows on another PC, and click/tap on Next to activate Windows 11.
![]() Free Activation from Windows 7/8 key or upgrade to Windows 10/11 Ends
Free Activation from Windows 7/8 key or upgrade to Windows 10/11 Ends
If you do not have a product key available right now, click/tap on the I don't have a product key link, select the Windows 11 edition you want to install at step 8. You will be able to manually activate Windows 11 with your product key when you want later after the Windows 11 installation has finished.
If you want to activate with a digital license linked to your Microsoft account, click/tap on the I don't have a product key link, select the Windows 11 edition you want to install at step 8, and add your linked Microsoft account at step 20 .
You will not be asked to enter a product key if installing Windows 11 Enterprise. You will need to manually activate later after installation has finished.
If this is an OEM PC that has a valid product key embedded in its UEFI firmware chip, then you will not be prompted to enter a product key. Windows 11 will automatically use the embedded product key if its valid for the edition being installed. If needed, you can change the product key after installation has finished.
8 If you clicked on I don't have a product key in step 7 above, then select the Windows 11 edition you want to install, and click/tap on Next. (see screenshots below)
9 Click/tap on Accept for applicable notices and license terms. (see screenshot below)
10 Perform one of the following actions to select a drive or disk to install Windows 11 on: (see screenshots below)

Default UEFI/GPT Hard Drive Partition Layout Description for Windows 10 and 11
 www.elevenforum.com
If RAID is enabled in UEFI/BIOS, Windows Setup may not see any drive(s) available to select to install on.
In this situation, you could either disable RAID in BIOS/UEFI or select to "Add driver" to install the RAID driver from your OEM/motherboard manufacturer's chipset.
AMD Quick Start Guide- Chapter 5: Install AMD-RAID Drivers (PDF)
Intel Support - Installing the Operating System onto a RAID Volume—F6 Install Method
If no drives can be found during Windows 11 or Windows 10 installation (Intel 11th Generation processors)
- Delete all partitions on the Drive # (ex: Drive 0) you want to install Windows 11 until that Drive # shows only as one Unallocated Space, select the unallocated space, and click/tap on Next.
Starting with Windows 11 build 27774.1000 (Canary), you will now see a confirmation dialog when formatting or deleting partitions.
- Select a Primary or unallocated partition on a drive you want to install Windows 11, Delete the partition/volume if not already unallocated, click/tap on OK to confirm, and click/tap on Next.
11 Click/tap on Install when ready. (see screenshot below)
12 The installation of Windows 11 will now begin. (see screenshot below)
During the installation process, your screen may flash and the computer will restart a few times.
13 When installation has finished, select your country or region (ex: "United States"), and click/tap on Yes. (see screenshot below)
If you would like to set up this PC to have an OOBE (Out-of-box Experience) so another user/owner can pick up at this step to finish setting up Windows on the PC with their own account and preferences the next time the PC it turned on, then:
1. Press the Shift + F10 keys when you see the screenshot below to open a command prompt.
2. Type C:\Windows\System32\shutdown -s -t 0 -f into the command prompt, and press Enter to shut down Windows.
14 Select the keyboard layout (ex: "US") you want, and click/tap on Yes. (see screenshot below)
15 Select Add layout or Skip depending on if you want to add a second keyboard layout or not. (see screenshot below)
16 Windows Setup will now check for an Internet connection. If an Internet connection is not detected, it will prompt you to connect and select an Ethernet network and/or setup and connect to a Wi-Fi network (if available), and click/tap on Next. (see screenshots below)
Starting with a Windows 11 build 25987 (Canary) ISO, when you need to connect to a network and there is no Wi-Fi drivers, you will be given an option to press an Install Drivers button to install drivers you have previously downloaded.
It is required to have an Internet connection if you want to set up a Microsoft account, or work or school account.
If you do not have an Internet connection, you will only be able to set up a local account instead of a Microsoft account during Windows Setup.
If installing a Windows 11 Pro or Education edition and you currently do not have an Internet connection available, click/tap on I don't have Internet (if prompted), and go to step 21D to set up a local account. I don't have Internet is not available by default for the Home edition unless you use the OOBE\BYPASSNRO command below first.
Starting with Windows 11 version 23H2 and 24H2, if you have an Internet connection and want to set up a local account instead of a Microsoft account, you will need to press the Shift + F10 keys to open a command prompt. Copy and paste the OOBE\BYPASSNRO command into the command prompt, and press Enter. This will restart the computer, and take you back to step 13. You should then be able to click/tap on I don't have internet (if prompted) when you get back to this step, and go to step 21D to set up a local account.
17 Type a name you want for the PC, and click/tap on Next. (see screenshot below)
You can always rename the PC at anytime if needed.
Your PC name cannot have more then 15 characters.
Your PC name cannot have spaces or any of the following special characters: " /\ [] : | <> + + ; , ?
18 Perform an action below for which type of account you want to set up: (see screenshot below)
You will not see this step if installing a Windows 11 Home edition. You will see step 19 instead.
- Click/tap on Set up for personal use, click/tap on Next, and go to step 19 to set up a Microsoft account or local account on your personal PC.
- Click/tap on Set up for work or school, click/tap on Next, and go to step 22 to set up a work or school account on your PC to join a domain.
If Windows Updates are available, they will install before you are able to continue past this step.

19 Click/tap on Sign in, and go to the step below depending on if your want to set up a local account or Microsoft account to sign in to Windows 11 with. (see screenshot below)
This account will be an administrator account on the PC.
For more details about a Microsoft account, see: Microsoft account | Microsoft Docs
If you do not have a Microsoft account and would like to use one, click/tap on the Create one link to create a new Microsoft account.
You will be able to change these privacy settings at anytime in Windows 11.
- Enable or Disable Location Services in Windows 11
- Enable or Disable Find My Device in Windows 11
- Change Diagnostic Data Settings in Windows 11
- Enable or Disable Improve Inking and Typing in Windows 11
- Enable or Disable Tailored Experiences in Windows 11
- Enable or Disable Advertising ID for Personalized Ads in Apps in Windows 11
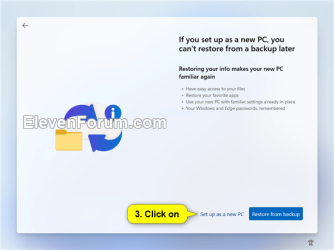
You can select to restore your settings, preferences, Microsoft Store apps, and synced OneDrive files from another device instead of setting up as a new device.
Click/tap on Skip instead if you do not want to select (check) any device usages.
You can change your device usage options at any time in Windows 11.

Link Samsung Android Phone to Windows 11 PC
 www.elevenforum.com
Click/tap on Skip instead if you do not want to link an Android phone.
This option is only available starting with Windows 11 build 22567.
This is for backing up and syncing your account's personal Desktop, Documents, Pictures, Music, and/or Videos folders to your online (cloud) OneDrive.
When you back up a folder its contents get moved to your account's OneDrive folder on the PC to then be synced with your online OneDrive.
![]() If you set up a Microsoft account during Windows Setup, it will get linked to OneDrive to backup and sync your files by default. You can either set up a local account instead to avoid this, or stop the backup and sync your files to OneDrive when the installation is complete.
If you set up a Microsoft account during Windows Setup, it will get linked to OneDrive to backup and sync your files by default. You can either set up a local account instead to avoid this, or stop the backup and sync your files to OneDrive when the installation is complete.

Turn On or Off OneDrive Folder Backup Syncing Across Windows 11 Devices
 www.elevenforum.com
For more details about a local account, see: Local account | Microsoft Docs:
If you see "To unlock you account, you can reset your password" instead of "please try again later", then press the Shift + F10 keys to open a command prompt. Copy and paste the OOBE\BYPASSNRO command into the command prompt, and press Enter. This will restart the computer, and take you back to step 13. You should then be able to click/tap on I don't have internet (if prompted) when you get back to step 16, and go to step 21D below to set up a local account.
If you do not want this local account to have a password, leave the password field empty, click/tap on Next, and go to step J below.
You will be able to change these privacy settings at anytime in Windows 11.
- Enable or Disable Location Services in Windows 11
- Enable or Disable Find My Device in Windows 11
- Change Diagnostic Data Settings in Windows 11
- Enable or Disable Improve Inking and Typing in Windows 11
- Enable or Disable Tailored Experiences in Windows 11
- Enable or Disable Advertising ID for Personalized Ads in Apps in Windows 11
23 When the clean install has finished, you will be on your desktop in Windows 11 with the Start menu open. (see screenshot below)
24 Make sure the correct time zone, date, and time is set.
25 Check for and install any available Windows Updates.
26 Install any needed drivers for your devices.
That's it,
Shawn Brink
- Default UEFI/GPT Hard Drive Partition Layout Description for Windows 10 and 11
- Custom Install Windows 11
- Reset Windows 11 PC
- Upgrade to Windows 11
- Upgrade to Windows 11 from Windows 10 with Windows 11 Installation Assistant
- Dual Boot Windows 11 with Windows 10
- Repair Install Windows 11 with an In-place Upgrade
- Create Windows 11 Virtual Hard Disk (VHDX) at Boot to Native Boot
- Buy Windows 11 Digital Product Key from Microsoft


