Personalization Disable "Show more options" context menu in Windows 11


Show_more_options_banner.png

This tutorial will show you how to enable or disable having to click on "Show more options" to see the full context menu for your account or all users in Windows 11.

When you right click on an item in Windows 11, you will see a new modern condensed context menu with Show more options (Shift+F10) at the bottom you have to click on to see all available options.

Reference:

If you use the context menu a lot, then you will most likely find having to click on Show more options annoying anytime you need more options.

Pressing the Shift + F10 keys while having something selected will open the "Show more options" context menu for that item.

Starting with Windows 11 build 22572, you can now also press Shift + right click in File Explorer and the Desktop to be the same as click/tap on the “Show more options” context menu item.

Starting with Windows 11 build 26058 (Canary and Dev), to make it easier to use the File Explorer context menu, labels have been added to previously unlabeled actions such as cut, copy, paste, rename, share, and delete.

If you like, you can disable this condensed Show more options context menu to always have it open too see the full context menu again when you right click on an item.


Contents

  • Option One: Enable or Disable "Show more options" context menu for Current User using REG file
  • Option Two: Enable or Disable "Show more options" context menu for Current User using Command
  • Option Three: Enable or Disable "Show more options" context menu for All Users in Registry Editor


EXAMPLE: "Show more options" context menu enabled and disabled

Enable_Show_more_options.png
Disable_Show_more_options.png


Option One

Enable or Disable "Show more options" context menu for Current User using REG file


1 Do step 2 (enable) or step 3 (disable) below for what you would like to do.

2 Enable "Show more options" context menu for Current User

This is the default setting.


A) Click/tap on the Download button below to download the file below, and go to step 4 below.

Enable_Show_more_options_context_menu.reg


(Contents of REG file for reference)
Code:
Windows Registry Editor Version 5.00

[-HKEY_CURRENT_USER\Software\Classes\CLSID\{86ca1aa0-34aa-4e8b-a509-50c905bae2a2}]

3 Disable "Show more options" context menu for Current User

A) Click/tap on the Download button below to download the file below, and go to step 4 below.

Disable_Show_more_options_context_menu.reg


(Contents of REG file for reference)
Code:
Windows Registry Editor Version 5.00

[HKEY_CURRENT_USER\Software\Classes\CLSID\{86ca1aa0-34aa-4e8b-a509-50c905bae2a2}\InprocServer32]
@=""

4 Save the .reg file to your desktop.

5 Double click/tap on the downloaded .reg file to merge it.

6 When prompted, click/tap on Run, Yes (UAC), Yes, and OK to approve the merge.

7 You may need to either restart the explorer process, sign out and sign in, or restart the computer to apply.

8 You can now delete the downloaded .reg file if you like.


Option Two

Enable or Disable "Show more options" context menu for Current User using Command


1 Open Windows Terminal, and select Windows PowerShell or Command Prompt.

2 Copy and paste the command below you want into Windows Terminal, and press Enter.

(Disable)​
reg add "HKCU\Software\Classes\CLSID\{86ca1aa0-34aa-4e8b-a509-50c905bae2a2}\InprocServer32" /f /ve

OR​

(Enable)​
reg delete "HKCU\Software\Classes\CLSID\{86ca1aa0-34aa-4e8b-a509-50c905bae2a2}" /f

3 Close Windows Terminal.

4 You may need to either restart the explorer process, sign out and sign in, or restart the computer to apply.


Option Three

Enable or Disable "Show more options" context menu for All Users in Registry Editor


You must be signed in as an administrator to use this option.


1 Open Registry Editor (regedit.exe).

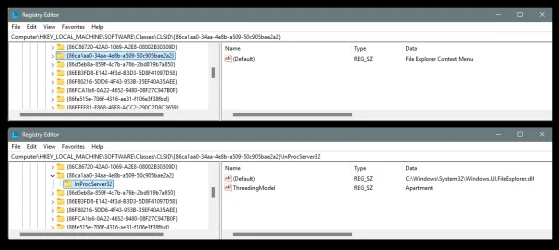
2 Navigate to the key below in the left pane of Registry Editor. (see screenshot below)

HKEY_LOCAL_MACHINE\SOFTWARE\Classes\CLSID\{86ca1aa0-34aa-4e8b-a509-50c905bae2a2}

Show_more_options_all_users-1.png

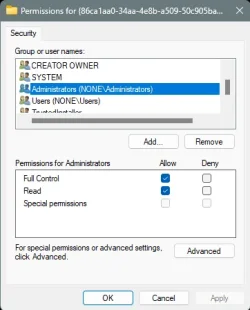
3 If you have not already, you will need to first change the owner of the {86ca1aa0-34aa-4e8b-a509-50c905bae2a2} registry key in the left pane to be the Administrators group, check the Replace owner on subcontainers and objects box, and click/tap on OK. (see screenshot below)


Show_more_options_all_users-2.png

4 If you have not already, you will need to second set permissions of the {86ca1aa0-34aa-4e8b-a509-50c905bae2a2} registry key in the left pane to "Allow" the Administrators group "Full control". (see screenshot below)


Show_more_options_all_users-3.png

5 You can now close Registry Editor.

6 Do step 7 (enable) or step 8 (disable) below for what you would like to do.

7 Enable "Show more options" context menu for All Users

This is the default setting to allow using Option One and Option Two.


A) Click/tap on the Download button below to download the file below, and go to step 9 below.

Enable_Show_more_options_context_menu.reg


(Contents of REG file for reference)
Code:
Windows Registry Editor Version 5.00

[HKEY_LOCAL_MACHINE\SOFTWARE\Classes\CLSID\{86ca1aa0-34aa-4e8b-a509-50c905bae2a2}]
@="File Explorer Context Menu"

[HKEY_LOCAL_MACHINE\SOFTWARE\Classes\CLSID\{86ca1aa0-34aa-4e8b-a509-50c905bae2a2}\InProcServer32]
@="C:\\Windows\\System32\\Windows.UI.FileExplorer.dll"
"ThreadingModel"="Apartment"

8 Disable "Show more options" context menu for All Users

This will override Option One and Option Two.


A) Click/tap on the Download button below to download the file below, and go to step 9 below.

Disable_Show_more_options_context_menu.reg


(Contents of REG file for reference)
Code:
Windows Registry Editor Version 5.00

[HKEY_LOCAL_MACHINE\SOFTWARE\Classes\CLSID\{86ca1aa0-34aa-4e8b-a509-50c905bae2a2}]
@="File Explorer Context Menu"

[-HKEY_LOCAL_MACHINE\SOFTWARE\Classes\CLSID\{86ca1aa0-34aa-4e8b-a509-50c905bae2a2}\InProcServer32]

[HKEY_LOCAL_MACHINE\SOFTWARE\Classes\CLSID\{86ca1aa0-34aa-4e8b-a509-50c905bae2a2}\InProcServer32]
@=""

9 Save the .reg file to your desktop.

10 Double click/tap on the downloaded .reg file to merge it.

11 When prompted, click/tap on Run, Yes (UAC), Yes, and OK to approve the merge.

12 You may need to either restart the explorer process, sign out and sign in, or restart the computer to apply.

13 You can now delete the downloaded .reg file if you like.


That's it,
Shawn Brink


Attachments

Last edited:
thats because the "show more options" *shouldn't* duplicate 3rd party apps that are on the main context menu, whereas Shift+RClick bypasses the new context menu and displays the 'classic' context menu, thus showing ALL entries (ie - Unlock with Locksmith, etc)
Okay, so how do we get Windows/this tutorial to (optionally) go straight to this classic context menu, instead of the more options one? Or can't it be done?

By the way, to manage what shows and what doesn't, I've been using a free tool called ShellExView for years.
 

My Computers

System One System Two

  • OS
    Windows 11 Pro
    Computer type
    PC/Desktop
    CPU
    Intel Core i5-10600K
    Motherboard
    Gigabyte Aorus Z490 Elite AC
    Memory
    32 GB (G.Skill Ripjaws V F4-3600C16D-32GVKC)
    Graphics Card(s)
    MSI GeForce RTX 3070 Gaming Z Trio
    Monitor(s) Displays
    LG UltraGear 32GR93U
    Screen Resolution
    4K
    Hard Drives
    Lexar NM790 2TB; Lexar NM790 2TB; Seagate Barracuda Compute 8TB
    PSU
    be quiet! Straight Power 11 750W
    Case
    be quiet! Silent Base 801
  • Operating System
    Windows 11 Pro
    Computer type
    Laptop
    CPU
    Intel Core i5-1155G7
    Memory
    8 GB
    Graphics card(s)
    Intel Iris Xᵉ
    Screen Resolution
    1920 x 1080
Okay, so how do we get Windows/this tutorial to (optionally) go straight to this classic context menu, instead of the more options one? Or can't it be done?

By the way, to manage what shows and what doesn't, I've been using a free tool called ShellExView for years.
 

My Computer

System One

  • OS
    Windows 11 Pro
Didn't we just establish there's a difference between the result of following this tutorial and shift right-click? ;-) I'd want right click to be shift right click by default, not the more options view. As more options is not all options.
 

My Computers

System One System Two

  • OS
    Windows 11 Pro
    Computer type
    PC/Desktop
    CPU
    Intel Core i5-10600K
    Motherboard
    Gigabyte Aorus Z490 Elite AC
    Memory
    32 GB (G.Skill Ripjaws V F4-3600C16D-32GVKC)
    Graphics Card(s)
    MSI GeForce RTX 3070 Gaming Z Trio
    Monitor(s) Displays
    LG UltraGear 32GR93U
    Screen Resolution
    4K
    Hard Drives
    Lexar NM790 2TB; Lexar NM790 2TB; Seagate Barracuda Compute 8TB
    PSU
    be quiet! Straight Power 11 750W
    Case
    be quiet! Silent Base 801
  • Operating System
    Windows 11 Pro
    Computer type
    Laptop
    CPU
    Intel Core i5-1155G7
    Memory
    8 GB
    Graphics card(s)
    Intel Iris Xᵉ
    Screen Resolution
    1920 x 1080
the difference between the two is a layering. disabling the show more options disables the first layer (win 11 context) and shows the fill listing of context items on the second layer (classic context menu - aka your shift+rclick)
 

My Computer

System One

  • OS
    Windows 11 Pro
There are three. Default right-click, more options, shift right-click. See video in attachment. This tutorial allows me to go straight to door number two, but not to door number three.


My Computers

System One System Two

  • OS
    Windows 11 Pro
    Computer type
    PC/Desktop
    CPU
    Intel Core i5-10600K
    Motherboard
    Gigabyte Aorus Z490 Elite AC
    Memory
    32 GB (G.Skill Ripjaws V F4-3600C16D-32GVKC)
    Graphics Card(s)
    MSI GeForce RTX 3070 Gaming Z Trio
    Monitor(s) Displays
    LG UltraGear 32GR93U
    Screen Resolution
    4K
    Hard Drives
    Lexar NM790 2TB; Lexar NM790 2TB; Seagate Barracuda Compute 8TB
    PSU
    be quiet! Straight Power 11 750W
    Case
    be quiet! Silent Base 801
  • Operating System
    Windows 11 Pro
    Computer type
    Laptop
    CPU
    Intel Core i5-1155G7
    Memory
    8 GB
    Graphics card(s)
    Intel Iris Xᵉ
    Screen Resolution
    1920 x 1080

My Computers

System One System Two

  • OS
    Windows 11
    Computer type
    PC/Desktop
    Manufacturer/Model
    ASUS ROG Strix
  • Operating System
    Windows 11
    Computer type
    Laptop
    Manufacturer/Model
    ASUS VivoBook
LOL! Already done. ;-) My thumb button is now shift right-click. (On a Logitech M720, with Logi Options+)

I was just wondering if there was registry hack for it.
 

My Computers

System One System Two

  • OS
    Windows 11 Pro
    Computer type
    PC/Desktop
    CPU
    Intel Core i5-10600K
    Motherboard
    Gigabyte Aorus Z490 Elite AC
    Memory
    32 GB (G.Skill Ripjaws V F4-3600C16D-32GVKC)
    Graphics Card(s)
    MSI GeForce RTX 3070 Gaming Z Trio
    Monitor(s) Displays
    LG UltraGear 32GR93U
    Screen Resolution
    4K
    Hard Drives
    Lexar NM790 2TB; Lexar NM790 2TB; Seagate Barracuda Compute 8TB
    PSU
    be quiet! Straight Power 11 750W
    Case
    be quiet! Silent Base 801
  • Operating System
    Windows 11 Pro
    Computer type
    Laptop
    CPU
    Intel Core i5-1155G7
    Memory
    8 GB
    Graphics card(s)
    Intel Iris Xᵉ
    Screen Resolution
    1920 x 1080
LOL! Already done. ;-) My thumb button is now shift right-click. (On a Logitech M720, with Logi Options+)

I was just wondering if there was registry hack for it.
thats not a 3rd menu.. thats the Extended classic context menu. its extended for a reason, but here is an ahk script to make Right Click automatically Shift+Right Click. had to zip the compiled exe to upload here. runs in the tray.

EDIT:
Only reg mod that i know of would be to find all entries on your extended context menu in the reg and delete the Extended keys from them so they show on the root.
@Ten Forward if you dont want to do this manually, you can use NirSoft's ShellMenuView to remove the Extended tag from multiple entries simultaneously, thus showing them on the root menu. its portable and dont have to keep it after tasks if you dont want
Version 1.10
  • Added support for setting or removing the extended mode of menu items. When menu item is in extended mode, the item is displayed only if you press the Shift key when the context menu is opened
.https://www.nirsoft.net/utils/shell_menu_view.html
 

Attachments

Last edited:

My Computer

System One

  • OS
    Windows 11 Pro
In Win 11 24H2, I can't add Admin Group Full Control permission to the key with error "Access denied". Any suggestions?
 

My Computer

System One

  • OS
    Windows 11
In Win 11 24H2, I can't add Admin Group Full Control permission to the key with error "Access denied". Any suggestions?


In the tutorial, here... use Option #1


Option #3 does work in 24H2... but it's kind of complicated.

Image4.webp


Maybe re-read Option #3 a few times, and then try it again. :-)
 
Last edited:

My Computers

System One System Two

  • OS
    Win 11 Home ♦♦♦26100.4652 ♦♦♦♦♦♦♦24H2
    Computer type
    PC/Desktop
    Manufacturer/Model
    Built by Ghot® [May 2020]
    CPU
    AMD Ryzen 7 3700X
    Motherboard
    Asus Pro WS X570-ACE (BIOS 5002)
    Memory
    G.Skill (F4-3200C14D-16GTZKW)
    Graphics Card(s)
    EVGA RTX 2070 (08G-P4-2171-KR)
    Sound Card
    Realtek ALC1220P / ALC S1220A
    Monitor(s) Displays
    Dell U3011 30"
    Screen Resolution
    2560 x 1600
    Hard Drives
    2x Samsung 860 EVO 500GB,
    WD 4TB Black FZBX - SATA III,
    WD 8TB Black FZBX - SATA III,
    DRW-24B1ST CD/DVD Burner
    PSU
    PC Power & Cooling 750W Quad EPS12V
    Case
    Cooler Master ATCS 840 Tower
    Cooling
    CM Hyper 212 EVO (push/pull)
    Keyboard
    Ducky DK9008 Shine II Blue LED
    Mouse
    Logitech Optical M-100
    Internet Speed
    300/300
    Browser
    Firefox (latest)
    Antivirus
    Bitdefender Internet Security
    Other Info
    Speakers: Klipsch Pro Media 2.1
  • Operating System
    Windows XP Pro 32bit w/SP3
    Computer type
    PC/Desktop
    Manufacturer/Model
    Built by Ghot® (not in use)
    CPU
    AMD Athlon 64 X2 5000+ (OC'd @ 3.2Ghz)
    Motherboard
    ASUS M2N32-SLI Deluxe Wireless Edition
    Memory
    TWIN2X2048-6400C4DHX (2 x 1GB, DDR2 800)
    Graphics card(s)
    EVGA 256-P2-N758-TR GeForce 8600GT SSC
    Sound Card
    Onboard
    Monitor(s) Displays
    ViewSonic G90FB Black 19" Professional (CRT)
    Screen Resolution
    up to 2048 x 1536
    Hard Drives
    WD 36GB 10,000rpm Raptor SATA
    Seagate 80GB 7200rpm SATA
    Lite-On LTR-52246S CD/RW
    Lite-On LH-18A1P CD/DVD Burner
    PSU
    PC Power & Cooling Silencer 750 Quad EPS12V
    Case
    Generic Beige case, 80mm fans
    Cooling
    ZALMAN 9500A 92mm CPU Cooler
    Keyboard
    Logitech Classic Keybooard 200
    Mouse
    Logitech Optical M-BT96a
    Internet Speed
    300/300
    Browser
    Firefox 3.x ??
    Antivirus
    Symantec (Norton)
    Other Info
    Still assembled, still runs. Haven't turned it on for 15 years?
Thanks, Option 1 worked. For Option 3, did you need & were able to change the key ownership, and how?
 

My Computer

System One

  • OS
    Windows 11
Thanks, Option 1 worked. For Option 3, did you need & were able to change the key ownership, and how?


Yes. And I just followed the directions. Those screen shots above are from MY registry.
As I said, they are complicated. Just take your time and re-read option #3 until it makes more sense.

Brink writes thousands of tutorials.
Every sentence and every word is important, or it won't work.


Make sure you're choosing Administrator(s), with the "S".
If you just choose Administrator without the "S", it won't work.


Image1.webp
 

Attachments

  • Image1.webp
    Image1.webp
    45.4 KB · Views: 28
  • Image1.webp
    Image1.webp
    20.1 KB · Views: 6
Last edited:

My Computers

System One System Two

  • OS
    Win 11 Home ♦♦♦26100.4652 ♦♦♦♦♦♦♦24H2
    Computer type
    PC/Desktop
    Manufacturer/Model
    Built by Ghot® [May 2020]
    CPU
    AMD Ryzen 7 3700X
    Motherboard
    Asus Pro WS X570-ACE (BIOS 5002)
    Memory
    G.Skill (F4-3200C14D-16GTZKW)
    Graphics Card(s)
    EVGA RTX 2070 (08G-P4-2171-KR)
    Sound Card
    Realtek ALC1220P / ALC S1220A
    Monitor(s) Displays
    Dell U3011 30"
    Screen Resolution
    2560 x 1600
    Hard Drives
    2x Samsung 860 EVO 500GB,
    WD 4TB Black FZBX - SATA III,
    WD 8TB Black FZBX - SATA III,
    DRW-24B1ST CD/DVD Burner
    PSU
    PC Power & Cooling 750W Quad EPS12V
    Case
    Cooler Master ATCS 840 Tower
    Cooling
    CM Hyper 212 EVO (push/pull)
    Keyboard
    Ducky DK9008 Shine II Blue LED
    Mouse
    Logitech Optical M-100
    Internet Speed
    300/300
    Browser
    Firefox (latest)
    Antivirus
    Bitdefender Internet Security
    Other Info
    Speakers: Klipsch Pro Media 2.1
  • Operating System
    Windows XP Pro 32bit w/SP3
    Computer type
    PC/Desktop
    Manufacturer/Model
    Built by Ghot® (not in use)
    CPU
    AMD Athlon 64 X2 5000+ (OC'd @ 3.2Ghz)
    Motherboard
    ASUS M2N32-SLI Deluxe Wireless Edition
    Memory
    TWIN2X2048-6400C4DHX (2 x 1GB, DDR2 800)
    Graphics card(s)
    EVGA 256-P2-N758-TR GeForce 8600GT SSC
    Sound Card
    Onboard
    Monitor(s) Displays
    ViewSonic G90FB Black 19" Professional (CRT)
    Screen Resolution
    up to 2048 x 1536
    Hard Drives
    WD 36GB 10,000rpm Raptor SATA
    Seagate 80GB 7200rpm SATA
    Lite-On LTR-52246S CD/RW
    Lite-On LH-18A1P CD/DVD Burner
    PSU
    PC Power & Cooling Silencer 750 Quad EPS12V
    Case
    Generic Beige case, 80mm fans
    Cooling
    ZALMAN 9500A 92mm CPU Cooler
    Keyboard
    Logitech Classic Keybooard 200
    Mouse
    Logitech Optical M-BT96a
    Internet Speed
    300/300
    Browser
    Firefox 3.x ??
    Antivirus
    Symantec (Norton)
    Other Info
    Still assembled, still runs. Haven't turned it on for 15 years?
Thanks, Option 1 worked. For Option 3, did you need & were able to change the key ownership, and how?
Hello mate, :alien:

Option 3 is only if you wanted to apply to all users instead of just your account.

There are links in steps 3 and 4 in option three to help show step by step for change the owner and set permissions.
 

My Computers

System One System Two

  • OS
    Windows 11 Pro for Workstations
    Computer type
    PC/Desktop
    Manufacturer/Model
    Custom self build
    CPU
    Intel i7-8700K 5 GHz
    Motherboard
    ASUS ROG Maximus XI Formula Z390
    Memory
    64 GB (4x16GB) G.SKILL TridentZ RGB DDR4 3600 MHz (F4-3600C18D-32GTZR)
    Graphics Card(s)
    ASUS ROG-STRIX-GTX1080TI-O11G-GAMING (11GB GDDR5X)
    Sound Card
    Integrated Digital Audio (S/PDIF)
    Monitor(s) Displays
    2 x Samsung Odyssey G75 27"
    Screen Resolution
    2560x1440
    Hard Drives
    1TB Samsung 990 PRO M.2,
    4TB Samsung 990 PRO M.2,
    8TB WD MyCloudEX2Ultra NAS
    PSU
    Seasonic Prime Titanium 850W
    Case
    Thermaltake Core P3 wall mounted
    Cooling
    Corsair Hydro H115i
    Keyboard
    Logitech wireless K800
    Mouse
    Logitech MX Master 3
    Internet Speed
    1 Gbps Download and 35 Mbps Upload
    Browser
    Chrome and Edge
    Antivirus
    Microsoft Defender
    Other Info
    Logitech Z625 speaker system,
    Logitech BRIO 4K Pro webcam,
    HP Color LaserJet Pro MFP M477fdn,
    CyberPower CP1500PFCLCD
    Galaxy S23 Plus phone
  • Operating System
    Windows 11 Pro
    Computer type
    Laptop
    Manufacturer/Model
    Surface Laptop 7 Copilot+ PC
    CPU
    Snapdragon X Elite (12 core) 3.42 GHz
    Memory
    16 GB LPDDR5x-7467 MHz
    Monitor(s) Displays
    15" HDR
    Screen Resolution
    2496 x 1664
    Hard Drives
    1 TB SSD
    Internet Speed
    Wi-Fi 7 and Bluetooth 5.4
    Browser
    Chrome and Edge
    Antivirus
    Microsoft Defender
Here, I'll translate...

1. Navigate to: HKEY_LOCAL_MACHINE\SOFTWARE\Classes\CLSID\{86ca1aa0-34aa-4e8b-a509-50c905bae2a2}
...and right click on the huge number (in the left pane), and choose: "Permissions".
2. On the box that opens, choose: "Advanced"
3. On the next box (at the top), on the "Owner" line, choose: "Change"
4. In the next box (at the bottom), choose: "Advanced"
5. In the next box, at the middle right, choose: "Find Now"
6. In the next box, choose the line (in the Search results), that begins with "Administrators" (with the S)
7. Click on that line and choose: "OK", and then choose: "OK" in the next box.
8. Then in the BIG box, check mark the box at the top, like so...

Image1.webp

9. Then click (bottom right), on "Apply" and on "OK".
10. THEN you'll be able to check mark "Full Control" and click "Apply" and "OK", and it will work. :-)


Image1.webp

11. For the next registry edit (the InProcServer32 one), you will already have "Full Control".
12. You may have to reboot for the registry changes to take effect.
 
Last edited:

My Computers

System One System Two

  • OS
    Win 11 Home ♦♦♦26100.4652 ♦♦♦♦♦♦♦24H2
    Computer type
    PC/Desktop
    Manufacturer/Model
    Built by Ghot® [May 2020]
    CPU
    AMD Ryzen 7 3700X
    Motherboard
    Asus Pro WS X570-ACE (BIOS 5002)
    Memory
    G.Skill (F4-3200C14D-16GTZKW)
    Graphics Card(s)
    EVGA RTX 2070 (08G-P4-2171-KR)
    Sound Card
    Realtek ALC1220P / ALC S1220A
    Monitor(s) Displays
    Dell U3011 30"
    Screen Resolution
    2560 x 1600
    Hard Drives
    2x Samsung 860 EVO 500GB,
    WD 4TB Black FZBX - SATA III,
    WD 8TB Black FZBX - SATA III,
    DRW-24B1ST CD/DVD Burner
    PSU
    PC Power & Cooling 750W Quad EPS12V
    Case
    Cooler Master ATCS 840 Tower
    Cooling
    CM Hyper 212 EVO (push/pull)
    Keyboard
    Ducky DK9008 Shine II Blue LED
    Mouse
    Logitech Optical M-100
    Internet Speed
    300/300
    Browser
    Firefox (latest)
    Antivirus
    Bitdefender Internet Security
    Other Info
    Speakers: Klipsch Pro Media 2.1
  • Operating System
    Windows XP Pro 32bit w/SP3
    Computer type
    PC/Desktop
    Manufacturer/Model
    Built by Ghot® (not in use)
    CPU
    AMD Athlon 64 X2 5000+ (OC'd @ 3.2Ghz)
    Motherboard
    ASUS M2N32-SLI Deluxe Wireless Edition
    Memory
    TWIN2X2048-6400C4DHX (2 x 1GB, DDR2 800)
    Graphics card(s)
    EVGA 256-P2-N758-TR GeForce 8600GT SSC
    Sound Card
    Onboard
    Monitor(s) Displays
    ViewSonic G90FB Black 19" Professional (CRT)
    Screen Resolution
    up to 2048 x 1536
    Hard Drives
    WD 36GB 10,000rpm Raptor SATA
    Seagate 80GB 7200rpm SATA
    Lite-On LTR-52246S CD/RW
    Lite-On LH-18A1P CD/DVD Burner
    PSU
    PC Power & Cooling Silencer 750 Quad EPS12V
    Case
    Generic Beige case, 80mm fans
    Cooling
    ZALMAN 9500A 92mm CPU Cooler
    Keyboard
    Logitech Classic Keybooard 200
    Mouse
    Logitech Optical M-BT96a
    Internet Speed
    300/300
    Browser
    Firefox 3.x ??
    Antivirus
    Symantec (Norton)
    Other Info
    Still assembled, still runs. Haven't turned it on for 15 years?
Hello, thank you for sharing this tweak. Long-time lurker/user of 7/8/10/11forums but first time posting.. so I hope this is received well. I was wondering if it would be possible to swap the SHIFT+R-click function, such that the classic context menu is default and the shift modifier calls the default win11 context menu. I honestly can't think of a specific use case for this at the moment, but I think preserving all functionality is a win, whenever possible.. (i.e. both context menus).

Thank you for your time and all the work that's been done and shared over the years by the active, long-time community members; it is appreciated
 

My Computer

System One

  • OS
    Windows 11 Pro
    Computer type
    PC/Desktop
    CPU
    AMD Ryzen 9 5900X
    Motherboard
    ROG Crosshair VIII Dark Hero
    Memory
    G.Skill TridentZ DDR4-3200MHz 64GB (4x16)
    Graphics Card(s)
    EVGA RTX 3080 Ti FTW3 Ultra
    Sound Card
    SupremeFX ALC1220
    Monitor(s) Displays
    Dell Alienware AW3418DW 3440x1440 (21:9)
    Screen Resolution
    1440P Ultrawide
    Hard Drives
    2TB Mushkin Pilot NVMe PCIe 3.0
    8TB WD Black
    8TB WD Black
    PSU
    be quiet! Dark Power Pro 12 1500W Digital
    Case
    Lian-Li O11-Dynamic XL (white/silver)
    Cooling
    EKWB Custom Loop (720mm Cooling Power), Corsair QL120 Fans (x9)
    Keyboard
    Logitech G513 Carbon (Red Switches)
    Mouse
    Logitech G503 Lightspeed, Logitech G Pro
    Internet Speed
    1 Gbps
    Browser
    MS Chromium Edge
    Antivirus
    MS Defender
Hello, thank you for sharing this tweak. Long-time lurker/user of 7/8/10/11forums but first time posting.. so I hope this is received well. I was wondering if it would be possible to swap the SHIFT+R-click function, such that the classic context menu is default and the shift modifier calls the default win11 context menu. I honestly can't think of a specific use case for this at the moment, but I think preserving all functionality is a win, whenever possible.. (i.e. both context menus).

Thank you for your time and all the work that's been done and shared over the years by the active, long-time community members; it is appreciated
i could play with it later when i have time, but here is a quick authotkey script compiled into an exe. runs in the tray. Right click will remain right click (win 11 context if thats what you have set) and Double Right click will "show more options" if you have windows 11 context set - thus the classic context menu.
 

Attachments

My Computer

System One

  • OS
    Windows 11 Pro
Don't get me wrong but that tutorial was so cumbersome and unclear that I had to find the steps from another source and they were actually so simple yet the tutorial made it look really complicated

Navigate to: HKEY_CURRENT_USER\Software\Classes\CLSID

Right-click CLSID choose New > Key, and name it: {86ca1aa0-34aa-4e8b-a509-50c905bae2a2}

Right-click that newly created key choose New > Key, and name it: InprocServer32

Now click on InprocServer32 and double-click the (Default) value on the right.

Do not type anything, just click OK (this leaves it as an empty string)
 

My Computer

System One

  • OS
    Windows 11
Don't get me wrong but that tutorial was so cumbersome and unclear that I had to find the steps from another source and they were actually so simple yet the tutorial made it look really complicated
As far as I see it, that is what exactly is done by the registry file that can be downloaded "Disable_Show_more_options_context_menu.reg" in the startpost!
Content:
Code:
Windows Registry Editor Version 5.00

[HKEY_CURRENT_USER\Software\Classes\CLSID\{86ca1aa0-34aa-4e8b-a509-50c905bae2a2}\InprocServer32]
@=""
I don't see any changes from that one.
The only difference is, that you are doing it 'manually' while the downloaded file only has to be clicked on after downloading it.
 

My Computer

System One

  • OS
    Windows 11 Pro 24H2 26100.3915
    Computer type
    PC/Desktop
    Manufacturer/Model
    Build by vendor to my specs
    CPU
    AMD Ryzen 7 5700G
    Motherboard
    MSI PRO B550M-P Gen3
    Memory
    Kingston FURY Beast 2x16GB DIMM DDR4 2666 CL16
    Graphics Card(s)
    MSI GeForce GT 730 2GB LP V1
    Sound Card
    Creative Sound Blaster Audigy FX
    Monitor(s) Displays
    Samsung S24E450F 24"
    Screen Resolution
    1920 x 1080
    Hard Drives
    1. SSD Crucial P5 Plus 500GB PCIe M.2
    2. SSD-SATA Crucial MX500-2TB
    PSU
    Corsair CV650W
    Case
    Cooler Master Silencio S400
    Cooling
    Cooler Master Hyper H412R with Be Quiet Pure Wings 2 PWM BL038 fan
    Keyboard
    Cherry Stream (wired, scissor keys)
    Mouse
    Asus WT465 (wireless)
    Internet Speed
    70 Mbps down / 80 Mbps up
    Browser
    Firefox 130.0
    Antivirus
    Windows Defender
    Other Info
    Router: FRITZBox 7490
    Oracle VirtualBox 7 for testing software on Win 10 or 11
that tutorial was so cumbersome and unclear
Then you need to reread it again. There are 3 ways to do it and they were all listed, including yours.
What can be quicker than downloading a file and clicking on it or copying a command and pasting it into a command line.
What's cumbersome is manually editing the registry.
 

My Computers

System One System Two

  • OS
    Windows 11 Pro 24H2 26100.4652
    Computer type
    PC/Desktop
    Manufacturer/Model
    Dell Optiplex 7080
    CPU
    i9-10900 10 core 20 threads
    Motherboard
    DELL 0J37VM
    Memory
    32 gb
    Graphics Card(s)
    none-Intel UHD Graphics 630
    Sound Card
    Integrated Realtek
    Monitor(s) Displays
    Benq 27
    Screen Resolution
    2560x1440
    Hard Drives
    2x1tb Solidigm m.2 nvme /External drives 512gb Samsung m.2 sata+2tb Kingston m2.nvme
    PSU
    500w
    Case
    MT
    Cooling
    Dell Premium
    Keyboard
    Logitech wired
    Mouse
    Logitech wireless
    Internet Speed
    so slow I'm too embarrassed to tell
    Browser
    #1 Edge #2 Firefox
    Antivirus
    Defender+MWB Premium
  • Operating System
    Windows 11 Pro 24H2 26100.4061
    Computer type
    PC/Desktop
    Manufacturer/Model
    Beelink Mini PC SER5
    CPU
    AMD Ryzen 7 6800U
    Memory
    32 gb
    Graphics card(s)
    integrated
    Sound Card
    integrated
    Monitor(s) Displays
    Benq 27
    Screen Resolution
    2560x1440
    Hard Drives
    1TB Crucial nvme
    Keyboard
    Logitech wired
    Mouse
    Logitech wireless
    Internet Speed
    still too embarrassed to tell
    Browser
    Firefox
    Antivirus
    Defender
    Other Info
    System 3 is non compliant Dell 9020 i7-4770/24gb ram Win11 PRO 26100.4061
Back
Top Bottom