This tutorial will show you how to enable or disable search indexing for all users in Windows 10 and Windows 11.
Indexing the content of your PC helps you get faster results when your searching it for files, emails, or other local content.
The search index only includes your selected locations by default. These locations can be filtered for what file types (extensions), file properties, and file contents you want indexed.
You can choose to use Classic or Enhanced search indexing mode for where your PC will search for files.
The index uses the Windows Search service and runs as the Searchindexer.exe process in the background. The index will automatically rebuild and update for changes made to the included locations since the last index rebuild to increase search result accuracy.
By default, the search indexer backoff feature will reduce indexing speed while rebuilding the index when there is user activity, and will automatically continue at full speed when no user activity is detected.
Starting with Windows 11 build 26120.2992 (Dev) and build 26100.3902 (RP), Microsoft is making finding your documents, photos, and settings across Windows 11 easier on Copilot+ PCs by introducing semantic indexing along with traditional indexing. Whether it’s searching in File Explorer, in the Windows search box on your taskbar, or in Settings – just type what’s on your mind to find it on your Copilot+ PC. You no longer need to remember file names, exact words in file content, or settings names. Thanks to the power of the 40+ TOPS NPU onboard Copilot+ PCs, these search improvements work even when you’re not connected to the internet. Searching for files on your Copilot+ PC with improved Windows Search will only work for files saved locally in indexed locations on your PC. You can go to Settings > Privacy & security > Searching Windows to adjust which locations are indexed on your PC or turn on Enhanced to index your entire PC. In a future flight, we will support searching for documents and photos stored in cloud storage providers such as OneDrive. These improved Windows Search experiences will gradually roll out to Windows Insiders on Snapdragon-powered Copilot+ PCs, with support for AMD and Intel-powered Copilot+ PCs coming soon. These experiences are supported in select languages (Chinese, English, French, German, Japanese, and Spanish) and document formats. Supported file formats include .txt, .pdf, .docx, .doc, .rtf, .pptx, .ppt, .xls, .xlsx for documents and .jpg/.jpeg, .png, .gif, .bmp, .ico for images. See here for more details.
Starting with Windows 11 build 26120.3073 (Beta/Dev), and build 26100.3902 (RP), Microsoft announces support for also finding photos saved in the cloud with improved Windows Search. Just use your own words to find photos stored and saved in the cloud by describing what they are about like “European castles” or “summer picnics” in the search box at the top right corner of File Explorer. In addition to photos stored locally on your Copilot+ PC, photos from the cloud will now show up in the search results together. In addition to searching for photos, exact matches for your keywords within the text of your cloud files will show in the search results. Microsoft is excited to introduce a new way to find your cloud content in Windows and will continue improving search results and capabilities over time. These improved Windows Search experiences continue to gradually roll out to Windows Insiders on Snapdragon-powered Copilot+ PCs, including finding photos saved in the cloud, so you may not see these experiences right away. Support for AMD and Intel-powered Copilot+ PCs is coming soon. See here for more details.
Starting with Windows 11 build 26120.3291 (Beta/Dev), and build 26100.3902 (RP), Microsoft is extending support for finding photos saved in the cloud with improved Windows Search to the Windows search box on the taskbar. Just use your own words to find photos stored and saved in the cloud by describing what they are about like “European castles” or “summer picnics” in the search box on your taskbar. In addition to photos stored locally on your Copilot+ PC, photos from the cloud will now show up in the search results together. In addition to searching for photos, exact matches for your keywords within the text of your cloud files will show in the search results.
References:
Search indexing in Windows - Microsoft Support
Learn more about how indexing affects searches in Windows.
Search indexing in Windows - Microsoft Support
Learn more about how indexing affects searches in Windows.
If you prefer to search without using the index, then you could completely disable search indexing. If you disable search indexing, searches will take longer to finish, but search results will always be up to date and accurate.
If you do a lot of file content searching, then you may not want to disable search indexing since it will take a lot longer to search file contents without the index.
You must be signed in as an administrator to enable or disable search indexing.
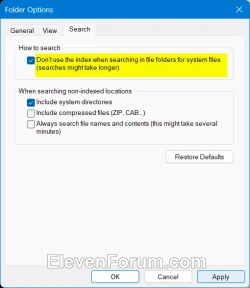
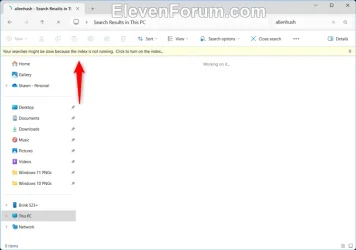
If you disable Search Indexing, then be sure to check the Don't use the index when searching in file folders for system files setting in Folder Options to stop getting the message banner below when searching in File Explorer.
Your searches might be slow because the index is not running. Click to turn on the index.


Contents
- Option One: Enable Search Indexing in Services Console
- Option Two: Disable Search Indexing in Services Console
- Option Three: Enable or Disable Search Indexing in Command Prompt
EXAMPLE: Search indexing disabled
OPTION ONE
Enable Search Indexing in Services Console
This is the default setting.
1 Open Services (services.msc).
2 Double click/tap on the Windows Search service to open its properties page. (see screenshot below)
3 Select Automatic (Delayed Start) in the Startup type drop menu, and click/tap on Apply. (see screenshot below)
4 Click/tap on Start. (see screenshot below)
5 When "Servicing status" shows as Running, click/tap on OK. (see screenshot below)
OPTION TWO
Disable Search Indexing in Services Console
1 Open Services (services.msc).
2 Double click/tap on the Windows Search service to open its properties page. (see screenshot below)
3 Select Disabled in the Startup type drop menu, and click/tap on Apply. (see screenshot below)
4 Click/tap on Stop. (see screenshot below)
5 When "Servicing status" shows as Stopped, click/tap on OK. (see screenshot below)
OPTION THREE
Enable or Disable Search Indexing in Command Prompt
1 Open Windows Terminal (Admin), and select Command Prompt.
2 Do step 3 (enable) or step 4 (disable) below for what you want.
3 Enable Search Indexing
This is the default setting.
A) Copy and paste the command below into the elevated command prompt, press Enter, and go to step 5 below. (see screenshot below)
sc config "wsearch" start=delayed-auto && sc start "wsearch"4 Disable Search Indexing
A) Copy and paste the command below into the elevated command prompt, press Enter, and go to step 5 below. (see screenshot below)
sc stop "wsearch" && sc config "wsearch" start=disabled5 You can now close Windows Terminal (Admin) if you like.
That's it,
Shawn Brink
Related Tutorials
- Remove "Your searches might be slow because the index is not running. Click to turn on the index." in Windows 11
- Turn On or Off Enhanced Mode for Search Indexer in Windows 11
- Reset and Rebuild Search Index in Windows 11
- Check Search Indexing Status in Windows 11
- Turn On or Off Respect Power Settings when Indexing in Windows 11
- Add or Remove Search Index Locations in Windows 11
- Search in Windows 11 File Explorer
Last edited:


 - but what I know about search is that it's mostly useful for going through text files, just like the old-days grep. While I do have some text files on my computer (LaTeX files are basically plain text, for example), very few of them are *.txt and so I'm not sure search can look into them (not that I need that). On the other hand I have lots of pdfs, various Office files, photos, etc. I don't think Search can look inside Excel files or inside pdfs, definitely not the non-OCRed ones. If I am looking for a photo, how would the search even begin to look for some image of which I have only a vague recollection (try searching for an image of a yellow tree on a riverbank)? All that makes search useless to me, that's why I disable it.


