How can I stop Win 11 22H2 to auto install unnecessary Apps?


11user11

New member
Local time
3:49 AM
Posts
4
OS
11
Hello,

I tried to look up online and couldn't find any solutions for this new issue.

We make templates of the latest Win 11 OS so we can create VMs out of it.

When making the template of the new Win 11 22H2, I'm having issue.

It had automatically installed all the unnecessary stuff:

1664807049394.png

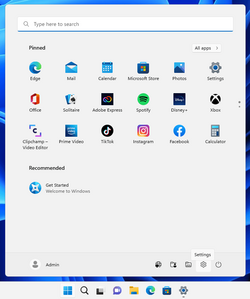
I tried to remove the apps using any bloatware program, then it comes back like this, after SysPrep:

1664807605360.png

It says "A great app is on it's way!". So when we connect to Internet, it downloads those crap apps again. Not sure why on the earth Microsoft forcing to install Tiktok/Disney+/Instagram/Facebook.. for an Enterprise version of Windows.

If I try to remove the Microsoft.DesktopAppInstaller which installs these apps automatically during startup. I'm unable to do SysPrep as I'm getting an error:

2022-10-03 10:19:13, Error SYSPRP Package Microsoft.DesktopAppInstaller_1.18.2091.0_x64__8wekyb3d8bbwe was installed for a user, but not provisioned for all users. This package will not function properly in the sysprep image.
2022-10-03 10:19:13, Error SYSPRP Failed to remove apps for the current user: 0x80073cf2.

I've tried removing Microsoft.DesktopAppInstaller via PowerShell:
1664807323489.png

Please advise.
Thanks
 

My Computer

System One

  • OS
    11
Interesting, since Windows 10 first came out as a free upgrade for Windows 7 I used DISM to de provision all those sort of 'fluff' apps, Candy Crush, Solitaire, Disney etc, from that day on they have never been re installed, over several builds of Win10 and into Win11, even when using the Media Creation Tool to clean install to a blank disk.
I am now on Win 22h2, clean installed using the Media Creation Tool to a wiped disk (all partitions removed, as is usual for me with a new build of the OS), still no re install of the apps I have previously used DISM to nuke way back in Win10.
Maybe it is due to the way Sysprep configures the image compared to the way the OOBE normally runs, have you looked into using DISM to both de provision the unwanted apps and create your image templates?
 

My Computer

System One

  • OS
    Windows 11 Pro 22H2, build: 22621.521
    Computer type
    PC/Desktop
    Manufacturer/Model
    Scan 3XS Custom 1700
    CPU
    Intel i7-12700K 3.6GHz Base (5.0GHz Turbo)
    Motherboard
    Asus ProArt Creator B660 D4
    Memory
    64GB DDR 3600Mhz
    Graphics Card(s)
    Asus Tuff RTX 3080 10GB OC
    Sound Card
    Onboard Realtek
    Monitor(s) Displays
    Gigabyte G32QC 32inch 16:9 curved @2560 x 1440p 165Hz Freesync Premium Pro/ Dell SE2422H 24inch 16:9 1920 x 1080p 75Hz Freesync
    Screen Resolution
    2560 x 1440p & 1920 x 1080p
    Hard Drives
    WD SN570 1TB NVME (Boot), Samsung 870QVO 1TB (SSD), SanDisk 3D Ultra 500Gb (SSD) x2, Seagate 3Tb Expansion Desk (Ext HDD), 2x Toshiba 1Tb P300 (Ext HDD)
    PSU
    Corsair RM1000X Modular
    Case
    Corsair 4000D Airflow Desktop
    Cooling
    Corsair Hydro H150i RGB Pro XT 360mm Liquid Cooler, 3 x 120mm fans, 1x Exhaust
    Keyboard
    Microsoft Ergonomic
    Mouse
    Logitech G402
    Internet Speed
    800Mbs
    Browser
    Edge Chromium
    Antivirus
    Defender, Malwarebytes
Interesting, since Windows 10 first came out as a free upgrade for Windows 7 I used DISM to de provision all those sort of 'fluff' apps, Candy Crush, Solitaire, Disney etc, from that day on they have never been re installed, over several builds of Win10 and into Win11, even when using the Media Creation Tool to clean install to a blank disk.
I am now on Win 22h2, clean installed using the Media Creation Tool to a wiped disk (all partitions removed, as is usual for me with a new build of the OS), still no re install of the apps I have previously used DISM to nuke way back in Win10.
Maybe it is due to the way Sysprep configures the image compared to the way the OOBE normally runs, have you looked into using DISM to both de provision the unwanted apps and create your image templates?
Hi DigitalGoat. Thanks for the info. Anyway I can get the steps you're following to build your image by using DISM? Please note that, I'm trying to make a VM templates. So I can deploy/create new VM for users. We also use the "VMware OS Optimization Tool" for optimization.
 

My Computer

System One

  • OS
    11
This thread here on tenforums Create Windows 10 ISO image from Existing Installation would probably be a good starting point, it is not something I do myself.
I do read the posts with interest and your issue just made me think of tutorials I have read by that author, pretty sure the author is still active on elevenforums, thinking it might be of help to you if you could create a custom golden image to apply to your VM templates.
 

My Computer

System One

  • OS
    Windows 11 Pro 22H2, build: 22621.521
    Computer type
    PC/Desktop
    Manufacturer/Model
    Scan 3XS Custom 1700
    CPU
    Intel i7-12700K 3.6GHz Base (5.0GHz Turbo)
    Motherboard
    Asus ProArt Creator B660 D4
    Memory
    64GB DDR 3600Mhz
    Graphics Card(s)
    Asus Tuff RTX 3080 10GB OC
    Sound Card
    Onboard Realtek
    Monitor(s) Displays
    Gigabyte G32QC 32inch 16:9 curved @2560 x 1440p 165Hz Freesync Premium Pro/ Dell SE2422H 24inch 16:9 1920 x 1080p 75Hz Freesync
    Screen Resolution
    2560 x 1440p & 1920 x 1080p
    Hard Drives
    WD SN570 1TB NVME (Boot), Samsung 870QVO 1TB (SSD), SanDisk 3D Ultra 500Gb (SSD) x2, Seagate 3Tb Expansion Desk (Ext HDD), 2x Toshiba 1Tb P300 (Ext HDD)
    PSU
    Corsair RM1000X Modular
    Case
    Corsair 4000D Airflow Desktop
    Cooling
    Corsair Hydro H150i RGB Pro XT 360mm Liquid Cooler, 3 x 120mm fans, 1x Exhaust
    Keyboard
    Microsoft Ergonomic
    Mouse
    Logitech G402
    Internet Speed
    800Mbs
    Browser
    Edge Chromium
    Antivirus
    Defender, Malwarebytes
This thread here on tenforums Create Windows 10 ISO image from Existing Installation would probably be a good starting point, it is not something I do myself.
I do read the posts with interest and your issue just made me think of tutorials I have read by that author, pretty sure the author is still active on elevenforums, thinking it might be of help to you if you could create a custom golden image to apply to your VM templates.
Whilst @Kari is still active, he has not been able to devote as much time as he used to, for personal reasons, so it may take a while to get a reply.
 

My Computer

System One

  • OS
    Windows 10 Pro + others in VHDs
    Computer type
    Laptop
    Manufacturer/Model
    ASUS Vivobook 14
    CPU
    I7
    Motherboard
    Yep, Laptop has one.
    Memory
    16 GB
    Graphics Card(s)
    Integrated Intel Iris XE
    Sound Card
    Realtek built in
    Monitor(s) Displays
    N/A
    Screen Resolution
    1920x1080
    Hard Drives
    1 TB Optane NVME SSD, 1 TB NVME SSD
    PSU
    Yep, got one
    Case
    Yep, got one
    Cooling
    Stella Artois
    Keyboard
    Built in
    Mouse
    Bluetooth , wired
    Internet Speed
    72 Mb/s :-(
    Browser
    Edge mostly
    Antivirus
    Defender
    Other Info
    TPM 2.0
Hi @DigitalGoat.

Just wanted to let you know I followed the instructions using DISM to deprovision the unnecessary apps.

Same result:

1664904888076.png

However it did remove other apps which I was able to remove it by any bloatware removal process earlier:
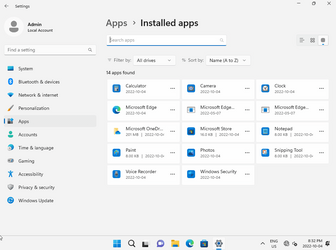
1664904782866.png

I followed this video:


Step 1:

First create two folders naming Mount and Image under C drive.


Step 2:

Copy all content from Windows 11 setup disk/ISO to "Image" folder


Step 3:

Before customize, we need to find the correct index number of the OS you want. Enterprise in my case.

dism /get-wiminfo /wimfile:G:\sources\install.wim

Index : 3
Name : Windows 11 Enterprise
Description : Windows 11 Enterprise
Size : 16,395,906,853 bytes


Step 4:

Now we need to mount the correct source file for editing:

dism /mount-wim /wimfile:C:\Windows11\image\sources\install.wim /mountdir:C:\Windows11\mount /index:3


Step 5:

Now we need to find out the available ProvisionedApps on that image.

dism /image:C:\Windows11\mount /Get-ProvisionedAppxPackages > c:\Windows11\apps.txt


Step 6:

Remove the apps from the list which you want to keep.


Step 7:

Remove the unwanted apps from the "Image" using the following command:

dism.exe /image:C:\Windows11\mount /Remove-ProvisionedAppxPackage /PackageName:package Name

Post removal content (Items need to be removed):

dism.exe /image:C:\Windows11\mount /Remove-ProvisionedAppxPackage /PackageName:Clipchamp.Clipchamp_2.2.8.0_neutral_~_yxz26nhyzhsrt
dism.exe /image:C:\Windows11\mount /Remove-ProvisionedAppxPackage /PackageName:Microsoft.549981C3F5F10_3.2204.14815.0_neutral_~_8wekyb3d8bbwe
dism.exe /image:C:\Windows11\mount /Remove-ProvisionedAppxPackage /PackageName:Microsoft.BingNews_4.2.27001.0_neutral_~_8wekyb3d8bbwe
dism.exe /image:C:\Windows11\mount /Remove-ProvisionedAppxPackage /PackageName:Microsoft.BingWeather_4.53.33420.0_neutral_~_8wekyb3d8bbwe
dism.exe /image:C:\Windows11\mount /Remove-ProvisionedAppxPackage /PackageName:Microsoft.DesktopAppInstaller_2022.310.2333.0_neutral_~_8wekyb3d8bbwe
dism.exe /image:C:\Windows11\mount /Remove-ProvisionedAppxPackage /PackageName:Microsoft.GamingApp_2021.427.138.0_neutral_~_8wekyb3d8bbwe
dism.exe /image:C:\Windows11\mount /Remove-ProvisionedAppxPackage /PackageName:Microsoft.GetHelp_10.2201.421.0_neutral_~_8wekyb3d8bbwe
dism.exe /image:C:\Windows11\mount /Remove-ProvisionedAppxPackage /PackageName:Microsoft.Getstarted_2021.2204.1.0_neutral_~_8wekyb3d8bbwe
dism.exe /image:C:\Windows11\mount /Remove-ProvisionedAppxPackage /PackageName:Microsoft.HEIFImageExtension_1.0.43012.0_x64__8wekyb3d8bbwe
dism.exe /image:C:\Windows11\mount /Remove-ProvisionedAppxPackage /PackageName:Microsoft.HEVCVideoExtension_1.0.50361.0_x64__8wekyb3d8bbwe
dism.exe /image:C:\Windows11\mount /Remove-ProvisionedAppxPackage /PackageName:Microsoft.MicrosoftOfficeHub_18.2204.1141.0_neutral_~_8wekyb3d8bbwe
dism.exe /image:C:\Windows11\mount /Remove-ProvisionedAppxPackage /PackageName:Microsoft.MicrosoftSolitaireCollection_4.12.3171.0_neutral_~_8wekyb3d8bbwe
dism.exe /image:C:\Windows11\mount /Remove-ProvisionedAppxPackage /PackageName:Microsoft.MicrosoftStickyNotes_4.2.2.0_neutral_~_8wekyb3d8bbwe
dism.exe /image:C:\Windows11\mount /Remove-ProvisionedAppxPackage /PackageName:Microsoft.People_2020.901.1724.0_neutral_~_8wekyb3d8bbwe
dism.exe /image:C:\Windows11\mount /Remove-ProvisionedAppxPackage /PackageName:Microsoft.PowerAutomateDesktop_10.0.3735.0_neutral_~_8wekyb3d8bbwe
dism.exe /image:C:\Windows11\mount /Remove-ProvisionedAppxPackage /PackageName:Microsoft.RawImageExtension_2.1.30391.0_neutral_~_8wekyb3d8bbwe
dism.exe /image:C:\Windows11\mount /Remove-ProvisionedAppxPackage /PackageName:Microsoft.SecHealthUI_1000.22621.1.0_x64__8wekyb3d8bbwe
dism.exe /image:C:\Windows11\mount /Remove-ProvisionedAppxPackage /PackageName:Microsoft.StorePurchaseApp_12008.1001.113.0_neutral_~_8wekyb3d8bbwe
dism.exe /image:C:\Windows11\mount /Remove-ProvisionedAppxPackage /PackageName:Microsoft.Todos_2.54.42772.0_neutral_~_8wekyb3d8bbwe
dism.exe /image:C:\Windows11\mount /Remove-ProvisionedAppxPackage /PackageName:Microsoft.VCLibs.140.00_14.0.30704.0_x64__8wekyb3d8bbwe
dism.exe /image:C:\Windows11\mount /Remove-ProvisionedAppxPackage /PackageName:Microsoft.VP9VideoExtensions_1.0.50901.0_x64__8wekyb3d8bbwe
dism.exe /image:C:\Windows11\mount /Remove-ProvisionedAppxPackage /PackageName:Microsoft.WebMediaExtensions_1.0.42192.0_neutral_~_8wekyb3d8bbwe
dism.exe /image:C:\Windows11\mount /Remove-ProvisionedAppxPackage /PackageName:Microsoft.WebpImageExtension_1.0.42351.0_x64__8wekyb3d8bbwe
dism.exe /image:C:\Windows11\mount /Remove-ProvisionedAppxPackage /PackageName:microsoft.windowscommunicationsapps_16005.14326.20544.0_neutral_~_8wekyb3d8bbwe
dism.exe /image:C:\Windows11\mount /Remove-ProvisionedAppxPackage /PackageName:Microsoft.WindowsFeedbackHub_2022.106.2230.0_neutral_~_8wekyb3d8bbwe
dism.exe /image:C:\Windows11\mount /Remove-ProvisionedAppxPackage /PackageName:Microsoft.WindowsMaps_2022.2202.6.0_neutral_~_8wekyb3d8bbwe
dism.exe /image:C:\Windows11\mount /Remove-ProvisionedAppxPackage /PackageName:Microsoft.WindowsTerminal_3001.12.10983.0_neutral_~_8wekyb3d8bbwe
dism.exe /image:C:\Windows11\mount /Remove-ProvisionedAppxPackage /PackageName:Microsoft.Xbox.TCUI_1.23.28004.0_neutral_~_8wekyb3d8bbwe
dism.exe /image:C:\Windows11\mount /Remove-ProvisionedAppxPackage /PackageName:Microsoft.XboxGameOverlay_1.47.2385.0_neutral_~_8wekyb3d8bbwe
dism.exe /image:C:\Windows11\mount /Remove-ProvisionedAppxPackage /PackageName:Microsoft.XboxGamingOverlay_2.622.3232.0_neutral_~_8wekyb3d8bbwe
dism.exe /image:C:\Windows11\mount /Remove-ProvisionedAppxPackage /PackageName:Microsoft.XboxIdentityProvider_12.50.6001.0_neutral_~_8wekyb3d8bbwe
dism.exe /image:C:\Windows11\mount /Remove-ProvisionedAppxPackage /PackageName:Microsoft.XboxSpeechToTextOverlay_1.17.29001.0_neutral_~_8wekyb3d8bbwe
dism.exe /image:C:\Windows11\mount /Remove-ProvisionedAppxPackage /PackageName:Microsoft.YourPhone_1.22022.147.0_neutral_~_8wekyb3d8bbwe
dism.exe /image:C:\Windows11\mount /Remove-ProvisionedAppxPackage /PackageName:Microsoft.ZuneMusic_11.2202.46.0_neutral_~_8wekyb3d8bbwe
dism.exe /image:C:\Windows11\mount /Remove-ProvisionedAppxPackage /PackageName:Microsoft.ZuneVideo_2019.22020.10021.0_neutral_~_8wekyb3d8bbwe
dism.exe /image:C:\Windows11\mount /Remove-ProvisionedAppxPackage /PackageName:MicrosoftCorporationII.QuickAssist_2022.414.1758.0_neutral_~_8wekyb3d8bbwe
dism.exe /image:C:\Windows11\mount /Remove-ProvisionedAppxPackage /PackageName:MicrosoftWindows.Client.WebExperience_421.20070.195.0_neutral_~_cw5n1h2txyewy

Step 8:

Unmount the Image --
dism.exe /unmount-wim /mountdir:C:\Windows11\mount /commit

Then I converted to a bootable ISO and installed it on a new template.


So I'm really curious how you build your Win 11 22H2 image without showing "A great app is on it's way".

Thanks
 

My Computer

System One

  • OS
    11
I wonder if the difference for me is that I am logged in with an MS account not local when I de provisioned my unwanted apps?
Is it possible under a local account, maybe due to MS Store integration with the OS, that the apps are re installed because they are treated as missing rather than intentionally removed.

My theory was that if it works the same for you as it does for me then you could simply set up an OS, de provision the unwanted apps then use DISM again to create a hardware independant image of that customised Windows install for redeploy to VMs.
(The custom image and redeploy I don't need to do as each subsequent install 'remembers' the packages I have de provisioned previosly).

From your post it seems you removed the packages from the install.wim then used that to install Windows. The method I suggest is to install Windows, customise it, remove packages then use DISM to write that custom install to a deployable image.

To be honest this is just guess work on my part as I think I followed one of Kari's tutorials many years ago, but then decided Macrium served my needs better. However I do remember several tutorials by him and others on using DISM to create custom install images from existing Windows installs, hence why I pointed you in that direction.
 

My Computer

System One

  • OS
    Windows 11 Pro 22H2, build: 22621.521
    Computer type
    PC/Desktop
    Manufacturer/Model
    Scan 3XS Custom 1700
    CPU
    Intel i7-12700K 3.6GHz Base (5.0GHz Turbo)
    Motherboard
    Asus ProArt Creator B660 D4
    Memory
    64GB DDR 3600Mhz
    Graphics Card(s)
    Asus Tuff RTX 3080 10GB OC
    Sound Card
    Onboard Realtek
    Monitor(s) Displays
    Gigabyte G32QC 32inch 16:9 curved @2560 x 1440p 165Hz Freesync Premium Pro/ Dell SE2422H 24inch 16:9 1920 x 1080p 75Hz Freesync
    Screen Resolution
    2560 x 1440p & 1920 x 1080p
    Hard Drives
    WD SN570 1TB NVME (Boot), Samsung 870QVO 1TB (SSD), SanDisk 3D Ultra 500Gb (SSD) x2, Seagate 3Tb Expansion Desk (Ext HDD), 2x Toshiba 1Tb P300 (Ext HDD)
    PSU
    Corsair RM1000X Modular
    Case
    Corsair 4000D Airflow Desktop
    Cooling
    Corsair Hydro H150i RGB Pro XT 360mm Liquid Cooler, 3 x 120mm fans, 1x Exhaust
    Keyboard
    Microsoft Ergonomic
    Mouse
    Logitech G402
    Internet Speed
    800Mbs
    Browser
    Edge Chromium
    Antivirus
    Defender, Malwarebytes
Just wanted to post the solution here which I found from Reddit.

Can be done via Intune or GPO to turn of Microsoft Consumer Features

In Intune, its under device restrictions policies/ Windows Spotlight

Consumer Features set to Blocked
Third-party suggestions in Windows Spotlight set to blocked

Via GPO

Administrative Templates\Windows Components\Cloud Contents Turn off Microsoft consumer experiences set to enabled
Do not suggest third-party content in Windows spotlight set to enabled

I'd Enable all of them.

1667408008944.png


I can't believe I couldn't find this solution anywhere.
 

My Computer

System One

  • OS
    11
I tried to look up online and couldn't find any solutions for this new issue.
You could download the latest free version of Revo Uninstaller Pro from here and remove the offending apps.

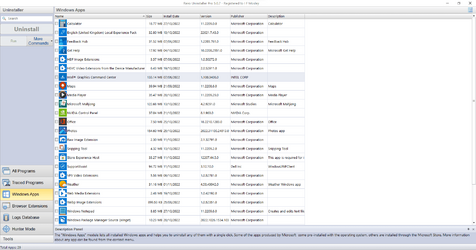
When installed and loaded, navigate to the 'Windows Apps' tab,

1.png

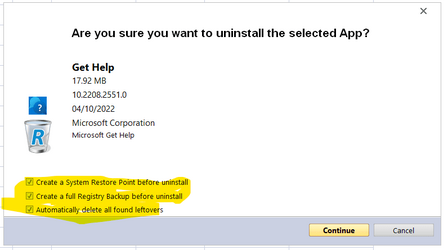
select the app(s) you wish to remove, hit the 'Uninstall' tab, select which operations you want to run, and finally hit the 'Continue' tab.

2.png

Reboot, and it is my experience that any deleted apps will not be re-installed.
 

My Computer

System One

  • OS
    Windows 11 Pro v 23H2 (Build 22631.3374)
    Computer type
    PC/Desktop
    Manufacturer/Model
    Dell Precision 3660 Tower Workstation
    CPU
    12th Gen Intel(R) Core(TM) i9-12900 5.10 GHz
    Motherboard
    64-bit operating system, x64-based processor
    Memory
    32.00 GB
    Graphics Card(s)
    Intel UHD Graphics 770
    Sound Card
    Realtek Audio
    Monitor(s) Displays
    Dell P2714H Monitor
    Screen Resolution
    1920 x 1080
    Hard Drives
    1 x 512GB NVME PC801 NVMe SK hynix Boot
    1 x 1TB Seagate ST1000LM049-2GH172 Internal HDD
    1 x 1TB Seagate STGX4000400 External HDD
    1 x 2TB Seagate STGX4000400 External HDD
    1 x 4TB Seagate STGX4000400 External HDD
    PSU
    300 Watts
    Cooling
    Air
    Keyboard
    Microsoft Wired Keyboard 600
    Mouse
    Microsoft USB Basic Optical Mouse v2.0
    Browser
    Firefox
    Antivirus
    Windows Defender + Malwarebytes Premium
    Other Info
    BaseBoard Manufacturer Dell Inc.
    BaseBoard Product 0J1CP3
    BaseBoard Version A01

Latest Support Threads

Back
Top Bottom