Solved How to delete duplicate recovery partitions and reclaim the space


Birk

Well-known member
Member
Local time
11:47 AM
Posts
227
Visit site
OS
Win11
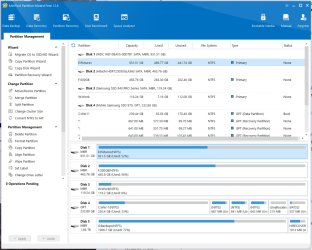
Following a Repair install I found my boot drive looked like this:
1.jpg
So I thought it would be easy to delete the unused Recovery partitions, move everything else to the right, and reclaim the unallocated space. But I encountered a nasty problem when I tried to do this - so I clearly missed an important step. Here are the steps I took and hopefully someone can tell me where I messed up:

1. Delete 643 MB partition/Apply
2. Delete 641 MB partition/Apply
3. Drag/Move 667 partition to the right/Apply
4. Expand 230.4 partition to include newly created Unallocated space/Apply
5. Reboot
6.At this point I got a boot error saying the boot BCD data was bad. So I booted Reflect and ran the Boot disk repair function and rebooted. This time I got an AMD BIOS message saying the BCD data was missing, so I repeated this step and got the same results.
7. Restored the Macrium backup I made just before I did Step 1. Reboot gave the same error (missing BCD data) so I booted to BIOS and changed BCD Recovery from Custom to Auto. This allowed the system to boot ok to the configuration shown above, which is what I started from.

I'm thinking I missed some step that I should have done between #4 & #5, but have no idea what it might be. Here's hoping someone can get me back on the right track.
 

My Computer

System One

  • OS
    Win11
    Computer type
    PC/Desktop
    Manufacturer/Model
    Custom build
    CPU
    Intel i5-12600K 3700 MHz
    Motherboard
    Asus B660-M
    Memory
    16 GB
    Graphics Card(s)
    none
    Sound Card
    none
    Monitor(s) Displays
    Primary: LG 4K; Secondary: Dell U2412M
    Screen Resolution
    Primary: 3860 x 2160; Secondary: 1200 x 1920
    Hard Drives
    C: Samsung NVme SSD970 256K
    E: 1 TB HDD
    F: 500K HDD
    W: Samsung SSD 840 128K
    Keyboard
    Logitech Lighted
    Mouse
    Kensington ExpertMouse trackball
    Internet Speed
    500/500
    Browser
    Brave
    Antivirus
    Windows Defender
1. reagentc /disable ---> "Operation Successful"
2. Delete 643 MB partition/Apply
3. Delete 641 MB partition/Apply
4. Drag/Move 667 partition to the right/Apply
5. Expand 230.4 partition to include newly created Unallocated space/Apply
6. reagentc /enable ---> "Operation Successful"
7. bcdboot c:\windows ---> "Boot files successfully created"
8. Reboot

edit:

On a GPT disk, BCDBOOT copies the boot files from the Windows partition to the EFI system partition and creates the Boot Configuration Data (BCD) store in the same partition.

In this case /s and /f are not needed.

BCDBOOT <source> [/s <volume letter> [/f <firmware type>]]

<source>
- Required. Specifies the location of the Windows directory to use as the source for copying boot-environment files.

/s <volume letter>
- Optional. Specifies the volume letter of the system partition.

/f <firmware type>
- Optional. Specifies the firmware type. Valid values include UEFI, BIOS, and ALL.
- If you specify the /f option, you must also specify the /s option to identify the volume letter of the system partition.
 
Last edited:

My Computer

System One

  • OS
    Windows 11 Pro
Aha! Thanks aubergine - I'll give that a try. Will let you know what happens.
 

My Computer

System One

  • OS
    Win11
    Computer type
    PC/Desktop
    Manufacturer/Model
    Custom build
    CPU
    Intel i5-12600K 3700 MHz
    Motherboard
    Asus B660-M
    Memory
    16 GB
    Graphics Card(s)
    none
    Sound Card
    none
    Monitor(s) Displays
    Primary: LG 4K; Secondary: Dell U2412M
    Screen Resolution
    Primary: 3860 x 2160; Secondary: 1200 x 1920
    Hard Drives
    C: Samsung NVme SSD970 256K
    E: 1 TB HDD
    F: 500K HDD
    W: Samsung SSD 840 128K
    Keyboard
    Logitech Lighted
    Mouse
    Kensington ExpertMouse trackball
    Internet Speed
    500/500
    Browser
    Brave
    Antivirus
    Windows Defender
From a command prompt:
Code:
diskpart
list volume
select volume X <replace X with the letter of your 230 GB windows partition
shrink desired=100
create part efi size=100
format fs=fat32 quick
assign letter=s
exit
bcdboot C:\Windows /s S: /f UEFI <Note use the same letter you did in step 3 - it may not be C:
exit
reboot
 

My Computers

System One System Two

  • OS
    Windows 11
    Computer type
    PC/Desktop
    Manufacturer/Model
    Homebuilt
    CPU
    AMD Ryzen 7 3800XT
    Motherboard
    ASUS ROG Crosshair VII Hero (WiFi)
    Memory
    32GB
    Graphics Card(s)
    EVGA GeForce GTX 1080 Ti
  • Operating System
    Windows 11 Education
    Computer type
    Laptop
    Manufacturer/Model
    Dell Inspiron 7773
    CPU
    Intel i7-8550U
    Memory
    32GB
    Graphics card(s)
    Nvidia Geforce MX150
    Sound Card
    Realtek
    Monitor(s) Displays
    17"
    Screen Resolution
    1920 x 1080
    Hard Drives
    Toshiba 512GB NVMe SSD
    SK Hynix 512GB SATA SSD
    Internet Speed
    Fast!
Well the 8 commands did not work as expected. reagents/disable gave me something like "already disabled". But I went ahead with the other commands and they ran ok. reagentc/ enable failed with a message about BCD cannot be found. The bcdboot command failed for the same reason. Fortunately I was able to rebot OK. So it looks like I'll need to do more research about how to deal with BCD stuff.

Navy: I really don't like dealing with command line stuff - but I may try your suggestion after I learn a bit more about all this.
 

My Computer

System One

  • OS
    Win11
    Computer type
    PC/Desktop
    Manufacturer/Model
    Custom build
    CPU
    Intel i5-12600K 3700 MHz
    Motherboard
    Asus B660-M
    Memory
    16 GB
    Graphics Card(s)
    none
    Sound Card
    none
    Monitor(s) Displays
    Primary: LG 4K; Secondary: Dell U2412M
    Screen Resolution
    Primary: 3860 x 2160; Secondary: 1200 x 1920
    Hard Drives
    C: Samsung NVme SSD970 256K
    E: 1 TB HDD
    F: 500K HDD
    W: Samsung SSD 840 128K
    Keyboard
    Logitech Lighted
    Mouse
    Kensington ExpertMouse trackball
    Internet Speed
    500/500
    Browser
    Brave
    Antivirus
    Windows Defender
reagents/disable gave me something like "already disabled".

reagentc /disable ---> "Windows RE is already disabled"

It means that the command cannot find the Winre.wim file or the recovery environment has already been disabled with the reagentc /disable command.

reagentc /enable ---> "The Windows RE image was not found"

It means that the command cannot find the Winre.wim file.

edit:


@Bree:

Open the install.esd with 7-Zip file Manager. Extract the WinRE.wim (the Windows Recovery Environment windows image file) and ReAgent.xml and place them in C:\Windows\System32\Recovery. You can now run the command reagentc /enable. This should move WinRE.wim to the recovery partition

reagentc /info ---> "Windows RE status: Disabled" or "Windows RE status: Enabled"
 
Last edited:

My Computer

System One

  • OS
    Windows 11 Pro
reagentc/ enable failed with a message about BCD cannot be found.

reagentc /enable ---> "Unable to update Boot Configuration Data"

Fortunately I was able to rebot OK. So it looks like I'll need to do more research about how to deal with BCD stuff.


If you need to repair or create a new recovery partition or having problems with the Windows 11 operating system on your PC, and the usual solutions will not fix it, you can do a repair install of Windows 11 by performing an in-place upgrade without losing anything.
 

My Computer

System One

  • OS
    Windows 11 Pro
The story continues....

I had to run another In-Place Install in order to fix an SFC problem with un-fixed system files. Fortunately that did fix it and sfc runs OK now.

I did check the status of reagentc and it says it is currently disabled. I thought that was odd, but my system does boot OK and seems to run fine. What is interesting (to me at least) is that my disk layout now looks like this:

drives.jpg

The In-Place install has eliminated one of the old Recovery partitions and moved everything around so that the current Recovery partition and 2 more inactive ones and free space all follow the boot drive partition. It's not clear to me which is the active Recovery partition, so I think I'll leave things alone until I can find out which one I need to retain.
 

My Computer

System One

  • OS
    Win11
    Computer type
    PC/Desktop
    Manufacturer/Model
    Custom build
    CPU
    Intel i5-12600K 3700 MHz
    Motherboard
    Asus B660-M
    Memory
    16 GB
    Graphics Card(s)
    none
    Sound Card
    none
    Monitor(s) Displays
    Primary: LG 4K; Secondary: Dell U2412M
    Screen Resolution
    Primary: 3860 x 2160; Secondary: 1200 x 1920
    Hard Drives
    C: Samsung NVme SSD970 256K
    E: 1 TB HDD
    F: 500K HDD
    W: Samsung SSD 840 128K
    Keyboard
    Logitech Lighted
    Mouse
    Kensington ExpertMouse trackball
    Internet Speed
    500/500
    Browser
    Brave
    Antivirus
    Windows Defender
At this point we don't know if the recovery environment was deleted with your commands or if it was deleted previously.
I Suggest you start over again by Restoring the Macrium backup.
Once back to the original configuration, find the real situation of the recovery environment by running:
reagentc /info
This will give the recovery partition where the recovery environment is.
If it say it is disabled look for WinRE.wim on C:\Windows\System32\Recovery
Report
 

My Computers

System One System Two

  • OS
    Windows 7 HP 64 - Windows 11 Pro - Lubuntu
    Computer type
    PC/Desktop
    Manufacturer/Model
    custom build
    CPU
    i5 6600K - 800MHz to 4400MHz
    Motherboard
    GA-Z170-HD3P
    Memory
    4+4G GSkill DDR4 3000
    Graphics Card(s)
    IG - Intel 530
    Monitor(s) Displays
    Samsung 226BW
    Screen Resolution
    1680x1050
    Hard Drives
    (1) -1 SM951 – 128GB M.2 AHCI PCIe SSD drive for Win 11
    (2) -1 WD SATA 3 - 1T for Data
    (3) -1 WD SATA 3 - 1T for backup
    (4) -1 BX500 SSD - 128G for Windows 7 and Lubuntu
    PSU
    Thermaltake 450W TR2 gold
    Keyboard
    Old and good Chicony mechanical keyboard
    Mouse
    Logitech mX performance - 9 buttons (had to disable some)
    Internet Speed
    500 Mb/s
    Browser
    Firefox 64
  • Operating System
    Windows 7 Pro
    Computer type
    Laptop
    Manufacturer/Model
    Asus Q550LF
    CPU
    i7-4500U 800- 3000MHz
    Motherboard
    Asus Q550LF
    Memory
    (4+4)G DDR3 1600
    Graphics card(s)
    IG intel 4400 + NVIDIA GeForce GT 745M
    Sound Card
    Realtek
    Monitor(s) Displays
    LG Display LP156WF4-SPH1
    Screen Resolution
    1920 x 1080
    Hard Drives
    BX500 120G SSD for Windows and programs
    & 1T HDD for data
    Internet Speed
    350 Mb/s
    Browser
    Firefox 64
We both posted at the same time.
Now you clearly have the recovery partition on the 698M partition.
698M is small in size and I suggest you make it at least 1G.
- Run reagentc /disable
- With Mini tool enlarge the recovery partition to the left to more or less 1G.
- delete the 667M partition
- expand the C: partition to the right till the recovery partition
- Apply
- Run reagentc /enable

To check run reagentc /info
 

My Computers

System One System Two

  • OS
    Windows 7 HP 64 - Windows 11 Pro - Lubuntu
    Computer type
    PC/Desktop
    Manufacturer/Model
    custom build
    CPU
    i5 6600K - 800MHz to 4400MHz
    Motherboard
    GA-Z170-HD3P
    Memory
    4+4G GSkill DDR4 3000
    Graphics Card(s)
    IG - Intel 530
    Monitor(s) Displays
    Samsung 226BW
    Screen Resolution
    1680x1050
    Hard Drives
    (1) -1 SM951 – 128GB M.2 AHCI PCIe SSD drive for Win 11
    (2) -1 WD SATA 3 - 1T for Data
    (3) -1 WD SATA 3 - 1T for backup
    (4) -1 BX500 SSD - 128G for Windows 7 and Lubuntu
    PSU
    Thermaltake 450W TR2 gold
    Keyboard
    Old and good Chicony mechanical keyboard
    Mouse
    Logitech mX performance - 9 buttons (had to disable some)
    Internet Speed
    500 Mb/s
    Browser
    Firefox 64
  • Operating System
    Windows 7 Pro
    Computer type
    Laptop
    Manufacturer/Model
    Asus Q550LF
    CPU
    i7-4500U 800- 3000MHz
    Motherboard
    Asus Q550LF
    Memory
    (4+4)G DDR3 1600
    Graphics card(s)
    IG intel 4400 + NVIDIA GeForce GT 745M
    Sound Card
    Realtek
    Monitor(s) Displays
    LG Display LP156WF4-SPH1
    Screen Resolution
    1920 x 1080
    Hard Drives
    BX500 120G SSD for Windows and programs
    & 1T HDD for data
    Internet Speed
    350 Mb/s
    Browser
    Firefox 64
Now you clearly have the recovery partition on the 698M partition.
Good to know - thanks. I thought the blue bar in that one was important, but wasn't sure why.

The only question I have is about reagentc - it is currently disabled. Is that an issue I need to deal with first, before attempting any actions with Minitool? To my surprise when I did reagentc /enable it came back with Operation successful. This is clearly better than the response I got before the latest Windows reinstall, but as I said my system seemed to run fine anyway.

I think I need to learn about what reagentc actually does.
 

My Computer

System One

  • OS
    Win11
    Computer type
    PC/Desktop
    Manufacturer/Model
    Custom build
    CPU
    Intel i5-12600K 3700 MHz
    Motherboard
    Asus B660-M
    Memory
    16 GB
    Graphics Card(s)
    none
    Sound Card
    none
    Monitor(s) Displays
    Primary: LG 4K; Secondary: Dell U2412M
    Screen Resolution
    Primary: 3860 x 2160; Secondary: 1200 x 1920
    Hard Drives
    C: Samsung NVme SSD970 256K
    E: 1 TB HDD
    F: 500K HDD
    W: Samsung SSD 840 128K
    Keyboard
    Logitech Lighted
    Mouse
    Kensington ExpertMouse trackball
    Internet Speed
    500/500
    Browser
    Brave
    Antivirus
    Windows Defender
I'm confused with your last post.

drives-jpg.113442

From the above image the recovery isn't disabled as it is on the 698M partition. If it were disabled the recovery environment will be on C:\Windows\System32\Recovery.
To find out if it is enabled or disabled and where it is run run reagentc /info
 
Last edited:

My Computers

System One System Two

  • OS
    Windows 7 HP 64 - Windows 11 Pro - Lubuntu
    Computer type
    PC/Desktop
    Manufacturer/Model
    custom build
    CPU
    i5 6600K - 800MHz to 4400MHz
    Motherboard
    GA-Z170-HD3P
    Memory
    4+4G GSkill DDR4 3000
    Graphics Card(s)
    IG - Intel 530
    Monitor(s) Displays
    Samsung 226BW
    Screen Resolution
    1680x1050
    Hard Drives
    (1) -1 SM951 – 128GB M.2 AHCI PCIe SSD drive for Win 11
    (2) -1 WD SATA 3 - 1T for Data
    (3) -1 WD SATA 3 - 1T for backup
    (4) -1 BX500 SSD - 128G for Windows 7 and Lubuntu
    PSU
    Thermaltake 450W TR2 gold
    Keyboard
    Old and good Chicony mechanical keyboard
    Mouse
    Logitech mX performance - 9 buttons (had to disable some)
    Internet Speed
    500 Mb/s
    Browser
    Firefox 64
  • Operating System
    Windows 7 Pro
    Computer type
    Laptop
    Manufacturer/Model
    Asus Q550LF
    CPU
    i7-4500U 800- 3000MHz
    Motherboard
    Asus Q550LF
    Memory
    (4+4)G DDR3 1600
    Graphics card(s)
    IG intel 4400 + NVIDIA GeForce GT 745M
    Sound Card
    Realtek
    Monitor(s) Displays
    LG Display LP156WF4-SPH1
    Screen Resolution
    1920 x 1080
    Hard Drives
    BX500 120G SSD for Windows and programs
    & 1T HDD for data
    Internet Speed
    350 Mb/s
    Browser
    Firefox 64
When you disable the recovery environment (reagentc.exe /disable) on the recovery partition, the recovery environment is moved to C:\Windows\System32\Recovery but you don't disable the recovery environment. You will still be able to boot to WinRE as when it was on the Recovery partition.

So you may ask "Why recovery environment on the Recovery partition"?
The answer is Bitlocker. If C: is encrypted you won't have access to it unless you boot from a non encrypted partition, load the encrypted key and then access the C: partition.
 

My Computers

System One System Two

  • OS
    Windows 7 HP 64 - Windows 11 Pro - Lubuntu
    Computer type
    PC/Desktop
    Manufacturer/Model
    custom build
    CPU
    i5 6600K - 800MHz to 4400MHz
    Motherboard
    GA-Z170-HD3P
    Memory
    4+4G GSkill DDR4 3000
    Graphics Card(s)
    IG - Intel 530
    Monitor(s) Displays
    Samsung 226BW
    Screen Resolution
    1680x1050
    Hard Drives
    (1) -1 SM951 – 128GB M.2 AHCI PCIe SSD drive for Win 11
    (2) -1 WD SATA 3 - 1T for Data
    (3) -1 WD SATA 3 - 1T for backup
    (4) -1 BX500 SSD - 128G for Windows 7 and Lubuntu
    PSU
    Thermaltake 450W TR2 gold
    Keyboard
    Old and good Chicony mechanical keyboard
    Mouse
    Logitech mX performance - 9 buttons (had to disable some)
    Internet Speed
    500 Mb/s
    Browser
    Firefox 64
  • Operating System
    Windows 7 Pro
    Computer type
    Laptop
    Manufacturer/Model
    Asus Q550LF
    CPU
    i7-4500U 800- 3000MHz
    Motherboard
    Asus Q550LF
    Memory
    (4+4)G DDR3 1600
    Graphics card(s)
    IG intel 4400 + NVIDIA GeForce GT 745M
    Sound Card
    Realtek
    Monitor(s) Displays
    LG Display LP156WF4-SPH1
    Screen Resolution
    1920 x 1080
    Hard Drives
    BX500 120G SSD for Windows and programs
    & 1T HDD for data
    Internet Speed
    350 Mb/s
    Browser
    Firefox 64
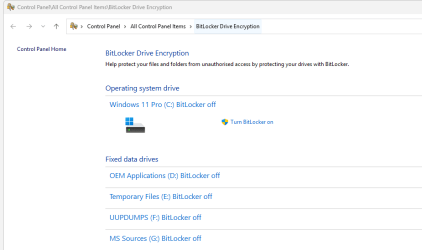
. . . or - permanently - manage your BitLocker settings at Control Panel => All Control Panel Items => BitLocker Drive Encryption

1.png
 

My Computer

System One

  • OS
    Windows 11 Pro 24H2 (Build 26100.2454)
    Computer type
    PC/Desktop
    Manufacturer/Model
    Dell Precision 3660 Tower Workstation
    CPU
    12th Gen Intel(R) Core(TM) i9-12900 5.10 GHz
    Motherboard
    64-bit operating system, x64-based processor
    Memory
    32.00 GB
    Graphics Card(s)
    Intel UHD Graphics 770
    Sound Card
    Realtek Audio
    Monitor(s) Displays
    Dell P2714H Monitor
    Screen Resolution
    1920 x 1080
    Hard Drives
    1 x 512GB NVME PC801 NVMe SK hynix - BOOT
    1 x 1TB Seagate ST1000LM049-2GH172 Internal HDD
    1 x 1TB Seagate STGX4000400 External HDD
    1 x 2TB Seagate STGX4000400 External HDD
    1 x 4TB Seagate STGX4000400 External HDD
    PSU
    300 Watts
    Cooling
    Air
    Keyboard
    Microsoft Wired Keyboard 600
    Mouse
    Microsoft USB Basic Optical Mouse v2.0
    Browser
    Firefox
    Antivirus
    Windows Defender + Malwarebytes Premium
    Other Info
    BaseBoard Manufacturer Dell Inc.
    BaseBoard Product 0J1CP3
    BaseBoard Version A01
Thanks - I was aware of the "interaction" between Bitlocker and the recovery function. I thought it was a level of complexity I neither wanted nor needed. Consequently I do not have Bitlocker enabled or functioning.
 

My Computer

System One

  • OS
    Win11
    Computer type
    PC/Desktop
    Manufacturer/Model
    Custom build
    CPU
    Intel i5-12600K 3700 MHz
    Motherboard
    Asus B660-M
    Memory
    16 GB
    Graphics Card(s)
    none
    Sound Card
    none
    Monitor(s) Displays
    Primary: LG 4K; Secondary: Dell U2412M
    Screen Resolution
    Primary: 3860 x 2160; Secondary: 1200 x 1920
    Hard Drives
    C: Samsung NVme SSD970 256K
    E: 1 TB HDD
    F: 500K HDD
    W: Samsung SSD 840 128K
    Keyboard
    Logitech Lighted
    Mouse
    Kensington ExpertMouse trackball
    Internet Speed
    500/500
    Browser
    Brave
    Antivirus
    Windows Defender
I think I need to learn about what reagentc actually does.

reagentc /disable - Disables Windows RE.
reagentc /enable - Enables Windows RE.
reagentc /info - Displays Windows RE and system reset configuration information.

reagentc info.png

The command "reagentc /disable" ---> "Operation Successful" modifies the ReAgent.xml file and moves the Winre.wim file from the recovery partition to the C:\Windows\System32\Recovery folder.

The command "reagentc /enable" ---> "Operation Successful" modifies the ReAgent.xml file and moves the Winre.wim file from the C:\Windows\System32\Recovery folder to the recovery partition.

Winre.wim file is a hidden system file.

The ReAgent.log file can be found in the C:\Windows\Logs\Reagent folder.
 

My Computer

System One

  • OS
    Windows 11 Pro
The command "reagentc /disable" ---> "Operation Successful" modifies the ReAgent.xml file and moves the Winre.wim file from the recovery partition to the C:\Windows\System32\Recovery folder.

The command "reagentc /enable" ---> "Operation Successful" modifies the ReAgent.xml file and moves the Winre.wim file from the C:\Windows\System32\Recovery folder to the recovery partition.

Most excellent information - thanks. Nothing I found online was that precise and specific.
 

My Computer

System One

  • OS
    Win11
    Computer type
    PC/Desktop
    Manufacturer/Model
    Custom build
    CPU
    Intel i5-12600K 3700 MHz
    Motherboard
    Asus B660-M
    Memory
    16 GB
    Graphics Card(s)
    none
    Sound Card
    none
    Monitor(s) Displays
    Primary: LG 4K; Secondary: Dell U2412M
    Screen Resolution
    Primary: 3860 x 2160; Secondary: 1200 x 1920
    Hard Drives
    C: Samsung NVme SSD970 256K
    E: 1 TB HDD
    F: 500K HDD
    W: Samsung SSD 840 128K
    Keyboard
    Logitech Lighted
    Mouse
    Kensington ExpertMouse trackball
    Internet Speed
    500/500
    Browser
    Brave
    Antivirus
    Windows Defender
The disk has two recovery partitions (see screenshot below).

1.png

(disable Windows RE)

reagentc /disable ---> "Operation Successful"

(delete all recovery partitions and then extend Windows partition)

diskpart
select volume c
list partition
select partition # (replace # with the Recovery partition number)
delete partition override
select partition # (replace # with the Recovery partition number)
delete partition override
list partition
select partition # (replace # with the Windows partition number)
extend
exit

2.png

(create a new recovery partition)

diskpart
select volume c
shrink desired=1000
create partition primary size=1000
format quick fs=ntfs
set id=DE94BBA4-06D1-4D40-A16A-BFD50179D6AC
gpt attributes=0x8000000000000001
list partition
exit

reagentc /enable ---> "Operation Successful"

reagentc /info

3.png

4.png

The "bcdboot c:\windows" command from my first post is not needed.

edit:

Note that accidentally deleting the Windows partition and the EFI system partition is not possible (see screenshot below).

Screenshot 2024-10-22 120438.png
 
Last edited:

My Computer

System One

  • OS
    Windows 11 Pro
Thanks aubergine - that script makes sense to me (now that I understand what reagentc does) and seems to be the easiest way to do what I want. However, how did you know what parameters to specify for these 2 lines:

set id=DE94BBA4-06D1-4D40-A16A-BFD50179D6AC
gpt attributes=0x8000000000000001

Are these the same for everyone (in particular, for me), or do the 2 parameters have to be copied from somewhere else? I've just made another Macrium disk backup, so I'm ready to make the change.
 

My Computer

System One

  • OS
    Win11
    Computer type
    PC/Desktop
    Manufacturer/Model
    Custom build
    CPU
    Intel i5-12600K 3700 MHz
    Motherboard
    Asus B660-M
    Memory
    16 GB
    Graphics Card(s)
    none
    Sound Card
    none
    Monitor(s) Displays
    Primary: LG 4K; Secondary: Dell U2412M
    Screen Resolution
    Primary: 3860 x 2160; Secondary: 1200 x 1920
    Hard Drives
    C: Samsung NVme SSD970 256K
    E: 1 TB HDD
    F: 500K HDD
    W: Samsung SSD 840 128K
    Keyboard
    Logitech Lighted
    Mouse
    Kensington ExpertMouse trackball
    Internet Speed
    500/500
    Browser
    Brave
    Antivirus
    Windows Defender
Are these the same for everyone (in particular, for me), or do the 2 parameters have to be copied from somewhere else?

Recovery partition - GUID Partition Table (GPT)

set id=DE94BBA4-06D1-4D40-A16A-BFD50179D6AC
gpt attributes=0x8000000000000001

Recovery partition - Master Boot Record (MBR)

set id=27


My Computer

System One

  • OS
    Windows 11 Pro

Latest Support Threads

Back
Top Bottom