Please note that this is my first attempt at an article with all the BBcode formatting. Any constructive critisism is welcome. At the same time, I would appreciate it if you could bear in mind that this is a first attempt!
This is the initial release of this document, released on May 3, 2024.
In this document, I will try to clarify the steps involved in applying mitigations for the BlackLotus UEFI Bootkit vulnerability. Since this mitigation involves multiple phases, some of which are still to occur in the future, this article will be updated as new information becomes available.
Do not consider this procedure to be "completed" until Microsoft releases all phases to the implementation. I encourage you to check back here occasionally for updates.
This document includes the latest information from Microsoft which includes the April 9, 2024 updates to this procedure.
Audience: Before proceeding with this procedure, you should determine whether or not you even wish to apply this mitigation. While not a difficult procedure to carry out, there are potentially quite a few steps depending upon which portions of this mitigation apply to your configuration. The article related to this issue (KB5025885) is now in its ninth version. The opening of the latest revision appears to now target the current mitigations towards Enterprise organizations, so take this into consideration. In addition, you should be aware that that this vulnerability requires either Administrative access or physical access to the machine in order to be able to target a system. If you can adequately protect against such scenarios, then the urgency of this update will be greatly diminished. You may also want to take into consideration the fact that Microsoft has not yet made this mitigation mandatory. In fact, the expected timeframe for mandatory implementation has slipped rather dramatically. I also strongly suggest carefully reviewing the sections called Understanding the risks as well as Known Issues in the Microsoft article before you begin this procedure.
Terminology: You should be familiar with the terms below before proceeding.
Windows PE - The Windows Preinstallation Environment is used by Windows during setup. Some of you may recall a time where Windows Setup was text based. Windows PE allows setup to run in a graphical environment that looks a lot like Windows. Think of this as a very feature limited version of Windows that can run in a smaller amount of memory and storage space. Since Windows PE may need to run on a system that has no disks that have been prepared for usage yet, it runs entirely in RAM on a RAM Disk. Windows PE is also used by many bootable tools, most notably backup recovery disks are often built using Windows PE providing a whole host of advantages over Linux based boot media on systems, especially on those that run Windows.
Windows RE - The Windows Recovery Environment is very similar to Windows PE but it has a slightly different set of capabilities compared to Windows PE. When you boot your Windows system to the Recovery Environment, this is what you are running. This update is NOT needed for Windows RE based bootable media.
Windows LCU (Latest Cumulative Update) - Microsoft provides frequent updates to Windows. While there are other types of updates as well, by far the majority of updates can be obtained in a downloadable file known as the LCU or Latest Cumulative Update. As the name implies, these updates are cumulative, so an update released in May of 2024 would contain all the latest updates as well as all previously released updates for that version of Windows. For this reason, only the newest LCU needs to be installed on a system. Of course, when a newer update becomes available, this can be applied. The installation procedure is smart enough to know what updates are already present so that it only needs to install the newest updates that are not yet installed.
Summary of Tasks to Be Completed
There are three main tasks that need to be accomplished to fully implement the mitigations for the BlackLotus UEFI Bootkit:
Task 1: Update any media that is based upon Windows PE. For example, if you have a Macrium Reflect boot disk based upon Windows PE, then this media should be updated. This is NOT necessary if your boot media uses Windows RE rather than Windows PE. We will discuss that further later on. If the option to create bootable media based upon Windows RE is provided and that version of the boot disk meets your requirements, you may want to consider that option rather than creating media based upon Windows PE.
Task 2: Update your UEFI certificates and revoke the old certificate on your PC.
Task 3: Update the Windows PE ADK add-on if you have installed this on your system.
Please note the order of the tasks listed above. We want to update any bootable media first to ensure that it will work after you revoke the old certificate in task 2.
Update any Windows PE based bootable media
If you have no Windows PE based bootable media, skip to Task 2. Please note that if you have bootable media that is based upon Windows RE, then you do not need to update that media. The program used to create the bootable media should indicate whether the media being created is based upon Windows PE or not. Some programs will give you a choice to use Windows PE or some other base for your bootable media. As an example, Macrium Reflect can create bootable media based upon either Windows PE or Windows RE. Their program and documentation will inform you of the advantages and disadvantages of either option.
1 Begin by downloading the most recent Windows Latest Cumulative Update (LCU). To do so, follow these steps:
Go to the Microsoft Update catalog located here:
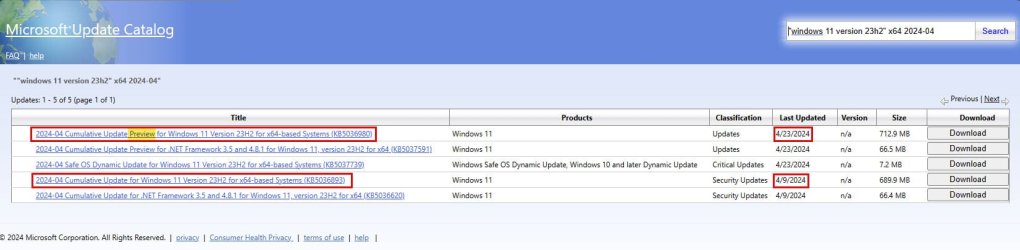
In the search box, use a search term that will narrow down the search for you. As an example, suppose that I want the LCU for Windows 11, version 23H2, released in April of 2024. Use this search string (include the quotes):
"Windows 11 version 23H2" x64 2024-04
"Windows 11 version 23H2" - This portion of the search string indicates that we want to see only the updates for the 23H2 version of Windows 11.
x64 - This indicates that we want updates only for Intel and AMD based CPUs and NOT the ARM64 CPUs.
2024-04 - Show updates released in April of 2024.
Please note that Microsoft releases updates on the second Tuesday of the month at 10:00 AM US Pacific Time. If you are performing your search before the second Tuesday of the month and find no LCU update for the current month, go back to the previous month. As an example, if today is April 1, 2024, you will find that no update exists for April yet. In that case, go back to the previous month, 2024-03. You should also be aware that Microsoft releases a "Preview" update on the 4th Tuesday of the month. As a result, you may see two LCU updates for same month. Feel free to use the preview update if you like. If you prefer not to use a preview update, it is perfectly fine to use the first update of the month instead.
In the screenshot below, note that there are two cumulative updates for the month of April 2024. One of them is a preview release for the update that will be released in May 2024. It is perfectly acceptable to use either of these updates.

2 After you download the update, place it aside for now. You will need to move it in just a little while.
3 Copy the contents of the box below to a text file and save it. I suggest saving it to your desktop, although you can put it anywhere you like.
@echo off
setlocal enabledelayedexpansion
setlocal enableextensions
cd /d %~dp0

:: Version: May 3, 2024 (Simplified Version Without User Customization Options)

set ProjectLocation=C:\Project

:start

::::::::::::::::::::::::::::::::::::::::::::::::::::::::::::::::::::::::::::::::::::::::::::::::::::::::::::
:: Check to see if this batch file is being run as Administrator. If it is not, then rerun the batch file ::
:: automatically as admin and terminate the intial instance of the batch file.                            ::
::::::::::::::::::::::::::::::::::::::::::::::::::::::::::::::::::::::::::::::::::::::::::::::::::::::::::::

(Fsutil Dirty Query %SystemDrive%>Nul)||(PowerShell start """%~f0""" -verb RunAs & Exit /B)

::::::::::::::::::::::::::::::::::::::::::::::::
:: End Routine to check if being run as Admin ::
::::::::::::::::::::::::::::::::::::::::::::::::

:::::::::::::::::::::::::::::::::::::::::::::::::::::::::::::
:: We reach this point once the batch file is run as admin ::
:::::::::::::::::::::::::::::::::::::::::::::::::::::::::::::

::::::::::::::::::::::::::::::::::::::::::::::::::::::::::::::::::
:: Change the console mode to 120 columns wide by 25 lines high ::
::::::::::::::::::::::::::::::::::::::::::::::::::::::::::::::::::

mode con: cols=120 lines=25

::::::::::::::::::::::::::::::::::::::::::::::::::::::::::::::::::::::::::::::::::::::::::::::::::::::::::::
:: Save the current location where this batch file is being run, then run the the "DandISetEnv.bat" file  ::
:: which sets environment variables for the ADK. This also changes the current directory, which we do NOT ::
:: want, so we will change it back to the current directory.                                              ::
::::::::::::::::::::::::::::::::::::::::::::::::::::::::::::::::::::::::::::::::::::::::::::::::::::::::::::

:: Make the folders for this project

md %ProjectLocation% >nul 2>&1
md %ProjectLocation%\Mount >nul 2>&1
md %ProjectLocation%\LCU >nul 2>&1
md %ProjectLocation%\SSU >nul 2>&1
md %ProjectLocation%\temp >nul 2>&1
md %ProjectLocation%\WinPE >nul 2>&1
md %ProjectLocation%\WinPE_NEW >nul 2>&1

:: Disable AV scanning for the project location. We will remove this exclusion when we are done.

powershell.exe -command Add-MpPreference -ExclusionPath "%ProjectLocation%"

cls
echo *******************
echo * Action Required *
echo *******************
echo.
echo 1) From the Microsoft Update Catalog, download the Latest Cumulative Update (LCU). Here is a sample search term to find
echo the LCU for Windows 11 23H2 as of April, 2024. Include the quotes as shown: "Windows 11 version 23H2" x64 2024-04
echo.
echo After downloading, right-click the update file, select properties, check the "Unblock" box and then click on OK.
echo.
echo Move the file to the %ProjectLocation%\LCU folder.
echo.
echo The Microsoft Update Catalog is located here: https://www.catalog.update.microsoft.com/Home.aspx
echo.
echo 2) Copy the boot.wim file from your custom media to the following location:
echo.
echo %ProjectLocation%\WinPE
echo.
echo Note that the boot.wim file can be located in the \sources folder of your bootable media.
echo.
echo Proceed only after you have performed the above tasks. If you indicate that you are not ready to proceed, we will exit
echo from this batch file. You can then rerun the batch file when you are ready to proceed. Please note that the folders
echo noted above have already been created and are ready for you to place the LCU and boot.wim files into.
echo.

CHOICE /M "Are you ready to proceed now? "
goto option-%errorlevel%

:option-2
:: This option indicates that the user is not ready to proceed. Terminate the batch file now.
goto END

:option-1
:: This option indicates that the user is ready to proceed. Continue with the code below.

:: Mount Windows PE

echo.
echo **********************
echo * Mounting the Image *
echo **********************
echo.

DISM /Mount-Image /ImageFile:"%ProjectLocation%\WinPE\boot.wim" /index:1 /MountDir:"%ProjectLocation%\Mount"

:: The Latest Cumulative Update (LCU) may possibly also contain an SSU (Servicing Stack Update). Run the following to
:: extract the SSU if one is present. If an SSU is not present, no worries, this won't harm anything.

echo.
echo *****************************
echo * Extracting SSU if Present *
echo *****************************
echo.

expand "%ProjectLocation%\LCU\*.MSU" /f:"SSU*.cab" "%ProjectLocation%\SSU"

:: Apply SSU if a file is present. If no file is present, an error may be shown.

echo.
echo ***************************************************
echo * Applying SSU, if present. An error may be shown *
echo * if no SSU is present or if it does not apply to *
echo * this image. This is okay.                       *
echo ***************************************************
echo.

DISM /Add-Package /Image:"%ProjectLocation%\Mount" /PackagePath="%ProjectLocation%\SSU"

:: Apply The LCU

echo.
echo ********************
echo * Applying the LCU *
echo ********************
echo.

DISM /Add-Package /Image:"%ProjectLocation%\Mount" /PackagePath="%ProjectLocation%\LCU"

:: Lock in the updates

echo.
echo **********************
echo * Locking in Updates *
echo **********************
echo.

DISM /Cleanup-Image /Image:"%ProjectLocation%\Mount" /StartComponentCleanup /Resetbase /ScratchDir:%ProjectLocation%\temp

:: Unmount the Win PE image and commit the changes

echo.
echo *********************
echo * Commiting Changes *
echo *********************
echo.

DISM /Unmount-Image /MountDir:"%ProjectLocation%\Mount" /Commit

echo.
echo *******************************
echo * Exporting the Updated Image *
echo *******************************
echo.

DISM /Export-Image /Bootable /SourceImageFile:"%ProjectLocation%\WinPE\boot.wim" /SourceIndex:1 /DestinationImageFile:"%ProjectLocation%\WinPE_New\boot.wim"

:: This concludes the process.


:END

powershell.exe -command Remove-MpPreference -ExclusionPath "%ProjectLocation%"

cls
echo The updated boot.wim file can now be found in the following location:
echo.
echo %ProjectLocation%\WinPE_NEW
echo.
echo Copy this file to your customized media, overwriting the original boot.wim file located there.
echo.
echo TIP: You may want to backup your original boot.wim until you test this updated file to make sure it works properly.
echo.
pause
cls
echo The batch file will now end. If you are done, you may want to consider deleting the project folder.
echo The project folder is located here:
echo.
echo %ProjectLocation%
echo.
pause
4 Rename that file to "UpdateWinPECustomMedia.bat". Please note that if your computer is set to hide file extensions, you may not see the file extension.
5 Run the batch file by double-clicking it. The batch file will ask that you place the LCU that you downloaded into the folder C:\Project\LCU and that you place the boot.wim from your bootable media into C:\Project\WinPE. Please do this when you are asked to do so. Note that the boot.wim file should be located in the \sources folder of the bootable media.
6 When the batch file is done running, it will instruct you to copy the newly updated boot.wim file back to your bootable media. Follow the instructions presented to do so.
Update your UEFI certificates and revoke the old certificate
This is the step in which the bulk of the work will be done. Please follow the steps in the below article to accomplish this. Before starting this procedure, you may want to read further below as I have some comments and clarification of the article that you will want to be aware of. I would also suggest that you read the entire article before starting to avoid a situation where you partially complete the procedure only to discover that you encounter a step that you do not understand, preventing you from completing the procedure.

By now, you have already read the section of this document that describes how to update bootable media that is based upon Windows PE. I also have a procedure for slipstreaming (injecting) Windows updates into your standard Windows installation media. A link to that article will be provided in this space once that article is posted within the next few days.
Please note that at the time of this writing, if you download the latest Windows ISO image from Microsoft, you will get a December 2023 build. Once an April 2024 or later build becomes available, I suspect that it should boot just fine on a system with these mitigations applied, but you can also inject the latest updates yourself to ensure that your Windows bootable media and ISO images can boot successfully.
There is a block in KB5025885 just above the section called Timing of Updates that contains an error. Please be aware of this! Details regarding this follow this message.
The block in question looks like this:

Please note that the second and third lines are actually just a single command with a space between them. Hopefully Microsoft will correct this in the tenth release of the article.
Update the Windows PE ADK add-on if you have installed this on your system
If you have the Windows PE add-on for the Windows ADK installed, you will want to update it. If you are not certain whether you have Windows PE installed, check to see if the following folder exists on your system:
C:\Program Files (x86)\Windows Kits\10\Assessment and Deployment Kit\Windows Preinstallation Environment
1 Begin by downloading the most recent Windows Latest Cumulative Update (LCU) if you have not already done so for Step 1. To do so, follow these steps:
Go to the Microsoft Update catalog located here:
In the search box, use a search term that will narrow down the search for you. As an example, suppose that I want the LCU for Windows 11, version 23H2, released in April of 2024. Use this search string (include the quotes):
"Windows 11 version 23H2" x64 2024-04
"Windows 11 version 23H2" - This portion of the search string indicates that we want to see only the updates for the 23H2 version of Windows 11.
x64 - This indicates that we want updates only for Intel and AMD based CPUs and NOT the ARM64 CPUs.
2024-04 - Show updates released in April of 2024.
Please note that Microsoft releases updates on the second Tuesday of the month at 10:00 AM US Pacific Time. If you are performing your search before the second Tuesday of the month and find no LCU update for the current month, go back to the previous month. As an example, if today is April 1, 2024, you will find that no update exists for April yet. In that case, go back to the previous month, 2024-03. You should also be aware that Microsoft releases a "Preview" update on the 4th Tuesday of the month. As a result, you may see two LCU updates for same month. Feel free to use the preview update if you like. If you prefer not to use a preview update, it is perfectly fine to use the first update of the month instead.
In the screenshot below, note that there are two cumulative updates for the month of April 2024. One of them is a preview release for the update that will be released in May 2024. It is perfectly acceptable to use either of these updates.

2 After you download the update, place it aside for now. You will need to move it in just a little while.
3 Copy the contents of the box below to a text file and save it. I suggest saving it to your desktop, although you can put it anywhere you like.
@echo off
setlocal enabledelayedexpansion
setlocal enableextensions
cd /d %~dp0

:: Version: May 3, 2024

:: Note: This batch file is tested with the US English version of Windows. There are paths that reference
::       en-us in the batch file that may need to be modified for other locales.

::::::::::::::::::::::::::::::::::::::::::::::::::::::::::::::::::::::::::::::::::::::::::::::::::::::::::::::::::::
:: Explanation of User Customizable Settings ::                                                                   ::
:::::::::::::::::::::::::::::::::::::::::::::::                                                                   ::
:: Set the variables below to customize the behavior of the batch file.                                           ::
::                                                                                                                ::
:: ADK_Location - This should contain the path to the Windows ADK Deployment Tools. By default this will be:      ::
::    C:\Program Files ^(x86^)\Windows Kits\10\Assessment and Deployment Kit\Deployment Tools                     ::
::    You should not normally need to change this.                                                                ::
::                                                                                                                ::
:: ProjectLocation - The batch file will need a location where it can place the files needed for this project.    ::
::    Specify a location to use for this purpose. By default the batch file is configured to use C:\Project       ::
::::::::::::::::::::::::::::::::::::::::::::::::::::::::::::::::::::::::::::::::::::::::::::::::::::::::::::::::::::


:: IMPORTANT: For any variable to which a path is assigned, please  DO NOT end the path with a trailing backslash (\).
:: Note that if a path contains parenthesis You should preceed both the opening and closing parens with a ^ character.
:: Example: C:\Program Files ^(x86^)\Windows Kits\10\Assessment and Deployment Kit\Deployment Tools

set ADK_Location=C:\Program Files ^(x86^)\Windows Kits\10\Assessment and Deployment Kit\Deployment Tools
set ProjectLocation=C:\Project


:start

::::::::::::::::::::::::::::::::::::::::::::::::::::::::::::::::::::::::::::::::::::::::::::::::::::::::::::
:: Check to see if this batch file is being run as Administrator. If it is not, then rerun the batch file ::
:: automatically as admin and terminate the intial instance of the batch file.                            ::
::::::::::::::::::::::::::::::::::::::::::::::::::::::::::::::::::::::::::::::::::::::::::::::::::::::::::::

(Fsutil Dirty Query %SystemDrive%>Nul)||(PowerShell start """%~f0""" -verb RunAs & Exit /B)

::::::::::::::::::::::::::::::::::::::::::::::::
:: End Routine to check if being run as Admin ::
::::::::::::::::::::::::::::::::::::::::::::::::

:::::::::::::::::::::::::::::::::::::::::::::::::::::::::::::
:: We reach this point once the batch file is run as admin ::
:::::::::::::::::::::::::::::::::::::::::::::::::::::::::::::

::::::::::::::::::::::::::::::::::::::::::::::::::::::::::::::::::
:: Change the console mode to 120 columns wide by 25 lines high ::
::::::::::::::::::::::::::::::::::::::::::::::::::::::::::::::::::

mode con: cols=120 lines=25

::::::::::::::::::::::::::::::::::::::::::::::::::::::::::::::::::::::::::::::::::::::::::::::::::::::::::::
:: Save the current location where this batch file is being run, then run the the "DandISetEnv.bat" file  ::
:: which sets environment variables for the ADK. This also changes the current directory, which we do NOT ::
:: want, so we will change it back to the current directory.                                              ::
::::::::::::::::::::::::::::::::::::::::::::::::::::::::::::::::::::::::::::::::::::::::::::::::::::::::::::

pushd %~dp0
call "%ADK_Location%\DandISetEnv.bat"
popd

:: Make the folders for this project

md %ProjectLocation% >nul 2>&1
md %ProjectLocation%\Mount >nul 2>&1
md %ProjectLocation%\LCU >nul 2>&1
md %ProjectLocation%\SSU >nul 2>&1
md %ProjectLocation%\temp >nul 2>&1

:: Disable AV scanning for the project location. We will remove this exclusion when we are done.

powershell.exe -command Add-MpPreference -ExclusionPath "%ProjectLocation%"

cls
echo *******************
echo * Action Required *
echo *******************
echo.
echo From the Microsoft Update Catalog, download the Latest Cumulative Update (LCU). Here is a sample search term to find the
echo LCU for Windows 11 23H2 as of April 2024. Include the quotes as shown:
echo.
echo. "Windows 11 version 23H2" x64 2024-04
echo.
echo After downloading, right-click the update file, select properties, check the "Unblock" box and then click on OK.
echo.
echo Move the file to the %ProjectLocation%\LCU folder.
echo.
echo The Microsoft Update Catalog is located here: https://www.catalog.update.microsoft.com/Home.aspx
echo.
echo Proceed only after you have downloaded the update and placed it in the above noted location. If you indicate that
echo you are not ready to proceed, we will exit from this batch file. You can then rerun the batch file when you are
echo ready to proceed. Please note that the folder %ProjectLocation%\LCU has already been created and is ready for you
echo to place the LCU file.
echo.

CHOICE /M "Are you ready to proceed now? "
goto option-%errorlevel%

:option-2
:: This option indicates that the user is not ready to proceed. Terminate the batch file now.
goto END

:option-1
:: This option indicates that the user is ready to proceed. Continue with the code below.

cls
c:
cd %ADK_Location%\..\Windows Preinstallation Environment\amd64

:: Make a backup copy of winpe.wim.

xcopy "en-us\winpe.wim" "en-us\winpe.wim.orig" /Y /-I

:: Mount Windows PE

echo.
echo **********************
echo * Mounting the Image *
echo **********************
echo.

DISM /Mount-Image /ImageFile:"en-us\winpe.wim" /index:1 /MountDir:"%ProjectLocation%\Mount"

:: The Latest Cumulative Update (LCU) may possibly also contain an SSU (Servicing Stack Update). Run the following to
:: extract the SSU if one is present. If an SSU is not present, no worries, this won't harm anything.

echo.
echo *****************************
echo * Extracting SSU if Present *
echo *****************************
echo.

expand "%ProjectLocation%\LCU\*.MSU" /f:"SSU*.cab" "%ProjectLocation%\SSU"

:: Apply SSU if a file is present. If no file is present, an error may be shown.

echo.
echo ***************************************************
echo * Applying SSU, if present. An error may be shown *
echo * if no SSU is present or if it does not apply to *
echo * this image. This is okay.                       *
echo ***************************************************
echo.

DISM /Add-Package /Image:"%ProjectLocation%\Mount" /PackagePath="%ProjectLocation%\SSU"

:: Apply The LCU

echo.
echo ********************
echo * Applying the LCU *
echo ********************
echo.

DISM /Add-Package /Image:"%ProjectLocation%\Mount" /PackagePath="%ProjectLocation%\LCU"

:: Lock in the updates

echo.
echo **********************
echo * Locking in Updates *
echo **********************
echo.

DISM /Cleanup-Image /Image:"%ProjectLocation%\Mount" /StartComponentCleanup /Resetbase /ScratchDir:%ProjectLocation%\temp

:: Copy boot files back to the Win PE add-on installation

echo.
echo **********************
echo * Copying Boot Files *
echo **********************
echo.

Xcopy "%ProjectLocation%\Mount\Windows\Boot\EFI\bootmgr.efi" "Media\bootmgr.efi" /Y /-I
Xcopy "%ProjectLocation%\Mount\Windows\Boot\EFI\bootmgfw.efi" "Media\EFI\Boot\bootx64.efi" /Y /-I

:: Unmount the Win PE image and commit the changes

echo.
echo *********************
echo * Commiting Changes *
echo *********************
echo.

DISM /Unmount-Image /MountDir:"%ProjectLocation%\Mount" /Commit

:: Performing an export can make the file smaller because the old version of files that were
:: updated do not get deleted until the export is performed.

DISM /Export-Image /Bootable /SourceImageFile:"%ADK_Location%\..\Windows Preinstallation Environment\amd64\en-us\winpe.wim" /SourceIndex:1 /DestinationImageFile:"%ADK_Location%\..\Windows Preinstallation Environment\amd64\en-us\winpe.wim.new"

DEL "%ADK_Location%\..\Windows Preinstallation Environment\amd64\en-us\winpe.wim"

REN "%ADK_Location%\..\Windows Preinstallation Environment\amd64\en-us\winpe.wim.new" winpe.wim

:: This concludes the process. Any images or media that you now create that uses the Windows PE add-on will now have
:: updated Windows PE files.

:END

powershell.exe -command Remove-MpPreference -ExclusionPath "%ProjectLocation%"

cls
echo The batch file will now end. If you are done, you may want to consider deleting the project folder.
echo The project is located here:
echo.
echo %ProjectLocation%
echo.
pause5 Run the batch file by double-clicking it. The batch file will ask that you place the LCU that you downloaded into the folder C:\Project\LCU. Please do this when you are asked to do so. Note that the boot.wim file should be located in the \sources folder of the bootable media.
6 When the batch file is done running, it will instruct you to copy the newly updated boot.wim file back to your bootable media. Follow the instructions presented to do so.
This concludes the procedure.
Reference Materials
Security Update Guide - Microsoft Security Response Center
 msrc.microsoft.com

Download and install the Windows ADK
")
 in it, just wrap it in plain tags.


