This tutorial will show you different ways to have a desktop app or application file Run as administrator with elevated rights in Windows 11.
Windows runs desktops apps and application files (ex: .bat, .cmd, .exe, and .msc file types) in user mode by default without elevated administrator rights unless it prompts you with UAC to run elevated (highest privileges).
Windows has standard user and administrator types of user accounts.
Standard User - Standard user accounts are good for everyday usage, and can be a local account or Microsoft account. Standard user accounts can use most apps and change system settings that do not affect other users. If any action that requires elevated rights is attempted while signed in as a standard user, Windows will display a UAC prompt for the password of an administrator for approval. If UAC is set to "Never notify", then a standard user will automatically be denied the elevated action.
Administrator - Administrator accounts have complete access to the PC and can make any desired changes. Administrators can be a local account or Microsoft account. If any action that requires elevated rights is attempted while signed in as an administrator, Windows will display a UAC prompt for the administrator to confirm (Yes or No) using full administrator rights.
When you use Run as administrator on a desktop app or application file, you are allowing it to run with full administrator access to everything on the computer. This means you are giving it special permissions to access restricted parts of the computer that would otherwise be off-limits. This could be a potential security risk if not a trusted app or application file, but sometimes "Run as administrator" is necessary for a trusted app or application file to run properly if it requires elevated rights for full access.
Starting with Windows 11 build 22631.4541 (23H2) and build 22631.4534 (24H2), if you hold Shift and CTRL when clicking on a jump list item in Start menu or taskbar, this will now launch that item as admin, just like if you were to do Shift + CTRL and click the app icon itself. For example, if you right-click on Windows Terminal, and hold Shift and CTRL when you click PowerShell, it would open a PowerShell window as admin.
Run as administrator is only available in the context menu of desktop apps, and not available for Microsoft Store PWA apps.
- Option One: Run as Administrator using Keyboard Shortcut
- Option Two: Run as Administrator from Context Menu
- Option Three: Run as Administrator in Run
- Option Four: Run as Administrator in Start Menu
- Option Five: Run as Administrator in All Apps
- Option Six: Run as Administrator from Taskbar
- Option Seven: Run as Administrator in Search
- Option Eight: Run as Administrator in Task Manager
- Option Nine: Always Run as Administrator in Shortcut Advanced Properties
- Option Ten: Always Run as Administrator in Compatibility Properties
- Option Eleven: Always Run as Administrator in Registry Editor
- Option Twelve: Always Run as Administrator with Task Scheduler
1 Press and hold the CTRL + Shift keys.
2 Click/tap on the app.
3 Release the CTRL + Shift keys.
1 Right click or press and hold on a desktop app or application file, and click/tap on Run as administrator. (see screenshot below)
1 Open Run (Win+R).
2 Browse and select or type the app file name (ex: "cmd") you want to "Run as administrator" in the Run dialog. (see screenshot below)
3 Either press the CTRL + Shift + Enter keys OR press CTRL + Shift and click/tap on OK.
1 Open the Start menu
 . (see screenshot below)
2 Right click or press and hold on a pinned desktop app or application file, and click/tap on Run as administrator.
1 Open the Start menu
, and click/tap on All apps. (see screenshot below)2 Right click or press and hold on a desktop app (ex: "Windows Terminal"), click/tap on More, and click/tap on Run as administrator. (see screenshot below)
1 Right click or press and hold on an open or pinned desktop app or application file icon on the taskbar. (see screenshot below)
2 Right click or press and hold on the desktop app or application file in the jump list menu.
3 Click/tap on Run as administrator.
1 Open Search (Win+S). (see screenshots below)
2 Type the app file name (ex: "cmd" or "Windows Terrminal") you want to "Run as administrator" into the search box at the top.
3 When the app shows under Best match, click/tap on Run as administrator in its right pane.
Sometimes you may need to click/tap on the Expand arrow first in the right pane, then click/tap on Run as administrator.
1 Open Task Manager (Ctrl+Shift+Esc).
2 Click/tap on File on the menu bar, and click/tap on Run new task. (see screenshot below)
2 Browse and select or type the app file name (ex: "cmd") you want to "Run as administrator" in the "Create new task" dialog. (see screenshot below step 3)
3 Check the Create this task with administrative privileges box, and click/tap on OK. (see screenshot below)
1 Right click or press and hold on a shortcut of a desktop app or application file you want to always "Run as administrator", and click/tap on Properties in the context menu. (see screenshot below)
2 Click/tap on the Shortcut tab, and click/tap on the Advanced button. (see screenshot below)
3 Check or uncheck (default) Run as administrator for what you want, and click/tap on OK. (see screenshot below)
4 Click/tap on OK. (see screenshot below)
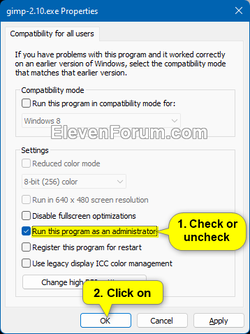
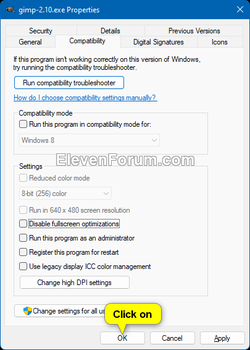
1 Right click or press and hold on a desktop app or application file you want to always "Run as administrator", and click/tap on Properties in the context menu. (see screenshot below)
2 Do step 3 (current user) or step 4 (all users) below for which user you want to run this program as an administrator for.
If you check Run this program as an administrator for all users, it will check and gray out Run this program as an administrator for current user in step 3.
This option sets the same setting from Option Ten, but manually in Registry Editor.
1 Open Registry Editor (regedit.exe).
2 Navigate to the key location below you want to use in the left pane of Registry Editor. (see screenshot below)
If the Layers key is not there, then right click or press and hold on the AppCompatFlags key, click/tap on New, click/tap on Key, type Layers, and press Enter.
3 In the right pane of the Layers key, right click or press and hold on an empty area, then click/tap on New, and click/tap on String Value. (see screenshot above)
4 Type in the full path of the app's exe file (ex: "C:\Program Files\GIMP 2\bin\gimp-2.10.exe") you want to always run as administrator, press Enter, and double click/tap on the full path in the right pane to modify it. (see screenshot below step 2)
Deleting this string value (ex: "C:\Program Files\GIMP 2\bin\gimp-2.10.exe") will undo this to not have it always run as administrator.
5 Copy and paste
~ RUNASADMIN into the Value data field, and click/tap on OK. (see screenshot below)6 You can now close Registry Editor if you like.
1 For how, see: How to Create Elevated App Shortcut without UAC Prompt in Windows
That's it,
Shawn Brink
- Add or Remove Run as administrator Context Menu in Windows 11
- Add Run as administrator to Context Menu of MSI Files in Windows 11
- Add Run as administrator to Context Menu of PS1 Files in Windows 11
- Add Run as administrator to Context Menu of VBS Files in Windows 11
- Check if App or Process is Running as Administrator (elevated) in Windows 11
- Run as different user in Windows 11
- Change User Account Control (UAC) Settings in Windows 11
- Open Elevated Command Prompt as Administrator in Windows 11
- Turn On or Off Always Run as Administrator for PowerToys in Windows 10 and Windows 11
")