This tutorial will show you how to set up a single app kiosk in Windows 11 Pro, Enterprise, and Education editions.
A single-app kiosk uses the Assigned Access feature to run a single app above the lock screen. When the kiosk account signs in, the app is launched automatically. The person using the kiosk cannot do anything on the device outside of the kiosk app.
If the kiosk app is closed, it will automatically restart.
When you are in kiosk mode, you can press the Ctrl + Alt + Delete keys to exit kiosk mode.
References:

Windows kiosks and restricted user experiences
Learn about the options available in Windows to configure kiosks and restricted user experiences.
docs.microsoft.com

Assigned Access recommendations
Learn about the recommended kiosk and restricted user experience configuration options.
docs.microsoft.com

What is Assigned Access?
Learn how to configure a Windows kiosk for single-app and multi-app scenarios with Assigned Access.
docs.microsoft.com

Multi-app kiosk mode now available in Windows 11! | Microsoft Community Hub
Create a custom locked-down device experience with multi-app kiosk mode, now available in Windows 11.
The kiosk feature is not supported in the Windows 10/11 Home edition.
You must be signed in as an administrator to set up a kiosk.
User account control (UAC) must be turned on to enable kiosk mode.
Kiosk mode is not supported over a remote desktop connection. Your kiosk users must sign in on the physical device that is set up as a kiosk. Apps that run in kiosk mode cannot use copy and paste.
EXAMPLE: Sign in to kiosk account, and kiosk app in kiosk mode
You can configure the kiosk account to sign in automatically at startup if wanted.
Here's How:
1 Open Settings (Win+I).
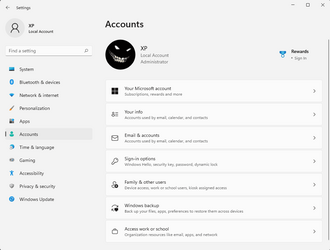
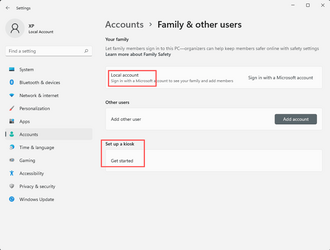
2 Click/tap on Accounts on the left side, and click/tap on Other Users on the right side. (see screenshot below)
3 Click/tap on the Get started button for Kiosk. (see screenshot below)
Home editions of Windows will not have a Get started button since the kiosk feature is not supported in the Home edition.
4 Do step 5 (create account) or step 6 (choose existing account) for the account you want used to sign in to kiosk mode.
5 To Create an Account for Kiosk
A) Type a name (ex: "Kiosk") you want for this kiosk account. (see screenshot below)
B) Click/tap on Next, and go to step 7 below.
6 To Choose an Existing Local Account for Kiosk
A) Click/tap on the Choose an existing account link. (see screenshot below)
B) Select an existing local account (ex: "Brink2") you want used to sign in to kiosk mode. (see screenshot below)
You cannot select a Microsoft account or an administrator account.
C) Click/tap on Next, and go to step 7 below.
7 Select an app (ex: "Microsoft Edge") you want used in kiosk mode, and click/tap on Next. (see screenshot below)

What is Assigned Access?
Learn how to configure a Windows kiosk for single-app and multi-app scenarios with Assigned Access.
docs.microsoft.com
8 If you selected the Microsoft Edge app, follow the steps below for how you want it used in kiosk mode. (see screenshots below)
- Select (dot) As a digital sign or interactive display or As a public browser.
- As a digital sign or interactive display = The entered URL will open and appear full screen in Microsoft Edge.
- As a public browser = The entered URL will be used as the home page, start page, and new tab page in Microsoft Edge with a limited set of features.
- Enter a URL (ex: "www.elevenforum.com") you want.
- Select how long you want to "Restart Microsoft Edge after someone has not used it for".
- Click/tap on Next.
9 Click/tap on Close. (see screenshot below)
10 You can now close Settings if you like.
That's it,
Shawn Brink
Last edited:


