Solved viBoot VMs and licensing issues


Haydon

Well-known member
Power User
VIP
Local time
12:11 PM
Posts
1,992
OS
Windows 10 Pro
I am playing with viBoot VMs that I created from Macrium Reflect full disk images and I wrote the following in a parallel thread.

For the paid for software, I got in the viBoot VM a trial license that expires in zero days, LOL, as long as I don't use that too often too long, I am OK, I guess.

Well, I have been playing more and more with the viBoot VMs recently and have become a bit uneasy about the licensing issue, for apps and OS.

Also, is the licensing issue worse if I run the viBoot VMs on a different machine than the source machine? (I have not done that yet)

Any opinions?
 

My Computer

System One

  • OS
    Windows 10 Pro
Yeah, I think the intention of viBoot is to just more or less verify that a backup worked, or maybe to see quickly how something was setup at a particular moment in time. I don't think the expectation would be that somebody would run that VM for very long at all. And in the event that you were running it for a period of time at home, I'm pretty sure that you wouldn't really be in any type of violation of a license agreement. I mean technically you probably are, but I don't think any software entity is going to go after you for it.
 

My Computers

System One System Two

  • OS
    Windows 11 Pro
    Computer type
    PC/Desktop
    Manufacturer/Model
    Beelink SEI8
    CPU
    Intel Core i5-8279u
    Motherboard
    AZW SEI
    Memory
    32GB DDR4 2666Mhz
    Graphics Card(s)
    Intel Iris Plus 655
    Sound Card
    Intel SST
    Monitor(s) Displays
    Asus ProArt PA278QV
    Screen Resolution
    2560x1440
    Hard Drives
    512GB NVMe
    PSU
    NA
    Case
    NA
    Cooling
    NA
    Keyboard
    NA
    Mouse
    NA
    Internet Speed
    500/50
    Browser
    Edge
    Antivirus
    Defender
    Other Info
    Mini PC used for testing Windows 11.
  • Operating System
    Windows 10 Pro
    Computer type
    PC/Desktop
    Manufacturer/Model
    Custom
    CPU
    Ryzen 9 5900x
    Motherboard
    Asus Rog Strix X570-E Gaming
    Memory
    64GB DDR4-3600
    Graphics card(s)
    EVGA GeForce 3080 FT3 Ultra
    Sound Card
    Onboard
    Monitor(s) Displays
    ASUS TUF Gaming VG27AQ. ASUS ProArt Display PA278QV 27” WQHD
    Screen Resolution
    2560x1440
    Hard Drives
    2TB WD SN850 PCI-E Gen 4 NVMe
    2TB Sandisk Ultra 2.5" SATA SSD
    PSU
    Seasonic Focus 850
    Case
    Fractal Meshify S2 in White
    Cooling
    Dark Rock Pro CPU cooler, 3 x 140mm case fans
    Mouse
    Logitech G9 Laser Mouse
    Keyboard
    Corsiar K65 RGB Lux
    Internet Speed
    500/50
    Browser
    Chrome
    Antivirus
    Defender.
Viboot vms are all created from scratch and as such, they are always unactivated installations.

Viboot vhds are actually based on differencing vhds.

You can create a standalone vhdx file from the differencing vhd files, and legitimately attach the standalone vhd to any activated vm.
 
Last edited:

My Computer

System One

  • OS
    Windows 10 Pro + others in VHDs
    Computer type
    Laptop
    Manufacturer/Model
    ASUS Vivobook 14
    CPU
    I7
    Motherboard
    Yep, Laptop has one.
    Memory
    16 GB
    Graphics Card(s)
    Integrated Intel Iris XE
    Sound Card
    Realtek built in
    Monitor(s) Displays
    N/A
    Screen Resolution
    1920x1080
    Hard Drives
    1 TB Optane NVME SSD, 1 TB NVME SSD
    PSU
    Yep, got one
    Case
    Yep, got one
    Cooling
    Stella Artois
    Keyboard
    Built in
    Mouse
    Bluetooth , wired
    Internet Speed
    72 Mb/s :-(
    Browser
    Edge mostly
    Antivirus
    Defender
    Other Info
    TPM 2.0
I know that there are alternative ways, but can the experts please comment on the block diagram? Thanks!

BlockDiagram.png
 

My Computer

System One

  • OS
    Windows 10 Pro
Viboot is just not the right approach here. It uses differencing disks which cannot be moved to another pc. Also, you should not activate the viboot vm, but final installation.

It would be much simpler to simply restore w10 reflect pc to new pc, and then upgrade to W11 and activate it.

The tricky part is ensuring you have all the drivers for new pc, particularly if changing from sata to nvme drives.
 

My Computer

System One

  • OS
    Windows 10 Pro + others in VHDs
    Computer type
    Laptop
    Manufacturer/Model
    ASUS Vivobook 14
    CPU
    I7
    Motherboard
    Yep, Laptop has one.
    Memory
    16 GB
    Graphics Card(s)
    Integrated Intel Iris XE
    Sound Card
    Realtek built in
    Monitor(s) Displays
    N/A
    Screen Resolution
    1920x1080
    Hard Drives
    1 TB Optane NVME SSD, 1 TB NVME SSD
    PSU
    Yep, got one
    Case
    Yep, got one
    Cooling
    Stella Artois
    Keyboard
    Built in
    Mouse
    Bluetooth , wired
    Internet Speed
    72 Mb/s :-(
    Browser
    Edge mostly
    Antivirus
    Defender
    Other Info
    TPM 2.0
I can't find 'VM > Hardware' in the MR User Guide, so I modified the block diagram to create a future W11 Pro test machine in Hyper-V.

I said 'future' because I would have to deactivate the W10 Pro product key on my current (physical) test machine, I am not ready to do that yet (my current test machine does not satisfy W11 system requirements)

In any case, the block diagram is strictly legal, I would not have to rely on 'fair use' or similar (y)

BlockDiagram2.png
 

My Computer

System One

  • OS
    Windows 10 Pro
I can't find 'VM > Hardware' in the MR User Guide, so I modified the block diagram to create a future W11 Pro test machine in Hyper-V.

I said 'future' because I would have to deactivate the W10 Pro product key on my current (physical) test machine, I am not ready to do that yet (my current test machine does not satisfy W11 system requirements)

In any case, the block diagram is strictly legal, I would not have to rely on 'fair use' or similar (y)

View attachment 29493
I would definitely not use a viboot vm is it is really a temporary creation .

If you delete it, you lose the vm and its activation.

The problem with viboot is lack of flexibility as it uses differencing drives - you cannot change the vhdx, relocate easily etc.

This is the way I do it.

1) create reflect image as you have done.

2) create blank vhdx on new pc large enough to hold source machine contents

3) copy reflect image to new pc (reflect must be installed on target pc host OS)

4) attach blank vhdx file as a drive

5) restore reflect image to blank vhdx file

6) Create new vm, and attach the vhdx file.

7) set vm to boot from it - activate.

You now have an activated VM which you can change out the vhdx file, multiboot etc. So log as you do not delete the VM (backup the files in hyper-v virtual machine folder), it will always remain activated.


If you do not wish to do it as I do it, then I would modify your method like this (jumping steps 2 to 4):

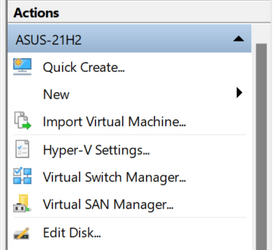
After creating viboot vm, use "edit disk" option in Hyper-V

1652980093772.png

Select your viboot vhd and select option to merge differencing file to a new (standalone) vhdx file (which is same as following my procedure up to step 5).

The vhdx file can now be added to new vm and activated.
 

My Computer

System One

  • OS
    Windows 10 Pro + others in VHDs
    Computer type
    Laptop
    Manufacturer/Model
    ASUS Vivobook 14
    CPU
    I7
    Motherboard
    Yep, Laptop has one.
    Memory
    16 GB
    Graphics Card(s)
    Integrated Intel Iris XE
    Sound Card
    Realtek built in
    Monitor(s) Displays
    N/A
    Screen Resolution
    1920x1080
    Hard Drives
    1 TB Optane NVME SSD, 1 TB NVME SSD
    PSU
    Yep, got one
    Case
    Yep, got one
    Cooling
    Stella Artois
    Keyboard
    Built in
    Mouse
    Bluetooth , wired
    Internet Speed
    72 Mb/s :-(
    Browser
    Edge mostly
    Antivirus
    Defender
    Other Info
    TPM 2.0
This is the way I do it.

1) create reflect image as you have done.

2) create blank vhdx on new pc large enough to hold source machine contents

3) copy reflect image to new pc (reflect must be installed on target pc host OS)

4) attach blank vhdx file as a drive

5) restore reflect image to blank vhdx file

6) Create new vm, and attach the vhdx file.

7) set vm to boot from it - activate.
The way I have done it in the past is a variation on that theme. I use the Macrium Rescue Media Creator to make an ISO file. Then I boot a new VM from that ISO and use it to restore a Macrium image to the VM's blank .vhdx.
 

My Computers

System One System Two

  • OS
    Windows 11 Home
    Computer type
    Laptop
    Manufacturer/Model
    Acer Aspire 3 A315-23
    CPU
    AMD Athlon Silver 3050U
    Memory
    8GB
    Graphics Card(s)
    Radeon Graphics
    Monitor(s) Displays
    laptop screen
    Screen Resolution
    1366x768 native resolution, up to 2560x1440 with Radeon Virtual Super Resolution
    Hard Drives
    1TB Samsung EVO 870 SSD
    Internet Speed
    50 Mbps
    Browser
    Edge, Firefox
    Antivirus
    Defender
    Other Info
    fully 'Windows 11 ready' laptop. Windows 10 C: partition migrated from my old unsupported 'main machine' then upgraded to 11. A test migration ran Insider builds for 2 months. When 11 was released on 5th October it was re-imaged back to 10 and was offered the upgrade in Windows Update on 20th October. Windows Update offered the 22H2 Feature Update on 20th September 2022. It got the 23H2 Feature Update on 4th November 2023 through Windows Update.

    My SYSTEM THREE is a Dell Latitude 5410, i7-10610U, 32GB RAM, 512GB ssd, supported device running Windows 11 Pro (and all my Hyper-V VMs).

    My SYSTEM FOUR is a 2-in-1 convertible Lenovo Yoga 11e 20DA, Celeron N2930, 4GB RAM, 256GB ssd. Unsupported device: currently running Win10 Pro, plus Win11 Pro RTM and Insider Beta as native boot vhdx.

    My SYSTEM FIVE is a Dell Latitude 3190 2-in-1, Pentium Silver N5030, 4GB RAM, 512GB NVMe ssd, supported device running Windows 11 Pro, plus the Insider Beta, Dev, and Canary builds as a native boot .vhdx.
  • Operating System
    Windows 11 Pro
    Computer type
    Laptop
    Manufacturer/Model
    Dell Lattitude E4310
    CPU
    Intel® Core™ i5-520M
    Motherboard
    0T6M8G
    Memory
    8GB
    Graphics card(s)
    (integrated graphics) Intel HD Graphics
    Screen Resolution
    1366x768
    Hard Drives
    500GB Crucial MX500 SSD
    Browser
    Firefox, Edge
    Antivirus
    Defender
    Other Info
    unsupported machine: Legacy bios, MBR, TPM 1.2, upgraded from W10 to W11 using W10/W11 hybrid install media workaround. In-place upgrade to 22H2 using ISO and a workaround. Feature Update to 23H2 by manually installing the Enablement Package.

    My SYSTEM THREE is a Dell Latitude 5410, i7-10610U, 32GB RAM, 512GB ssd, supported device running Windows 11 Pro (and all my Hyper-V VMs).

    My SYSTEM FOUR is a 2-in-1 convertible Lenovo Yoga 11e 20DA, Celeron N2930, 4GB RAM, 256GB ssd. Unsupported device: currently running Win10 Pro, plus Win11 Pro RTM and Insider Beta as native boot vhdx.

    My SYSTEM FIVE is a Dell Latitude 3190 2-in-1, Pentium Silver N5030, 4GB RAM, 512GB NVMe ssd, supported device running Windows 11 Pro, plus the Insider Beta, Dev, and Canary builds as a native boot .vhdx.
The way I have done it in the past is a variation on that theme. I use the Macrium Rescue Media Creator to make an ISO file. Then I boot a new VM from that ISO and use it to restore a Macrium image to the VM's blank .vhdx.
Sure, but how do you access host drive containing image as enhanced mode will not work in winpe mode?

I know you can take a drive offline from host OS and do it that way, but I always found that cumbersome.

A way I have done it is to put image in a vm first and also attach that.
 

My Computer

System One

  • OS
    Windows 10 Pro + others in VHDs
    Computer type
    Laptop
    Manufacturer/Model
    ASUS Vivobook 14
    CPU
    I7
    Motherboard
    Yep, Laptop has one.
    Memory
    16 GB
    Graphics Card(s)
    Integrated Intel Iris XE
    Sound Card
    Realtek built in
    Monitor(s) Displays
    N/A
    Screen Resolution
    1920x1080
    Hard Drives
    1 TB Optane NVME SSD, 1 TB NVME SSD
    PSU
    Yep, got one
    Case
    Yep, got one
    Cooling
    Stella Artois
    Keyboard
    Built in
    Mouse
    Bluetooth , wired
    Internet Speed
    72 Mb/s :-(
    Browser
    Edge mostly
    Antivirus
    Defender
    Other Info
    TPM 2.0
Sure, but how do you access host drive containing image as enhanced mode will not work in winpe mode?
I usually create a vhd, mount it and copy the image to it. Then attach it as a 2nd drive for the VM.
 

My Computers

System One System Two

  • OS
    Windows 11 Home
    Computer type
    Laptop
    Manufacturer/Model
    Acer Aspire 3 A315-23
    CPU
    AMD Athlon Silver 3050U
    Memory
    8GB
    Graphics Card(s)
    Radeon Graphics
    Monitor(s) Displays
    laptop screen
    Screen Resolution
    1366x768 native resolution, up to 2560x1440 with Radeon Virtual Super Resolution
    Hard Drives
    1TB Samsung EVO 870 SSD
    Internet Speed
    50 Mbps
    Browser
    Edge, Firefox
    Antivirus
    Defender
    Other Info
    fully 'Windows 11 ready' laptop. Windows 10 C: partition migrated from my old unsupported 'main machine' then upgraded to 11. A test migration ran Insider builds for 2 months. When 11 was released on 5th October it was re-imaged back to 10 and was offered the upgrade in Windows Update on 20th October. Windows Update offered the 22H2 Feature Update on 20th September 2022. It got the 23H2 Feature Update on 4th November 2023 through Windows Update.

    My SYSTEM THREE is a Dell Latitude 5410, i7-10610U, 32GB RAM, 512GB ssd, supported device running Windows 11 Pro (and all my Hyper-V VMs).

    My SYSTEM FOUR is a 2-in-1 convertible Lenovo Yoga 11e 20DA, Celeron N2930, 4GB RAM, 256GB ssd. Unsupported device: currently running Win10 Pro, plus Win11 Pro RTM and Insider Beta as native boot vhdx.

    My SYSTEM FIVE is a Dell Latitude 3190 2-in-1, Pentium Silver N5030, 4GB RAM, 512GB NVMe ssd, supported device running Windows 11 Pro, plus the Insider Beta, Dev, and Canary builds as a native boot .vhdx.
  • Operating System
    Windows 11 Pro
    Computer type
    Laptop
    Manufacturer/Model
    Dell Lattitude E4310
    CPU
    Intel® Core™ i5-520M
    Motherboard
    0T6M8G
    Memory
    8GB
    Graphics card(s)
    (integrated graphics) Intel HD Graphics
    Screen Resolution
    1366x768
    Hard Drives
    500GB Crucial MX500 SSD
    Browser
    Firefox, Edge
    Antivirus
    Defender
    Other Info
    unsupported machine: Legacy bios, MBR, TPM 1.2, upgraded from W10 to W11 using W10/W11 hybrid install media workaround. In-place upgrade to 22H2 using ISO and a workaround. Feature Update to 23H2 by manually installing the Enablement Package.

    My SYSTEM THREE is a Dell Latitude 5410, i7-10610U, 32GB RAM, 512GB ssd, supported device running Windows 11 Pro (and all my Hyper-V VMs).

    My SYSTEM FOUR is a 2-in-1 convertible Lenovo Yoga 11e 20DA, Celeron N2930, 4GB RAM, 256GB ssd. Unsupported device: currently running Win10 Pro, plus Win11 Pro RTM and Insider Beta as native boot vhdx.

    My SYSTEM FIVE is a Dell Latitude 3190 2-in-1, Pentium Silver N5030, 4GB RAM, 512GB NVMe ssd, supported device running Windows 11 Pro, plus the Insider Beta, Dev, and Canary builds as a native boot .vhdx.
I usually create a vhd, mount it and copy the image to it. Then attach it as a 2nd drive for the VM.
Ah same as I said "A way I have done it is to put image in a vhd first and also attach that.". (I did say vm but meant vhd in my earlier post - post edited).

The only real difference between my way and your way, is you attach a blank image in hyper-v and restore image inside vm, whereas I restore image on to blank vhd in host OS and then attach restored vhd to hyper-v.

Either way is fine, but I think it is rather quicker my way but equally, you can do it in background your way - 6 of 1, half dozen of other......


edit: the above techniques can be modified to other vm packages e.g. vmware provided they can use vhdx files. Not sure how easy if not using vhdx files.
 

My Computer

System One

  • OS
    Windows 10 Pro + others in VHDs
    Computer type
    Laptop
    Manufacturer/Model
    ASUS Vivobook 14
    CPU
    I7
    Motherboard
    Yep, Laptop has one.
    Memory
    16 GB
    Graphics Card(s)
    Integrated Intel Iris XE
    Sound Card
    Realtek built in
    Monitor(s) Displays
    N/A
    Screen Resolution
    1920x1080
    Hard Drives
    1 TB Optane NVME SSD, 1 TB NVME SSD
    PSU
    Yep, got one
    Case
    Yep, got one
    Cooling
    Stella Artois
    Keyboard
    Built in
    Mouse
    Bluetooth , wired
    Internet Speed
    72 Mb/s :-(
    Browser
    Edge mostly
    Antivirus
    Defender
    Other Info
    TPM 2.0
I have the info I need, I will mark the thread 'Solved', thanks to all who responded (y)
 

My Computer

System One

  • OS
    Windows 10 Pro

Latest Support Threads

Back
Top Bottom