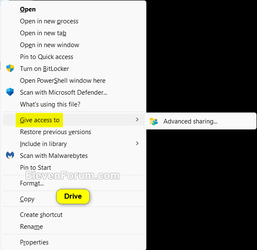
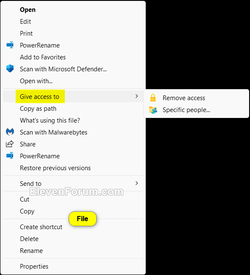
This tutorial will show you how to add or remove the Give access to context menu for your account or all users in Windows 10 and Windows 11.
The Give access to context menu makes it easy for a user to grant access to share their selected files, folders, and libraries with other users registered on the PC.
Reference:
File sharing over a network in Windows - Microsoft Support
Learn about file sharing over a network in Windows.
Contents
- Option One: Add or Remove "Give access to" context menu for Current User in Folder Options
- Option Two: Add or Remove "Give access to" context menu for Current User using REG file
- Option Three: Add or Remove "Give access to" context menu for Current User in Registry Editor
- Option Four: Add or Remove "Give access to" context menu for All Users using REG file
EXAMPLE: "Give access to" context menu
You will need to click/tap on Show more options first by default, then click/tap on Give access to.


1 Open Folder Options.
2 Click/tap on the View tab. (see screenshot below)
3 Check (on- default) or uncheck (off) Use Sharing Wizard for what you want.
4 Click/tap on OK.
This option will not work when Administrator protection is turned on.
1 Do step 2 (on) or step 3 (off) below for what you would like to do.
2 Add "Give access to" context menu for Current User
This is the default setting.
A) Click/tap on the Download button below to download the file below, and go to step 4 below.
Add_Give_access_to_context_menu_for_current_user.reg
Download
(Contents of REG file for reference)
Code:
Windows Registry Editor Version 5.00

[HKEY_CURRENT_USER\Software\Microsoft\Windows\CurrentVersion\Explorer\Advanced]
"SharingWizardOn"=dword:00000001
3 Remove "Give access to" context menu for Current User
A) Click/tap on the Download button below to download the file below, and go to step 4 below.
Remove_Give_access_from_context_menu_for_current_user.reg
Download
(Contents of REG file for reference)
Code:
Windows Registry Editor Version 5.00

[HKEY_CURRENT_USER\Software\Microsoft\Windows\CurrentVersion\Explorer\Advanced]
"SharingWizardOn"=dword:00000000
4 Save the .reg file to your desktop.
5 Double click/tap on the downloaded .reg file to merge it.
6 When prompted, click/tap on Run, Yes (UAC), Yes, and OK to approve the merge.
7 You may need to Refresh (F5) the current File Explorer window or Desktop to apply.
8 You can now delete the downloaded .reg file if you like.
1 Open Registry Editor (regedit.exe).
2 Navigate to the key location below in the left pane of Registry Editor. (see screenshot below step 3)
HKEY_USERS\<SID>\Software\Microsoft\Windows\CurrentVersion\Explorer\Advanced
Substitute <SID> in the key path above with the actual SID for the account you want to apply this to.
For example:
HKEY_USERS\S-1-5-21-2498639629-3946114050-4100787084-1001\Software\Microsoft\Windows\CurrentVersion\Explorer\Advanced
3 In the right pane of the Advanced key, double click/tap on the SharingWizardOn DWORD to modify it. (see screenshot below)
4 Enter 0 (remove) or 1 (add - default) for what you want, and click/tap on OK. (see screenshot below)
5 You may need to Refresh (F5) the current File Explorer window or Desktop to apply.
6 You can now close Registry Editor if you like.
You must be signed in as an administrator to use this option.
1 Do step 2 (add) or step 3 (remove) below for what you would like to do.
2. Add "Give access to" context menu for All Users
This is the default setting to allow Option One, Option Two, and Option Three to work.
A) Click/tap on the Download button below to download the file below, and go to step 4 below.
Add_Give_access_to_context_menu_for_all_users.reg
Download
(Contents of REG file for reference)
Code:
Windows Registry Editor Version 5.00

[HKEY_CLASSES_ROOT\*\shellex\ContextMenuHandlers\Sharing]
@="{f81e9010-6ea4-11ce-a7ff-00aa003ca9f6}"

[HKEY_CLASSES_ROOT\Directory\Background\shellex\ContextMenuHandlers\Sharing]
@="{f81e9010-6ea4-11ce-a7ff-00aa003ca9f6}"

[HKEY_CLASSES_ROOT\Directory\shellex\ContextMenuHandlers\Sharing]
@="{f81e9010-6ea4-11ce-a7ff-00aa003ca9f6}"

[HKEY_CLASSES_ROOT\Directory\shellex\CopyHookHandlers\Sharing]
@="{40dd6e20-7c17-11ce-a804-00aa003ca9f6}"

[HKEY_CLASSES_ROOT\Drive\shellex\ContextMenuHandlers\Sharing]
@="{f81e9010-6ea4-11ce-a7ff-00aa003ca9f6}"

[HKEY_CLASSES_ROOT\LibraryFolder\background\shellex\ContextMenuHandlers\Sharing]
@="{f81e9010-6ea4-11ce-a7ff-00aa003ca9f6}"

[HKEY_CLASSES_ROOT\UserLibraryFolder\shellex\ContextMenuHandlers\Sharing]
@="{f81e9010-6ea4-11ce-a7ff-00aa003ca9f6}"

[HKEY_CURRENT_USER\SOFTWARE\Microsoft\Windows\CurrentVersion\Policies\Explorer]
"NoInplaceSharing"=-

[HKEY_LOCAL_MACHINE\SOFTWARE\Microsoft\Windows\CurrentVersion\Shell Extensions\Blocked]
"{f81e9010-6ea4-11ce-a7ff-00aa003ca9f6}"=-

[HKEY_LOCAL_MACHINE\SYSTEM\CurrentControlSet\Control\Lsa]
"forceguest"=dword:00000000

[HKEY_CURRENT_USER\Software\Microsoft\Windows\CurrentVersion\Explorer\Advanced]
"SharingWizardOn"=dword:00000001
3. Remove "Give access to" context menu for All Users
This will override Option One, Option Two, and Option Three.
A) Click/tap on the Download button below to download the file below, and go to step 4 below.
Remove_Give_access_from_context_menu_for_all_users.reg
Download
(Contents of REG file for reference)
Code:
Windows Registry Editor Version 5.00

[-HKEY_CLASSES_ROOT\*\shellex\ContextMenuHandlers\Sharing]

[-HKEY_CLASSES_ROOT\Directory\Background\shellex\ContextMenuHandlers\Sharing]

[-HKEY_CLASSES_ROOT\Directory\shellex\ContextMenuHandlers\Sharing]

[-HKEY_CLASSES_ROOT\Drive\shellex\ContextMenuHandlers\Sharing]

[-HKEY_CLASSES_ROOT\LibraryFolder\background\shellex\ContextMenuHandlers\Sharing]

[-HKEY_CLASSES_ROOT\UserLibraryFolder\shellex\ContextMenuHandlers\Sharing]
4 Save the .reg file to your desktop.
5 Double click/tap on the downloaded .reg file to merge it.
6 When prompted, click/tap on Run, Yes (UAC), Yes, and OK to approve the merge.
7 You can now delete the downloaded .reg file if you like.
That's it,
Shawn Brink
Attachments
-
Add_Give_access_to_context_menu_for_all_users.reg2.9 KB · Views: 757
-
Add_Give_access_to_context_menu_for_current_user.reg640 bytes · Views: 989
-
Remove_Give_access_from_context_menu_for_all_users.reg1.3 KB · Views: 1,300
-
Remove_Give_access_from_context_menu_for_current_user.reg640 bytes · Views: 1,434
Last edited:


