This tutorial will show you how to change the picture for your local account or Microsoft account in Windows 11.
You can change your local account or Microsoft account picture in Windows 11 to have more of a personal touch that reflects you.
A Microsoft account picture will sync by default to all PCs, devices, and Microsoft services you sign in to with the same Microsoft account.
Reference:
Change Your Account Picture in Windows - Microsoft Support
Learn how to change your account picture in Windows.
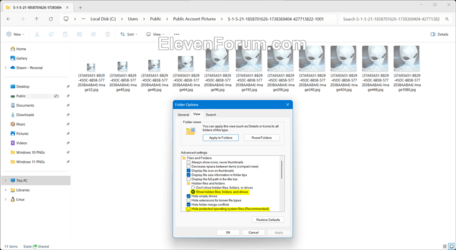
The account picture per account is cached in the folder below. You will need to turn on both Show hidden files, folders, and drives and Hide protected operating system files to see the images.
C:\Users\Public\Public Account Pictures\<SID of user>
These account pictures are also referenced in Registry Editor (regedit.exe) in the key below:
HKEY_LOCAL_MACHINE\SOFTWARE\Microsoft\Windows\CurrentVersion\AccountPicture\Users\<SID of user>

Contents
- Option One: Change Local Account or Microsoft Account Picture in Settings
- Option Two: Change Microsoft Account Picture Online at Microsoft
1 Open Settings (Win+I).
2 Click/tap on Accounts on the left side, and click/tap on Your info on the right side. (see screenshot below)
Open Your info settings
3 Do step 4 (Take a photo) or step 5 (Choose a file) below for what you want.
4 "Take a photo" for Account Picture
This option is only available if your device has a camera (webcam) to take a selfie with.
A) Click/tap on Open Camera to "Take a photo" under Adjust your photo. (see screenshot below)
B) When ready, click/tap on the Take photo button in the Camera app. (see screenshot below)
C) Adjust the photo borders if needed, and click/tap on Done when finished. (see screenshot below)
D) Go to step 7. (see screenshot below)
5 "Choose a file" for Account Picture
A) Click/tap on Browse files to "Choose a file" under Adjust your photo. (see screenshot below)
B) Navigate to and select the image file you want, and click/tap on Choose picture. (see screenshot below)
C) Go to step 7. (see screenshot below)
7 You can now close Settings if you like.
1 Sign in to the Your info page at Microsoft with your Microsoft account.
2 Click/tap on Add a photo or Change photo. (see screenshot below)
3 Click/tap on the Add a photo link. (see screenshot below)
4 Navigate to and select the image file you want, and click/tap on Open. (see screenshot below)
5 Adjust the photo if needed, and click/tap on Save when finished. (see screenshot below)
6 Click/tap on Close. (see screenshot below)
7 Your new Microsoft account picture will eventually (usually within 24 hours) sync to all devices you sign in to with the same Microsoft account.
That's it,
Shawn Brink
Last edited:


