This tutorial will show you how to change which category an app will appear in for the Start Menu All apps section for your account in Windows 11.
The Start menu in Windows 11 is comprised of three sections: Pinned, Recent, and All apps.
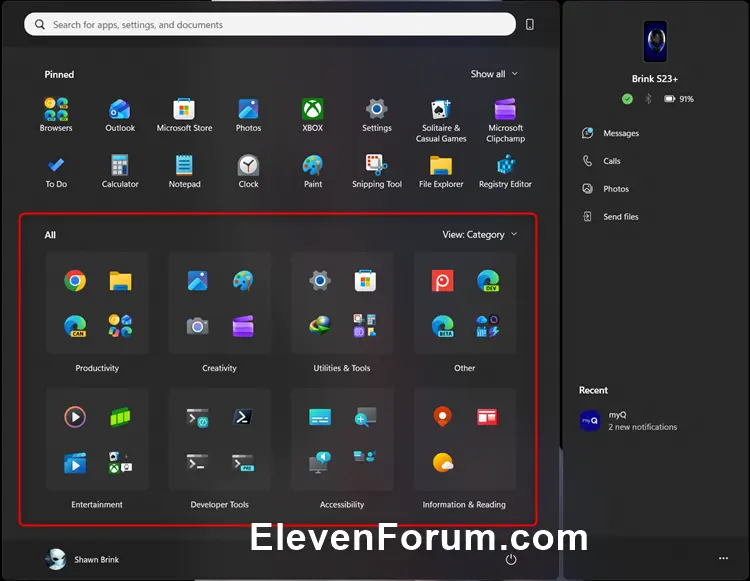
The All apps section on the Start menu shows all your installed apps in either a Category, Grid, or List view. With All now on the top-level, apps are easily accessible without having to navigate to a secondary page. The new default Category view automatically groups your apps by category for quick access to your most used categories and apps. So, if your most used apps are Outlook and Solitaire, you can expect those apps to bubble up to the top in their respective categories. Categories are formed when there are at least 3 apps in each respective category. Otherwise, they will remain in the “Other” category. Grid view is ordered alphabetically like List view but allows for better scanning of all your installed apps with more horizontal real estate. The Start menu will remember your last used view so you can reliably launch your apps with the view you prefer most.
The All apps section automatically organizes apps into the Productivity, Creativity, Utilities & Tools, Other, Entertainment, Developer Tools, Accessibility, and Information & Reading categories by default.
When you have the Start Menu All apps section set to Category view, you can change which category each app appears in to customize it how you want instead of the default category.
EXAMPLE: Start Menu All apps section in Category view
Here's How:
1 Open Registry Editor (regedit.exe).
2 Navigate to the key below in the left pane of Registry Editor. (see screenshota below step 5)
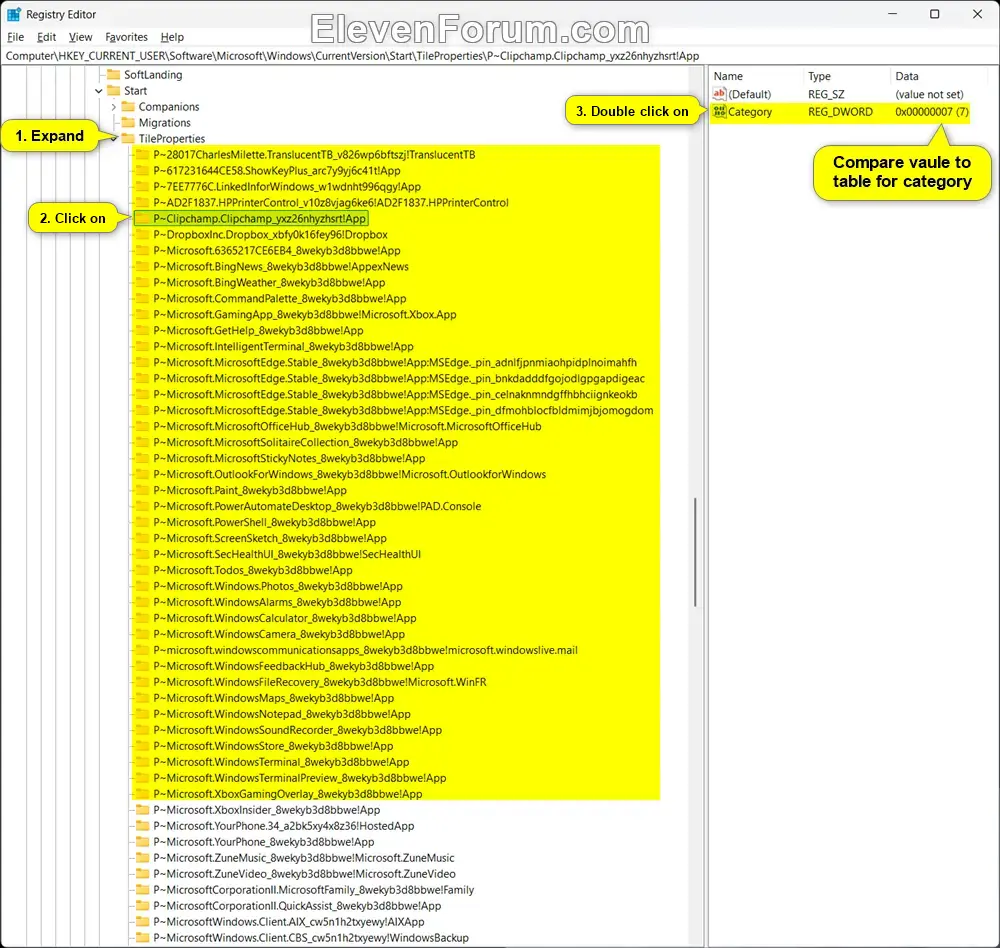
3 Expand open the TileProperties key in the left pane to see a list of all apps. (see screenshots below step 5)
4 Click/tap on an app (ex: "P~Clipchamp.Clipchamp_yxz26nhyzhsrt!App") you want to change which category it appears in on the Start Menu All apps section. (see screenshots below step 5)
5 In the right pane of the app (ex: "P~Clipchamp.Clipchamp_yxz26nhyzhsrt!App"), double click/tap on the Category DWORD to modify it. (see screenshots below)
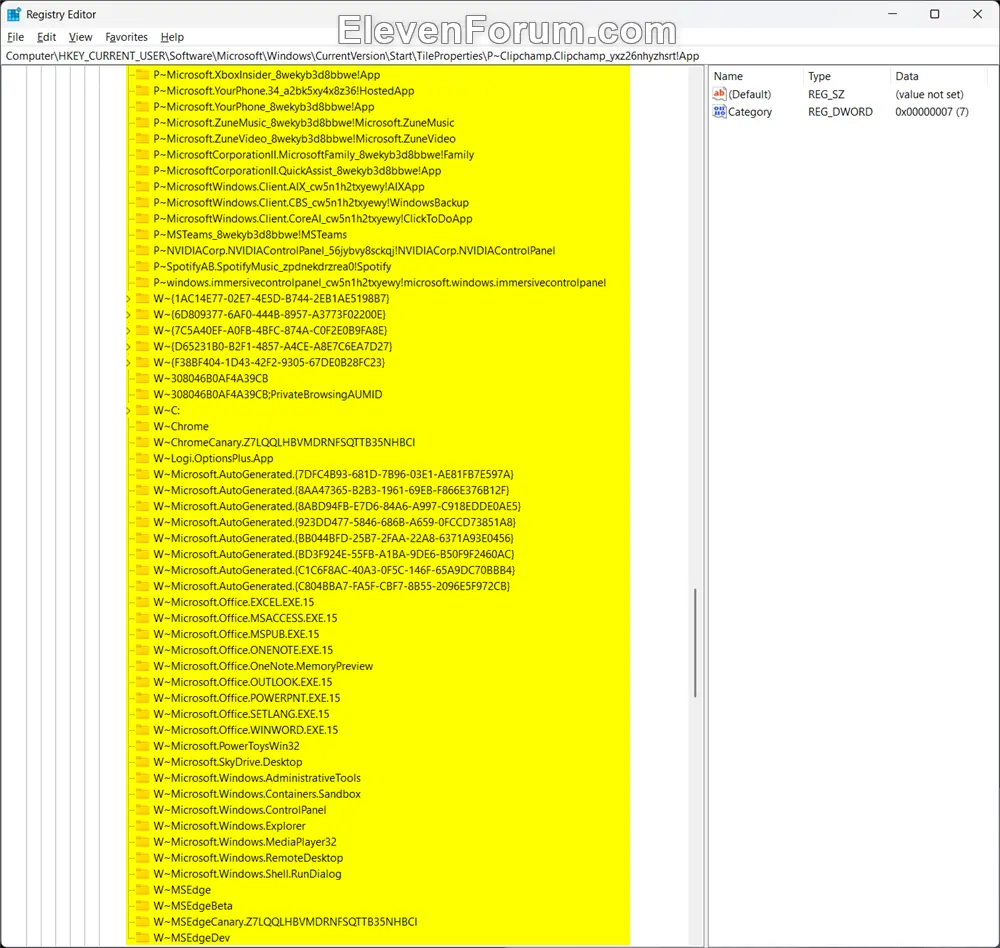
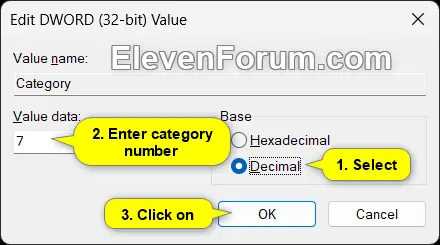
6 Select (dot) Decimal, enter a value data from the table below for the category you want the app to appear in, and click/tap on OK. (see screenshot below)
7 When finished changing categories for apps, you can close Registry Editor.
8 Either restart explorer process, sign out and sign in, or restart the computer to apply your changes.
That's it,
Shawn Brink
The Start menu in Windows 11 is comprised of three sections: Pinned, Recent, and All apps.
The All apps section on the Start menu shows all your installed apps in either a Category, Grid, or List view. With All now on the top-level, apps are easily accessible without having to navigate to a secondary page. The new default Category view automatically groups your apps by category for quick access to your most used categories and apps. So, if your most used apps are Outlook and Solitaire, you can expect those apps to bubble up to the top in their respective categories. Categories are formed when there are at least 3 apps in each respective category. Otherwise, they will remain in the “Other” category. Grid view is ordered alphabetically like List view but allows for better scanning of all your installed apps with more horizontal real estate. The Start menu will remember your last used view so you can reliably launch your apps with the view you prefer most.
The All apps section automatically organizes apps into the Productivity, Creativity, Utilities & Tools, Other, Entertainment, Developer Tools, Accessibility, and Information & Reading categories by default.
When you have the Start Menu All apps section set to Category view, you can change which category each app appears in to customize it how you want instead of the default category.
EXAMPLE: Start Menu All apps section in Category view
Here's How:
1 Open Registry Editor (regedit.exe).
2 Navigate to the key below in the left pane of Registry Editor. (see screenshota below step 5)
HKEY_CURRENT_USER\Software\Microsoft\Windows\CurrentVersion\Start\TileProperties
3 Expand open the TileProperties key in the left pane to see a list of all apps. (see screenshots below step 5)
4 Click/tap on an app (ex: "P~Clipchamp.Clipchamp_yxz26nhyzhsrt!App") you want to change which category it appears in on the Start Menu All apps section. (see screenshots below step 5)
5 In the right pane of the app (ex: "P~Clipchamp.Clipchamp_yxz26nhyzhsrt!App"), double click/tap on the Category DWORD to modify it. (see screenshots below)
6 Select (dot) Decimal, enter a value data from the table below for the category you want the app to appear in, and click/tap on OK. (see screenshot below)
Category | Value Data |
|---|---|
| (none) | 0 |
| Accessibility | 1 |
| Creativity | 7, 23 |
| Developer Tools | 15 |
| Entertainment | 3, 16, 17 |
| Information & Reading | 21, 25 |
| Other | 2, 10 |
| Productivity | 5, 13 |
| Utilities & Tools | 9 |
7 When finished changing categories for apps, you can close Registry Editor.
8 Either restart explorer process, sign out and sign in, or restart the computer to apply your changes.
That's it,
Shawn Brink
Attachments
Last edited: