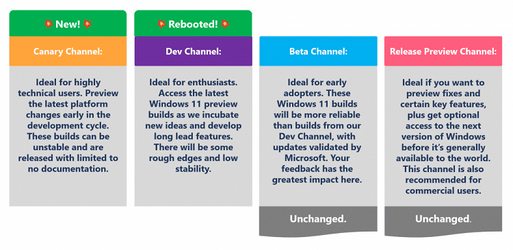
This tutorial will show you how to change your Windows Insider Program channel to the Beta, Experimental, or Release Preview channel to get Insider preview builds of Windows 11 on your PC.
Flighting is the process of running Windows Insider Preview Builds on your device. When you run these early versions of Windows and give Microsoft feedback, you can help Microsoft shape the future of Windows. Once you've registered for the Windows Insider Program, you can run Insider Preview builds on as many devices as you want, each in the channel of your choice.
- Beta (25H2 or 26H1)
- Experimental (26H2) for latest features
- Experimental (26H1)
- Experimental (Future Platforms)
- Release Preview (24H2, 25H2, 26H1, 26H2)
Depending on your channel today, leaving the Windows Insider Program or even moving between channels can sometimes require wiping your device and doing a clean install of Windows. That can be a barrier both for people considering the program and for Insiders who want to leave. To make this a more streamlined and consistent experience, Microsoft is making some behind the scenes changes to enable Insider builds to use an in-place upgrade (IPU) to hop between versions. This will allow in most cases Insiders to move between Experimental, Beta, and Release Preview on the same Windows core version, or leave the program without a clean install. An IPU takes a bit more time than your normal update but migrates your apps, settings, and data in-place. As Experimental Future Platforms is our earliest preview build option and does not align to a retail production build of Windows, moving to a different channel or out of the WIP program will still require a clean install.
References:
Flight Hub - Windows Insider Program
Join Windows Insider – Get early access to Windows 11 features & updates
Deeper look at running Windows Insider Preview Builds - Windows Insider Program

Windows Insiders moving to Experimental and Beta on Windows 11
 www.elevenforum.com

Microsoft improving your Windows Insider experience for Windows 11
www.elevenforum.com
This requires you have already set to get Windows Insider builds.
You must be signed in as an administrator to change the Insider channel.
- Option One: Change Windows Insider Program Channel for Windows 11 in Settings
- Option Two: Change Windows Insider Program Channel for Windows 11 using REG file
- Option Three: Specify Windows Insider Program Channel for Windows 11 in Local Group Policy Editor
- Option Four: Specify Windows Insider Program Channel for Windows 11 using REG file
1 Open Settings (Win+I).
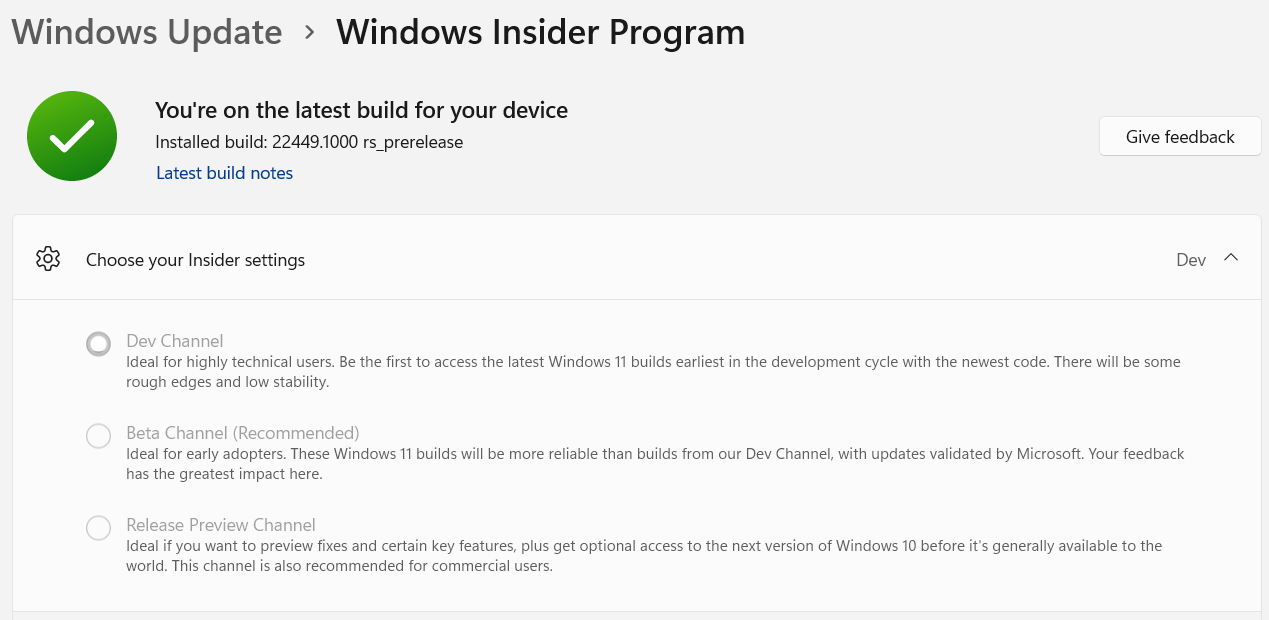
2 Click/tap on Windows Update on the left side, and click/tap on Windows Insider Program on the right side. (see screenshot below)
3 Do step 4 (Beta), step 5 (Experimental), step 6 (Experimental 26H1), step 7 (Experimental Future Platforms), or step 8 (Release Preview) below for what you want.
If Select your experience or Choose your Insider settings is missing from your Settings, then perform the following steps to restore it:
1) Open an elevated Windows Terminal, and select Command Prompt.
2) Copy and paste the bcdedit /set flightsigning on command into the elevated terminal, and press Enter.
3) Copy and paste the bcdedit /set {bootmgr} flightsigning on command into the elevated terminal, and press Enter.
4) Restart the computer to apply.
This option makes the same changes in Settings like in Option One.
1 Do step 2 (Experimental), step 3 (Experimental 26H1), step 4 (Experimental Future-Platforms), step 5 (Beta 25H2), step 6 (Beta 26H1), or step 7 (Release Preview 25H2), or step 8 (Release Preview 26H1) below for which Insider channel you want.
(Contents of REG file for reference)
Windows Registry Editor Version 5.00

[HKEY_LOCAL_MACHINE\SOFTWARE\Microsoft\WindowsSelfHost\UI\Selection]
"AdvancedToggleState"=dword:00000000
"OptOutState"=dword:00000000
"UIBranch"="Dev"
"UIContentType"="Mainline"
"UIRing"="External"
"UITargetVersion"=dword:00006658(Contents of REG file for reference)
Windows Registry Editor Version 5.00

[HKEY_LOCAL_MACHINE\SOFTWARE\Microsoft\WindowsSelfHost\UI\Selection]
"AdvancedToggleState"=dword:00000000
"OptOutState"=dword:00000000
"UIBranch"="Dev"
"UIContentType"="Mainline"
"UIRing"="External"
"UITargetVersion"=dword:00006d60(Contents of REG file for reference)
Windows Registry Editor Version 5.00

[HKEY_LOCAL_MACHINE\SOFTWARE\Microsoft\WindowsSelfHost\UI\Selection]
"AdvancedToggleState"=dword:00000000
"OptOutState"=dword:00000000
"UIBranch"="Dev"
"UIContentType"="Mainline"
"UIRing"="External"
"UITargetVersion"=dword:ffffffff(Contents of REG file for reference)
Windows Registry Editor Version 5.00

[HKEY_LOCAL_MACHINE\SOFTWARE\Microsoft\WindowsSelfHost\UI\Selection]
"AdvancedToggleState"=dword:00000000
"OptOutState"=dword:00000000
"UIBranch"="Beta"
"UIContentType"="Mainline"
"UIRing"="External"
"UITargetVersion"=dword:00006658(Contents of REG file for reference)
Windows Registry Editor Version 5.00

[HKEY_LOCAL_MACHINE\SOFTWARE\Microsoft\WindowsSelfHost\UI\Selection]
"AdvancedToggleState"=dword:00000000
"OptOutState"=dword:00000000
"UIBranch"="Beta"
"UIContentType"="Mainline"
"UIRing"="External"
"UITargetVersion"=dword:00006d60(Contents of REG file for reference)
Windows Registry Editor Version 5.00

[HKEY_LOCAL_MACHINE\SOFTWARE\Microsoft\WindowsSelfHost\UI\Selection]
"AdvancedToggleState"=dword:00000000
"OptOutState"=dword:00000000
"ReleasePreviewSelectable"=dword:00000001
"UIBranch"="ReleasePreview"
"UIContentType"="Mainline"
"UIRing"="External"
"UITargetVersion"=dword:00006658(Contents of REG file for reference)
Windows Registry Editor Version 5.00

[HKEY_LOCAL_MACHINE\SOFTWARE\Microsoft\WindowsSelfHost\UI\Selection]
"AdvancedToggleState"=dword:00000000
"OptOutState"=dword:00000000
"ReleasePreviewSelectable"=dword:00000001
"UIBranch"="ReleasePreview"
"UIContentType"="Mainline"
"UIRing"="External"
"UITargetVersion"=dword:00006d60
9 Save the .reg file to your desktop.
10 If you have Smart App Control turned on, you will need to unblock the downloaded REG file.
11 Double click/tap on the downloaded .reg file to merge it.
12 When prompted, click/tap on Run, Yes (UAC), Yes, and OK to approve the merge.
13 You can now delete the downloaded .reg file if you like.
14 Check for updates, and click/tap on Restart now when prompted to complete.
The Local Group Policy Editor is only available in the Windows 11 Pro, Enterprise, and Education editions.
All editions can use Option Four to configure the same policy.
1 Open the Local Group Policy Editor (gpedit.msc).
2 Navigate to the policy location below in the left pane of the Local Group Policy Editor. (see screenshot below)
3 In the right pane of Manage update offered from Windows Update in the Local Group Policy Editor, double click/tap on the Manage preview builds policy to edit it. (see screenshot above)
4 Do step 5 (default) or step 6 (specify) below for what you want.
This is the default setting to allow using Option One and Option Two.
7 You can now close the Local Group Policy Editor if you like.
8 Check for updates, and click/tap on Restart now when prompted to complete.
1 Do step 2 (default), step 3 (Dev), step 4 (Beta), or step 5 (Release Preview) below for what you want.
This is the default setting to allow using Option One and Option Two.
(Contents of REG file for reference)
Windows Registry Editor Version 5.00

[HKEY_LOCAL_MACHINE\SOFTWARE\Policies\Microsoft\Windows\WindowsUpdate]
"ManagePreviewBuildsPolicyValue"=-
"BranchReadinessLevel"=-This will override and prevent using Option One and Option Two.
(Contents of REG file for reference)
Windows Registry Editor Version 5.00

[HKEY_LOCAL_MACHINE\SOFTWARE\Policies\Microsoft\Windows\WindowsUpdate]
"ManagePreviewBuildsPolicyValue"=dword:00000002
"BranchReadinessLevel"=dword:00000002This will override and prevent using Option One and Option Two.
(Contents of REG file for reference)
Windows Registry Editor Version 5.00

[HKEY_LOCAL_MACHINE\SOFTWARE\Policies\Microsoft\Windows\WindowsUpdate]
"ManagePreviewBuildsPolicyValue"=dword:00000004
"BranchReadinessLevel"=dword:00000002This will override and prevent using Option One and Option Two.
(Contents of REG file for reference)
Windows Registry Editor Version 5.00

[HKEY_LOCAL_MACHINE\SOFTWARE\Policies\Microsoft\Windows\WindowsUpdate]
"ManagePreviewBuildsPolicyValue"=dword:00000002
"BranchReadinessLevel"=dword:00000008
6 Save the REG file to your desktop.
7 If you have Smart App Control turned on, you will need to unblock the downloaded REG file.
8 Double click/tap on the downloaded REG file to merge it.
9 When prompted, click/tap on Run, Yes (UAC), Yes, and OK to approve the merge.
10 You can now delete the downloaded REG file if you like.
11 Check for updates, and click/tap on Restart now when prompted to complete.
That's it,
Shawn Brink
Attachments
-
 New-Channels.png73 KB · Views: 274
 -
Specify_Beta_channel.reg726 bytes · Views: 395
-
Default_user-choice_Insider_Channel.reg674 bytes · Views: 447
-
Specify_Dev_channel.reg726 bytes · Views: 444
-
Specify_Release_Preview_channel.reg726 bytes · Views: 452
-
Switch_to_Experimental_26H1_Channel.reg930 bytes · Views: 137
-
Switch_to_Experimental_Future_Platforms_Channel.reg930 bytes · Views: 176
-
Switch_to_Release_Preview_26H1_Channel.reg1 KB · Views: 107
-
Switch_to_Beta_25H2_Channel.reg932 bytes · Views: 90
-
Switch_to_Beta_26H1_Channel.reg932 bytes · Views: 95
-
Switch_to_Experimental_25H2-26H2_Channel.reg930 bytes · Views: 48
-
Switch_to_Release_Preview_25H2-26H2_Channel.reg1 KB · Views: 52