Custom Recovery Partition from F9 Key?


HsRada18

New member
Local time
2:32 AM
Posts
4
OS
Windows 11
I’ve been reading up on this topic but I can only find ways to make a custom install.wim and boot.wim with all the updated drivers incorporated using DSIM. This only leads me to making a custom recovery USB via Rufus.

However, I would like to make these part of a recovery partition on a new SSD that executes when pressing F9 on the startup logo screen which is exactly like the factory reset but having up to date drivers and zero bloatware.

What is the step by step process? Or an easy tutorial that I can follow. Thanks!!
 
Windows Build/Version
23H2 22631.2861

My Computer

System One

  • OS
    Windows 11
    Computer type
    Laptop
    Manufacturer/Model
    ASUS
It is simply easier to just make an image backup using tool like Macrium Reflect, Aoemi Backupper, Hasleo Backup etc.

Making custom install.wims requires a fair bit of skill and if you really want to go down this route, you should read tutorials in www.tenforums.com by @Kari.

It would take far too long to basically repeat what is in the tutorials.
 

My Computer

System One

  • OS
    Windows 10 Pro + others in VHDs
    Computer type
    Laptop
    Manufacturer/Model
    ASUS Vivobook 14
    CPU
    I7
    Motherboard
    Yep, Laptop has one.
    Memory
    16 GB
    Graphics Card(s)
    Integrated Intel Iris XE
    Sound Card
    Realtek built in
    Monitor(s) Displays
    N/A
    Screen Resolution
    1920x1080
    Hard Drives
    1 TB Optane NVME SSD, 1 TB NVME SSD
    PSU
    Yep, got one
    Case
    Yep, got one
    Cooling
    Stella Artois
    Keyboard
    Built in
    Mouse
    Bluetooth , wired
    Internet Speed
    72 Mb/s :-(
    Browser
    Edge mostly
    Antivirus
    Defender
    Other Info
    TPM 2.0
However, I would like to make these part of a recovery partition on a new SSD that executes when pressing F9 on the startup logo screen which is exactly like the factory reset but having up to date drivers and zero bloatware.

It is fairly simple.

1. Copy the contents of the installation media onto the partition.

2. Replace the original sources\install.wim with your own install.wim
(Very easy to capture your current os partition using dism++ and save it as install.wim ).

3. Add a winpe f9 boot menu entry pointing at \sources\boot.wim on the recovery partition

1 and 2 are child's play. Number 3 is a bit beyond complete beginner. I can do a batch file that will do number 3.
 
Last edited:

My Computers

System One System Two

  • OS
    Win7
    Computer type
    PC/Desktop
    CPU
    i5-8400
    Motherboard
    gigabyte b365m ds3h
    Memory
    2x8gb 3200mhz
    Monitor(s) Displays
    benq gw2480
    PSU
    bequiet pure power 11 400CM
    Cooling
    cryorig m9i
  • Operating System
    win7
    Computer type
    PC/Desktop
    CPU
    pentium g5400
    Motherboard
    gigabyte b365m ds3h
    Memory
    1x8gb 2400
    PSU
    xfx pro 450
It is fairly simple.

1. Copy the contents of the installation media onto the partition.

2. Replace the original sources\install.wim with your own install.wim
(Very easy to capture your current os partition using dism++ and save it as install.wim ).

3. Add a winpe f9 boot menu entry pointing at \sources\boot.wim on the recovery partition

1 and 2 are child's play. Number 3 is a bit beyond complete beginner. I can do a batch file that will do number 3.
I understand how to do #1 and #2 to create a custom boot.wim with critical drivers and install.swm which includes all the drivers using DSIM.

But after I have wiped the drive completely using Parted Magic, created a recovery partition which houses the custom boot.wim and install#.swm, and the rest formatted being the active partition for the working installed OS, what do I specifically do to create a F9 key press option as you describe in 3.

I know how to do this already in Windows 10 as described in part three. But that's a menu option that pops up every time I turn on the computer versus when ONLY pressing F9 so not quite like the factory recovery boot.
 

My Computer

System One

  • OS
    Windows 11
    Computer type
    Laptop
    Manufacturer/Model
    ASUS
scancode for F9 is 4300

bcdedit.exe -SET {BOOTMGR} custom:0x54000001 {loaderguid}
bcdedit.exe -SET {BOOTMGR} customactions 0x1000043000001 0x54000001
bcdedit.exe -displayorder {loaderguid} /remove

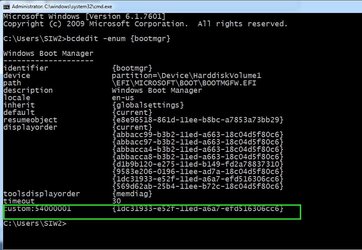
They must be sequential. 0x54000001 0x54000002 etc. If you don't already have any, start with 0x54000001
First check so check if any already exist
For example here there is already 54000001


customaction.jpg

so to add another use 0x54000002
 
Last edited:

My Computers

System One System Two

  • OS
    Win7
    Computer type
    PC/Desktop
    CPU
    i5-8400
    Motherboard
    gigabyte b365m ds3h
    Memory
    2x8gb 3200mhz
    Monitor(s) Displays
    benq gw2480
    PSU
    bequiet pure power 11 400CM
    Cooling
    cryorig m9i
  • Operating System
    win7
    Computer type
    PC/Desktop
    CPU
    pentium g5400
    Motherboard
    gigabyte b365m ds3h
    Memory
    1x8gb 2400
    PSU
    xfx pro 450
I know how to do this already in Windows 10 as described in part three. But that's a menu option that pops up every time I turn on the computer versus when ONLY pressing F9 so not quite like the factory recovery boot.
If you have already set up the usual winpe entry which displays on the menu , then just find the loader guid and change it to scankey using the 3 bcdedit commands in the above post. .

The first two commands add the key action to bootmgr and the third one removes the display.
 

My Computers

System One System Two

  • OS
    Win7
    Computer type
    PC/Desktop
    CPU
    i5-8400
    Motherboard
    gigabyte b365m ds3h
    Memory
    2x8gb 3200mhz
    Monitor(s) Displays
    benq gw2480
    PSU
    bequiet pure power 11 400CM
    Cooling
    cryorig m9i
  • Operating System
    win7
    Computer type
    PC/Desktop
    CPU
    pentium g5400
    Motherboard
    gigabyte b365m ds3h
    Memory
    1x8gb 2400
    PSU
    xfx pro 450
For example run bcdedit -enum to find the loader guid for the entry you want to change to scankey

mac-bcd-entry.jpg

{9583e206-0196-11ee-ad7a-18c04d5f80c6} is the {loader-guid} also called "identifier"


If like me there are very many entries , a simple way to list them all is
bcdedit -enum |findstr "iden desc" which will list just the identifiers and the descriptions
 

My Computers

System One System Two

  • OS
    Win7
    Computer type
    PC/Desktop
    CPU
    i5-8400
    Motherboard
    gigabyte b365m ds3h
    Memory
    2x8gb 3200mhz
    Monitor(s) Displays
    benq gw2480
    PSU
    bequiet pure power 11 400CM
    Cooling
    cryorig m9i
  • Operating System
    win7
    Computer type
    PC/Desktop
    CPU
    pentium g5400
    Motherboard
    gigabyte b365m ds3h
    Memory
    1x8gb 2400
    PSU
    xfx pro 450
If you have already set up the usual winpe entry which displays on the menu , then just find the loader guid and change it to scankey using the 3 bcdedit commands in the above post. .

The first two commands add the key action to bootmgr and the third one removes the display.
Thanks! This is a helpful explanation. I will first experiment with this on my Win 10 laptop before trying this on my new laptop.

If you have a copy of your batch file used to make this happen, I would appreciate the post. Thanks again!
 

My Computer

System One

  • OS
    Windows 11
    Computer type
    Laptop
    Manufacturer/Model
    ASUS
If you already have the winpe entry it is simple to change to scankey as above.

If you dont already have it, then it is just those 3 commands added to the usual batch file for adding winpe entry.
 
Last edited:

My Computers

System One System Two

  • OS
    Win7
    Computer type
    PC/Desktop
    CPU
    i5-8400
    Motherboard
    gigabyte b365m ds3h
    Memory
    2x8gb 3200mhz
    Monitor(s) Displays
    benq gw2480
    PSU
    bequiet pure power 11 400CM
    Cooling
    cryorig m9i
  • Operating System
    win7
    Computer type
    PC/Desktop
    CPU
    pentium g5400
    Motherboard
    gigabyte b365m ds3h
    Memory
    1x8gb 2400
    PSU
    xfx pro 450
If you have a copy of your batch file used to make this happen

The usual way for a winpe boot menu entry- just change the bolded paths to point at whatever wim and sdi file you want and any desccription as appropriate

@echo off
set pedrive=%systemdrive%
set pewimpath=\boot\macrium\WinREFiles\media\sources\boot.wim
set mydescription="Macrium Pe"
set sdipath=\boot\macrium\WinREFiles\media\Boot\boot.sdi

IF NOT EXIST %pedrive%%pewimpath% (
ECHO %pedrive%%pewimpath% not found &goto :endline
)
IF NOT EXIST %pedrive%%sdipath% (
ECHO %pedrive%%sdipath% not found &goto :endline
)

(set WLOADER=)
for /f "usebackq tokens=1,2" %%G in (`bcdedit.exe -enum {current} ^| find "path"`) do set WLOADER=%%H
if "%WLOADER%"=="" (
ECHO LOADER NOT FOUND &goto :endline
)
echo.
(set LCAL=)
for /f "usebackq tokens=1,2" %%G in (`bcdedit.exe -enum {current} ^| find "locale"`) do set LCAL=%%H
echo.
for /f "tokens=2 delims={}" %%a in ('BCDEDIT -create -d "%mydescription%" -device') do set newramdiskguid=%%a
echo new ramdisk guid is %newramdiskguid%
bcdedit.exe -set {%newramdiskguid%} ramdisksdidevice partition=%PEDRIVE%
bcdedit.exe -set {%newramdiskguid%} ramdisksdipath "%SDIPATH%"
echo.
for /f "tokens=2 delims={}" %%g in ('BCDEDIT -create -d "%mydescription%" -application osloader') do set newloaderguid=%%g
echo new loader guid is %newloaderguid%
bcdedit.exe -set {%newloaderguid%} path %WLOADER%
bcdedit.exe -set {%newloaderguid%} locale %LCAL%
bcdedit.exe -set {%newloaderguid%} systemroot \Windows
bcdedit.exe -set {%newloaderguid%} detecthal Yes
bcdedit.exe -set {%newloaderguid%} winpe Yes
bcdedit.exe -set {%newloaderguid%} osdevice ramdisk=[%PEDRIVE%]"%PEWIMPATH%",{%newramdiskguid%}
bcdedit.exe -set {%newloaderguid%} device ramdisk=[%PEDRIVE%]"%PEWIMPATH%",{%newramdiskguid%}
bcdedit.exe -displayorder {%newloaderguid%} -addlast


:endline
pause
 
Last edited:

My Computers

System One System Two

  • OS
    Win7
    Computer type
    PC/Desktop
    CPU
    i5-8400
    Motherboard
    gigabyte b365m ds3h
    Memory
    2x8gb 3200mhz
    Monitor(s) Displays
    benq gw2480
    PSU
    bequiet pure power 11 400CM
    Cooling
    cryorig m9i
  • Operating System
    win7
    Computer type
    PC/Desktop
    CPU
    pentium g5400
    Motherboard
    gigabyte b365m ds3h
    Memory
    1x8gb 2400
    PSU
    xfx pro 450
To use scancode just change the end like this

set myscan=0x1000043000001
set mycustom=0x54000001

for /f "tokens=2 delims={}" %%g in ('BCDEDIT -create -d "%mydescription%" -application osloader') do set newloaderguid=%%g
echo new loader guid is %newloaderguid%
bcdedit.exe -set {%newloaderguid%} path %WLOADER%
bcdedit.exe -set {%newloaderguid%} locale %LCAL%
bcdedit.exe -set {%newloaderguid%} systemroot \Windows
bcdedit.exe -set {%newloaderguid%} detecthal Yes
bcdedit.exe -set {%newloaderguid%} winpe Yes
bcdedit.exe -set {%newloaderguid%} osdevice ramdisk=[%PEDRIVE%]"%PEWIMPATH%",{%newramdiskguid%}
bcdedit.exe -set {%newloaderguid%} device ramdisk=[%PEDRIVE%]"%PEWIMPATH%",{%newramdiskguid%}

bcdedit.exe -SET {BOOTMGR} custom:%mycustom% {%newloaderguid%}
bcdedit.exe -SET {BOOTMGR} customactions %myscan% %mycustom%
bcdedit.exe -displayorder {%newloaderguid%} /remove
:endline
pause

Note: there is an sdi file in your os %windir%\Boot\DVD\PCAT\boot.sdi which you can use / copy it wherever you want onto the same partition as - easiest to copy it into the same folder as the bootable wim
 
Last edited:

My Computers

System One System Two

  • OS
    Win7
    Computer type
    PC/Desktop
    CPU
    i5-8400
    Motherboard
    gigabyte b365m ds3h
    Memory
    2x8gb 3200mhz
    Monitor(s) Displays
    benq gw2480
    PSU
    bequiet pure power 11 400CM
    Cooling
    cryorig m9i
  • Operating System
    win7
    Computer type
    PC/Desktop
    CPU
    pentium g5400
    Motherboard
    gigabyte b365m ds3h
    Memory
    1x8gb 2400
    PSU
    xfx pro 450
F1 3B00
F2 3C00
F3 3D00
F4 3E00
F5 3F00
F6 4000
F7 4100
F8 4200
F9 4300
F10 4400
F11 8500
F12 8600
 

My Computers

System One System Two

  • OS
    Win7
    Computer type
    PC/Desktop
    CPU
    i5-8400
    Motherboard
    gigabyte b365m ds3h
    Memory
    2x8gb 3200mhz
    Monitor(s) Displays
    benq gw2480
    PSU
    bequiet pure power 11 400CM
    Cooling
    cryorig m9i
  • Operating System
    win7
    Computer type
    PC/Desktop
    CPU
    pentium g5400
    Motherboard
    gigabyte b365m ds3h
    Memory
    1x8gb 2400
    PSU
    xfx pro 450
You can all do it now. :-)
 

My Computers

System One System Two

  • OS
    Win7
    Computer type
    PC/Desktop
    CPU
    i5-8400
    Motherboard
    gigabyte b365m ds3h
    Memory
    2x8gb 3200mhz
    Monitor(s) Displays
    benq gw2480
    PSU
    bequiet pure power 11 400CM
    Cooling
    cryorig m9i
  • Operating System
    win7
    Computer type
    PC/Desktop
    CPU
    pentium g5400
    Motherboard
    gigabyte b365m ds3h
    Memory
    1x8gb 2400
    PSU
    xfx pro 450

Latest Support Threads

Back
Top Bottom