This tutorial will show you how to change your DNS Server address and enable DNS over HTTPS (DoH) in Windows 11.
A DNS (Domain Name System) server is the service that makes it possible for you to open a web browser, type a domain name and load your favorite websites.
DNS over HTTPS (DoH), or Secure DNS, is a protocol for performing remote Domain Name System resolution via the HTTPS protocol. A goal of the method is to increase user privacy and security by preventing eavesdropping and manipulation of DNS data by man-in-the-middle attacks by using the HTTPS protocol to encrypt the data between the DoH client and the DoH-based DNS resolver.
References:

Windows Insiders gain new DNS over HTTPS controls | Microsoft Community Hub

Making DoH Discoverable: Introducing DDR | Microsoft Community Hub
You must be signed in as an administrator to change the DNS server address and enable DoH.
Here's How:
1 Open Settings (Win+I).
2 Click/tap on Network & internet on the left side. (see screenshot below)
3 Do step 4 (current), step 5 (specific), or step 6 (all Wi-Fi) below for which network connection or adapter you want to enable DoH for.
This will be for a network connection you are currently connected to.
If you have a The DNS settings for all Wi-Fi networks have been set. The settings below won't be saved. type message, then it means you used step 6 that overrides this setting. You can click/tap on the Change DNS settings for all Wi-Fi networks link instead, and then click/tap on the Edit button in step 6.
This will be for a network connection you do not have to be currently connected to.
- For Ethernet, click/tap on the connection you want to enable DoH for to expand it open.
- For Wi-Fi, click/tap on Manage known networks, and click/tap on the known Wi-Fi network connection you want to enable DoH for.
If you have a The DNS settings for all Wi-Fi networks have been set. The settings below won't be saved. type message, then it means you used step 6 that overrides this setting. You can click/tap on the Change DNS settings for all Wi-Fi networks link instead, and then click/tap on the Edit button in step 6.
This will include all connections you make from the selected Wi-Fi network adapter.
This will override what is set for a network connection in step 4 and/or step 5.
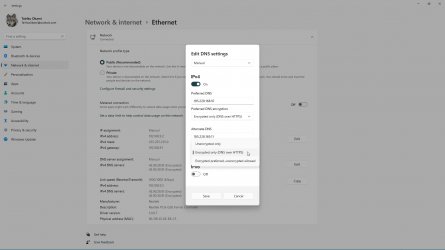
7 Select Manual in the drop menu at the top. (see screenshots below step 11)
A) Turn on IPv4. (see screenshots below step 11)
B) Type a Preferred DNS you want to use that supports DoH. (see table below)
DoH DNS server | Preferred DNS for IPv4 |
|---|---|
| Cloudflare | 1.1.1.1 |
| Google Public DNS | 8.8.8.8 |
| Quad9 | 9.9.9.9 |
C) Perform one of the following actions depending on which setting is available to you:
- If you do not have an Insider Dev build installed, select Encrypted only (DNS over HTTPS) from the Preferred DNS encryption drop menu under IPv4.
- If you do have an Insider Dev build installed, select On (automatic template) from the DNS over HTTPS drop menu under IPv4. Leave Fallback to paintext turned off.
If you do not have a Preferred DNS encryption drop menu option to select Encrypted only (DNS over HTTPS), then close Settings, change the IPv4 DNS address for this connected network adapter in the Control Panel, and start over at step 1.
You will now have the red The DNS settings for all Wi-Fi networks have been set. The settings below won't be saved. message at step 3.
D) Type an Alternate DNS you want to use that supports DoH. (see table below)
DoH DNS server | Alternate DNS for IPv4 |
|---|---|
| Cloudflare | 1.0.0.1 |
| Google Public DNS | 8.8.4.4 |
| Quad9 | 149.112.112.112 |
E) Perform one of the following actions depending on which setting is available to you:
- If you do not have an Insider Dev build installed, select Encrypted only (DNS over HTTPS) from the Preferred DNS encryption drop menu under IPv4.
- If you do have an Insider Dev build installed, select On (automatic template) from the DNS over HTTPS drop menu under IPv4. Leave Fallback to paintext turned off.
If you do not have a Alternate DNS encryption drop menu option to select Encrypted only (DNS over HTTPS), then close Settings, change the IPv4 DNS address for this connected network adapter in the Control Panel, and start over at step 1.
You will now have the red The DNS settings for all Wi-Fi networks have been set. The settings below won't be saved. message at step 3.
A) Turn on IPv6. (see screenshots below step 11)
B) Type a Preferred DNS you want to use that supports DoH. (see table below)
DoH DNS server | Preferred DNS for IPv6 |
|---|---|
| Cloudflare | 2606:4700:4700::1111 |
| Google Public DNS | 2001:4860:4860::8888 |
| Quad9 | 2620:fe::fe |
C) Perform one of the following actions depending on which setting is available to you:
- If you do not have an Insider Dev build installed, select Encrypted only (DNS over HTTPS) from the Preferred DNS encryption drop menu under IPv6.
- If you do have an Insider Dev build installed, select On (automatic template) from the DNS over HTTPS drop menu under IPv6. Leave Fallback to paintext turned off.
If you do not have a Preferred DNS encryption drop menu option to select Encrypted only (DNS over HTTPS), then close Settings, change the IPv6 DNS address for this connected network adapter in the Control Panel, and start over at step 1.
You will now have the red The DNS settings for all Wi-Fi networks have been set. The settings below won't be saved. message at step 3.
D) Type an Alternate DNS you want to use that supports DoH. (see table below)
DoH DNS server | Alternate DNS for IPv6 |
|---|---|
| Cloudflare | 2606:4700:4700::1001 |
| Google Public DNS | 2001:4860:4860::8844 |
| Quad9 | 2620:fe::9 |
E) Perform one of the following actions depending on which setting is available to you:
- If you do not have an Insider Dev build installed, select Encrypted only (DNS over HTTPS) from the Preferred DNS encryption drop menu under IPv6.
- If you do have an Insider Dev build installed, select On (automatic template) from the DNS over HTTPS drop menu under IPv6. Leave Fallback to paintext turned off.
If you do not have a Alternate DNS encryption drop menu option to select Encrypted only (DNS over HTTPS), then close Settings, change the IPv4 DNS address for this connected network adapter in the Control Panel, and start over at step 1.
You will now have the red The DNS settings for all Wi-Fi networks have been set. The settings below won't be saved. message at step 3.
10 When finished, click/tap on Save.
11 You can now close Settings if you like.
That's it,
Shawn Brink


