This tutorial will show you how to turn on or off passkey managers available to save passkeys to for your account in Windows 11.
Passkeys provide a more secure and convenient method to logging into websites and applications compared to passwords. Unlike passwords, which users must remember and type, passkeys are stored as secrets on a device and can use a device's unlock mechanism (such as biometrics or a PIN). Passkeys can be used without the need for other sign-in challenges, making the authentication process faster, secure, and more convenient.
You can use passkeys with any applications or websites that support them, to create and sign in with Windows Hello. Once a passkey is created and saved with Windows Hello, you can use your device's biometrics or PIN to sign in. Alternatively, you can use a companion device (phone or tablet) to sign in.
Windows 11 now has seamless passkey manager integration. This means you can use your passkey credential manager of choice such as 1Password or Bitwarden to use passkeys in Windows. You can turn this on via Settings > Accounts > Passkeys > Advanced options. Once you turn this on, you will need to complete user verification using Windows Hello (through biometric authentication using face recognition or fingerprint, or with a PIN). Once verified, you can use your existing passkeys saved in your passkey credential manager or save new passkeys – and your passkeys are protected by Windows Hello.
Passkeys are phish-resistant, less vulnerable to data breaches, and easier and faster to use than passwords. With plugin passkey manager support, you get:
- Choice and flexibility: Use your preferred passkey manager natively on Windows.
- Easy authentication: Create and sign in with passkeys using Windows Hello.
- Passkeys everywhere: Your passkeys are synced between your Windows PCs and mobile devices. They go where you go.
If you install a 3rd party passkey manager (ex: 1Password or Bitwarden), you will be able to turn on or off saving passkeys to your Windows device. If you don't have a 3rd party passkey manager installed, then you will only be able to save passkeys to your Windows device.
When you turn on passkey managers, they will be available to save your passkeys to.
References:
Windows 11 expands passkey manager support - Windows IT Pro Blog
Smooth, secure, and passwordless: Try out native support for passkey managers in Windows 11.
 techcommunity.microsoft.com

New experiences currently rolling out for Windows 11
Today, we announced some new Copilot and agentic experiences that make every Windows 11 PC an AI PC with Copilot at the center. You can read all about these new experiences. We are a

Plugin passkey manager support - Windows apps
This topic describes the plugin API support for passkey providers on Windows.
learn.microsoft.com
Support for Passkeys in Windows
Learn about passkeys and how to use them on Windows devices.
learn.microsoft.com
What are passkeys and why they matter - Microsoft Support
Learn about passkeys and how they are used in Windows.
 support.microsoft.com
Contents
- Option One: Enable or Disable Passkey Managers in Settings
- Option Two: Enable or Disable Saving Passkeys to Windows Device using REG file
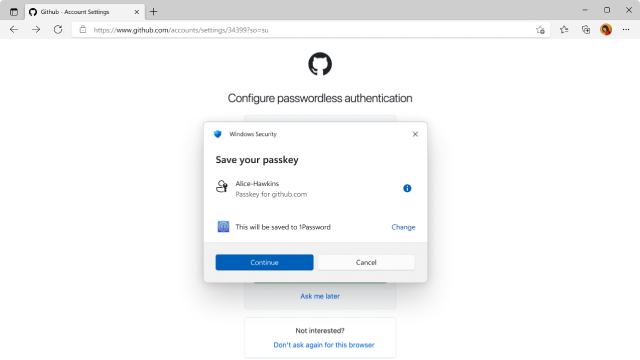
EXAMPLE: Choose passkey manager for where to save your passkey for a site or app
1 Open Settings (Win+I).
2 Click/tap on Accounts on the left side, and click/tap on Passkeys on the right side. (see screenshot below)
3 Click/tap on Advanced options. (see screenshot below)
4 Turn on (default) or off available passkey managers you want. (see screenshot below)
If you do not have a 3rd party passkey manager installed and turned on, then the Save passkeys to this Windows device passkey manager will be turned on and grayed out.
If you do have a 3rd party passkey manager installed and turned on, then you will be able to turn on or off the Save passkeys to this Windows device passkey manager.
5 If you turned on a passkey manager (ex: 1Password or Bitwarden), you will be prompted by Windows Security to verify with your Windows Hello sign-in options. (see screenshot below)
6 When finished, you can close Settings if you like.
This option will only work if you have a 3rd party passkey manager turned on in Option One.
1 Do step 2 (enable) or step 3 (disable) below for what you would like to do.
2 Turn On "Save passkeys to this Windows device passkey manager"
This is the default setting.
A) Click/tap on the Download button below to download the file below, and go to step 4 below.
Turn_ON_Save_passkeys_to_this_Windows_device.reg
Download
(Contents of REG file for reference)
Code:
Windows Registry Editor Version 5.00

[HKEY_CURRENT_USER\Software\Microsoft\Passkeys]
"LocalToggleStatus"=dword:00000001
"LocalToggleEnabledByUser"=dword:00000001
3 Turn Off "Save passkeys to this Windows device passkey manager"
A) Click/tap on the Download button below to download the file below, and go to step 4 below.
Turn_OFF_Save_passkeys_to_this_Windows_device.reg
Download
(Contents of REG file for reference)
Code:
Windows Registry Editor Version 5.00

[HKEY_CURRENT_USER\Software\Microsoft\Passkeys]
"LocalToggleStatus"=dword:00000000
"LocalToggleEnabledByUser"=dword:00000001
4 Save the .reg file to your desktop.
5 If you have Smart App Control turned on, you will need to unblock the downloaded REG file.
6 Double click/tap on the downloaded .reg file to merge it.
7 When prompted, click/tap on Run, Yes (UAC), Yes, and OK to approve the merge.
8 You can now delete the downloaded .reg file if you like.
That's it,
Shawn Brink
Related Tutorials
- Enable or Disable Passkey Access for Apps in Windows 11
- Enable or Disable Passkey Autofill Access for Apps in Windows 11
- Create and Save Passkey for Website in Windows 11
- View Passkeys for Apps and Websites in Windows 11
- Delete Passkey for App or Website in Windows 11
- Add or Remove Passkey on Security Key for your Microsoft Account
- Add or Remove Passkey on Android Phone for your Microsoft Account
- Sign in to Website with Passkey in Windows 11
Attachments
Last edited: