How to create ISO from Windows 11 22H2.22621.963 bootable USB Stick?


Badger

Well-known member
Member
VIP
Local time
9:30 PM
Posts
276
Location
Idaho
OS
Windows 11 Pro
I've just started using Ventoy and would like to free up some of these Windows bootable USB pen drives I have and move their iso's over to a Ventoy USB pen drive. Since I no longer have the original ISO files for some of these releases. I'd like to reverse the process and turn the bootable USB pen drive (for instance that has 22621.963) back into an ISO file so I can then free up the pen drive and move that ISO onto the Ventoy USB pen drive. If someone can detail the procedure necessary I'd appreciate it. Thanks!
 

My Computer

System One

  • OS
    Windows 11 Pro
    Computer type
    PC/Desktop
    Manufacturer/Model
    Homemade
    CPU
    AMD Ryzen 7 5700G 8-Core
    Motherboard
    ASUS ROG Strix B550-F Gaming
    Memory
    Corsair Vengeance RGB PRO 16GB (2x8GB) DDR4 3200MHz
    Graphics Card(s)
    Onboard ATI Radeon
    Sound Card
    Onboard
    Monitor(s) Displays
    Asus 28"
    Screen Resolution
    4K - 3840 X 2160
    Hard Drives
    PNY CS2140 500GB M.2 NVMe Gen4 x4
    Western Digital 500GB M.2 NVME Gen3
    OCZ-TRION 100 500GB SSD
    OCZ-TRION 150 500GB SSD
several ways to do it.

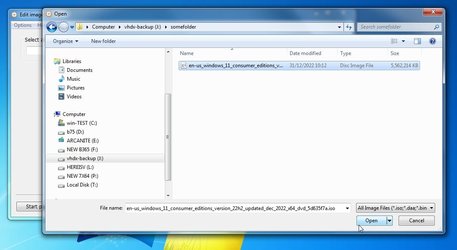
one way is to use an isohandler to pick up a known good installation iso, then replace the contents and save.

another way is using cmd line tools like mkisofs or cdimage

or just use this
 

Attachments

  • Windows-isomaker_x64_x86.zip
    1.5 MB · Views: 26

My Computers

System One System Two

  • OS
    Win7
    Computer type
    PC/Desktop
    CPU
    i5-8400
    Motherboard
    gigabyte b365m ds3h
    Memory
    2x8gb 3200mhz
    Monitor(s) Displays
    benq gw2480
    PSU
    bequiet pure power 11 400CM
    Cooling
    cryorig m9i
  • Operating System
    win7
    Computer type
    PC/Desktop
    CPU
    pentium g5400
    Motherboard
    gigabyte b365m ds3h
    Memory
    1x8gb 2400
    PSU
    xfx pro 450

My Computer

System One

  • OS
    Windows 10 Pro + others in VHDs
    Computer type
    Laptop
    Manufacturer/Model
    ASUS Vivobook 14
    CPU
    I7
    Motherboard
    Yep, Laptop has one.
    Memory
    16 GB
    Graphics Card(s)
    Integrated Intel Iris XE
    Sound Card
    Realtek built in
    Monitor(s) Displays
    N/A
    Screen Resolution
    1920x1080
    Hard Drives
    1 TB Optane NVME SSD, 1 TB NVME SSD
    PSU
    Yep, got one
    Case
    Yep, got one
    Cooling
    Stella Artois
    Keyboard
    Built in
    Mouse
    Bluetooth , wired
    Internet Speed
    72 Mb/s :-(
    Browser
    Edge mostly
    Antivirus
    Defender
    Other Info
    TPM 2.0
OR for your favourite 22H2 build, use UUP Dump; for example, for Build (22621.963), use this; for other builds, start here.
 

My Computer

System One

  • OS
    Windows 11 Pro v 23H2 (Build 22631.3520)
    Computer type
    PC/Desktop
    Manufacturer/Model
    Dell Precision 3660 Tower Workstation
    CPU
    12th Gen Intel(R) Core(TM) i9-12900 5.10 GHz
    Motherboard
    64-bit operating system, x64-based processor
    Memory
    32.00 GB
    Graphics Card(s)
    Intel UHD Graphics 770
    Sound Card
    Realtek Audio
    Monitor(s) Displays
    Dell P2714H Monitor
    Screen Resolution
    1920 x 1080
    Hard Drives
    1 x 512GB NVME PC801 NVMe SK hynix Boot
    1 x 1TB Seagate ST1000LM049-2GH172 Internal HDD
    1 x 1TB Seagate STGX4000400 External HDD
    1 x 2TB Seagate STGX4000400 External HDD
    1 x 4TB Seagate STGX4000400 External HDD
    PSU
    300 Watts
    Cooling
    Air
    Keyboard
    Microsoft Wired Keyboard 600
    Mouse
    Microsoft USB Basic Optical Mouse v2.0
    Browser
    Firefox
    Antivirus
    Windows Defender + Malwarebytes Premium
    Other Info
    BaseBoard Manufacturer Dell Inc.
    BaseBoard Product 0J1CP3
    BaseBoard Version A01

My Computer

System One

  • OS
    Windows 10
    Computer type
    Laptop
    Manufacturer/Model
    HP
    CPU
    Intel(R) Core(TM) i7-4800MQ CPU @ 2.70GHz
    Motherboard
    Product : 190A Version : KBC Version 94.56
    Memory
    16 GB Total: Manufacturer : Samsung MemoryType : DDR3 FormFactor : SODIMM Capacity : 8GB Speed : 1600
    Graphics Card(s)
    NVIDIA Quadro K3100M; Intel(R) HD Graphics 4600
    Sound Card
    IDT High Definition Audio CODEC; PNP Device ID HDAUDIO\FUNC_01&VEN_111D&DEV_76E0
    Hard Drives
    Model Hitachi HTS727575A9E364
    Antivirus
    Microsoft Defender
    Other Info
    Mobile Workstation
I've just started using Ventoy and would like to free up some of these Windows bootable USB pen drives I have and move their iso's over to a Ventoy USB pen drive. Since I no longer have the original ISO files for some of these releases. I'd like to reverse the process and turn the bootable USB pen drive (for instance that has 22621.963) back into an ISO file so I can then free up the pen drive and move that ISO onto the Ventoy USB pen drive. If someone can detail the procedure necessary I'd appreciate it. Thanks!


You could also go here and download the ISO...


My Computers

System One System Two

  • OS
    Win 11 Home ♦♦♦22631.3447 ♦♦♦♦♦♦♦23H2
    Computer type
    PC/Desktop
    Manufacturer/Model
    Built by Ghot® [May 2020]
    CPU
    AMD Ryzen 7 3700X
    Motherboard
    Asus Pro WS X570-ACE (BIOS 4702)
    Memory
    G.Skill (F4-3200C14D-16GTZKW)
    Graphics Card(s)
    EVGA RTX 2070 (08G-P4-2171-KR)
    Sound Card
    Realtek ALC1220P / ALC S1220A
    Monitor(s) Displays
    Dell U3011 30"
    Screen Resolution
    2560 x 1600
    Hard Drives
    2x Samsung 860 EVO 500GB,
    WD 4TB Black FZBX - SATA III,
    WD 8TB Black FZBX - SATA III,
    DRW-24B1ST CD/DVD Burner
    PSU
    PC Power & Cooling 750W Quad EPS12V
    Case
    Cooler Master ATCS 840 Tower
    Cooling
    CM Hyper 212 EVO (push/pull)
    Keyboard
    Ducky DK9008 Shine II Blue LED
    Mouse
    Logitech Optical M-100
    Internet Speed
    300/300
    Browser
    Firefox (latest)
    Antivirus
    Bitdefender Internet Security
    Other Info
    Speakers: Klipsch Pro Media 2.1
  • Operating System
    Windows XP Pro 32bit w/SP3
    Computer type
    PC/Desktop
    Manufacturer/Model
    Built by Ghot® (not in use)
    CPU
    AMD Athlon 64 X2 5000+ (OC'd @ 3.2Ghz)
    Motherboard
    ASUS M2N32-SLI Deluxe Wireless Edition
    Memory
    TWIN2X2048-6400C4DHX (2 x 1GB, DDR2 800)
    Graphics card(s)
    EVGA 256-P2-N758-TR GeForce 8600GT SSC
    Sound Card
    Onboard
    Monitor(s) Displays
    ViewSonic G90FB Black 19" Professional (CRT)
    Screen Resolution
    up to 2048 x 1536
    Hard Drives
    WD 36GB 10,000rpm Raptor SATA
    Seagate 80GB 7200rpm SATA
    Lite-On LTR-52246S CD/RW
    Lite-On LH-18A1P CD/DVD Burner
    PSU
    PC Power & Cooling Silencer 750 Quad EPS12V
    Case
    Generic Beige case, 80mm fans
    Cooling
    ZALMAN 9500A 92mm CPU Cooler
    Mouse
    Logitech Optical M-BT96a
    Keyboard
    Logitech Classic Keybooard 200
    Internet Speed
    300/300
    Browser
    Firefox 3.x ??
    Antivirus
    Symantec (Norton)
    Other Info
    Still assembled, still runs. Haven't turned it on for 13 years?
Folks, I'm well aware that I could re-download the ISO's again and was hoping for an alternate way to take it from the USB pen drive I already have. Anyway, thanks for the responses.
 
Last edited:

My Computer

System One

  • OS
    Windows 11 Pro
    Computer type
    PC/Desktop
    Manufacturer/Model
    Homemade
    CPU
    AMD Ryzen 7 5700G 8-Core
    Motherboard
    ASUS ROG Strix B550-F Gaming
    Memory
    Corsair Vengeance RGB PRO 16GB (2x8GB) DDR4 3200MHz
    Graphics Card(s)
    Onboard ATI Radeon
    Sound Card
    Onboard
    Monitor(s) Displays
    Asus 28"
    Screen Resolution
    4K - 3840 X 2160
    Hard Drives
    PNY CS2140 500GB M.2 NVMe Gen4 x4
    Western Digital 500GB M.2 NVME Gen3
    OCZ-TRION 100 500GB SSD
    OCZ-TRION 150 500GB SSD
The gui I already posted is childs play.

But like oscdimg commands it will include everything in the source folder it is pointed at.


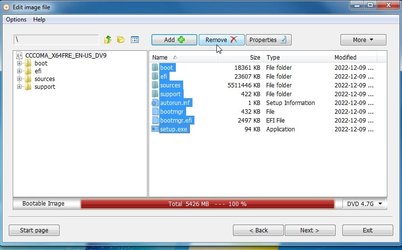
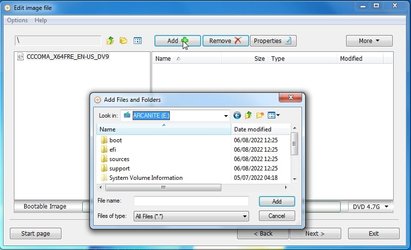
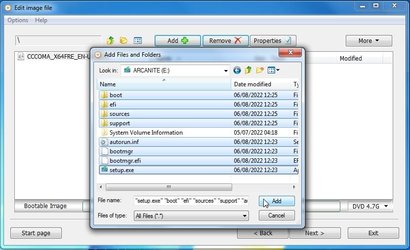
If there is other stuff on the usb stick that you dont want to be in the iso, one way is to use an isohandler so you can select what is included.


pick up an existing windows iso
2023-01-04_183033.jpg


delete the contents
isohandler-delete.jpg

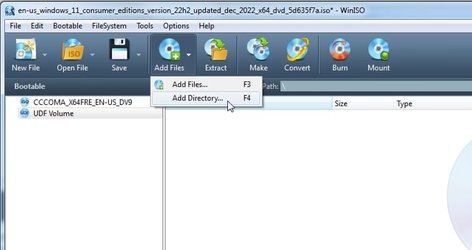
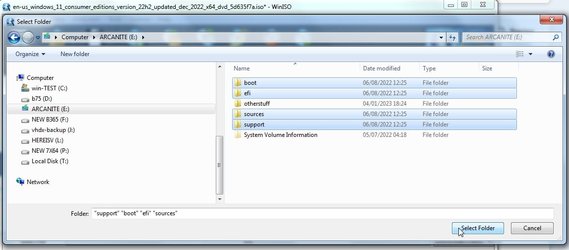
browse to the folders you want to include from the usb stick

isohandler-add-directory.jpg


isohandler-add-directory2.jpg


browse to the files you want to include from the usb stick
isohandler-add-files.jpg

isohandler-add-files2.jpg


save as and browse to where you want to save it to and give it a name.

save-as.jpg
 
Last edited:

My Computers

System One System Two

  • OS
    Win7
    Computer type
    PC/Desktop
    CPU
    i5-8400
    Motherboard
    gigabyte b365m ds3h
    Memory
    2x8gb 3200mhz
    Monitor(s) Displays
    benq gw2480
    PSU
    bequiet pure power 11 400CM
    Cooling
    cryorig m9i
  • Operating System
    win7
    Computer type
    PC/Desktop
    CPU
    pentium g5400
    Motherboard
    gigabyte b365m ds3h
    Memory
    1x8gb 2400
    PSU
    xfx pro 450
the thing about using the gui I posted is that it will include everything in the distribution folder ( which in this case would be the usb stick ).

same thing if you use oscdimg commands

There might other stuff on the usb you dont want included, one easy way round that is to use an isohandler,

pick up an existing windows iso
View attachment 49107


delete the contents
View attachment 49108

browse to the folders you want to include from the usb stick

View attachment 49109


View attachment 49110


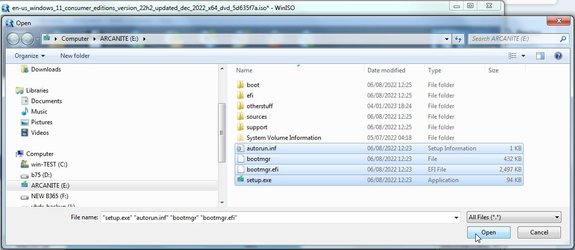
browse to the files you want to include from the usb stick
View attachment 49111

View attachment 49112


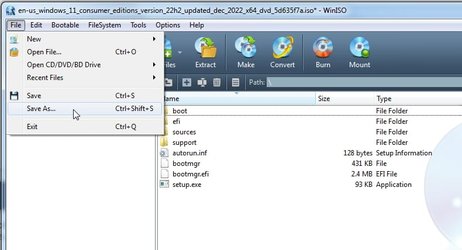
save as

View attachment 49113
SIW2, thanks for your detailed response!
 

My Computer

System One

  • OS
    Windows 11 Pro
    Computer type
    PC/Desktop
    Manufacturer/Model
    Homemade
    CPU
    AMD Ryzen 7 5700G 8-Core
    Motherboard
    ASUS ROG Strix B550-F Gaming
    Memory
    Corsair Vengeance RGB PRO 16GB (2x8GB) DDR4 3200MHz
    Graphics Card(s)
    Onboard ATI Radeon
    Sound Card
    Onboard
    Monitor(s) Displays
    Asus 28"
    Screen Resolution
    4K - 3840 X 2160
    Hard Drives
    PNY CS2140 500GB M.2 NVMe Gen4 x4
    Western Digital 500GB M.2 NVME Gen3
    OCZ-TRION 100 500GB SSD
    OCZ-TRION 150 500GB SSD
One note about writing contents of a UFD back to optical media - you need to make sure that you create a valid optical media boot sector.

Bottom line - after creating your media, test it to make sure that it will actually boot!
 

My Computers

System One System Two

  • OS
    Win11 Pro 23H2
    Computer type
    PC/Desktop
    Manufacturer/Model
    Home Built
    CPU
    Intel i7-11700K
    Motherboard
    ASUS Prime Z590-A
    Memory
    128GB Crucial Ballistix 3200MHz DRAM
    Graphics Card(s)
    No GPU - CPU graphics only (for now)
    Sound Card
    Realtek (on motherboard)
    Monitor(s) Displays
    HP Envy 32
    Screen Resolution
    2560 x 1440
    Hard Drives
    1 x 1TB NVMe Gen 4 x 4 SSD
    1 x 2TB NVMe Gen 3 x 4 SSD
    2 x 512GB 2.5" SSDs
    2 x 8TB HD
    PSU
    Corsair HX850i
    Case
    Corsair iCue 5000X RGB
    Cooling
    Noctua NH-D15 chromax.black cooler + 10 case fans
    Keyboard
    CODE backlit mechanical keyboard
    Mouse
    Logitech MX Master 3
    Internet Speed
    1Gb Up / 1 Gb Down
    Browser
    Edge
    Antivirus
    Windows Defender
    Other Info
    Additional options installed:
    WiFi 6E PCIe adapter
    ASUS ThunderboltEX 4 PCIe adapter
  • Operating System
    Win11 Pro 23H2
    Computer type
    Laptop
    Manufacturer/Model
    Lenovo ThinkBook 13x Gen 2
    CPU
    Intel i7-1255U
    Memory
    16 GB
    Graphics card(s)
    Intel Iris Xe Graphics
    Sound Card
    Realtek® ALC3306-CG codec
    Monitor(s) Displays
    13.3-inch IPS Display
    Screen Resolution
    WQXGA (2560 x 1600)
    Hard Drives
    2 TB 4 x 4 NVMe SSD
    PSU
    USB-C / Thunderbolt 4 Power / Charging
    Mouse
    Buttonless Glass Precision Touchpad
    Keyboard
    Backlit, spill resistant keyboard
    Internet Speed
    1Gb Up / 1Gb Down
    Browser
    Edge
    Antivirus
    Windows Defender
    Other Info
    WiFi 6e / Bluetooth 5.1 / Facial Recognition / Fingerprint Sensor / ToF (Time of Flight) Human Presence Sensor
I think there is a free thing that can do it, might be called anyburn.

If you start with a known good windows iso, the el torito should be retained just fine. I have done it dozens of times with WinIso.

I am lazy so I always do it this way when I update my winpe iso files.
 

My Computers

System One System Two

  • OS
    Win7
    Computer type
    PC/Desktop
    CPU
    i5-8400
    Motherboard
    gigabyte b365m ds3h
    Memory
    2x8gb 3200mhz
    Monitor(s) Displays
    benq gw2480
    PSU
    bequiet pure power 11 400CM
    Cooling
    cryorig m9i
  • Operating System
    win7
    Computer type
    PC/Desktop
    CPU
    pentium g5400
    Motherboard
    gigabyte b365m ds3h
    Memory
    1x8gb 2400
    PSU
    xfx pro 450
I think there is a free thing that can do it, might be called anyburn.

If you start with a known good windows iso, the el torito should be retained just fine. I have done it dozens of times with WinIso.
Yeah, simple enough to do, just something to be aware of. Always good to test that the disc boots okay after creation.

BTW, this discussion really takes me make. There once was a Microsoft article on how to manually create an El Torito bootable CD way back in the Windows NT days. I was the author of that article :-)

Here's a copy for nostolgia sake. Some of the formatting may not look right, but the info is still there.


How to Create an El Torito Bootable CD-ROM

The information in this article applies to:

  • Microsoft Windows NT Advanced Server, version 3.1
  • Microsoft Windows NT Workstation versions 3.1, 3.5, 3.51, 4.0
  • Microsoft Windows NT Server versions 3.1, 3.5, 3.51, 4.0
  • Microsoft Windows for Workgroups version 3.11
  • Microsoft Windows 95


SUMMARY

The contents of this article are, in part, derived from the El Torito Bootable CD-ROM Format Specification version 1.0 from Phoenix Technologies and IBM and from the white paper "Constructing a Bootable CD" version 0.5 from Phoenix Technologies. For additional information regarding the El Torito Specification, please refer to these documents.

What Is El Torito?

El Torito is a specification written by Phoenix Technologies and IBM for bootable CD-ROMs. The El Torito specification allows for the creation of a CD-ROM as an image of a hard disk drive or a floppy drive. When you make an image of a hard disk, the CD-ROM will boot as drive C and all hard disk drive letters will be shifted up one letter. When booting a floppy disk image, the CD-ROM will be identified as drive A. The original drive A will become drive B and the original drive B will be unavailable.

What Is Needed to Be Able to Use a Bootable CD-ROM?

The system BIOS must be capable of supporting a bootable CD-ROM. If the system BIOS has this capability, an EIDE (ATAPI) CD-ROM drive attached to the system should be able to boot from the compact discs.

If the CD-ROM drive is a SCSI drive, the SCSI BIOS must also support bootable compact discs.

Note that some system's BIOS may have a setting to control the boot order between drive A, drive C, and the CD-ROM drive. Some systems, although able to support bootable compact discs, may give no such indication. Even though they may allow you to change the boot priority between floppy disk and hard disk drive but give no option for booting from a compact disc, the system may still support this feature. Such systems always place the priority on a bootable compact disc so that, if one is inserted, the system will boot from it.

What Can Be Done with a Bootable CD-ROM?

Anything that can be run from a hard disk drive or floppy at DOS can be run from a CD with one exception: Since a CD is read only the program must not attempt to write data to the CD or it will fail.


MORE INFORMATION

Items you will need to create a bootable CD-ROM:

  • An empty hard disk drive of less than 650MB capacity OR a floppy drive.

    An exact copy of a hard drive will be made onto the compact disc. In other words, because the capacity of a CD is 650 MB, a hard disk drive smaller than this is required so that it can fit onto the CD. Please note that partitioning the hard disk drive is not sufficient as the entire physical disk will be imaged.

    The hard drive should contain only the data you want placed on the CD.

    Removable media can be used in place of a hard disk. Some optical disks are particularly well suited for this task.

    If you are making an image of a floppy disks, a floppy disk will be needed in place of the empty hard disk drive.
  • Another drive with at least twice the space of the drive in above.

    -or-
  • Two additional drives each with at least as much free space as the drive listed above.

    To clarify this information: A bit-for-bit image of the first drive will be created AND an ISO file will then be created from that image. Thus, one drive will contain the original files, again as much space is needed for the image, and finally once again as much space for the ISO file.

    When imaging a floppy disk, only a few megabytes of free space is required. As described below, when properly configured, the remainder of the compact disc can be accessed by drivers loaded from the floppy disk image. For this reason, as well as the greatly reduced system requirements and time requirements, the imaging of a floppy disk image will be far easier to accomplish.
  • A compact disc authoring package that will allow a real ISO image file to be created. Adaptec EZ-CD Pro is an example of such a package. Packages such as Corel CD Creator (now Adaptec CD Creator) will NOT allow the creation of real ISO images and, as such, are not suitable for creating bootable compact discs.
  • A utility to allow byte-level editing of a disk. The instructions in this article assume the use of Norton Utilities Diskedit from Symantec.
Creating the Bootable CD from Start to Finish

Please note that the steps below assume that a hard disk drive will be imaged. Only a single byte will need to be changed to image a floppy disk. This change is described in step 12 of this procedure.

Also, because these instructions assume the use of the Norton Diskedit program, here are a few tips on using Norton Diskedit:

  • The HOME key will take you to the beginning of the file.
  • To search, select Find from the Tools menu or press CTRL+S. To search for the next occurrence of the same item, select Find Again from the Tools menu or press CTRL+G.
  • To move the cursor from the Hex editing side to the text side of the screen or vice versa, press the TAB key.
Follow these steps to create a bootable CD:

  1. Prepare the hard disk drive or floppy disk exactly as you would want the CD to appear. Organize all the files and directories to suit your needs.
  2. Make certain that the hard disk drive has an operating system on it, that it is bootable, and that the partition is marked active. It is strongly suggested that you actually boot from this drive to make certain that it behaves as expected. After burned onto the CD, you cannot modify it without burning another CD. For this reason, it is suggested that careful testing be performed before writing a CD.
  3. Use Norton Diskedit (or similar application) to copy the hard disk drive contents to a file. In Norton Diskedit, follow these steps:
    1. Select Object, and then Physical Disk. Select the hard disk drive to make an image of.
    2. Select Tools, and then Write.
    3. Select Write to a File.
    4. Save this file as Osboot.img.
NOTE: This may be a lengthy process.

  1. Create a file named Bootcat.bin that is exactly 2,048 bytes in size. This file will serve as a dummy boot catalog. An easy way to create this file is by using either the MS-DOS Edit program or Windows Notepad and typing in any characters until you have a file exactly 2,048 bytes in size.
  2. Use DISKEDIT to edit this file. Starting at the beginning of the file, enter the data below. Note that the left side shows the hex equivalent of the characters on the right. It is suggested that you enter the actual hex characters for accuracy. In addition, some of the ANSI characters shown on the right are not correctly represented here. Just enter the hex data as shown for proper operation.
01 00 00 00 =

50 68 6F 65 - ....Phoe

6E 69 78 20 54 65 63 68 - nix Tech

6E 6F 6C 6F 67 69 65 73 - nologies

20 4C 54 44 34 E4 55 AA - LTD4_U~


  1. Make certain to write Hex "00" to all the remaining bytes of the file.
  2. Instruct the compact disc authoring software to create an ISO image containing the two files Osboot.img and Bootcat.bin. Save the ISO file as Bootcd.iso. Be sure to create the file as a MODE 1 file. Before actually performing this step please read the notes below.

    Notes on adding additional files:

    At this point, you will want to be aware of a few additional items should you want to add any additional files to this CD.
  1. When booting from the compact disc, all the files that were on the original hard disk drive or floppy disk that was imaged will be visible. Any files added to the CD after the imaging process will not be visible at this time.
  2. When the compact disc is viewed on a system that has been booted from the hard disk drive or a floppy disk, and CD-ROM drivers are loaded, the additional files will be visible. The contents of Osboot.img (which, in turn, contains the files from the hard disk drive or floppy that was imaged) will not be visible. Instead, the actual files Osboot.img and Bootcat.bin will be seen in addition to the other files that were added.
  3. If the bootable compact disc loads CD-ROM drivers at startup, it is possible to then see all files on the CD. The files that were on the imaged hard disk drive or floppy disk will be visible at drive A or C, and any additional files can be accessed through the CD-ROM drive letter assigned by the CD-ROM drivers.
If you want to have additional files on the compact disc, now is the time to add them. To do so, simply instruct your compact disc authoring software to include not only Osboot.img and Bootcat.bin, but any additional files as well.

  1. Use Diskedit to open Bootcd.iso.
  2. Go to sector 17 (this is at offset 8800h). "CD001" should be on the first line.
  3. Enter the following data:
=

00 43 44 30 30 31 01 45 - .CD001.E

4C 20 54 4F 52 49 54 4F - L TORITO

20 53 50 45 43 49 46 49 - SPECIFI

43 41 54 49 4F 4E 00 00 - CATION

Continue entering hex "00" after the characters above through offset 8FFF (2048 characters total).

NOTE: Although a number of characters near the beginning may already be identical to that shown in the table above, take note that the very first line starts with 00. These characters are often overlooked. The information should be entered exactly as shown in hexadecimal.

  1. Creating a valid Boot Volume Descriptor
    1. Go to the beginning of the file, and then search for BOOTCAT.
    2. Count back 31 characters. To do so in Diskedit, place the cursor on the letter "B" in BOOTCAT and go up two lines and to the right one character.
    3. Write down the next four hex bytes (including the one the cursor is on).
    4. Go to offset 8847h. This will be just a bit after the data you entered in step 10. Enter the 4 bytes you just wrote down above.


  1. Creating a valid Boot Catalog
    1. Go to the beginning of the file, and then search for OSBOOT.
    2. Count back 31 characters. To do so in Diskedit, place the cursor on the letter O in OSBOOT and go up two lines and to the right one character.
    3. Write down the next four hex bytes (including the one the cursor is on).
    4. Go to the beginning of the file, and then search for LTD4. You should see the contents of the Bootcat.bin file created in step 5. If not, repeat the search until you find the data as you entered it in step 5.
    5. At offset 20h enter the following bytes:
      1. 88 04 00 00 00 00 01 00
      2. The four bytes you just wrote down.
These should follow one after the other. In other words, 88 04 00 00 00 01 00 B1 B2 B3 B4.

NOTE: B1-B4 are the four bytes you wrote down.

NOTE: In 1) above, the 04 specifies a hard disk drive image. Use 01 for a 1.2 MB floppy disk image, 02 for a 1.44 MB floppy disk image, and 03 for a 2.88 MB disk floppy image.

  1. Exit Diskedit, saving any changes.
  2. Burn the ISO file to the compact disc. Please remember that, if you decide to add additional files (in the optional section for step 7) that have long file names, you will want to burn the CD using the Joliet format rather than ISO 9660 so that the long file names may be seen in Windows 95 and Windows NT 4.
Please note that additional sessions cannot be added to a bootable compact disc. Adding additional sessions will cause the CD to no longer be bootable. For this reason, it is suggested that the CD authoring software be instructed to close the CD as well.

Norton Utilities Diskedit is manufactured by Symantec Corporation and Easy CD Pro is manufactured by Adaptec, Inc., vendors independent of Microsoft; we make no warranty, implied or otherwise, regarding these products' performance or reliability.
 

My Computers

System One System Two

  • OS
    Win11 Pro 23H2
    Computer type
    PC/Desktop
    Manufacturer/Model
    Home Built
    CPU
    Intel i7-11700K
    Motherboard
    ASUS Prime Z590-A
    Memory
    128GB Crucial Ballistix 3200MHz DRAM
    Graphics Card(s)
    No GPU - CPU graphics only (for now)
    Sound Card
    Realtek (on motherboard)
    Monitor(s) Displays
    HP Envy 32
    Screen Resolution
    2560 x 1440
    Hard Drives
    1 x 1TB NVMe Gen 4 x 4 SSD
    1 x 2TB NVMe Gen 3 x 4 SSD
    2 x 512GB 2.5" SSDs
    2 x 8TB HD
    PSU
    Corsair HX850i
    Case
    Corsair iCue 5000X RGB
    Cooling
    Noctua NH-D15 chromax.black cooler + 10 case fans
    Keyboard
    CODE backlit mechanical keyboard
    Mouse
    Logitech MX Master 3
    Internet Speed
    1Gb Up / 1 Gb Down
    Browser
    Edge
    Antivirus
    Windows Defender
    Other Info
    Additional options installed:
    WiFi 6E PCIe adapter
    ASUS ThunderboltEX 4 PCIe adapter
  • Operating System
    Win11 Pro 23H2
    Computer type
    Laptop
    Manufacturer/Model
    Lenovo ThinkBook 13x Gen 2
    CPU
    Intel i7-1255U
    Memory
    16 GB
    Graphics card(s)
    Intel Iris Xe Graphics
    Sound Card
    Realtek® ALC3306-CG codec
    Monitor(s) Displays
    13.3-inch IPS Display
    Screen Resolution
    WQXGA (2560 x 1600)
    Hard Drives
    2 TB 4 x 4 NVMe SSD
    PSU
    USB-C / Thunderbolt 4 Power / Charging
    Mouse
    Buttonless Glass Precision Touchpad
    Keyboard
    Backlit, spill resistant keyboard
    Internet Speed
    1Gb Up / 1Gb Down
    Browser
    Edge
    Antivirus
    Windows Defender
    Other Info
    WiFi 6e / Bluetooth 5.1 / Facial Recognition / Fingerprint Sensor / ToF (Time of Flight) Human Presence Sensor
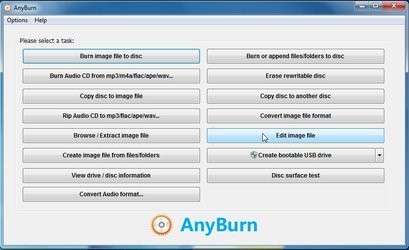
Just tried with free anyburn, seems to be ok.

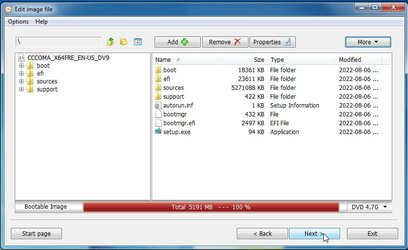
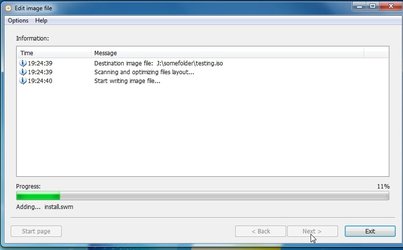
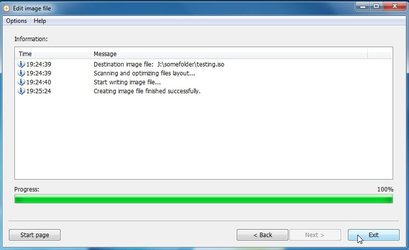
Start with an existing bootable iso file. For example win11 installation iso file.

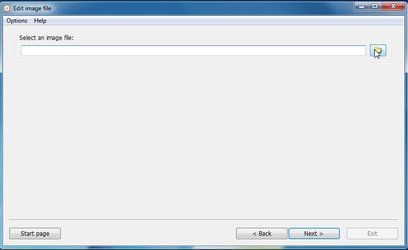
Then change the contents with anyburn

anyburn1.jpganyburn2.jpg
anyburn3.jpg

anyburn4.jpg


anyburn5.jpg

anyburn6.jpg

anyburn7.jpg

anyburn8.jpg


anyburn9.jpg
 
Last edited:

My Computers

System One System Two

  • OS
    Win7
    Computer type
    PC/Desktop
    CPU
    i5-8400
    Motherboard
    gigabyte b365m ds3h
    Memory
    2x8gb 3200mhz
    Monitor(s) Displays
    benq gw2480
    PSU
    bequiet pure power 11 400CM
    Cooling
    cryorig m9i
  • Operating System
    win7
    Computer type
    PC/Desktop
    CPU
    pentium g5400
    Motherboard
    gigabyte b365m ds3h
    Memory
    1x8gb 2400
    PSU
    xfx pro 450
anyburn10.jpg

anyburn11.jpg


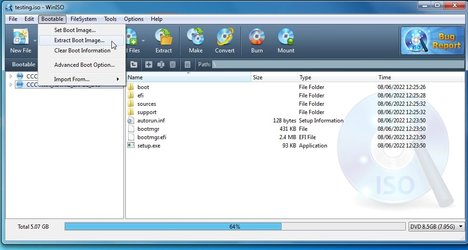
using winiso to extract the multiboot image from the testing.iso just created by anyburn to check it is ok

winiso-extract-bootimage1.jpg


winiso-extract-bootimage2.jpg

I examined it, looks ok.


You cant add or extract the multiboot image with the free anyburn, but if you are using an existing iso that already has it, seems to retain.
 

My Computers

System One System Two

  • OS
    Win7
    Computer type
    PC/Desktop
    CPU
    i5-8400
    Motherboard
    gigabyte b365m ds3h
    Memory
    2x8gb 3200mhz
    Monitor(s) Displays
    benq gw2480
    PSU
    bequiet pure power 11 400CM
    Cooling
    cryorig m9i
  • Operating System
    win7
    Computer type
    PC/Desktop
    CPU
    pentium g5400
    Motherboard
    gigabyte b365m ds3h
    Memory
    1x8gb 2400
    PSU
    xfx pro 450
the testing.iso is too big to fit on my ventoy usb stick, I will swap the sources folder using anyburn for something smaller and see if it boots up
 

My Computers

System One System Two

  • OS
    Win7
    Computer type
    PC/Desktop
    CPU
    i5-8400
    Motherboard
    gigabyte b365m ds3h
    Memory
    2x8gb 3200mhz
    Monitor(s) Displays
    benq gw2480
    PSU
    bequiet pure power 11 400CM
    Cooling
    cryorig m9i
  • Operating System
    win7
    Computer type
    PC/Desktop
    CPU
    pentium g5400
    Motherboard
    gigabyte b365m ds3h
    Memory
    1x8gb 2400
    PSU
    xfx pro 450
Yes it boots up fine, posting from it now :-)
 

My Computers

System One System Two

  • OS
    Win7
    Computer type
    PC/Desktop
    CPU
    i5-8400
    Motherboard
    gigabyte b365m ds3h
    Memory
    2x8gb 3200mhz
    Monitor(s) Displays
    benq gw2480
    PSU
    bequiet pure power 11 400CM
    Cooling
    cryorig m9i
  • Operating System
    win7
    Computer type
    PC/Desktop
    CPU
    pentium g5400
    Motherboard
    gigabyte b365m ds3h
    Memory
    1x8gb 2400
    PSU
    xfx pro 450
Thanks for the pointer to WinISO. I'll have to test it and compare it to my go to program, UltraISO:


My Computers

System One System Two

  • OS
    Win11 Pro 23H2
    Computer type
    PC/Desktop
    Manufacturer/Model
    Home Built
    CPU
    Intel i7-11700K
    Motherboard
    ASUS Prime Z590-A
    Memory
    128GB Crucial Ballistix 3200MHz DRAM
    Graphics Card(s)
    No GPU - CPU graphics only (for now)
    Sound Card
    Realtek (on motherboard)
    Monitor(s) Displays
    HP Envy 32
    Screen Resolution
    2560 x 1440
    Hard Drives
    1 x 1TB NVMe Gen 4 x 4 SSD
    1 x 2TB NVMe Gen 3 x 4 SSD
    2 x 512GB 2.5" SSDs
    2 x 8TB HD
    PSU
    Corsair HX850i
    Case
    Corsair iCue 5000X RGB
    Cooling
    Noctua NH-D15 chromax.black cooler + 10 case fans
    Keyboard
    CODE backlit mechanical keyboard
    Mouse
    Logitech MX Master 3
    Internet Speed
    1Gb Up / 1 Gb Down
    Browser
    Edge
    Antivirus
    Windows Defender
    Other Info
    Additional options installed:
    WiFi 6E PCIe adapter
    ASUS ThunderboltEX 4 PCIe adapter
  • Operating System
    Win11 Pro 23H2
    Computer type
    Laptop
    Manufacturer/Model
    Lenovo ThinkBook 13x Gen 2
    CPU
    Intel i7-1255U
    Memory
    16 GB
    Graphics card(s)
    Intel Iris Xe Graphics
    Sound Card
    Realtek® ALC3306-CG codec
    Monitor(s) Displays
    13.3-inch IPS Display
    Screen Resolution
    WQXGA (2560 x 1600)
    Hard Drives
    2 TB 4 x 4 NVMe SSD
    PSU
    USB-C / Thunderbolt 4 Power / Charging
    Mouse
    Buttonless Glass Precision Touchpad
    Keyboard
    Backlit, spill resistant keyboard
    Internet Speed
    1Gb Up / 1Gb Down
    Browser
    Edge
    Antivirus
    Windows Defender
    Other Info
    WiFi 6e / Bluetooth 5.1 / Facial Recognition / Fingerprint Sensor / ToF (Time of Flight) Human Presence Sensor
In this guide, you will learn the steps to use Rufus to download the ISO file and create a bootable media to install Windows 11 from scratch.


My Computer

System One

  • OS
    Windows 11
    Computer type
    PC/Desktop
    Manufacturer/Model
    HP Pavilion
    CPU
    AMD Ryzen 7 5700G
    Motherboard
    Erica6
    Memory
    Micron Technology DDR4-3200 16GB
    Graphics Card(s)
    NVIDIA GeForce RTX 3060
    Sound Card
    Realtek ALC671
    Monitor(s) Displays
    Samsung SyncMaster U28E590
    Screen Resolution
    3840 x 2160
    Hard Drives
    SAMSUNG MZVLQ1T0HALB-000H1
In this guide, you will learn the steps to use Rufus to download the ISO file and create a bootable media to install Windows 11 from scratch.

This is the opposite of what OP is wanting to do - OP wants to create an iso from a bootable usb drive!
 

My Computer

System One

  • OS
    Windows 10 Pro + others in VHDs
    Computer type
    Laptop
    Manufacturer/Model
    ASUS Vivobook 14
    CPU
    I7
    Motherboard
    Yep, Laptop has one.
    Memory
    16 GB
    Graphics Card(s)
    Integrated Intel Iris XE
    Sound Card
    Realtek built in
    Monitor(s) Displays
    N/A
    Screen Resolution
    1920x1080
    Hard Drives
    1 TB Optane NVME SSD, 1 TB NVME SSD
    PSU
    Yep, got one
    Case
    Yep, got one
    Cooling
    Stella Artois
    Keyboard
    Built in
    Mouse
    Bluetooth , wired
    Internet Speed
    72 Mb/s :-(
    Browser
    Edge mostly
    Antivirus
    Defender
    Other Info
    TPM 2.0
Back
Top Bottom