- Local time
- 5:28 PM
- Posts
- 746
- OS
- Windows 11 Pro build 26200.8524
@garlin Your advice needed !!!
I have been reading here in this reputable forum that some HP PC owners whose PCs are out of service life cannot update their HP PCs to UEFI CA 2023 certificates using your scripts or other methods.
On the other hand, I have updated my HP EliteBook 840 G5 notebook PC, which is also out of service life, without a hitch (in as short as 15 minutes or so) and I cannot understand why other HP owners with the same model PCs cannot update their systems.
I know you have done too much work in trying to help Windows users update their systems to UEFI CA 2023 certificates by introducing wonderful scripts and constantly improving them, which have led many people to update their PCs like pulling a hair out of butter without any effort.
That's great work and I consider this forum and its members or non-member readers very lucky having your scripts, your comments and your individual advises on very many special cases and occasions.
Therefore, for those people without success, I developed (in my humble opinion. I may be wrong) a method to check if they can update their HP PCs (or any make and model PC for that matter) to Microsoft UEFI CA 2023 certificates. This may be their last resort.
If you can take a quick look and advise on the applicability of the method, it will be very helpful to those not able to update their systems. This method is universal. The example is for HP PC only.
REPLACE MS CA2023 CERTIFICATES IN HP NOTEBOOKS (out of their service life such as EliteBook 840 G5 with HP Sure Start Technology)
PROCEDURE:
Make sure you have the latest BIOS update. The latest BIOS for HP EliteBook 840 G5 version is: Q78 01.31.00 dated March.10, 2025
This version is important because it has PK (Platform Key) with signed Microsoft KEK 2K CA 2023 certificate.
Open PowerShell.
Give the command "Get-SecureBootUEFI -name PK -Decoded" without quotes.
Please write down "Serial Number" of PK in your PC or take a screenshot of the PowerShell command result.
Go to Microsoft github website "secureboot_objects/PostSignedObjects at main · microsoft/secureboot_objects"
Expand "PostSignedObjects"
Download "KEK_update_map.json" file.
Open "KEK_update_map.json" file with notepad. You will see a long list of manufacturers signed UEFI KEK CA 2023 certificates list.
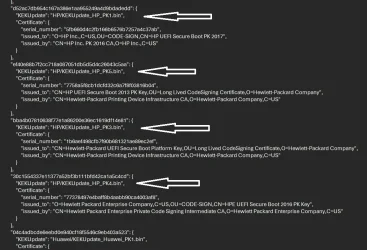
Browse down the file until you see HP/KEK file information such as above.
Here you will see HP/KEK file names and their serial numbers. One of the serial numbers must match your PK serial number.
If there is no match, you may actually be out of luck. Serial number of HP/KEKUpdate_HP_PK1.bin file matched my PK serial number.
HP/KEKUpdate_HP_PK(x) where (x) should match your serial number. Download this HP/KEKUpdate_HP_PK(x) file.
Put this file and the .json file in a folder, such as C:\CERT
Now you will prepare your PC for installing this KEK file (for HP PCs with HP Sure Start Technology). If your PC does not have HP Sure Start, you will skip some steps.
1. Disable BitLocker if it is enabled. You can re-enable BitLocker after everything is done and all certificates are installed.
2. Disable "Sure Start Secure Boot Keys Protection" in BIOS. Save the settings, Reboot into BIOS again and check if this setting has remained disabled.
3. Disable Secure Boot through selecting "Legacy Support Disable and Secure Boot Disable" setting. Save the settings, reboot into BIOS again.
5. Enable/check "Clear SecureBoot keys" in BIOS. This puts Secure Boot into Setup Mode. Save the settings, Reboot directly into WINDOWS.
6. Open Powershell with elevated rights and leave PowerShell open.
7. Check that the UEFI is in fact in Setup Mode with PowerShell command (PowerShell opened in Administrator mode)
Get-SecureBootUEFI -Name SetupMode
If the answer is SetupMode {1}, then Setup Mode is on. If it is {0}, then you need to revisit BIOS and check the Clear SecureBoot setting again.
8. Run the following PowerShell command (change time setting if necessary. It should not be months away):
Set-SecureBootUEFI -Name KEK -ContentFilePath C:\certs\KEKUpdate_HP_PK(x).bin -Time 2026-09-01T00:00:00Z
Note: (x) should be replaced with your KEK file number, such as KEKUpdate_HP_PK1.bin
Reboot your PC and enter BIOS.
9. Unselect Clear Secureboot Keys, if it is not automatically unselected. Save the settings, Reboot and enter BIOS again.
10. Enable Secure Boot through "Legacy Support Disable and Secure Boot Enable". Save the settings and Reboot into WINDOWS.
11. Open Registry Editor and navigate to HKEY_LOCAL_MACHINE\SYSTEM\CurrentControlSet\Control\SecureBoot key. Change the AvailableUpdates value to 0x5944 (hex).
12. Open Scheduled Tasks and run \Microsoft\Windows\PI\Secure-Boot-Update task.
13. Restart your PC and Reboot into WINDOWS.
14. Open Command Prompt with administrator rights and give the following command:
powershell -nop -ep bypass -f C:\Windows\SecureBoot\ExampleRolloutScripts\Detect-SecureBootCertUpdateStatus.ps1
You will get a report, confirming whether the certificate updates are completed or not.
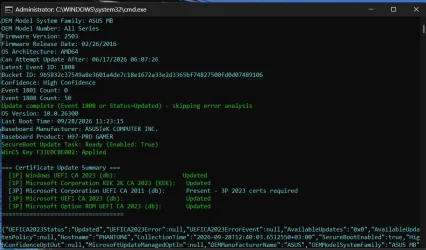
You can later revoke Windows UEFI PCA 2011 certificate and put it in DBX section of the UEFI firmware.
You can also later activate SVN of the firmware. There are commands to do all this very easily.
If your PC runs well, then you can re-enable "Sure Start SecureBoot Keys Protection" in BIOS to protect the new UEFI CA 2023 certificates.
Hope this post is useful to some.
I have been reading here in this reputable forum that some HP PC owners whose PCs are out of service life cannot update their HP PCs to UEFI CA 2023 certificates using your scripts or other methods.
On the other hand, I have updated my HP EliteBook 840 G5 notebook PC, which is also out of service life, without a hitch (in as short as 15 minutes or so) and I cannot understand why other HP owners with the same model PCs cannot update their systems.
I know you have done too much work in trying to help Windows users update their systems to UEFI CA 2023 certificates by introducing wonderful scripts and constantly improving them, which have led many people to update their PCs like pulling a hair out of butter without any effort.
That's great work and I consider this forum and its members or non-member readers very lucky having your scripts, your comments and your individual advises on very many special cases and occasions.
Therefore, for those people without success, I developed (in my humble opinion. I may be wrong) a method to check if they can update their HP PCs (or any make and model PC for that matter) to Microsoft UEFI CA 2023 certificates. This may be their last resort.
If you can take a quick look and advise on the applicability of the method, it will be very helpful to those not able to update their systems. This method is universal. The example is for HP PC only.
REPLACE MS CA2023 CERTIFICATES IN HP NOTEBOOKS (out of their service life such as EliteBook 840 G5 with HP Sure Start Technology)
PROCEDURE:
Make sure you have the latest BIOS update. The latest BIOS for HP EliteBook 840 G5 version is: Q78 01.31.00 dated March.10, 2025
This version is important because it has PK (Platform Key) with signed Microsoft KEK 2K CA 2023 certificate.
Open PowerShell.
Give the command "Get-SecureBootUEFI -name PK -Decoded" without quotes.
Please write down "Serial Number" of PK in your PC or take a screenshot of the PowerShell command result.
Go to Microsoft github website "secureboot_objects/PostSignedObjects at main · microsoft/secureboot_objects"
Expand "PostSignedObjects"
Download "KEK_update_map.json" file.
Open "KEK_update_map.json" file with notepad. You will see a long list of manufacturers signed UEFI KEK CA 2023 certificates list.
Browse down the file until you see HP/KEK file information such as above.
Here you will see HP/KEK file names and their serial numbers. One of the serial numbers must match your PK serial number.
If there is no match, you may actually be out of luck. Serial number of HP/KEKUpdate_HP_PK1.bin file matched my PK serial number.
HP/KEKUpdate_HP_PK(x) where (x) should match your serial number. Download this HP/KEKUpdate_HP_PK(x) file.
Put this file and the .json file in a folder, such as C:\CERT
Now you will prepare your PC for installing this KEK file (for HP PCs with HP Sure Start Technology). If your PC does not have HP Sure Start, you will skip some steps.
1. Disable BitLocker if it is enabled. You can re-enable BitLocker after everything is done and all certificates are installed.
2. Disable "Sure Start Secure Boot Keys Protection" in BIOS. Save the settings, Reboot into BIOS again and check if this setting has remained disabled.
3. Disable Secure Boot through selecting "Legacy Support Disable and Secure Boot Disable" setting. Save the settings, reboot into BIOS again.
5. Enable/check "Clear SecureBoot keys" in BIOS. This puts Secure Boot into Setup Mode. Save the settings, Reboot directly into WINDOWS.
6. Open Powershell with elevated rights and leave PowerShell open.
7. Check that the UEFI is in fact in Setup Mode with PowerShell command (PowerShell opened in Administrator mode)
Get-SecureBootUEFI -Name SetupMode
If the answer is SetupMode {1}, then Setup Mode is on. If it is {0}, then you need to revisit BIOS and check the Clear SecureBoot setting again.
8. Run the following PowerShell command (change time setting if necessary. It should not be months away):
Set-SecureBootUEFI -Name KEK -ContentFilePath C:\certs\KEKUpdate_HP_PK(x).bin -Time 2026-09-01T00:00:00Z
Note: (x) should be replaced with your KEK file number, such as KEKUpdate_HP_PK1.bin
Reboot your PC and enter BIOS.
9. Unselect Clear Secureboot Keys, if it is not automatically unselected. Save the settings, Reboot and enter BIOS again.
10. Enable Secure Boot through "Legacy Support Disable and Secure Boot Enable". Save the settings and Reboot into WINDOWS.
11. Open Registry Editor and navigate to HKEY_LOCAL_MACHINE\SYSTEM\CurrentControlSet\Control\SecureBoot key. Change the AvailableUpdates value to 0x5944 (hex).
12. Open Scheduled Tasks and run \Microsoft\Windows\PI\Secure-Boot-Update task.
13. Restart your PC and Reboot into WINDOWS.
14. Open Command Prompt with administrator rights and give the following command:
powershell -nop -ep bypass -f C:\Windows\SecureBoot\ExampleRolloutScripts\Detect-SecureBootCertUpdateStatus.ps1
You will get a report, confirming whether the certificate updates are completed or not.
You can later revoke Windows UEFI PCA 2011 certificate and put it in DBX section of the UEFI firmware.
You can also later activate SVN of the firmware. There are commands to do all this very easily.
If your PC runs well, then you can re-enable "Sure Start SecureBoot Keys Protection" in BIOS to protect the new UEFI CA 2023 certificates.
Hope this post is useful to some.
My Computers
-
At a glance
Windows 11 Pro build 26200.8524Intel i7-4790Teams DDR3-1600 4x4 GBMSI Nvidia GeForce GTX 1050Ti- OS
- Windows 11 Pro build 26200.8524
- Computer type
- PC/Desktop
- Manufacturer/Model
- Home Built
- CPU
- Intel i7-4790
- Motherboard
- Asus H97 Pro Gamer with add-on TPM1.2 module
- Memory
- Teams DDR3-1600 4x4 GB
- Graphics Card(s)
- MSI Nvidia GeForce GTX 1050Ti
- Sound Card
- Realtek ALC1150
- Monitor(s) Displays
- Dell P2425D
- Screen Resolution
- 2560 by 1440 pixels
- Hard Drives
- Corsair NVMe M.2 Core XT 1000 GB (Windows 11 v.25H2); Samsung SATA Evo 870 500 GB (Windows 11 v.25H2);
- PSU
- Corsair HX850
- Case
- Gigabyte Solo 210
- Cooling
- Zalman CNPS7X Tower
- Keyboard
- Microsoft AIO Wireless (includes touchpad)
- Mouse
- HP S1000 Plus Wireless
- Internet Speed
- 500 Mb fiber optic
- Browser
- Chrome; MS Edge
- Antivirus
- Windows Defender
-
At a glance
MacOS 12 MontereyIntel Core i58 GBIntel integrated- Operating System
- MacOS 12 Monterey
- Computer type
- Laptop
- Manufacturer/Model
- Apple Macbook Air
- CPU
- Intel Core i5
- Memory
- 8 GB
- Graphics card(s)
- Intel integrated
- Screen Resolution
- 1440 by 900 pixels
- Hard Drives
- 128 GB
- Keyboard
- Built-in
- Mouse
- Microsoft Wireless
- Internet Speed
- 802.11 ac
- Browser
- Chrome; Safari
- Antivirus
- N/A