IMPORTANT Issue to be aware of if you use BitLocker on your OS drive


I've written my own program to do similar to Ventoy, but in this instance we're talking about having to patch the WinRE.wim. It all has to be done manually because there is no Microsoft process that automatically patches this file.
I get that, but you can still patch the WinRE.wim file, or figure a way to patch it correctly (and also verify correctness) AFTER you moved it off of your OS drive. Because, next, you can delete the Recovery partition─like how I described─and still be able to re-create it later if/when needed. By doing this, at least you shouldn't be affected by this security bug if you are using BitLocker on the drive.

As for re-creating the Recovery partition after it has been deleted. I'm sure some people have posted a few times in the past on here and/or on Tenforums about how it is possible to achieve, but anyway, it's not that hard, and, for those who can't find the relevant posts on here or on there, here are two articles about that particular subject.

Microsoft's traditional style of always naturally getting things hopelessly wrong = Don't panic. The answer is 42. Always carry enough duct tape. :p
 

My Computers

System One System Two

  • OS
    11 Home
    Computer type
    Laptop
    Manufacturer/Model
    Asus TUF Gaming (2024)
    CPU
    i7 13650HX
    Memory
    16GB DDR5
    Graphics Card(s)
    GeForce RTX 4060 Mobile
    Sound Card
    Eastern Electric MiniMax DAC Supreme; Emotiva UMC-200; Astell & Kern AK240
    Monitor(s) Displays
    Sony Bravia XR-55X90J
    Screen Resolution
    3840×2160
    Hard Drives
    512GB SSD internal
    37TB external
    PSU
    Li-ion
    Cooling
    2× Arc Flow Fans, 4× exhaust vents, 5× heatpipes
    Keyboard
    Logitech K800
    Mouse
    Logitech G402
    Internet Speed
    20Mbit/s up, 250Mbit/s down
    Browser
    FF
  • Operating System
    11 Home
    Computer type
    Laptop
    Manufacturer/Model
    Medion S15450
    CPU
    i5 1135G7
    Memory
    16GB DDR4
    Graphics card(s)
    Intel Iris Xe
    Sound Card
    Eastern Electric MiniMax DAC Supreme; Emotiva UMC-200; Astell & Kern AK240
    Monitor(s) Displays
    Sony Bravia XR-55X90J
    Screen Resolution
    3840×2160
    Hard Drives
    2TB SSD internal
    37TB external
    PSU
    Li-ion
    Mouse
    Logitech G402
    Keyboard
    Logitech K800
    Internet Speed
    20Mbit/s up, 250Mbit/s down
    Browser
    FF
updatewinre11.jpg
 

My Computers

System One System Two

  • OS
    Win7
    Computer type
    PC/Desktop
    CPU
    i5-8400
    Motherboard
    gigabyte b365m ds3h
    Memory
    2x8gb 3200mhz
    Monitor(s) Displays
    benq gw2480
    PSU
    bequiet pure power 11 400CM
    Cooling
    cryorig m9i
  • Operating System
    win7
    Computer type
    PC/Desktop
    CPU
    pentium g5400
    Motherboard
    gigabyte b365m ds3h
    Memory
    1x8gb 2400
    PSU
    xfx pro 450
did this really quickly, not pretty and probably errors in it, it is the rough idea.

Exporting the updated image instead of just copying it back might be a better way for compression, so that bit could do with changing.

rough-update-winre.cmd

Code:
@echo off
TITLE (C) SIW2 2015
SET TP=%~dp0
SET TP=%TP:~0,-1%
cd /d "%TP%"
mode con lines=40 cols=100
color 5f
SET LINKMADE=0
SET FIXRERUN=0
SET GETRETRIED=0
SET MOUNTFOLDER=%systemdrive%\winremount
SET PATCHFOLDER=%systemdrive%\winreupdates
:GETRE
setlocal enableextensions enabledelayedexpansion

echo Looking for  WinRE...

IF EXIST %windir%\system32\RECOVERY\WinRE.wim (
 attrib -S -H -R "%windir%\system32\recovery\WinRE.wim"
 copy /y "%windir%\system32\RECOVERY\WinRE.wim" "%userprofile%\desktop" >nul
 SET winresource="%windir%\system32\RECOVERY\WinRE.wim"
 SET GETRETRIED=2
 GOTO :OKRE
 )

(set WREGUID=)
for /f "usebackq tokens=1,2 delims={} " %%G in (`bcdedit.exe /enum {current} ^| find "recoverysequence"`) do set WREGUID=%%H
if "%WREGUID%"=="" goto :FIXRE
echo.
echo winre guid is %WREGUID%
(set recseqdrv=)
(set recseqpth=)
for /f "usebackq tokens=1-4 delims=[]=, " %%G in (`bcdedit.exe /enum {%WREGUID%} ^| find "device"`) do (
    set recseqdrv=%%I
    set recseqpth=%%~PJ
 )
set recseqpth=%recseqpth:~0,-1%
echo.
echo. WinRE path: %recseqdrv%%recseqpth%
echo.
if  "%recseqdrv:~1,6%"=="Device" (

 MKLINK /D "%TP%\RSD" \\?\GLOBALROOT%recseqdrv%\ >nul
 IF NOT EXIST "%TP%\RSD\%recseqpth%\WinRE.wim" GOTO :FIXRE
 attrib -S -H -R "%TP%\RSD\%recseqpth%\WinRE.wim"
 COPY /Y "%TP%\RSD\%recseqpth%\WinRE.wim" "%userprofile%\desktop\WinRE.wim" >nul
 SET winresource="\\?\GLOBALROOT%recseqdrv%\%recseqpth%\WinRE.wim"
 SET LINKMADE=Y
 GOTO :OKRE
    ) ELSE (
 IF NOT EXIST "%recseqdrv%%recseqpth%\WinRE.wim" GOTO :FIXRE
 attrib -S -H -R "%recseqdrv%%recseqpth%\WinRE.wim"
 copy "%recseqdrv%%recseqpth%\WinRE.wim" "%userprofile%\desktop\WinRE.wim" >nul
 SET winresource="%recseqdrv%%recseqpth%\WinRE.wim"
 SET LINKMADE=N
 GOTO :OKRE
 ECHO.
  )
 
:NORE
echo.
echo.
echo bootable.wim Not Found...
 echo.
 echo Cannot continue
 echo.
 echo PRESS ANY KEY TO EXIT
 PAUSE >nul
 EXIT


:OKRE
ECHO.
ECHO %winresource% copied to %userprofile%\desktop\WinRe.wim
ECHO.
pause

:choosemountwinre

DIR /A-D /B /S "%PATCHFOLDER%\*.*" >nul 2>&1 && (
echo updates found in %patchfolder%
  )
echo.
 
ECHO MOUNT %userprofile%\desktop\WinRe.wim ? & ECHO.
 SET YESNO=
 SET /P YESNO="Y=YES / N=NO => "
echo.
IF /I NOT '%YESNO%'=='Y' IF /I NOT '%YESNO%'=='N' goto :choosemountwinre
IF /I '%YESNO%'=='N' goto :exitline

2>nul md "%MOUNTFOLDER%"
DISM /Mount-image /imagefile:%userprofile%\desktop\WinRe.wim /Index:1 /MountDir:"%MOUNTFOLDER%"
DISM /IMAGE:"%MOUNTFOLDER%" /ADD-PACKAGE /PACKAGEPATH:"%PATCHFOLDER%"
Dism /Unmount-Image /MountDir:"%MOUNTFOLDER%" /Commit

IF %LINKMADE% EQU Y (
COPY /Y "%userprofile%\desktop\WinRE.wim" "%TP%\RSD\%recseqpth%\WinRE.wim"
 attrib +S +H +R "%TP%\RSD\%recseqpth%\WinRE.wim"
 rd /q "%TP%\RSD"
 )
 IF %LINKMADE% EQU N (
 COPY /Y  "%userprofile%\desktop\WinRE.wim" "%recseqdrv%%recseqpth%\WinRE.wim"
 attrib +S +H +R "%recseqdrv%%recseqpth%\WinRE.wim"
 )
 
 IF %GETRETRIED% EQU 2 (
  copy /y "%userprofile%\desktop\WinRE.wim"  "%windir%\system32\RECOVERY\WinRE.wim"
  attrib +S +H +R "%windir%\system32\RECOVERY\WinRE.wim"
   )
 
:exitline
echo PRESS ANY KEY TO EXIT
PAUSE >nul
EXIT

:FIXRE
IF %FIXRERUN% NEQ 0 GOTO :NORE
echo.
REAGENTC /INFO
ECHO.
>NUL TIMEOUT /t 2
ECHO.
REAGENTC /DISABLE
>NUL TIMEOUT /t 2
ECHO.
echo.
echo Running reagentc
echo.
ECHO.
REAGENTC /ENABLE
ECHO.
>NUL TIMEOUT /t 2
ECHO.
SET FIXRERUN=1
 
Last edited:

My Computers

System One System Two

  • OS
    Win7
    Computer type
    PC/Desktop
    CPU
    i5-8400
    Motherboard
    gigabyte b365m ds3h
    Memory
    2x8gb 3200mhz
    Monitor(s) Displays
    benq gw2480
    PSU
    bequiet pure power 11 400CM
    Cooling
    cryorig m9i
  • Operating System
    win7
    Computer type
    PC/Desktop
    CPU
    pentium g5400
    Motherboard
    gigabyte b365m ds3h
    Memory
    1x8gb 2400
    PSU
    xfx pro 450
EDIT: Mar 22, 2023
Microsoft has released a script to patch the Win RE environment on a running PC. I strongly suggest running their script now rather than following my procedure below. Note that in order to run their script you will still need to download the latest Safe OS Dynamic Update for Windows from the Microsoft Update Catalog. If you are not familiar with how to obtain that update, you can still refer to the portion of my procedure below for getting that update. Please see this link which provides the script and describes its usage:


EDIT: Jan 13, 2023 4:30 PM UTC
Thanks to @wingers and @SIW2 for pointing out that an EXPORT operation should be performed. Without this, the newly updated WinRE.wim will work, but it will be significantly larger than is needed. Updated the procedure to correct this.

EDIT: Jan 13, 2023 10:30 AM UTC
Below is a completely revised procedure for updating the Recovery Environment, improved in a number of ways, especially to take into consideration different user scenarios and possible errors.

=================================================================

Before we even begin, you should verify that the following conditions apply to you:

1) BitLocker encryption is enabled on the Windows OS drive
2) An active Recovery Partition exists
3) The version of the WinRE.wim in the Recovery Partition actually needs to be updated

Open an elevated command prompt. Don't close it after running the next command. We will be using this command prompt extensively.

Run the command manage-bde -status C: (I am assuming that Windows is on C: and will make that assumption for the rest of this document).

You should see output similar to this:

C:\>manage-bde -status C:
BitLocker Drive Encryption: Configuration Tool version 10.0.22621
Copyright (C) 2013 Microsoft Corporation. All rights reserved.

Volume C: []
[OS Volume]

Size: 930.78 GB
BitLocker Version: 2.0
Conversion Status: Used Space Only Encrypted
Percentage Encrypted: 100.0%
Encryption Method: XTS-AES 128
Protection Status: Protection On
Lock Status: Unlocked
Identification Field: Unknown
Key Protectors:
TPM
Numerical Password

If the output indicates that protection status is off, you can stop now as there is no need to update the Recovery Partition.

Run the command reagentc /info

Output will look something like this:

C:\>reagentc /info
Windows Recovery Environment (Windows RE) and system reset configuration
Information:

Windows RE status: Enabled
Windows RE location: \\?\GLOBALROOT\device\harddisk4\partition4\Recovery\WindowsRE
Boot Configuration Data (BCD) identifier: 4ef24a5f-8c9d-11ed-bfcd-b1a303b564b5
Recovery image location:
Recovery image index: 0
Custom image location:
Custom image index: 0

REAGENTC.EXE: Operation Successful.

If the Windows RE status is disabled, then there is no need to follow this procedure. You can stop now.

In the output of the above command, take note of the Windows RE location. I suggest copying that path and saving it somewhere such as notepad because we will need this path a few times. Note that in my sample above Windows RE is located on harddisk4. Your location will likely be different.

Run the following command and substitute the path you just noted. Add \winre.wim /index:1 to the end of that path as you see done in the command below. Again, make sure to use the path you noted because the path I have below may not be correct for your system

DISM /Get-ImageInfo /ImageFile:\\?\GLOBALROOT\device\harddisk4\partition4\Recovery\WindowsRE\winre.wim /index:1

Deployment Image Servicing and Management tool
Version: 10.0.22621.1

Details for image : \\?\GLOBALROOT\device\harddisk4\partition4\Recovery\WindowsRE\winre.wim

Index : 1
Name : Microsoft Windows Recovery Environment (amd64)
Description : Microsoft Windows Recover Environment (amd64)
Size : 2,733,226,613 bytes
WIM Bootable : No
Architecture : x64
Hal : <undefined>
Version : 10.0.22621
ServicePack Build : 1105
ServicePack Level : 0
Edition : WindowsPE
Installation : WindowsPE
ProductType : WinNT
ProductSuite :
System Root : WINDOWS
Directories : 4904
Files : 19853
Created : 5/6/2022 - 11:53:32 PM
Modified : 1/12/2023 - 9:57:46 AM
Languages :
en-US (Default)
The operation completed successfully.


Take a look at the output from the above command. If ServicePack Build is less than 1105, then you should continue with steps below to update your Recovery Environment. In my output above, it has already been updated so it shows 1105.

If you look at the build number of Windows 11 22H2 after applying the January 2023 Patch Tuesday Updates, you will see that the Windows build number is 22621.1105. The 1105 is the ServicePack Build. We want the line for ServicePack Build to indicate a build of 1105 (or higher). If that number is already 1105 or higher then you can stop now as your Recovery Environment is already up to date.

NOTE: For the original release of Windows 11 or for Windows 10, the build number should be equal to or higher than the associated build for the January 2023 updates for that OS.

If you are still reading, then we have determined that you will need to update your Recovery Environment.

Let's check one more thing:

Refer to that path I asked you to save. Note the number that follows harddisk. In my sample output above, this was harddisk4. Yours will likely be different.

Open Disk Management. Look at the disk with that number. Check to see if the recovery partition is the LAST partition on that disk.

Image1.jpg

If that partition is NOT the last partition, please be aware that this procedure may not work for you unless you create an entirely new Recovery Partition. The reason for this is that this procedure will increase the size of the WinRE.wim file to the point where it may not fit on the partition any longer. This procedure includes the steps needed to increase the size of the Recovery Partition if needed, or to create a new Recovery Partition. If you have a system with a very small OS drive, please just be aware in advance that you may need to use a little space for a new Recovery Partition.

Please note that there are third-party utilities that may be able to move the current Recovery Partition for you. If you wish to do that, I suggest doing it now before you proceed. If you do so, please note that this will change the partition number in the path you noted above. I would also strongly suggest making certain that you have a reliable backup just in case any problems occur in moving that partition.

Okay, finally, on to the main procedure.

I strongly suggest temporarily disabling Antivirus real-time scanning on your system. AV scanning can interfere with some of the DISM command operations that we will need to perform, especially when attempting to dismount an image.

If you use Windows built-in security, you can disable real-time scanning with these steps:

1) Open Windows Security
2) Select Virus & threat protection
3) Under the section called Virus & threat protection settings, click on Manage settings
4) Turn off Real-time protection

After following the remainder of this procedure, you can turn real-time scanning back on again.

We will now create folders for the files that we will be working with.

Create a folder called C:\Updates. Under that folder create four folders named Backup, LCU, SafeOS, and SSU.

Download the Latest Cumulative Update (LCU) for Windows from the Microsoft Update Catalog and place it in C:\Updates\LCU. Feel free to rename the file after you download it if you wish to do so. You will note that in the example below I have renamed the cumulative update to "KB5022303 - Windows 11 Cumulative Update.msu" so it is clear what this file is when I look at it.

To download the Cumulative Update, go to the Microsoft Update Catalog (Microsoft Update Catalog). In the search box, type in "windows 11" "version 22h2" 2023-01 (include the quotes). Look for the Cumulative Update. Make sure to download the x64 based update. DO NOT download the update labeled as being the Dynamic Cumulative Update.

NOTE: It is possible that the dynamic update may work, but I have never tried to use it, so better safe than sorry.

NOTE 2: If you are following this procedure after January 2023, you can substitute the current date in place of 2023-01. For example, after the February updates are released, you can use 2023-02.
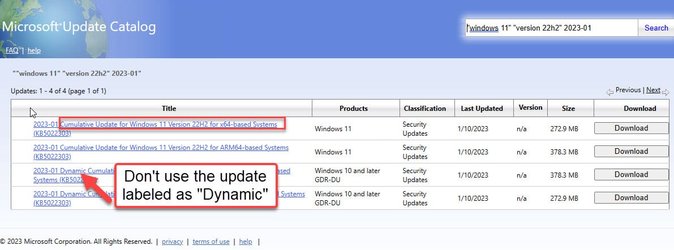
Image2.jpg

After downloading, right-click on the file that you downloaded, select properties, and on the general tab, select the Unblock check box. Click on OK.

image3.jpg

Move this file to C:\Updates\LCU

TECHNICAL NOTE: According to Microsoft documentation, the Windows Cumulative Update is NOT used to update the WinRE.wim. Instead, a file known as the Safe OS Dynamic Update is used to distribute updates for the WinRE.wim. Safe OS is another term for the Recovery Environment. However, for some reason, the update that we are trying to apply is being distributed in the LCU. In order to make sure that we fully patch the WinRE.wim file, we will also apply the latest Servicing Stack Update and the latest Safe OS update. The SSU is contained in the LCU package so we don't need to download any other files for this, but the Safe OS update is a separate file so we will download it now.

END OF TECHNICAL NOTE

To download the Safe OS update, go to the Microsoft Update Catalog (Microsoft Update Catalog). In the search box, type in "windows 11" "version 22h2" 2023-01 (include the quotes). Note that there is no Safe OS update in Jan 2023. Repeat the search using 2022-12. No update. Repeat with 2022-11. Now you will find a Safe OS update. Since a Safe OS is not published every month, only when needed, the above procedure will allow you to find the latest such update by simply walking back in time until you find the latest Safe OS update (if any exist).

Image4.jpg

Download that update.

Just as with the LCU, unblock that file.

Move the file to the C:\Updates\SafeOS folder.

Again, feel free to rename the file if you like.

Run this command:

reagentc /disable

This command disables the recovery environment and moves the WinRE.wim to c:\windows\system32\recovery so that we can operate on the file there and not run out of space in the recovery partition.

Run the following command to change the file attributes so that we can work on it:

attrib -h -s -i c:\windows\system32\recovery\winre.wim

Make a backup copy of the original winre.wim by copying it from C:\windows\system32\recovery\winre.wim to C:\Updates\Backup

Now we mount the WinRE.wim:

MD c:\mount DISM /mount-image /imagefile:c:\windows\system32\recovery\winre.wim /index:1 /mountdir:c:\mount

Apply the updates, perform a cleanup, then unmount the image. Note that you can copy and paste all of the commands below at once if you like:

EXPAND c:\updates\LCU\*.msu /f:ssu*.cab c:\updates\ssu DISM /Add-Package /Image:c:\mount /PackagePath=c:\updates\SSU DISM /Add-Package /Image:c:\mount /PackagePath=c:\updates\lcu DISM /Add-Package /Image:c:\Mount /PackagePath=c:\updates\safeos DISM /cleanup-image /image:c:\mount /StartComponentCleanup DISM /unmount-image /mountdir:c:\mount /commit

At this point, the WinRE.wim file has been fully updated and we simply need to perform an export operation, replace the old file with the new one, and reset the attributes. Then we can re-enable the Recovery Environment which copies it back to the recovery partition.

Before you continue, please just check the above output to make sure that there were no errors. If there were errors, skip the next three commands and continue to the line below that starts with If you saw errors.

Run these commands:

NOTE: The first command starting with DISM is long and will probably wrap on your screen. The second command starts with the DEL.

DISM /Export-Image /SourceImageFile:c:\windows\system32\recovery\winre.wim /SourceIndex:1 /DestinationImageFile:c:\windows\system32\recovery\winre.wim.new DEL c:\windows\system32\recovery\winre.wim REN c:\windows\system32\recovery\winre.wim.new winre.wim

If you saw errors, please copy the backup copy of the WinRE.wim file from C:\Updates\Backup to C:\windows\system32\Recovery.

TECHNICAL NOTE: After we committed the changes to the WinRE.wim file, it is fully updated at that point. However, the old versions of components replaced by the updates are still present although the cleanup-image operation has marked them for removal. It is not until we perform an export that these old components are actually removed.

END TECHNICAL NOTE

Regardless of whether an error occurred or not, continue by running the following two commands to reset the file attributes and re-enable the Recovery Environment. If you had an error and moved the backup copy of the file back, then the Recovery Environment will be enabled with the original version of the file and will not be updated.

attrib +h +s +i c:\windows\system32\recovery\winre.wim reagentc /enable

IMPORTANT:

It is possible that after running the second command above, you may see this error:

REAGENTC.EXE: Windows RE cannot be enabled on a volume with BitLocker Drive Encryption enabled.

If you did not get an error, please skip to VERIFICATION below

If you get the above error, it means that there was not enough space in the Recovery Partition to hold the updated file. If that happens, you have these choices:

1) (ABORT) Abort this procedure and restore the original Recovery Environment.
2a) (MAKE PARTITION LARGER) If your recovery partition is the last partition, make it larger.
2b) (MAKE NEW PARTITION) If your recovery partition is NOT the last partition, create a new, larger recovery partition. You will end up with two recovery partitions.

Select one of the above and jump to that section below.


ABORT

Please copy the backup copy of the WinRE.wim file from C:\Updates\Backup to C:\windows\system32\Recovery.

Run the following two commands to reset the file attributes and re-enable the Recovery Environment. The Recovery Environment will be enabled with the original version of the file and will not be updated.

attrib +h +s +i c:\windows\system32\recovery\winre.wim reagentc /enable

Jump to VERIFICATION. This should show the original version of the Recovery Environment and indicate that it is enabled.


MAKE PARTITION LARGER

To make room for the larger, updated WinRE.wim file, we need to do this:

1) Delete the current recovery partition.
2) Shrink C: by a small amount to make room for a larger recovery partition.
3) Recreate the recovery partition.

In your command prompt, run these commands:

diskpart

Wait for diskpart to run.

Run this command:

select disk x <-- Replace the x with the number of the hard disk you determined earlier

select partition x <-- Use the partition number that you previously determine to be the recovery partition

detail partition

If you selected the correct partition, it should indicate that this is a hidden partition, and it should show a partition type of de94bba4-06d1-4d40-a16a-bfd50179d6ac as in the example below.

DISKPART> detail partition

Partition 4
Type : de94bba4-06d1-4d40-a16a-bfd50179d6ac
Hidden : Yes
Required: Yes
Attrib : 0X8000000000000001
Offset in Bytes: 999539343360

Volume ### Ltr Label Fs Type Size Status Info
---------- --- ----------- ----- ---------- ------- --------- --------
* Volume 6 NTFS Partition 633 MB Healthy Hidden

We will now delete this partition:

delete partition override

Shrink the Windows partition to make room for the new file. In the example below, I am making 500 MB of additional space available for the recovery partition. You can alter this as you see fit.

NOTE: When determining the size that you want to make your recovery partition, you may want to include some extra space so that you don't need to grow it again in the future. While I increase the size by 500 MB in the example below, I grew my partition to 2 GB total size on my system. If you prefer to shoot for minimal size, I have found that other than the WinRE.wim file, there is roughly about 3 MB of other files in this directory structure. My suggestion would be to make the recovery partition at least 10 MB larger than the updated WinRE.wim.

list partition <-- From this command, determine which partition number the Windows partition is. It should be obvious from the size.

select partition x <-- Use the partition number for the Windows partition
shrink desired=500 minimum=500

Create a new recovery partition using all the unused space:

create partition primary format fs=ntfs quick label=Recovery set id=DE94BBA4-06D1-4D40-A16A-BFD50179D6AC
list vol <-- If successful, the new recovery partition should be shown as a hidden partition
exit <-- This exists from diskpart, taking you back to the command prompt

We will now try to re-enable the Recovery Environment. It should work this time:

reagentc /enable

Jump to the VERIFICATION section below.


MAKE NEW PARTITION

IMPORTANT: I have one pending question in my mind about this scenario. If you have a recovery partition that is NOT the last partition and you create a new partition using the procedure below, how will Windows know which recovery partition to use. Is it simply assumed that the last partition is used? If anyone has a system with more than one recovery partition, I would appreciate it if you could go into diskpart, select the first recovery partition, then run a detail partition. Repeat for the other partition. I'd like to see what that output looks like.

To make a new recovery partition with room for the larger, updated WinRE.wim file, we need to do this:

1) Shrink C: by the amount of space needed for the recovery partition.
3) Create the recovery partition.

In your command prompt, run these commands:

diskpart

Wait for diskpart to run.

Run this command:

select disk x <-- Replace the x with the number of the hard disk you determined earlier

Shrink the Windows partition to make room for the new file. In the example below, I am making 1024 MB (1GB) of space available for the recovery partition. You can alter this as you see fit.

NOTE: When determining the size that you want to make your recovery partition, you may want to include some extra space so that you don't need to grow it again in the future. While I use 1024 MB (1GB) in the example below, I made my partition 2GB on my system. If you prefer to shoot for minimal size, I have found that other than the WinRE.wim file, there is roughly about 3 MB of other files in this directory structure. My suggestion would be to make the recovery partition at least 10 MB larger than the updated WinRE.wim.

list partition <-- From this command, determine which partition number the Windows partition is. It should be obvious from the size.

select partition x <-- Use the partition number for the Windows partition
shrink desired=1024 minimum=1024

Create a new recovery partition using all the unused space:

create partition primary format fs=ntfs quick label=Recovery set id=DE94BBA4-06D1-4D40-A16A-BFD50179D6AC
list vol <-- If successful, the new recovery partition should be shown as a hidden partition
exit <-- This exists from diskpart, taking you back to the command prompt

We will now try to re-enable the Recovery Environment. It should work this time:

reagentc /enable

Jump to the VERIFICATION section below.


VERIFICATION

Now, let's verify that the update worked. We are going to run the same commands as we did initially to look at the version number. It should now be 1105 or newer (for Windows 11 22H2). Run this command:

reagentc /info
Windows Recovery Environment (Windows RE) and system reset configuration
Information:

Windows RE status: Enabled
Windows RE location: \\?\GLOBALROOT\device\harddisk4\partition4\Recovery\WindowsRE
Boot Configuration Data (BCD) identifier: 4ef24a5f-8c9d-11ed-bfcd-b1a303b564b5
Recovery image location:
Recovery image index: 0
Custom image location:
Custom image index: 0

REAGENTC.EXE: Operation Successful.

Again, in the second command, use the location from the command above and add \winre.wim /index:1. Don't use the location in my sample, make sure you use what you got on your system.

DISM /Get-ImageInfo /ImageFile:\\?\GLOBALROOT\device\harddisk4\partition4\Recovery\WindowsRE\winre.wim /index:1

Deployment Image Servicing and Management tool
Version: 10.0.22621.1

Details for image : \\?\GLOBALROOT\device\harddisk4\partition4\Recovery\WindowsRE\winre.wim

Index : 1
Name : Microsoft Windows Recovery Environment (amd64)
Description : Microsoft Windows Recover Environment (amd64)
Size : 2,733,226,613 bytes
WIM Bootable : No
Architecture : x64
Hal : <undefined>
Version : 10.0.22621
ServicePack Build : 1105
ServicePack Level : 0
Edition : WindowsPE
Installation : WindowsPE
ProductType : WinNT
ProductSuite :
System Root : WINDOWS
Directories : 4904
Files : 19853
Created : 5/6/2022 - 11:53:32 PM
Modified : 1/12/2023 - 9:57:46 AM
Languages :
en-US (Default)
The operation completed successfully.

That's it! We are done.

You can now delete the C:\mount folder as well as the C:\Updates folder. Also, remember to re-enable Antivirus real-time scanning if you disabled it earlier.
 

Attachments

  • Image2.jpg
    Image2.jpg
    11 KB · Views: 6
Last edited:

My Computers

System One System Two

  • OS
    Win11 Pro 23H2
    Computer type
    PC/Desktop
    Manufacturer/Model
    Home Built
    CPU
    Intel i7-11700K
    Motherboard
    ASUS Prime Z590-A
    Memory
    128GB Crucial Ballistix 3200MHz DRAM
    Graphics Card(s)
    No GPU - CPU graphics only (for now)
    Sound Card
    Realtek (on motherboard)
    Monitor(s) Displays
    HP Envy 32
    Screen Resolution
    2560 x 1440
    Hard Drives
    1 x 1TB NVMe Gen 4 x 4 SSD
    1 x 2TB NVMe Gen 3 x 4 SSD
    2 x 512GB 2.5" SSDs
    2 x 8TB HD
    PSU
    Corsair HX850i
    Case
    Corsair iCue 5000X RGB
    Cooling
    Noctua NH-D15 chromax.black cooler + 10 case fans
    Keyboard
    CODE backlit mechanical keyboard
    Mouse
    Logitech MX Master 3
    Internet Speed
    1Gb Up / 1 Gb Down
    Browser
    Edge
    Antivirus
    Windows Defender
    Other Info
    Additional options installed:
    WiFi 6E PCIe adapter
    ASUS ThunderboltEX 4 PCIe adapter
  • Operating System
    Win11 Pro 23H2
    Computer type
    Laptop
    Manufacturer/Model
    Lenovo ThinkBook 13x Gen 2
    CPU
    Intel i7-1255U
    Memory
    16 GB
    Graphics card(s)
    Intel Iris Xe Graphics
    Sound Card
    Realtek® ALC3306-CG codec
    Monitor(s) Displays
    13.3-inch IPS Display
    Screen Resolution
    WQXGA (2560 x 1600)
    Hard Drives
    2 TB 4 x 4 NVMe SSD
    PSU
    USB-C / Thunderbolt 4 Power / Charging
    Mouse
    Buttonless Glass Precision Touchpad
    Keyboard
    Backlit, spill resistant keyboard
    Internet Speed
    1Gb Up / 1Gb Down
    Browser
    Edge
    Antivirus
    Windows Defender
    Other Info
    WiFi 6e / Bluetooth 5.1 / Facial Recognition / Fingerprint Sensor / ToF (Time of Flight) Human Presence Sensor
Follow-up to my procedure in post #24:

Be aware that if you perform any clean installs of Windows, you will need to do this if you run BitLocker on the OS drive UNLESS Microsoft puts out an updated ISO image or you patch your own ISO images and installation media.

If I had my guess, I would be willing to bet that new ISO images will be forthcoming and that the Media Creation Tool will be updated to distribute the new build. When is anyone's guess, but it's simply a guess on my part.
 

My Computers

System One System Two

  • OS
    Win11 Pro 23H2
    Computer type
    PC/Desktop
    Manufacturer/Model
    Home Built
    CPU
    Intel i7-11700K
    Motherboard
    ASUS Prime Z590-A
    Memory
    128GB Crucial Ballistix 3200MHz DRAM
    Graphics Card(s)
    No GPU - CPU graphics only (for now)
    Sound Card
    Realtek (on motherboard)
    Monitor(s) Displays
    HP Envy 32
    Screen Resolution
    2560 x 1440
    Hard Drives
    1 x 1TB NVMe Gen 4 x 4 SSD
    1 x 2TB NVMe Gen 3 x 4 SSD
    2 x 512GB 2.5" SSDs
    2 x 8TB HD
    PSU
    Corsair HX850i
    Case
    Corsair iCue 5000X RGB
    Cooling
    Noctua NH-D15 chromax.black cooler + 10 case fans
    Keyboard
    CODE backlit mechanical keyboard
    Mouse
    Logitech MX Master 3
    Internet Speed
    1Gb Up / 1 Gb Down
    Browser
    Edge
    Antivirus
    Windows Defender
    Other Info
    Additional options installed:
    WiFi 6E PCIe adapter
    ASUS ThunderboltEX 4 PCIe adapter
  • Operating System
    Win11 Pro 23H2
    Computer type
    Laptop
    Manufacturer/Model
    Lenovo ThinkBook 13x Gen 2
    CPU
    Intel i7-1255U
    Memory
    16 GB
    Graphics card(s)
    Intel Iris Xe Graphics
    Sound Card
    Realtek® ALC3306-CG codec
    Monitor(s) Displays
    13.3-inch IPS Display
    Screen Resolution
    WQXGA (2560 x 1600)
    Hard Drives
    2 TB 4 x 4 NVMe SSD
    PSU
    USB-C / Thunderbolt 4 Power / Charging
    Mouse
    Buttonless Glass Precision Touchpad
    Keyboard
    Backlit, spill resistant keyboard
    Internet Speed
    1Gb Up / 1Gb Down
    Browser
    Edge
    Antivirus
    Windows Defender
    Other Info
    WiFi 6e / Bluetooth 5.1 / Facial Recognition / Fingerprint Sensor / ToF (Time of Flight) Human Presence Sensor
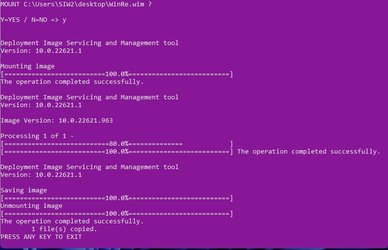
exporting the updated wim works fine

the original was 963 and the exported 1105 is shown below for size comparison

export-updated-winre.jpg

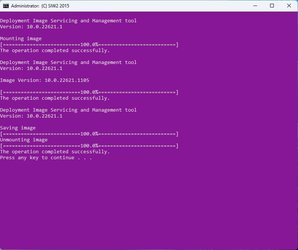
updated to 1105 without exporting:
updated-winre.jpg
 

My Computers

System One System Two

  • OS
    Win7
    Computer type
    PC/Desktop
    CPU
    i5-8400
    Motherboard
    gigabyte b365m ds3h
    Memory
    2x8gb 3200mhz
    Monitor(s) Displays
    benq gw2480
    PSU
    bequiet pure power 11 400CM
    Cooling
    cryorig m9i
  • Operating System
    win7
    Computer type
    PC/Desktop
    CPU
    pentium g5400
    Motherboard
    gigabyte b365m ds3h
    Memory
    1x8gb 2400
    PSU
    xfx pro 450
exporting the updated wim works fine

the original was 963 and the exported 1105 is shown below for size comparison

View attachment 49762

updated to 1105 without exporting:
View attachment 49764
Nice! Wow, you were fairly current. My WinRE was at 525 even though I just did a clean install on this machine like two weeks ago. Fortunately, I've now updated my installation media to 1105 as well :-).
 

My Computers

System One System Two

  • OS
    Win11 Pro 23H2
    Computer type
    PC/Desktop
    Manufacturer/Model
    Home Built
    CPU
    Intel i7-11700K
    Motherboard
    ASUS Prime Z590-A
    Memory
    128GB Crucial Ballistix 3200MHz DRAM
    Graphics Card(s)
    No GPU - CPU graphics only (for now)
    Sound Card
    Realtek (on motherboard)
    Monitor(s) Displays
    HP Envy 32
    Screen Resolution
    2560 x 1440
    Hard Drives
    1 x 1TB NVMe Gen 4 x 4 SSD
    1 x 2TB NVMe Gen 3 x 4 SSD
    2 x 512GB 2.5" SSDs
    2 x 8TB HD
    PSU
    Corsair HX850i
    Case
    Corsair iCue 5000X RGB
    Cooling
    Noctua NH-D15 chromax.black cooler + 10 case fans
    Keyboard
    CODE backlit mechanical keyboard
    Mouse
    Logitech MX Master 3
    Internet Speed
    1Gb Up / 1 Gb Down
    Browser
    Edge
    Antivirus
    Windows Defender
    Other Info
    Additional options installed:
    WiFi 6E PCIe adapter
    ASUS ThunderboltEX 4 PCIe adapter
  • Operating System
    Win11 Pro 23H2
    Computer type
    Laptop
    Manufacturer/Model
    Lenovo ThinkBook 13x Gen 2
    CPU
    Intel i7-1255U
    Memory
    16 GB
    Graphics card(s)
    Intel Iris Xe Graphics
    Sound Card
    Realtek® ALC3306-CG codec
    Monitor(s) Displays
    13.3-inch IPS Display
    Screen Resolution
    WQXGA (2560 x 1600)
    Hard Drives
    2 TB 4 x 4 NVMe SSD
    PSU
    USB-C / Thunderbolt 4 Power / Charging
    Mouse
    Buttonless Glass Precision Touchpad
    Keyboard
    Backlit, spill resistant keyboard
    Internet Speed
    1Gb Up / 1Gb Down
    Browser
    Edge
    Antivirus
    Windows Defender
    Other Info
    WiFi 6e / Bluetooth 5.1 / Facial Recognition / Fingerprint Sensor / ToF (Time of Flight) Human Presence Sensor
Nice! Wow, you were fairly current.
win11-dec-22.jpg


I tried the component cleanup on the updated winre, but it wasnt much help the size

SET MOUNTFOLDER=%systemdrive%\winremount
2>nul md "%MOUNTFOLDER%"
DISM /Mount-image /imagefile:%userprofile%\desktop\WinRe.wim /Index:1 /MountDir:"%MOUNTFOLDER%"
dism /cleanup-image /image:%MOUNTFOLDER% /startcomponentcleanup
Dism /Unmount-Image /MountDir:"%MOUNTFOLDER%" /Commit


component-cleanup-updated-winre.jpg

still chunky after the component cleanup


component-cleanup-updated-winre-size.jpg
 

My Computers

System One System Two

  • OS
    Win7
    Computer type
    PC/Desktop
    CPU
    i5-8400
    Motherboard
    gigabyte b365m ds3h
    Memory
    2x8gb 3200mhz
    Monitor(s) Displays
    benq gw2480
    PSU
    bequiet pure power 11 400CM
    Cooling
    cryorig m9i
  • Operating System
    win7
    Computer type
    PC/Desktop
    CPU
    pentium g5400
    Motherboard
    gigabyte b365m ds3h
    Memory
    1x8gb 2400
    PSU
    xfx pro 450
@hsehestedt

Thanks for your useful guide

Worked fine on one machine, but on another one it is failing at the point of running "reagentc /enable" with error of "REAGENTC.EXE: Windows RE cannot be enabled on a volume with BitLocker Drive Encryption enabled."

Any ideas?
 

My Computer

System One

  • OS
    Windows 11
    Computer type
    PC/Desktop
    Manufacturer/Model
    Dell
    CPU
    Intel(R) Core(TM) i7-10700 CPU @ 2.90GHz 2.90 GHz
    Memory
    32Gb
    Browser
    Google Chrome
    Antivirus
    AVG Internet Security
where did you get winre.wim from?
 

My Computers

System One System Two

  • OS
    Win7
    Computer type
    PC/Desktop
    CPU
    i5-8400
    Motherboard
    gigabyte b365m ds3h
    Memory
    2x8gb 3200mhz
    Monitor(s) Displays
    benq gw2480
    PSU
    bequiet pure power 11 400CM
    Cooling
    cryorig m9i
  • Operating System
    win7
    Computer type
    PC/Desktop
    CPU
    pentium g5400
    Motherboard
    gigabyte b365m ds3h
    Memory
    1x8gb 2400
    PSU
    xfx pro 450

My Computer

System One

  • OS
    Windows 11
    Computer type
    PC/Desktop
    Manufacturer/Model
    Dell
    CPU
    Intel(R) Core(TM) i7-10700 CPU @ 2.90GHz 2.90 GHz
    Memory
    32Gb
    Browser
    Google Chrome
    Antivirus
    AVG Internet Security
have you got a separate recovery partition?
 

My Computers

System One System Two

  • OS
    Win7
    Computer type
    PC/Desktop
    CPU
    i5-8400
    Motherboard
    gigabyte b365m ds3h
    Memory
    2x8gb 3200mhz
    Monitor(s) Displays
    benq gw2480
    PSU
    bequiet pure power 11 400CM
    Cooling
    cryorig m9i
  • Operating System
    win7
    Computer type
    PC/Desktop
    CPU
    pentium g5400
    Motherboard
    gigabyte b365m ds3h
    Memory
    1x8gb 2400
    PSU
    xfx pro 450
have you got a separate recovery partition?
yes - is the problem that the partition is too small - and the error message I am getting is just misleading?

How can I either shrink the winre.wim or resize the partition?

EDIT: Think it is definitely due to the size of the winre.wim and the "REAGENTC.EXE: Windows RE cannot be enabled on a volume with BitLocker Drive Encryption enabled." error is just completely misleading

For some reason my winre.wim grew from around 587mb to 930mb just adding one patch (windows10.0-kb5022282-x64) and the recovery partition was just too smal for the new larger winre.wim

Any idea why one patch would make it grow so much? and what can I do to get round it? have 100's of machines to get this done on....
 
Last edited:

My Computer

System One

  • OS
    Windows 11
    Computer type
    PC/Desktop
    Manufacturer/Model
    Dell
    CPU
    Intel(R) Core(TM) i7-10700 CPU @ 2.90GHz 2.90 GHz
    Memory
    32Gb
    Browser
    Google Chrome
    Antivirus
    AVG Internet Security
my winre.wim grew from around 587mb to 930mb
it will be bigger after integrating updates. The trick is to export the image to a new wim file.

It shouldnt be 930mb though, something wrong there.

rename the updated winre.wim to anything you like, lets say Bigwinre.wim

then you export the image from Bigwinre.wim to winre.wim and it should be a lot smaller.
 

My Computers

System One System Two

  • OS
    Win7
    Computer type
    PC/Desktop
    CPU
    i5-8400
    Motherboard
    gigabyte b365m ds3h
    Memory
    2x8gb 3200mhz
    Monitor(s) Displays
    benq gw2480
    PSU
    bequiet pure power 11 400CM
    Cooling
    cryorig m9i
  • Operating System
    win7
    Computer type
    PC/Desktop
    CPU
    pentium g5400
    Motherboard
    gigabyte b365m ds3h
    Memory
    1x8gb 2400
    PSU
    xfx pro 450
it will be bigger after integrating updates. The trick is to export the image to a new wim file.

It shouldnt be 930mb though, something wrong there.
will try it again tomorrow. what is the command to export it to a new wim file please?
 

My Computer

System One

  • OS
    Windows 11
    Computer type
    PC/Desktop
    Manufacturer/Model
    Dell
    CPU
    Intel(R) Core(TM) i7-10700 CPU @ 2.90GHz 2.90 GHz
    Memory
    32Gb
    Browser
    Google Chrome
    Antivirus
    AVG Internet Security
the first time I ran the DISM /add-package command I got error 0x800f0823 and it said try again, second time it worked okay, perhaps that was something to do with why WIM ended up so large
 

My Computer

System One

  • OS
    Windows 11
    Computer type
    PC/Desktop
    Manufacturer/Model
    Dell
    CPU
    Intel(R) Core(TM) i7-10700 CPU @ 2.90GHz 2.90 GHz
    Memory
    32Gb
    Browser
    Google Chrome
    Antivirus
    AVG Internet Security
Dism /Export-Image /SourceImageFile:"%userprofile%\desktop\BigWinRe.wim" /SourceIndex:1 /DestinationImageFile:"%userprofile%\desktop\WinRe.wim"

If you have done it with c:\windows\system32\Recovery\Winre.wim

rename it:
REN "%windir%\system32\Recovery\Winre.wim" bigwinre.wim

export it:
Dism /Export-Image /SourceImageFile:"%windir%\system32\Recovery\bigWinre.wim" /SourceIndex:1 /DestinationImageFile:"%windir%\system32\Recovery\Winre.wim"

delete the big one
del /q "%windir%\system32\Recovery\bigWinre.wim"
 
Last edited:

My Computers

System One System Two

  • OS
    Win7
    Computer type
    PC/Desktop
    CPU
    i5-8400
    Motherboard
    gigabyte b365m ds3h
    Memory
    2x8gb 3200mhz
    Monitor(s) Displays
    benq gw2480
    PSU
    bequiet pure power 11 400CM
    Cooling
    cryorig m9i
  • Operating System
    win7
    Computer type
    PC/Desktop
    CPU
    pentium g5400
    Motherboard
    gigabyte b365m ds3h
    Memory
    1x8gb 2400
    PSU
    xfx pro 450
@hsehestedt

Thanks for your useful guide

Worked fine on one machine, but on another one it is failing at the point of running "reagentc /enable" with error of "REAGENTC.EXE: Windows RE cannot be enabled on a volume with BitLocker Drive Encryption enabled."

Any ideas?
Let me look into that. Not sure why that would be happening.
 

My Computers

System One System Two

  • OS
    Win11 Pro 23H2
    Computer type
    PC/Desktop
    Manufacturer/Model
    Home Built
    CPU
    Intel i7-11700K
    Motherboard
    ASUS Prime Z590-A
    Memory
    128GB Crucial Ballistix 3200MHz DRAM
    Graphics Card(s)
    No GPU - CPU graphics only (for now)
    Sound Card
    Realtek (on motherboard)
    Monitor(s) Displays
    HP Envy 32
    Screen Resolution
    2560 x 1440
    Hard Drives
    1 x 1TB NVMe Gen 4 x 4 SSD
    1 x 2TB NVMe Gen 3 x 4 SSD
    2 x 512GB 2.5" SSDs
    2 x 8TB HD
    PSU
    Corsair HX850i
    Case
    Corsair iCue 5000X RGB
    Cooling
    Noctua NH-D15 chromax.black cooler + 10 case fans
    Keyboard
    CODE backlit mechanical keyboard
    Mouse
    Logitech MX Master 3
    Internet Speed
    1Gb Up / 1 Gb Down
    Browser
    Edge
    Antivirus
    Windows Defender
    Other Info
    Additional options installed:
    WiFi 6E PCIe adapter
    ASUS ThunderboltEX 4 PCIe adapter
  • Operating System
    Win11 Pro 23H2
    Computer type
    Laptop
    Manufacturer/Model
    Lenovo ThinkBook 13x Gen 2
    CPU
    Intel i7-1255U
    Memory
    16 GB
    Graphics card(s)
    Intel Iris Xe Graphics
    Sound Card
    Realtek® ALC3306-CG codec
    Monitor(s) Displays
    13.3-inch IPS Display
    Screen Resolution
    WQXGA (2560 x 1600)
    Hard Drives
    2 TB 4 x 4 NVMe SSD
    PSU
    USB-C / Thunderbolt 4 Power / Charging
    Mouse
    Buttonless Glass Precision Touchpad
    Keyboard
    Backlit, spill resistant keyboard
    Internet Speed
    1Gb Up / 1Gb Down
    Browser
    Edge
    Antivirus
    Windows Defender
    Other Info
    WiFi 6e / Bluetooth 5.1 / Facial Recognition / Fingerprint Sensor / ToF (Time of Flight) Human Presence Sensor
I've figured out why you are seeing the message about not being able to enable Windows RE on a volume with BitLocker. For now, I have placed a note at the start of the procedure advising people not to follow that procedure until I can publish an updated procedure tomorrow (Jan 13, 2023).

I had to go back into my notes from when I was developing my program that updates these same components in an offline image and it brought back to mind a number of issues centering around this topic. This is pretty messy, to say the least.
 

My Computers

System One System Two

  • OS
    Win11 Pro 23H2
    Computer type
    PC/Desktop
    Manufacturer/Model
    Home Built
    CPU
    Intel i7-11700K
    Motherboard
    ASUS Prime Z590-A
    Memory
    128GB Crucial Ballistix 3200MHz DRAM
    Graphics Card(s)
    No GPU - CPU graphics only (for now)
    Sound Card
    Realtek (on motherboard)
    Monitor(s) Displays
    HP Envy 32
    Screen Resolution
    2560 x 1440
    Hard Drives
    1 x 1TB NVMe Gen 4 x 4 SSD
    1 x 2TB NVMe Gen 3 x 4 SSD
    2 x 512GB 2.5" SSDs
    2 x 8TB HD
    PSU
    Corsair HX850i
    Case
    Corsair iCue 5000X RGB
    Cooling
    Noctua NH-D15 chromax.black cooler + 10 case fans
    Keyboard
    CODE backlit mechanical keyboard
    Mouse
    Logitech MX Master 3
    Internet Speed
    1Gb Up / 1 Gb Down
    Browser
    Edge
    Antivirus
    Windows Defender
    Other Info
    Additional options installed:
    WiFi 6E PCIe adapter
    ASUS ThunderboltEX 4 PCIe adapter
  • Operating System
    Win11 Pro 23H2
    Computer type
    Laptop
    Manufacturer/Model
    Lenovo ThinkBook 13x Gen 2
    CPU
    Intel i7-1255U
    Memory
    16 GB
    Graphics card(s)
    Intel Iris Xe Graphics
    Sound Card
    Realtek® ALC3306-CG codec
    Monitor(s) Displays
    13.3-inch IPS Display
    Screen Resolution
    WQXGA (2560 x 1600)
    Hard Drives
    2 TB 4 x 4 NVMe SSD
    PSU
    USB-C / Thunderbolt 4 Power / Charging
    Mouse
    Buttonless Glass Precision Touchpad
    Keyboard
    Backlit, spill resistant keyboard
    Internet Speed
    1Gb Up / 1Gb Down
    Browser
    Edge
    Antivirus
    Windows Defender
    Other Info
    WiFi 6e / Bluetooth 5.1 / Facial Recognition / Fingerprint Sensor / ToF (Time of Flight) Human Presence Sensor
Just posted an entirely revised procedure on post #24. This should be far more robust and tries to take into account different user configs and potential errors.

I was up all night working on this, now 4:30 AM here so going to sleep. I may be unresponsive for a few hours at this point :-)
 

My Computers

System One System Two

  • OS
    Win11 Pro 23H2
    Computer type
    PC/Desktop
    Manufacturer/Model
    Home Built
    CPU
    Intel i7-11700K
    Motherboard
    ASUS Prime Z590-A
    Memory
    128GB Crucial Ballistix 3200MHz DRAM
    Graphics Card(s)
    No GPU - CPU graphics only (for now)
    Sound Card
    Realtek (on motherboard)
    Monitor(s) Displays
    HP Envy 32
    Screen Resolution
    2560 x 1440
    Hard Drives
    1 x 1TB NVMe Gen 4 x 4 SSD
    1 x 2TB NVMe Gen 3 x 4 SSD
    2 x 512GB 2.5" SSDs
    2 x 8TB HD
    PSU
    Corsair HX850i
    Case
    Corsair iCue 5000X RGB
    Cooling
    Noctua NH-D15 chromax.black cooler + 10 case fans
    Keyboard
    CODE backlit mechanical keyboard
    Mouse
    Logitech MX Master 3
    Internet Speed
    1Gb Up / 1 Gb Down
    Browser
    Edge
    Antivirus
    Windows Defender
    Other Info
    Additional options installed:
    WiFi 6E PCIe adapter
    ASUS ThunderboltEX 4 PCIe adapter
  • Operating System
    Win11 Pro 23H2
    Computer type
    Laptop
    Manufacturer/Model
    Lenovo ThinkBook 13x Gen 2
    CPU
    Intel i7-1255U
    Memory
    16 GB
    Graphics card(s)
    Intel Iris Xe Graphics
    Sound Card
    Realtek® ALC3306-CG codec
    Monitor(s) Displays
    13.3-inch IPS Display
    Screen Resolution
    WQXGA (2560 x 1600)
    Hard Drives
    2 TB 4 x 4 NVMe SSD
    PSU
    USB-C / Thunderbolt 4 Power / Charging
    Mouse
    Buttonless Glass Precision Touchpad
    Keyboard
    Backlit, spill resistant keyboard
    Internet Speed
    1Gb Up / 1Gb Down
    Browser
    Edge
    Antivirus
    Windows Defender
    Other Info
    WiFi 6e / Bluetooth 5.1 / Facial Recognition / Fingerprint Sensor / ToF (Time of Flight) Human Presence Sensor

Latest Support Threads

Back
Top Bottom