- Local time
- 10:06 PM
- Posts
- 641
- OS
- Windows 11 Pro build 26200.8524
Modern Windows 11 installation should not need or rely on 8.3 short file names support. Stripping these short file names support off of install.wim file may slightly increase speed of Windows.
You may refer to Installing Windows 10/11 without 8.3 file names for further instructions.
There are several ways to apply the stripping procedure in above-referenced web site.
When I read the article in Schneegans.de web site above, I found the article quite clear about how I should apply the procedure delineated in there.
It is really very easy to strip 8.3 file name support from install.wim file. I created one for testing in Hyper-V VM. The procedure found 107739 short file name references in Windows 11 .wim file and stripped them.

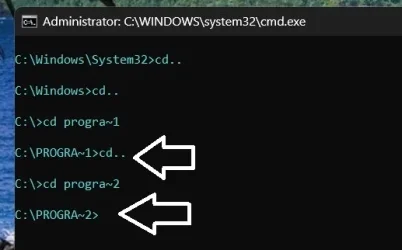
For those that may not know 8.3 file name support, it is this:
If at C:> command prompt, you type in PROGRA~1 or PROGRA~2 or PROGRA~3 and you see C:>PROGRA~1 or PROGRA~2 or PROGRA~3, then your Windows 11 installation has 8.3 short file name support. This support is a burden on Windows 11, especially for low spec machines. PROGRA~1 is for "Program Files" directory and PROGRA~2 is for "Program Files (x86)" directory and PROGRA~3 is for ProgramData directory.

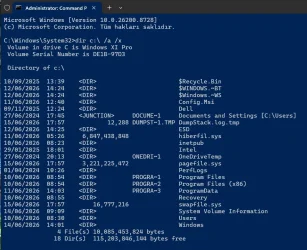
When you install Windows 11 with stripped 8.3 file name creation, then you see this:

I describe here (courtesy of schneegans.de) one of the ways on what you should do, should you choose to strip Windows 11 installation off of 8.3 file name support.
PROCEDURE:
Make a folder in C: drive and name it mt. It should look like C:\mt (Note: You can use any other drive of your choice but you must also modify the powershell script to point to the new location)
Find an install.wim file and put it C:\USB\sources folder. (Note: You can use any other drive of your choice but you must modify the powershell script to point to the new location)
You also need \Program Files\SysinternalsSuite\PsExec.exe executable. You can download the tool from:

This program should be installed into C:\Program Files\SysinternalsSuite folder and it must exist in Environment Variables window.

Open a Powershell window with admin privileges
Copy the code lines starting with function Remove.... between but excluding dashed lines and paste them into Powershell window and press Enter/Return key on the keyboard.
-------------------------------------------------------------------------------------------------------------------------------------------------------------
function Remove-WimShortNames {
[CmdletBinding()]
param(
[Parameter( Mandatory )]
[string]
$WimFile,
[string]
$MountDirectory = 'C:\mt',
[ValidateSet( 'Errors', 'Warnings', 'WarningsInfo' )]
[string]
$LogLevel = 'Errors',
[string]
$PsExecPath = "$env rogramFiles\SysinternalsSuite\PsExec.exe"
);
if( -not [System.IO.File]::Exists( $WimFile ) ) {
throw "File '$WimFile' does not exist.";
}
if( -not [System.IO.File]::Exists( $PsExecPath ) ) {
throw "File '$PsExecPath' does not exist.";
}
$params = @{
LogLevel = $LogLevel;
};
mkdir -Path $MountDirectory -ErrorAction 'SilentlyContinue' | Out-Null;
Get-WindowsImage -ImagePath $WimFile @params | ForEach-Object -Process {
"Now processing edition '{0}'. Mounting to '{1}'." -f $_.ImageName, $MountDirectory | Write-Host;
Mount-WindowsImage -Path $MountDirectory -ImagePath $WimFile -Name $_.ImageName @params;
& $PsExecPath -s "$env:windir\system32\fsutil.exe" 8dot3name strip /f /s $MountDirectory;
if( $LASTEXITCODE ) {
throw "fsutil.exe exited with error code $LASTEXITCODE.";
}
Dismount-WindowsImage -Path $MountDirectory -Save @params;
};
Remove-Item -LiteralPath $MountDirectory -Force;
}
------------------------------------------------------------------------------------------------------------------------------------------------------------
After that, you should run the command below in Powershell (copy-paste the whole line including the semi-colon at the end):
Remove-WimShortNames -WimFile 'C:\USB\sources\install.wim';
That's it. The install.wim file will be ready in a few minutes with 8.3 short file names removed.
If your .wim file contains more than one edition of Windows, all will be stripped.
You can replace this install.wim file with the one in Windows install USB drive.
When you clean-install Windows, you will not have installed 8dot3 file name references. After Windows is installed, you should also run
reg add HKEY_LOCAL_MACHINE\SYSTEM\CurrentControlSet\Control\FileSystem /v NtfsDisable8dot3NameCreation /t REG_DWORD /d 0x1 /f
to eliminate possible future creation of short file names. Restart Windows for the change to take effect.
Not all files and folders with 8.3 file names may be removed. There may be a few entries still with 8.3 short file names. But you will have removed more than
100 thousand 8dot3 file name references from Windows installation.
I do not know if you have legacy programs that still rely on 8.3 file names support.
Hope this helps.
Edit: You may see an emoji. It is not an emoji. Forum format puts it as emoji. It is actually a colon and P letter.

You may refer to Installing Windows 10/11 without 8.3 file names for further instructions.
There are several ways to apply the stripping procedure in above-referenced web site.
When I read the article in Schneegans.de web site above, I found the article quite clear about how I should apply the procedure delineated in there.
It is really very easy to strip 8.3 file name support from install.wim file. I created one for testing in Hyper-V VM. The procedure found 107739 short file name references in Windows 11 .wim file and stripped them.
For those that may not know 8.3 file name support, it is this:
If at C:> command prompt, you type in PROGRA~1 or PROGRA~2 or PROGRA~3 and you see C:>PROGRA~1 or PROGRA~2 or PROGRA~3, then your Windows 11 installation has 8.3 short file name support. This support is a burden on Windows 11, especially for low spec machines. PROGRA~1 is for "Program Files" directory and PROGRA~2 is for "Program Files (x86)" directory and PROGRA~3 is for ProgramData directory.
When you install Windows 11 with stripped 8.3 file name creation, then you see this:
I describe here (courtesy of schneegans.de) one of the ways on what you should do, should you choose to strip Windows 11 installation off of 8.3 file name support.
PROCEDURE:
Make a folder in C: drive and name it mt. It should look like C:\mt (Note: You can use any other drive of your choice but you must also modify the powershell script to point to the new location)
Find an install.wim file and put it C:\USB\sources folder. (Note: You can use any other drive of your choice but you must modify the powershell script to point to the new location)
You also need \Program Files\SysinternalsSuite\PsExec.exe executable. You can download the tool from:
Sysinternals Suite - Sysinternals
The Windows Sysinternals troubleshooting Utilities have been rolled up into a single suite of tools.
learn.microsoft.com
This program should be installed into C:\Program Files\SysinternalsSuite folder and it must exist in Environment Variables window.
Open a Powershell window with admin privileges
Copy the code lines starting with function Remove.... between but excluding dashed lines and paste them into Powershell window and press Enter/Return key on the keyboard.
-------------------------------------------------------------------------------------------------------------------------------------------------------------
function Remove-WimShortNames {
[CmdletBinding()]
param(
[Parameter( Mandatory )]
[string]
$WimFile,
[string]
$MountDirectory = 'C:\mt',
[ValidateSet( 'Errors', 'Warnings', 'WarningsInfo' )]
[string]
$LogLevel = 'Errors',
[string]
$PsExecPath = "$env
rogramFiles\SysinternalsSuite\PsExec.exe");
if( -not [System.IO.File]::Exists( $WimFile ) ) {
throw "File '$WimFile' does not exist.";
}
if( -not [System.IO.File]::Exists( $PsExecPath ) ) {
throw "File '$PsExecPath' does not exist.";
}
$params = @{
LogLevel = $LogLevel;
};
mkdir -Path $MountDirectory -ErrorAction 'SilentlyContinue' | Out-Null;
Get-WindowsImage -ImagePath $WimFile @params | ForEach-Object -Process {
"Now processing edition '{0}'. Mounting to '{1}'." -f $_.ImageName, $MountDirectory | Write-Host;
Mount-WindowsImage -Path $MountDirectory -ImagePath $WimFile -Name $_.ImageName @params;
& $PsExecPath -s "$env:windir\system32\fsutil.exe" 8dot3name strip /f /s $MountDirectory;
if( $LASTEXITCODE ) {
throw "fsutil.exe exited with error code $LASTEXITCODE.";
}
Dismount-WindowsImage -Path $MountDirectory -Save @params;
};
Remove-Item -LiteralPath $MountDirectory -Force;
}
------------------------------------------------------------------------------------------------------------------------------------------------------------
After that, you should run the command below in Powershell (copy-paste the whole line including the semi-colon at the end):
Remove-WimShortNames -WimFile 'C:\USB\sources\install.wim';
That's it. The install.wim file will be ready in a few minutes with 8.3 short file names removed.
If your .wim file contains more than one edition of Windows, all will be stripped.
You can replace this install.wim file with the one in Windows install USB drive.
When you clean-install Windows, you will not have installed 8dot3 file name references. After Windows is installed, you should also run
reg add HKEY_LOCAL_MACHINE\SYSTEM\CurrentControlSet\Control\FileSystem /v NtfsDisable8dot3NameCreation /t REG_DWORD /d 0x1 /f
to eliminate possible future creation of short file names. Restart Windows for the change to take effect.
Not all files and folders with 8.3 file names may be removed. There may be a few entries still with 8.3 short file names. But you will have removed more than
100 thousand 8dot3 file name references from Windows installation.
I do not know if you have legacy programs that still rely on 8.3 file names support.
Hope this helps.
Edit: You may see an emoji. It is not an emoji. Forum format puts it as emoji. It is actually a colon and P letter.
Attachments
Last edited:
My Computers
-
At a glance
Windows 11 Pro build 26200.8524Intel i7-4790Teams DDR3-1600 4x4 GBMSI Nvidia GeForce GTX 1050Ti- OS
- Windows 11 Pro build 26200.8524
- Computer type
- PC/Desktop
- Manufacturer/Model
- Home Built
- CPU
- Intel i7-4790
- Motherboard
- Asus H97 Pro Gamer with add-on TPM1.2 module
- Memory
- Teams DDR3-1600 4x4 GB
- Graphics Card(s)
- MSI Nvidia GeForce GTX 1050Ti
- Sound Card
- Realtek ALC1150
- Monitor(s) Displays
- Dell P2425D
- Screen Resolution
- 2560 by 1440 pixels
- Hard Drives
- Corsair NVMe M.2 Core XT 1000 GB (Windows 11 v.25H2); Samsung SATA Evo 870 500 GB (Windows 11 v.25H2);
- PSU
- Corsair HX850
- Case
- Gigabyte Solo 210
- Cooling
- Zalman CNPS7X Tower
- Keyboard
- Microsoft AIO Wireless (includes touchpad)
- Mouse
- HP S1000 Plus Wireless
- Internet Speed
- 500 Mb fiber optic
- Browser
- Chrome; MS Edge
- Antivirus
- Windows Defender
-
At a glance
MacOS 12 MontereyIntel Core i58 GBIntel integrated- Operating System
- MacOS 12 Monterey
- Computer type
- Laptop
- Manufacturer/Model
- Apple Macbook Air
- CPU
- Intel Core i5
- Memory
- 8 GB
- Graphics card(s)
- Intel integrated
- Screen Resolution
- 1440 by 900 pixels
- Hard Drives
- 128 GB
- Keyboard
- Built-in
- Mouse
- Microsoft Wireless
- Internet Speed
- 802.11 ac
- Browser
- Chrome; Safari
- Antivirus
- N/A


