This tutorial will show you how to move an installed app from the Microsoft Store to another drive for your account in Windows 11.
In Windows 11, you can move an installed app from the Microsoft Store to another drive. This can be handy if you do not have much free space on the Windows drive, or just prefer to move apps to a different drive location.
The default location for installed apps from the Microsoft Store is on the Windows "Local Disk (C)" drive in the %ProgramFiles%\WindowsApps (apps) and %LocalAppData%\Packages (user app data) folders.
You can select to move an app to any internal or external NTFS drive, including SD cards and USB drives.
If you disconnect the drive you selected to move apps to, then any app moved to that drive will no longer work until the drive is connected again.
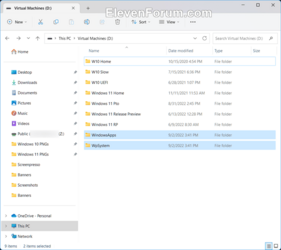
When an installed app from the Microsoft Store is moved to another drive location, Windows 11 will create a WindowsApps and WpSystem folder for the app's package in the root of the drive like below.

Here's How:
1 Open Settings (Win+I). (see screenshot below)
2 Click/tap on Apps on the left side, and click/tap on Installed apps on the right side. (see screenshot below)
System apps currently listed in Settings > Apps > Installed Apps page, have moved to their own page under Settings > System > System components.
3 Click/tap on the 3 dots button for the app (ex: "Scan") you want to move, and click/tap on Move. (see screenshot below)
Not all apps will support being moved to another drive.
4 Select an available drive in the drop menu you want to move the app to, and click/tap on Move. (see screenshot below)
5 If prompted to Delete other apps?, click/tap on Yes or No for what you want to do. (see screenshot below)
If you click/tap on No, the app will not be moved to the selected drive.
If you click/tap on Yes, any apps currently on the selected drive will be deleted.
6 The app will now get moved to the selected drive. (see screenshot below)
7 When finished, you can close Settings if you like.
That's it,
Shawn Brink
Related Tutorials
- Enable or Disable Move or Install Apps on Non-System Drives in Windows 11
- Choose where to get apps in Windows 11
- Uninstall Apps in Windows 11
- Change Where New Apps will Save to in Windows 11
- Find Storage Space Usage Size of Apps in Windows 11
- Change Game Installation Options in Microsoft Store and Xbox app in Windows 11
Last edited:


