Performed some testing and I have good news and bad news...
Test scenario
Install a clean copy of 23H2 (build 22631.4037) on Hyper-V. Set Hyper-V to not provide a TPM, and turn off TPM for the VM.
Attempted an upgrade install to 27718.1000.
Test 1 - Use "setup /product server"
This failed and would not allow the upgrade.
Test 2 - Change to the sources folder on install media and run "setupprep /product server"
This test also failed.
Test 3 - Patch the ISO image to mark it as a type "server" product.
SUCCESS!
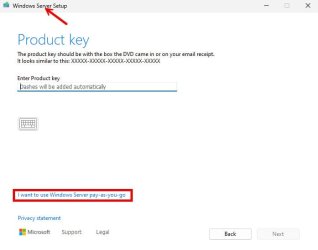
When starting setup in this manner I got a screen I had never seen before that looks like this:

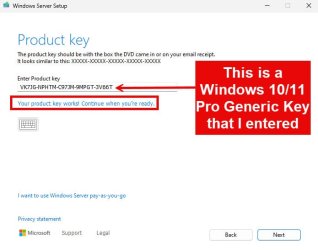
Simply enter your Windows Generic Product Key like this and click on Next:

To make this change to your Windows installation media, simply do this (this is very fast, taking mere seconds after running the commands):
NOTE: A hat tip to @garlin. It was Garlin who posted the fact that wimlib could be used to do this.
Download
Extract the contents of the ZIP file to a folder.
For this procedure we need only two of the files from wimlib:
Open a command prompt and change to the folder where wimlib-imagex.exe is located.
EDIT: Mount your Windows ISO image by double-clicking the ISO image in File Explorer. Note the drive letter it is mounted to. I assume D: in this example.
Get the number of indicies in the image:
The result looks something like this:
Image Count = 11
Modify the installation type, changing it to "Server". Note that the third number in the parenthesis should reflect the number of indicies in the image as found from the above command.
Example of the results:
Setting the WINDOWS/INSTALLATIONTYPE property of image 1 to "Server".
Setting the WINDOWS/INSTALLATIONTYPE property of image 2 to "Server".
Setting the WINDOWS/INSTALLATIONTYPE property of image 3 to "Server".
Setting the WINDOWS/INSTALLATIONTYPE property of image 4 to "Server".
Setting the WINDOWS/INSTALLATIONTYPE property of image 5 to "Server".
Setting the WINDOWS/INSTALLATIONTYPE property of image 6 to "Server".
Setting the WINDOWS/INSTALLATIONTYPE property of image 7 to "Server".
Setting the WINDOWS/INSTALLATIONTYPE property of image 8 to "Server".
Setting the WINDOWS/INSTALLATIONTYPE property of image 9 to "Server".
Setting the WINDOWS/INSTALLATIONTYPE property of image 10 to "Server".
Setting the WINDOWS/INSTALLATIONTYPE property of image 11 to "Server".
That is all that you need to do FOR AN UPGRADE INSTALL. Just create your physical installation media like normal using this patched image.
OPTIONAL: If you also want to patch your ISO image to bypass Win 11 requirements for a CLEAN INSTALL, do this:
Extract the contents of your Windows ISO image to a folder. In this example I will assume
Create a temporary folder to place a copy of the
Copy the
Create another folder to mount the
Run the following commands from an elevated command prompt:
Repeat for index 2 (the boot.wim contains 2 images):
Copy the
Use your favorite method to convert the files on the HDD back into a bootable ISO image or create your physical boot media the same way you would normally. My preference is to use
NOTE: If you use different paths, make sure to change all 3 paths in the above command. Also, I am saving the final ISO image to
Test scenario
Install a clean copy of 23H2 (build 22631.4037) on Hyper-V. Set Hyper-V to not provide a TPM, and turn off TPM for the VM.
Attempted an upgrade install to 27718.1000.
Test 1 - Use "setup /product server"
This failed and would not allow the upgrade.
Test 2 - Change to the sources folder on install media and run "setupprep /product server"
This test also failed.
Test 3 - Patch the ISO image to mark it as a type "server" product.
SUCCESS!
When starting setup in this manner I got a screen I had never seen before that looks like this:

Simply enter your Windows Generic Product Key like this and click on Next:

To make this change to your Windows installation media, simply do this (this is very fast, taking mere seconds after running the commands):
NOTE: A hat tip to @garlin. It was Garlin who posted the fact that wimlib could be used to do this.
Download
wimlib from here:https://wimlib.net/Extract the contents of the ZIP file to a folder.
For this procedure we need only two of the files from wimlib:
wimlib-imagex.exe and libwim-15.dll.Open a command prompt and change to the folder where wimlib-imagex.exe is located.
EDIT: Mount your Windows ISO image by double-clicking the ISO image in File Explorer. Note the drive letter it is mounted to. I assume D: in this example.
Get the number of indicies in the image:
Code:
wimlib-imagex.exe info "D:\sources\install.wim" --header | find "Image Count"The result looks something like this:
Image Count = 11
Modify the installation type, changing it to "Server". Note that the third number in the parenthesis should reflect the number of indicies in the image as found from the above command.
Code:
for /L %i in (1,1,11) do wimlib-imagex.exe info "D:\ISO_Files\sources\install.wim" %i --image-property WINDOWS/INSTALLATIONTYPE=ServerExample of the results:
Setting the WINDOWS/INSTALLATIONTYPE property of image 1 to "Server".
Setting the WINDOWS/INSTALLATIONTYPE property of image 2 to "Server".
Setting the WINDOWS/INSTALLATIONTYPE property of image 3 to "Server".
Setting the WINDOWS/INSTALLATIONTYPE property of image 4 to "Server".
Setting the WINDOWS/INSTALLATIONTYPE property of image 5 to "Server".
Setting the WINDOWS/INSTALLATIONTYPE property of image 6 to "Server".
Setting the WINDOWS/INSTALLATIONTYPE property of image 7 to "Server".
Setting the WINDOWS/INSTALLATIONTYPE property of image 8 to "Server".
Setting the WINDOWS/INSTALLATIONTYPE property of image 9 to "Server".
Setting the WINDOWS/INSTALLATIONTYPE property of image 10 to "Server".
Setting the WINDOWS/INSTALLATIONTYPE property of image 11 to "Server".
That is all that you need to do FOR AN UPGRADE INSTALL. Just create your physical installation media like normal using this patched image.
OPTIONAL: If you also want to patch your ISO image to bypass Win 11 requirements for a CLEAN INSTALL, do this:
Extract the contents of your Windows ISO image to a folder. In this example I will assume
D:\Project\ISO_Files.Create a temporary folder to place a copy of the
BOOT.WIM file. I will assume D:\Project\WinPE.Copy the
BOOT.WIM from D:\Project\ISO_Files\Sources to D:\Project\WinPE.Create another folder to mount the
BOOT.WIM file to. In this procedure I will the use of D:\Project\MOUNT.Run the following commands from an elevated command prompt:
Code:
DISM /mount-wim /wimfile:D:\Project\WinPE\boot.wim /index:1 /mountdir:D:\Project\Mount
reg load HKLM\offline D:\project\mount\windows\system32\config\system
reg add HKLM\offline\Setup\LabConfig /v BypassTPMCheck /t reg_dword /d 0x00000001 /f
reg add HKLM\offline\Setup\LabConfig /v BypassSecureBootCheck /t reg_dword /d 0x00000001 /f
reg add HKLM\offline\Setup\LabConfig /v BypassRAMCheck /t reg_dword /d 0x00000001 /f
reg unload HKLM\offline
dism /unmount-image /mountdir:D:\project\mount /commit"
Repeat for index 2 (the boot.wim contains 2 images):
Code:
DISM /mount-wim /wimfile:D:\Project\WinPE\boot.wim /index:2 /mountdir:D:\Project\Mount
reg load HKLM\offline D:\project\mount\windows\system32\config\system
reg add HKLM\offline\Setup\LabConfig /v BypassTPMCheck /t reg_dword /d 0x00000001 /f
reg add HKLM\offline\Setup\LabConfig /v BypassSecureBootCheck /t reg_dword /d 0x00000001 /f
reg add HKLM\offline\Setup\LabConfig /v BypassRAMCheck /t reg_dword /d 0x00000001 /f
reg unload HKLM\offline
dism /unmount-image /mountdir:D:\project\mount /commit"
Copy the
boot.wim file from D:\Project\WinPE to D:\Project\ISO_Files\Sources overwriting the copy that is there.Use your favorite method to convert the files on the HDD back into a bootable ISO image or create your physical boot media the same way you would normally. My preference is to use
OSCDIMG from the Windows ADK like this (note that this is all one single long command):
Code:
oscdimg.exe -m -o -u2 -udfver102 -bootdata:2#p0,e,bd:\project\iso_files\boot\etfsboot.com#pEF,e,bd:\project\iso_files\efi\microsoft\boot\efisys.bin d:\project\iso_files d:\project\Win11.isoNOTE: If you use different paths, make sure to change all 3 paths in the above command. Also, I am saving the final ISO image to
D:\project\Win11.iso. Use whatever path and filename you wish.My Computers
System One System Two
-
- OS
- Win11 Pro 24H2
- Computer type
- PC/Desktop
- Manufacturer/Model
- Self-built
- CPU
- Intel i7 11700K
- Motherboard
- ASUS Prime Z590-A MB
- Memory
- 64GB (Waiting for warranty replacement of another 64GB for 128GB total)
- Graphics Card(s)
- No GPU - Built-in Intel Graphics
- Sound Card
- Integrated
- Monitor(s) Displays
- HP Envy 32
- Screen Resolution
- 2560 x 1440
- Hard Drives
- 1 x 1TB NVMe SSD
1 x 2TB NVMe SSD
1 x 4TB NVMe SSD
3 x 512GB 2.5" SSD
1 x 4TB 2.5" SSD
5 x 8TB Seagate Barracuda HDD
- PSU
- Corsair HX850i
- Case
- Corsair iCUE RGB 5000X mid tower case
- Cooling
- Noctua NF-S12A chromax.black.swap case fans (Qty. 7) & Home Computer Specifications, Configuration, and Usage Notes General Specifications ASUS Prime Z590-A motherboard, serial number M1M0KC222467ARP Intel Core i7-11700K CPU (11th Gen Rocket Lake / LGA 1200 Socket) 128GB Crucial Ballistix RGB DDR4 3200 MHz DRAM (4 x 32GB) Corsair iCUE RGB 5000X mid tower case Noctua NH-D15 chromax.black CPU cooler Noctua NF-S12A chromax.black.swap case fans (Qty. 7) & Corsair LL-120 RGB Fans (Qty. 3)
- Keyboard
- Corsair K70 Max RGB Magnetic Keyboard
- Mouse
- Logitech MX Master 3
- Internet Speed
- 1Gb Up / 1 Gb Down
- Browser
- Edge
- Antivirus
- Windows Defender
- Other Info
- The five 8TB drives and three 512GB SSDs are part of a DrivePool using StableBit DrivePool software. The three SSDs are devoted purely to caching for the 8TB drives. All of the important data is stored in triplicate so that I can withstand simultaneous failure of 2 disks.
Networking: 2.5Gbps Ethernet and WiFi 6e
-
- Operating System
- Win11 Pro 23H2
- Computer type
- Laptop
- Manufacturer/Model
- Lenovo ThinkBook 13x Gen 2
- CPU
- Intel i7-1255U
- Memory
- 16 GB
- Graphics card(s)
- Intel Iris Xe Graphics
- Sound Card
- Realtek® ALC3306-CG codec
- Monitor(s) Displays
- 13.3-inch IPS Display
- Screen Resolution
- WQXGA (2560 x 1600)
- Hard Drives
- 2 TB 4 x 4 NVMe SSD
- PSU
- USB-C / Thunderbolt 4 Power / Charging
- Keyboard
- Backlit, spill resistant keyboard
- Mouse
- Buttonless Glass Precision Touchpad
- Internet Speed
- 1Gb Up / 1Gb Down
- Browser
- Edge
- Antivirus
- Windows Defender
- Other Info
- WiFi 6e / Bluetooth 5.1 / Facial Recognition / Fingerprint Sensor / ToF (Time of Flight) Human Presence Sensor


