Reports today that Windows11 TPM can be bypassed with Registry hack


Well, the article linked to in the first post of this thread contained those exact instructions....
My bad. After I read the OP I just followed a registry mod procedure I had previously read om another site.
 

My Computer

System One

  • OS
    Windows 10
As I said before, there is a simple way to clean install W11 on pc without TPM if you have HyperV.

1) Set HyperV to emulate TPM.

2) install W11 from iso in VM

3) Boot from Macrium Reflext USB Rescue Drive

4) attach VHDX created in Step 2 by clicking on command prompt and using diskpart.

5) exit command prompt and clone vhdx to internal hard drive.
It just seems a whole lot easier to adjust a couple registry entries during setup...... to me anyway (takes less than 2 minutes extra). Seems easier to also just apply the image from install.wim or install.esd manually to a partition. But I guess you do have to learn the commands.
 

My Computers

System One System Two

  • OS
    Windows 11
    Computer type
    PC/Desktop
    Manufacturer/Model
    Homebuilt
    CPU
    AMD Ryzen 7 3800XT
    Motherboard
    ASUS ROG Crosshair VII Hero (WiFi)
    Memory
    32GB
    Graphics Card(s)
    EVGA GeForce GTX 1080 Ti
  • Operating System
    Windows 11 Education
    Computer type
    Laptop
    Manufacturer/Model
    Dell Inspiron 7773
    CPU
    Intel i7-8550U
    Memory
    32GB
    Graphics card(s)
    Nvidia Geforce MX150
    Sound Card
    Realtek
    Monitor(s) Displays
    17"
    Screen Resolution
    1920 x 1080
    Hard Drives
    Toshiba 512GB NVMe SSD
    SK Hynix 512GB SATA SSD
    Internet Speed
    Fast!
I created a bootable disc earlier today with an ISO file for Windows 11 Pro Version 21H2 Build 22000.51 64-bit.

The pictorial guide and registry hack HERE worked fine in my Dell Precision Tower 3620.

It has a 6th generation Intel processor and 32 GB of DDR4 RAM, its BIOS has TPM 2.0, and secure boot and UEFI is not being used.

When I got to this point after hacking and exiting the registry,

Capture.JPG

the blue "back" arrow button was greyed out, so it could not be clicked.

By clicking the "X" in the upper right and choosing to exit setup, that allowed the image with the "Install" button to re-appear.

The install process then begin and successfully finished.

This is information for those who have the same problem.
 

My Computer

System One

  • OS
    Windows 7 Pro 64-bit / Windows 10 Pro 64-bit (dual boot)
    Computer type
    PC/Desktop
    Manufacturer/Model
    Dell OptiPlex 9020 / Dell Precision 3620
    CPU
    Intel Core i7-4790 / Intel Core i7-6700
    Motherboard
    Dell-branded
    Memory
    32 GB DDR3-1600 / 32 GB DDR4-2133
    Graphics Card(s)
    GeForce GT 730 / GeForce GTX 645 / GeForce GT 1030
    Monitor(s) Displays
    Viewsonic 32" LCD
    Hard Drives
    2 SSD's in each PC
    PSU
    290W
    Internet Speed
    Spectrum Internet Ultra - 400 Mbps
I created a bootable disc earlier today with an ISO file for Windows 11 Pro Version 21H2 Build 22000.51 64-bit.

The pictorial guide and registry hack HERE worked fine in my Dell Precision Tower 3620.

It has a 6th generation Intel processor and 32 GB of DDR4 RAM, its BIOS has TPM 2.0, and secure boot and UEFI is not being used.

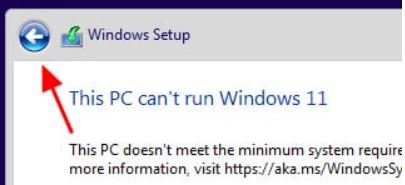
When I got to this point after hacking and exiting the registry,

View attachment 1844

the blue "back" arrow button was greyed out, so it could not be clicked.

By clicking the "X" in the upper right and choosing to exit setup, that allowed the image with the "Install" button to re-appear.

The install process then begin and successfully finished.

This is information for those who have the same problem.
Just like post #16!
 

My Computers

System One System Two

  • OS
    Windows 11
    Computer type
    PC/Desktop
    Manufacturer/Model
    Homebuilt
    CPU
    AMD Ryzen 7 3800XT
    Motherboard
    ASUS ROG Crosshair VII Hero (WiFi)
    Memory
    32GB
    Graphics Card(s)
    EVGA GeForce GTX 1080 Ti
  • Operating System
    Windows 11 Education
    Computer type
    Laptop
    Manufacturer/Model
    Dell Inspiron 7773
    CPU
    Intel i7-8550U
    Memory
    32GB
    Graphics card(s)
    Nvidia Geforce MX150
    Sound Card
    Realtek
    Monitor(s) Displays
    17"
    Screen Resolution
    1920 x 1080
    Hard Drives
    Toshiba 512GB NVMe SSD
    SK Hynix 512GB SATA SSD
    Internet Speed
    Fast!
(y)
 

My Computer

System One

  • OS
    Windows 7 Pro 64-bit / Windows 10 Pro 64-bit (dual boot)
    Computer type
    PC/Desktop
    Manufacturer/Model
    Dell OptiPlex 9020 / Dell Precision 3620
    CPU
    Intel Core i7-4790 / Intel Core i7-6700
    Motherboard
    Dell-branded
    Memory
    32 GB DDR3-1600 / 32 GB DDR4-2133
    Graphics Card(s)
    GeForce GT 730 / GeForce GTX 645 / GeForce GT 1030
    Monitor(s) Displays
    Viewsonic 32" LCD
    Hard Drives
    2 SSD's in each PC
    PSU
    290W
    Internet Speed
    Spectrum Internet Ultra - 400 Mbps
You could adjust boot.wim beforehand either by adding the entries to the system hive, or by merging during boot. It is quite easy.

One way is using 7-zip.
 

My Computers

System One System Two

  • OS
    Win7
    Computer type
    PC/Desktop
    CPU
    i5-8400
    Motherboard
    gigabyte b365m ds3h
    Memory
    2x8gb 3200mhz
    Monitor(s) Displays
    benq gw2480
    PSU
    bequiet pure power 11 400CM
    Cooling
    cryorig m9i
  • Operating System
    win7
    Computer type
    PC/Desktop
    CPU
    pentium g5400
    Motherboard
    gigabyte b365m ds3h
    Memory
    1x8gb 2400
    PSU
    xfx pro 450
Create this folder structure anywhere e.g. on your desktop 2\windows\system32.
(The reason the parent folder is called 2 is because the files will be added to image 2 in boot.wim)

folderstructure.jpg


Pop your winpeshl.ini and SKIP.cmd files into 2\windows\system32 folder

WINPESHL.INI
Code:
[LaunchApps]
SKIP.CMD
X:\SETUP.EXE

WINPESHL.jpg

SKIP.CMD
Code:
@echo off
echo adding reg entries
reg add "HKLM\System\Setup\LabConfig" /f /v "BypassTPMCheck" /t REG_DWORD /d 1
reg add "HKLM\System\Setup\LabConfig" /f /v "BypassSecureBootCheck" /t REG_DWORD /d 1
wpeinit
>nul TIMEOUT /T 3

SKIPCMD.jpg
 
Last edited:

My Computers

System One System Two

  • OS
    Win7
    Computer type
    PC/Desktop
    CPU
    i5-8400
    Motherboard
    gigabyte b365m ds3h
    Memory
    2x8gb 3200mhz
    Monitor(s) Displays
    benq gw2480
    PSU
    bequiet pure power 11 400CM
    Cooling
    cryorig m9i
  • Operating System
    win7
    Computer type
    PC/Desktop
    CPU
    pentium g5400
    Motherboard
    gigabyte b365m ds3h
    Memory
    1x8gb 2400
    PSU
    xfx pro 450
Unzip the 2.zip file that is attached to the bottom of this post. Unzip it to the desktop is fine.

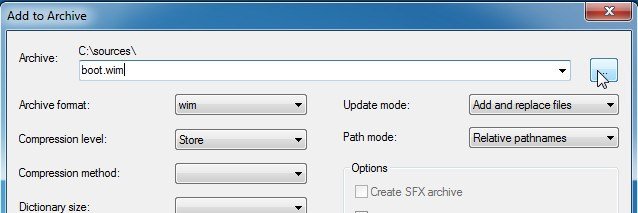
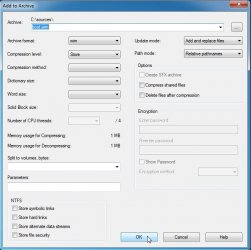
Then add the 2 folder to boot.wim with 7-zip

Rt click the 2 folder and select Add to Archive

ADDTOARCHIVE.jpg


Select wim in the dropdown

SELECTWIMFORMAT.jpg

Browse to boot.wim

BROWSETOWIM.jpg

Click OK

OKADDTOWIM.jpg


That is it job done.


Contains these which will be automatically added.

SKIPALL.jpg
 

Attachments

  • 2.zip
    994 bytes · Views: 17
Last edited:

My Computers

System One System Two

  • OS
    Win7
    Computer type
    PC/Desktop
    CPU
    i5-8400
    Motherboard
    gigabyte b365m ds3h
    Memory
    2x8gb 3200mhz
    Monitor(s) Displays
    benq gw2480
    PSU
    bequiet pure power 11 400CM
    Cooling
    cryorig m9i
  • Operating System
    win7
    Computer type
    PC/Desktop
    CPU
    pentium g5400
    Motherboard
    gigabyte b365m ds3h
    Memory
    1x8gb 2400
    PSU
    xfx pro 450
All these instructions only work when upgrading from 10 to 11. If you try to do a clean install of Win11, it will fail.
This is my guide on how to modify the Win11 installation so that it can be installed on any PC or laptop.

Production:


This is how the installation works:


My Computer

System One

  • OS
    Windows 10/11
    Computer type
    PC/Desktop
    CPU
    AMD Ryzen 5 2600 Six
    Motherboard
    GIGABYTE B450 GAMING X / Seasonic Focus GX 550 Gold
    Memory
    32 GB DDR4
    Graphics Card(s)
    AMD Radeon RX 5500 XT
    Monitor(s) Displays
    Acer EK240YAbi - LED monitor 23,8"
    Hard Drives
    SSD 250GB / WDC 1000GB
Back
Top Bottom