This tutorial will show you how to turn on or off using a screen saver for your account in Windows 11.
When you turn on and set up using a screen saver in Windows, it will start when user activity has been idle for a specified "wait" period of time.
You can check On resume, display logon screen to require sign in on resume from the screen saver.
Screen savers are used for these two reasons:
- To protect an old CRT or plasma screen from burn-in caused by static images.
- To conceal sensitive information left on a screen.
You can either move the mouse, touch the screen, touch the touchpad, or press a key to resume from the screen saver.
Reference:

Handling Screen Savers - Win32 apps
Here's How:
1 Open Settings (Win+I).
2 Click/tap on Personalization on the left side, and click/tap on Lock screen on the right side. (see screenshot below)
3 Click/tap on Screen saver under Related settings. (see screenshot below)
You can directly open Screen Saver Settings by running the command below:
rundll32 shell32.dll,Control_RunDLL desk.cpl,,1
4 Select a screen saver you want in the Screen saver drop menu. (see screenshot below)
Select (None) if you want to turn off screen saver, or use On resume, display logon screen (step 6) with the lock screen instead of a screen saver.
You can click/tap on the Preview button to see a preview of the selected screen saver.
The selected screen saver is saved to the SCRNSAVE.EXE string value (REG_SZ) in the registry key below. If you select (None) for the screen saver, the SCRNSAVE.EXE string value (REG_SZ) gets deleted.
HKEY_CURRENT_USER\Control Panel\Desktop

5 If you selected a screen saver in step 4 other than (None), click/tap on Settings to make any changes you want to that screen saver's specific settings (if available), and click/tap on OK in settings (ex: "3D Text Settings"). (see screenshots below)
You can click/tap on the Preview button to see a preview of changes made to the screen saver settings.
6 Check (on) or uncheck (off) On resume, display logon screen for what you want to turn on or off require sign in on resume from the screen saver. (see screenshot below)
Uncheck On resume, display logon screen if you want to turn off screen saver.
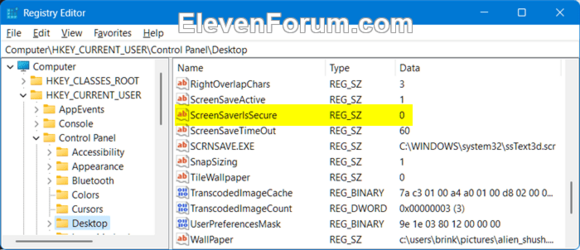
The On resume, display logon screen setting is saved to the ScreenSaverIsSecure string value (REG_SZ) as seconds in the registry key below.
HKEY_CURRENT_USER\Control Panel\Desktop
0 = Off (unchecked)
1 = On (checked)

7 Enter how many minutes you want in the Wait box for how long to be idle before the screen saver starts. (see screenshots below)
The Wait box will only be active (not grayed out) if you selected a screen saver other than (None) in step 4 and/or checked On resume, display logon screen in step 6.
The default wait time is 1 minute.
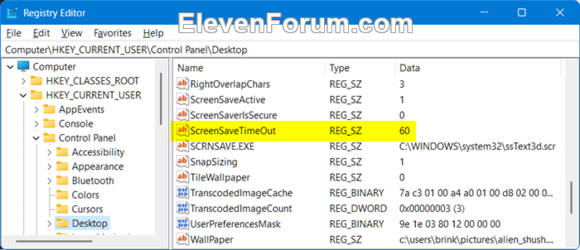
The screen saver wait time is saved to the ScreenSaveTimeOut string value (REG_SZ) as seconds in the registry key below.
HKEY_CURRENT_USER\Control Panel\Desktop

8 When finished, click/tap on OK to apply. (see screenshots below)
That's it,
Shawn Brink


