Unable to upgrade to windows 11 22h2 error code 0xc0000005


ali_ale

New member
Local time
3:53 PM
Posts
3
OS
Windows 11
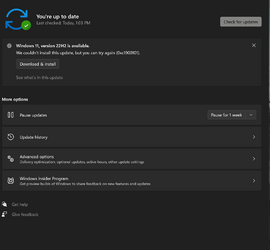
I am unable to install Windows 11 22H2 update on my Surface Book 3 windows version 21H2 22000.1042 , whenever I try, I get the error code 0xc0000005.
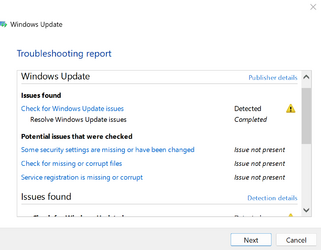
Have tried SFC/ Scannow, DSIM online, windows troubleshooter, Resetting windows, aslo tried installing update with Microsoft update assistant but ends up in error1665280525851.png1665280626080.png
 
Windows Build/Version
22000.1042

My Computer

System One

  • OS
    Windows 11
    Computer type
    Laptop
    Manufacturer/Model
    Surface Book 3
    Memory
    32 GB
You can try the Windows 11 Media Creation Tool or ISO image to upgrade to latest build.


Use Windows Update Troubleshooter.


  • Right-click on Start button and pick Settings
  • Go to System > Troubleshoot
  • Click on Other Troubleshooters > Windows Update and click Run button.


Download Windows updates manually.


  • Go to the official Microsoft update catalog;
  • Enter a specific update code, for example, KB4481031
  • Select the correct version and click Download
  • Click on the link and Windows will update your computer


Resetting the Windows Update components can usually solve these types of issues.


My Computer

System One

  • OS
    Windows 11
    Computer type
    PC/Desktop
    Manufacturer/Model
    HP Pavilion
    CPU
    AMD Ryzen 7 5700G
    Motherboard
    Erica6
    Memory
    Micron Technology DDR4-3200 16GB
    Graphics Card(s)
    NVIDIA GeForce RTX 3060
    Sound Card
    Realtek ALC671
    Monitor(s) Displays
    Samsung SyncMaster U28E590
    Screen Resolution
    3840 x 2160
    Hard Drives
    SAMSUNG MZVLQ1T0HALB-000H1
Let me add that any third party AV software should be disabled.
 

My Computers

System One System Two

  • OS
    Windows 11 Pro 23H2 22631.3296
    Computer type
    PC/Desktop
    Manufacturer/Model
    Dell Optiplex 7080
    CPU
    i9-10900 10 core 20 threads
    Motherboard
    DELL 0J37VM
    Memory
    32 gb
    Graphics Card(s)
    none-Intel UHD Graphics 630
    Sound Card
    Integrated Realtek
    Monitor(s) Displays
    Benq 27
    Screen Resolution
    2560x1440
    Hard Drives
    1tb Solidigm m.2 +256gb ssd+512 gb usb m.2 sata
    PSU
    500w
    Case
    MT
    Cooling
    Dell Premium
    Keyboard
    Logitech wired
    Mouse
    Logitech wireless
    Internet Speed
    so slow I'm too embarrassed to tell
    Browser
    Firefox
    Antivirus
    Defender+MWB Premium
  • Operating System
    Windows 10 Pro 22H2 19045.3930
    Computer type
    PC/Desktop
    Manufacturer/Model
    Dell Optiplex 9020
    CPU
    i7-4770
    Memory
    24 gb
    Monitor(s) Displays
    Benq 27
    Screen Resolution
    2560x1440
    Hard Drives
    256 gb Toshiba BG4 M.2 NVE SSB and 1 tb hdd
    PSU
    500w
    Case
    MT
    Cooling
    Dell factory
    Mouse
    Logitech wireless
    Keyboard
    Logitech wired
    Internet Speed
    still not telling
    Browser
    Firefox
    Antivirus
    Defender+MWB Premium
You can try the Windows 11 Media Creation Tool or ISO image to upgrade to latest build.


Use Windows Update Troubleshooter.


  • Right-click on Start button and pick Settings
  • Go to System > Troubleshoot
  • Click on Other Troubleshooters > Windows Update and click Run button.


Download Windows updates manually.


  • Go to the official Microsoft update catalog;
  • Enter a specific update code, for example, KB4481031
  • Select the correct version and click Download
  • Click on the link and Windows will update your computer


Resetting the Windows Update components can usually solve these types of issues.

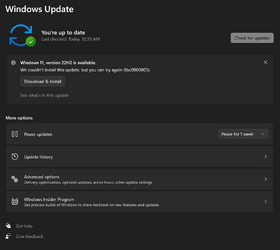
Tried all that, now another error 1665320909578.png
 

My Computer

System One

  • OS
    Windows 11
    Computer type
    Laptop
    Manufacturer/Model
    Surface Book 3
    Memory
    32 GB
Try to use the Repair install method or In-Place Upgrade, that is, run setup.exe from a mounted Win 11 22h2 iso.
- Download Win 11 22h2 iso from here
- Right click on the Win11_22H2_x64.iso file and select Mount.
- On the virtual drive run Setup.exe
It will upgrade to Win 11 22h2
 

My Computers

System One System Two

  • OS
    Windows 7 HP 64 - Windows 11 Pro - Lubuntu
    Computer type
    PC/Desktop
    Manufacturer/Model
    custom build
    CPU
    i5 6600K - 800MHz to 4400MHz
    Motherboard
    GA-Z170-HD3P
    Memory
    4+4G GSkill DDR4 3000
    Graphics Card(s)
    IG - Intel 530
    Monitor(s) Displays
    Samsung 226BW
    Screen Resolution
    1680x1050
    Hard Drives
    (1) -1 SM951 – 128GB M.2 AHCI PCIe SSD drive for Win 11
    (2) -1 WD SATA 3 - 1T for Data
    (3) -1 WD SATA 3 - 1T for backup
    (4) -1 BX500 SSD - 128G for Windows 7 and Lubuntu
    PSU
    Thermaltake 450W TR2 gold
    Keyboard
    Old and good Chicony mechanical keyboard
    Mouse
    Logitech mX performance - 9 buttons (had to disable some)
    Internet Speed
    500 Mb/s
    Browser
    Firefox 64
  • Operating System
    Windows 7 Pro
    Computer type
    Laptop
    Manufacturer/Model
    Asus Q550LF
    CPU
    i7-4500U 800- 3000MHz
    Motherboard
    Asus Q550LF
    Memory
    (4+4)G DDR3 1600
    Graphics card(s)
    IG intel 4400 + NVIDIA GeForce GT 745M
    Sound Card
    Realtek
    Monitor(s) Displays
    LG Display LP156WF4-SPH1
    Screen Resolution
    1920 x 1080
    Hard Drives
    BX500 120G SSD for Windows and programs
    & 1T HDD for data
    Internet Speed
    350 Mb/s
    Browser
    Firefox 64
Try to use the Repair install method or In-Place Upgrade, that is, run setup.exe from a mounted Win 11 22h2 iso.
- Download Win 11 22h2 iso from here
- Right click on the Win11_22H2_x64.iso file and select Mount.
- On the virtual drive run Setup.exe
It will upgrade to Win 11 22h2
Still didnt work :(
 

My Computer

System One

  • OS
    Windows 11
    Computer type
    Laptop
    Manufacturer/Model
    Surface Book 3
    Memory
    32 GB

My Computers

System One System Two

  • OS
    Windows 7 HP 64 - Windows 11 Pro - Lubuntu
    Computer type
    PC/Desktop
    Manufacturer/Model
    custom build
    CPU
    i5 6600K - 800MHz to 4400MHz
    Motherboard
    GA-Z170-HD3P
    Memory
    4+4G GSkill DDR4 3000
    Graphics Card(s)
    IG - Intel 530
    Monitor(s) Displays
    Samsung 226BW
    Screen Resolution
    1680x1050
    Hard Drives
    (1) -1 SM951 – 128GB M.2 AHCI PCIe SSD drive for Win 11
    (2) -1 WD SATA 3 - 1T for Data
    (3) -1 WD SATA 3 - 1T for backup
    (4) -1 BX500 SSD - 128G for Windows 7 and Lubuntu
    PSU
    Thermaltake 450W TR2 gold
    Keyboard
    Old and good Chicony mechanical keyboard
    Mouse
    Logitech mX performance - 9 buttons (had to disable some)
    Internet Speed
    500 Mb/s
    Browser
    Firefox 64
  • Operating System
    Windows 7 Pro
    Computer type
    Laptop
    Manufacturer/Model
    Asus Q550LF
    CPU
    i7-4500U 800- 3000MHz
    Motherboard
    Asus Q550LF
    Memory
    (4+4)G DDR3 1600
    Graphics card(s)
    IG intel 4400 + NVIDIA GeForce GT 745M
    Sound Card
    Realtek
    Monitor(s) Displays
    LG Display LP156WF4-SPH1
    Screen Resolution
    1920 x 1080
    Hard Drives
    BX500 120G SSD for Windows and programs
    & 1T HDD for data
    Internet Speed
    350 Mb/s
    Browser
    Firefox 64
Tried all that, now another error View attachment 41857


Hello ali_ale,

The 0xc1900101 error during the upgrade process and failed to install Windows. Usually, 0xC1900101 errors are specific to driver-related issues.
However, the error might be because some drivers are incompatible with the latest windows version.

You can follow the steps given below to troubleshoot the issue,

Ensure Enough Upgrade Space:

In order to install or upgrade Windows to the latest version, your device must meet the minimum hardware requirements, including clear storage requirements. So before upgrading, examine your available drive space.

Re-Install or Update Drivers :

You must update your Disk Drivers by following the steps:

  • Firstly, right-click on This PC > click "Manage" > click "Device Manager."
  • Now, expand the Disk driver. Right-click the outdated or problematic disk driver and select "Update Driver Software."
  • Then, on the Update Driver Software window, choose "Search automatically for updated driver software" and wait until the process completes.
  • Lastly, try to upgrade your Windows again after the PC gets the latest driver softwares.

Un-install and Re-install Disk Drivers:
  • You must right-click on the target disk driver and click Uninstall.
  • Lastly, restart your device, and Windows will check and then reinstall the specific driver.

Run SFC Scan:
  • Firstly, press the Windows logo + R keys to open the Run dialog
  • Then, type in CMD and press Enter to open the Command Prompt.
  • Now, type the following command and press Enter,
Code:
SFC /Scannow
  • Lastly, wait until the process gets complete.
Run DISM Scan:
  • Firstly, right-click on the Start menu, type CMD, and the command prompt will appear,
  • Then, right-click on the command prompt and choose to Run as Administrator.
  • Next, type the following command and hit enter,
Code:
DISM /Online /Cleanup-Image /RestoreHealth
  • Lastly, restart your system after this process finishes.

If the issue persists, you can also try the following method to fix the installation error,

Download and Upgrade Windows using Bootable USB Drive
Upgrade to the latest Windows version using Disk Image (ISO) file from Microsoft
Update your System BIOS


I hope the above information helps you to troubleshoot the 0xc1900101 error and let you install the latest version of the Windows system without facing any issue.

-----------------------------
Regards,
Rex M
 

My Computer

System One

  • OS
    Linux
    Computer type
    PC/Desktop
    Keyboard
    TVS Gold
    Mouse
    Logitech
    Internet Speed
    162 Mbps
    Browser
    Google Chrome
Also I found that Microsoft makes a tool called SetupDiag.exe you can run which will analyze the windows update/upgrade installation failure.

I ran setupdialog and it basically reported nothing of consequence in the logs but it gave me the path to an .mdmp (memory minidump) file that can be opened and analyzed by windbg. Doing that you get the call stack for the crash which is in migcore.

Code:
ExceptionAddress: 00007ffcbc71ba29 (migcore!Mig::CMXEPlugin::CallPlugin_PostApply_Success+0x0000000000000069)
   ExceptionCode: c0000005 (Access violation)
  ExceptionFlags: 00000000
NumberParameters: 2
   Parameter[0]: 0000000000000000
   Parameter[1]: 0000000000000000
Attempt to read from address 0000000000000000

PROCESS_NAME:  SetupHost.Exe

READ_ADDRESS:  0000000000000000

ERROR_CODE: (NTSTATUS) 0xc0000005 - The instruction at 0x%p referenced memory at 0x%p. The memory could not be %s.

EXCEPTION_CODE_STR:  c0000005

EXCEPTION_PARAMETER1:  0000000000000000

EXCEPTION_PARAMETER2:  0000000000000000

STACK_TEXT: 
0000005f`8957c490 00007ffc`bc715b73     : 0000023a`0e1e5608 0000005f`8957c658 0000005f`8957c6c0 0000005f`8957c6a0 : migcore!Mig::CMXEPlugin::CallPlugin_PostApply_Success+0x69
0000005f`8957c610 00007ffc`bc6f385c     : 00000000`00000000 0000005f`8957ed30 0000023a`153f37b8 0000005f`8957c7f8 : migcore!Mig::CMXEPlugin::ApplyInterfaceCallback+0x113
0000005f`8957c670 00007ffc`bc7ca580     : 0000023a`00000000 0000023a`797042f8 00007ffc`c9d22500 00007ffc`bc55d9fd : migcore!Mig::CMXEApplyInterfaceDelegate::Invoke+0x7c
0000005f`8957c6c0 00007ffc`bc5b9778     : 0000023a`797042f8 0000005f`8957c7f0 00007ffc`c9d22500 0000023a`72ab0f08 : migcore!Mig::CActionOp::CallAction+0x40
0000005f`8957c710 00007ffc`bc5bc296     : 0000023a`75827ab8 0000023a`7d27c2f8 0000023a`069cb2b8 0000023a`153f37b8 : migcore!Mig::CKnowledgeManager::ApplySuccess+0xd68
0000005f`8957c9b0 00007ffc`bc5bf10e     : 0000023a`75827ab8 0000023a`7d27c2f8 0000023a`128b4c08 0000023a`069cb2b8 : migcore!Mig::CKnowledgeManager::ApplyContext+0x866
0000005f`8957cc00 00007ffc`bc64084f     : 0000023a`778463a8 0000023a`09f755e8 00000000`00000000 00007ffc`bca0e7b0 : migcore!Mig::CKnowledgeManager::Apply+0x1dbe
0000005f`8957cf40 00007ffc`c9d50a1e     : 0000023a`066896f8 0000023a`066896f8 0000023a`7c652438 00000000`00000000 : migcore!MigApply+0x21af
0000005f`8957d190 00007ffc`c9d551c6     : 0000023a`78c261f8 0000023a`10b10678 0000023a`00000000 0000023a`00000000 : SetupPlatform!pSPExecuteApply+0x55ee
0000005f`8957ebe0 00007ffc`c9bf96bd     : 0000005f`00000000 0000023a`04d27908 0000023a`00000000 00000000`00000000 : SetupPlatform!SPExecuteOOBEBootApply+0x7c6
0000005f`8957ed60 00007ffc`c9d73293     : 0000023a`72aafb88 0000023a`78f08ae8 00000000`00002210 0000023a`06358aa8 : SetupPlatform!CApplyDataOffline::DoExecute+0x260d
0000005f`8957f090 00007ffc`c9d7d99f     : 0000023a`72aafb88 00000043`00000002 01d91efb`8000ffff 01d954c9`68599000 : SetupPlatform!COperation::Execute+0x1ab
0000005f`8957f190 00007ffc`c9d805d7     : 0000023a`751023a8 0000023a`78f08ae8 00007ffc`00000002 00000000`00000002 : SetupPlatform!COperationQueue::ExecuteOperationsInternal+0x1d2b
0000005f`8957f4b0 00007ffc`c9a78910     : 00000000`00000002 00000000`00000001 0000023a`78f08ae8 00000000`00002210 : SetupPlatform!COperationQueue::ExecuteOperations+0x1ef
0000005f`8957f560 00007ffc`c9a798f9     : 00007ffc`c9a7984d 00007ffc`00000000 0000023a`78f08ae8 00000000`00000064 : SetupPlatform!CDeploymentBase::DoExecuteOperations+0x60
0000005f`8957f5c0 00007ffc`bdb73cdd     : 0000023a`78f08ae8 00000000`00000001 0000023a`793dd1b8 0000023a`00000000 : SetupPlatform!CDeploymentBase::ExecuteCurrentOperations+0x9c9
0000005f`8957f750 00007ffc`bdb2ebd8     : 00000000`00000000 0000005f`8957f8a9 00007ffc`bdc4ab80 00000000`0000001e : SetupCore!CMoSetupPlatformT<CUnknownImpl<IUnknown> >::ExecuteOperations+0xe9
0000005f`8957f7d0 00007ffc`bdb61dcd     : 00000000`00000000 00000000`00000000 00000000`00000000 0000023a`734e7ca0 : SetupCore!CDlpActionPreFinalize::ExecuteRoutine+0xd88
0000005f`8957f910 00007ffc`bd95c1dd     : 0000023a`734e7cb0 0000023a`793dd1a0 0000023a`734e7ca0 00007ffc`bd95f13b : SetupCore!CDlpActionImpl<CDlpErrorImpl<CDlpObjectInternalImpl<CUnknownImpl<IMoSetupDlpAction> > > >::Execute+0x1fd
0000005f`8957f9a0 00007ffc`bd94bc4f     : 0000023a`734e7ca0 0000005f`8957faa9 0000023a`734e7ca0 0000023a`734e7ca0 : WinDlp!CDlpTask::ExecuteAction+0x99
0000005f`8957fa10 00007ffd`182355a0     : 00000000`00000000 00000000`00000000 00000000`00000000 00000000`00000000 : WinDlp!CDlpTask::ExecuteActionsThreadProc+0x3bf
0000005f`8957fb10 00007ffd`1a20485b     : 00000000`00000000 00000000`00000000 00000000`00000000 00000000`00000000 : kernel32!BaseThreadInitThunk+0x10
0000005f`8957fb40 00000000`00000000     : 00000000`00000000 00000000`00000000 00000000`00000000 00000000`00000000 : ntdll!RtlUserThreadStart+0x2b


SYMBOL_NAME:  migcore!Mig::CMXEPlugin::CallPlugin_PostApply_Success+69

MODULE_NAME: migcore

IMAGE_NAME:  migcore.dll

STACK_COMMAND:  ~15s; .ecxr ; kb

FAILURE_BUCKET_ID:  NULL_POINTER_READ_c0000005_migcore.dll!Mig::CMXEPlugin::CallPlugin_PostApply_Success

OS_VERSION:  10.0.22000.1

BUILDLAB_STR:  co_release

OSPLATFORM_TYPE:  x64

OSNAME:  Windows 10

IMAGE_VERSION:  10.0.22621.963

FAILURE_ID_HASH:  {197f5b7d-433c-7c6f-e6da-b1fcc002d8d4}

Followup:     MachineOwner

From that call stack it's clear it's a bug in Windows 11's update installation/deployment tools in migcore calling a plugin and getting an NULL pointer dereference access violation .
 

My Computer

System One

  • OS
    Win11
Still didnt work :(
I had the same issue. Go here...
Microsoft Win11 Media install
use the second download called...

Create Windows 11 Installation Media​

and follow the instructions. Your just gonna plug in a 16GB or higher USB stick and the Install stuffs is put on it(it will overwrite whats on it so make sure you dont need any files on there), leave the USB plugged in when the softwares done installing to your USB. Then through Windows FIle Explorer just run the setup.exe and remember to KEEP Personal FILES etc checked when installing and bam it installs ALL updates and youll be updated to the latest greatest public release out. Need any more help. We are here for you.
 

My Computer

System One

  • OS
    Windows 11 Pro Version 22H2(OS Build 22621.963)
    Computer type
    PC/Desktop
    Manufacturer/Model
    AMD
    CPU
    AMD Ryzen 7 5800X 8 Core
    Motherboard
    Gigabyte X570 Aorus Pro WiFi
    Memory
    32 GB
    Graphics Card(s)
    PCI Express 3.0 x16: PowerColor RX Vega 56 Red Dragon
    Sound Card
    Realtek ALC1220 and AMD Greenland - High Definition Audio Controller
    Monitor(s) Displays
    2 - 27 inch Westinghouse
    Screen Resolution
    1920 x 1080
    Hard Drives
    2 SSD - 2 TB each
    1 HDD - 2 TB
    Keyboard
    logitech
    Mouse
    logitech
    Internet Speed
    1 GB
    Browser
    Microsoft Edge
    Antivirus
    Avast Premium

Latest Support Threads

Back
Top Bottom