This tutorial will show you how to manually perform a Quick Machine Recovery in Windows 11 from WinRE.
Quick machine recovery is a feature that enables the recovery of Windows devices when they encounter critical errors that prevent them from booting. This feature can automatically search for remediations in the cloud and recover from widespread boot failures, significantly reducing the burden on IT administrators when multiple devices are affected.
Building on the foundation of Startup Repair, quick machine recovery uses a secure and connected Windows Recovery Environment to scan Windows Update for remediation options. This allows devices to be recovered without requiring manual intervention.
There are two main settings of quick machine recovery: cloud remediation and auto remediation.
Cloud remediation is the process of using Windows Update to find remediations and fix issues on devices:
- When enabled, devices connect to the network and utilize Windows Update during recovery scenarios
- When disabled, Windows uses Startup Repair as a local recovery option
- When enabled, the device connects automatically to Windows Update and tries to find a remediation. If a solution isn't found on the first attempt, the device retries without requiring manual intervention
- When disabled or not configured, the device requires manual intervention to continue the recovery process
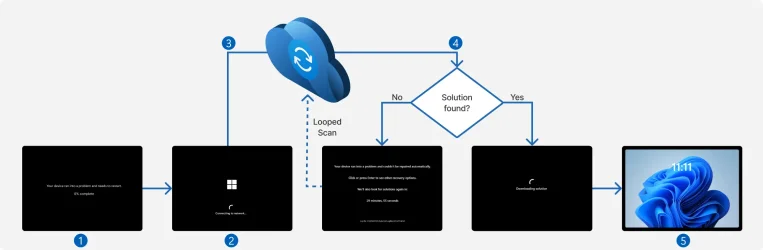
- Device crash: When the device fails to boot repeatedly, the system automatically detects the issue and initiates the recovery process
- Boot to recovery: The device boots into the recovery environment to initiate the quick machine recovery process
- Network connection: After a network connection is established, the device scans Windows Update for remediations
- Remediation
- If no solution is found, the system retries the process based on the configured retry scanning intervals and time-outs
- If a solution is found, the system downloads and applies it
- Reboot: After a remediation is applied, the device reboots:
- If the solution is successful, the device boots into Windows
- If the solution fails, the device reboots into the recovery environment again and the process repeats from step 2
Reference:

Quick Machine Recovery
Learn about quick machine recovery and how to configure it with the RemoteRemediation configuration service provider (CSP).
learn.microsoft.com
Here's How:
1 Boot to Advanced Startup (WinRE).
2 Click/tap on Troubleshoot. (see screenshot below)
3 Click/tap on Advanced options. (see screenshot below)
4 Click/tap on Quick machine recovery. (see screenshot below)
5 QMR will now start diagnosing your PC. (see screenshot below)
6 After a network connection is established, the device scans Windows Update for remediations. (see screenshots below)
7 Remediation will depend on if a solution is found or not: (see screenshots below)
- If no solution is found and the system is configured with the default one-time scan setting, the user will be guided to other recovery options
- If no solution is found and the system is configured with retry scanning intervals, the system retries the process based on the configured retry scanning intervals and timeouts
- If a solution is found, the system downloads and applies it
8 If a remediation is applied, the device boots back into Windows 11. You can verify the quick machine recovery remediation in Windows Update history. The remediation should be listed under Quality updates. (see screenshot below)
If the solution fails, the device reboots into the recovery environment again and the process repeats.

View Update History in Windows 11
This tutorial will show you how to view update history to see which Windows Updates failed or successfully installed on your Windows 11 PC. Windows Update keeps Windows 11 updated by automatically downloading and installing the latest updates, drivers, and hotfixes released by Microsoft. You...
 www.elevenforum.com
That's it,
Shawn Brink
Last edited: