Solved [W11 24H2] Autounattend file that doesn't work


DMD

Well-known member
Member
Local time
12:28 AM
Posts
218
OS
W11
Good morning
I have a problem with the file “autounattend.xml” inserted in the newly downloaded 24H2 ISO.
The same file inserted in the 23H2 iso works perfectly.
When I insert it into the 24H2 iso and it gets to about 75% of the installation it returns the message “Windows 11 installation failed”.
If I do the installation without the “autounattend.xml” file, the installation is successful of course with all numerous prompts.
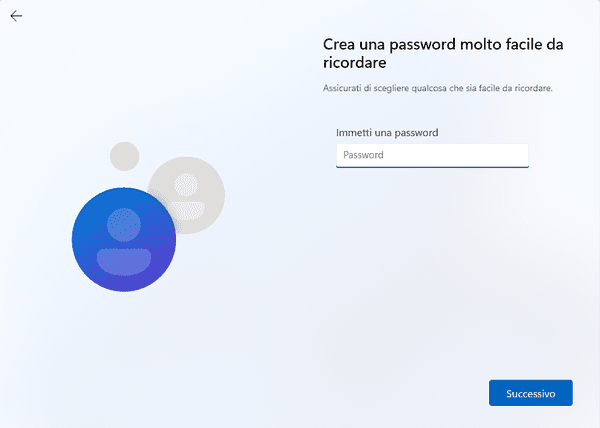
This is the script used with only 2 requests: password and Username, they are the only 2 requests I am interested in.
How can I correct the script?
Thank you very much

Code:
<!-- SCRIPT FOR WINDOWS 11 version 23H2 x64 version ITA-->

<?xml version="1.0" encoding="utf-8"?>
<unattend xmlns="urn:schemas-microsoft-com:unattend">
    
    <!-- windowsPE with 2 components: International-Core-WinPE amd64 e Setup amd64-->
    <settings pass="windowsPE">
        <component name="Microsoft-Windows-International-Core-WinPE" processorArchitecture="amd64" publicKeyToken="31bf3856ad364e35" language="neutral" versionScope="nonSxS" xmlns:wcm="http://schemas.microsoft.com/WMIConfig/2002/State" xmlns:xsi="http://www.w3.org/2001/XMLSchema-instance">
            <SetupUILanguage>
                <UILanguage>it-IT</UILanguage>
            </SetupUILanguage>
            <InputLocale>it-IT</InputLocale>
            <SystemLocale>it-IT</SystemLocale>
            <UILanguage>it-IT</UILanguage>
            <UserLocale>it-IT</UserLocale>
        </component>
        <component name="Microsoft-Windows-Setup" processorArchitecture="amd64" publicKeyToken="31bf3856ad364e35" language="neutral" versionScope="nonSxS" xmlns:wcm="http://schemas.microsoft.com/WMIConfig/2002/State" xmlns:xsi="http://www.w3.org/2001/XMLSchema-instance">
            <ImageInstall>
                <OSImage>
                    <InstallFrom>
                        <MetaData wcm:action="add">
                            <Key>/IMAGE/INDEX</Key>
                            <Value>1</Value>
                        </MetaData>
                    </InstallFrom>
                </OSImage>
            </ImageInstall>
            <UserData>
                <AcceptEula>true</AcceptEula>
            </UserData>
        </component>
    </settings>
        
    <!-- oobeSystem with 3 components: International-Core amd64, Shell-Setup amd64 e Shell-Setup x86-->
    <settings pass="oobeSystem">
        <component name="Microsoft-Windows-International-Core" processorArchitecture="amd64" publicKeyToken="31bf3856ad364e35" language="neutral" versionScope="nonSxS" xmlns:wcm="http://schemas.microsoft.com/WMIConfig/2002/State" xmlns:xsi="http://www.w3.org/2001/XMLSchema-instance">
            <InputLocale>it-IT</InputLocale>
            <SystemLocale>it-IT</SystemLocale>
            <UILanguage>it-IT</UILanguage>
            <UserLocale>it-IT</UserLocale>
        </component>
        <component name="Microsoft-Windows-Shell-Setup" processorArchitecture="amd64" publicKeyToken="31bf3856ad364e35" language="neutral" versionScope="nonSxS" xmlns:wcm="http://schemas.microsoft.com/WMIConfig/2002/State" xmlns:xsi="http://www.w3.org/2001/XMLSchema-instance">
            <OOBE>
                <HideEULAPage>true</HideEULAPage>
                <HideOnlineAccountScreens>true</HideOnlineAccountScreens>
                <HideWirelessSetupInOOBE>true</HideWirelessSetupInOOBE>
                <ProtectYourPC>3</ProtectYourPC>
            </OOBE>             
         </component> 
         <component name="Microsoft-Windows-Shell-Setup" processorArchitecture="x86" publicKeyToken="31bf3856ad364e35" language="neutral" versionScope="nonSxS" xmlns:wcm="http://schemas.microsoft.com/WMIConfig/2002/State" xmlns:xsi="http://www.w3.org/2001/XMLSchema-instance">
            <FirstLogonCommands>
                <SynchronousCommand wcm:action="add">
                    <CommandLine>CMD /c REG.exe add "HKEY_LOCAL_MACHINE\SOFTWARE\Microsoft\Windows\CurrentVersion\UserProfileEngagement" /v "ScoobeSystemSettingEnabled" /t REG_DWORD /d 0 /f</CommandLine>
                    <Description>Disable OOBE Screen - Get even more out of Windows</Description>
                    <Order>1</Order>
                </SynchronousCommand>
                <SynchronousCommand wcm:action="add">
                    <CommandLine>CMD /c REG.exe add "HKEY_LOCAL_MACHINE\SOFTWARE\Policies\Microsoft\Windows\System" /v "AllowCrossDeviceClipboard" /t REG_DWORD /d 0 /f</CommandLine>
                    <Description>Disable OOBE Screen - Synchronize the activities</Description>
                    <Order>2</Order>
                </SynchronousCommand>
                <SynchronousCommand wcm:action="add">
                    <CommandLine>CMD /c REG.exe add "HKEY_LOCAL_MACHINE\SOFTWARE\Policies\Microsoft\Windows\System" /v "EnableActivityFeed" /t REG_DWORD /d 0 /f</CommandLine>
                    <Description>Disable OOBE Screen - Synchronize the activities</Description>
                    <Order>3</Order>
                </SynchronousCommand>
                <SynchronousCommand wcm:action="add">
                    <CommandLine>CMD /c REG.exe add "HKEY_LOCAL_MACHINE\SOFTWARE\Policies\Microsoft\Windows\System" /v "PublishUserActivities" /t REG_DWORD /d 0 /f</CommandLine>
                    <Description>Disable OOBE Screen - Synchronize the activities</Description>
                    <Order>4</Order>
                </SynchronousCommand>
                <SynchronousCommand wcm:action="add">
                    <CommandLine>CMD /c REG.exe add "HKEY_LOCAL_MACHINE\SOFTWARE\Policies\Microsoft\Windows\System" /v "UploadUserActivities" /t REG_DWORD /d 0 /f</CommandLine>
                    <Description>Disable OOBE Screen - Synchronize the activities</Description>
                    <Order>5</Order>
                </SynchronousCommand>
            </FirstLogonCommands>     
        </component>
     </settings>
</unattend>
 

My Computer My Computer

At a glance

W11CPU AMD Ryzen 9 7950XG.Skill Flare X5 32GB Kit DDR5-6000 CL32 (F5-...
OS
W11
Computer type
PC/Desktop
CPU
CPU AMD Ryzen 9 7950X
Motherboard
ASUS ROG Strix X670E-F Gaming WiFi
Memory
G.Skill Flare X5 32GB Kit DDR5-6000 CL32 (F5-6000J3238F16GX2-FX5)
Monitor(s) Displays
LG E2381VR
Screen Resolution
1920x1080
Hard Drives
1x Samsung Memorie MZ-V8P1T0B 980 PRO SSD 1TB
2x Western Digital WD Red Nas 4TB
PSU
SEASONIC FOCUS PX-850 Plus Platinum
Case
Corsair 4000D Airflow
Cooling
ARCTIC Liquid Freezer II 280 A-RGB
Keyboard
Logitech G510
Mouse
Logitech G502 HERO
Browser
Firefox
Antivirus
Avg free
Other Info
Download: 90 Mbps
Upload: 20Mbps
Integrate this reg file to boot.wim (Setup).
It forces legacy Setup to run, otherwise the 24H2 SetupPrep.exe is really picky about autounattend.xml contents.

Code:
Windows Registry Editor Version 5.00

[HKEY_LOCAL_MACHINE\SYSTEM\Setup]
"CmdLine"="X:\\sources\\setup.exe"
 

My Computer My Computer

At a glance

Windows 7
OS
Windows 7
  • Like
Reactions: DMD
Integrate this reg file to boot.wim (Setup).
It forces legacy Setup to run, otherwise the 24H2 SetupPrep.exe is really picky about autounattend.xml contents.

Code:
Windows Registry Editor Version 5.00

[HKEY_LOCAL_MACHINE\SYSTEM\Setup]
"CmdLine"="X:\\sources\\setup.exe"
I thank you for this suggestion.
I integrated the registry key into the wim file, during installation at 75% I get the same message “Windows 11 installation failed”

Immagine-2024-10-03-115755.png


With the 23H2 script I only have 2 requests that I am interested in.
In addition, the username option allows me to start the machine in audit mode (CTRL+SHIFT+F3)

rid-4.png


rid-5.png


I tried the stand-alone generator online
It works with 24H2 version without any prompt by setting the username automatically.
I can't set the two prompts, username and password.

Code:
<!-- SCRIPT FOR WINDOWS 11 version 24H2 x64 version ITA-->

<?xml version="1.0" encoding="utf-8"?>
<unattend xmlns="urn:schemas-microsoft-com:unattend" xmlns:wcm="http://schemas.microsoft.com/WMIConfig/2002/State">

    <!--https://schneegans.de/windows/unattend-generator/?LanguageMode=Unattended&UILanguage=it-IT&Locale=it-IT&Keyboard=00000410&GeoLocation=118&ProcessorArchitecture=amd64&BypassRequirementsCheck=true&BypassNetworkCheck=true&ComputerNameMode=Random&TimeZoneMode=Implicit&PartitionMode=Interactive&WindowsEditionMode=Unattended&WindowsEdition=pro&UserAccountMode=Unattended&AccountName0=Admin&AccountPassword0=password&AccountGroup0=Administrators&AccountName1=User&AccountPassword1=password&AccountGroup1=Users&AccountName2=&AccountName3=&AccountName4=&AutoLogonMode=Own&PasswordExpirationMode=Unlimited&LockoutMode=Default&HideFiles=Hidden&TaskbarSearch=Box&ShowFileExtensions=true&WifiMode=Skip&ExpressSettings=DisableAll&KeysMode=Skip&WallpaperMode=Default&StartTilesMode=Default&StartPinsMode=Default&WdacMode=Skip-->
    
    <settings pass="offlineServicing"></settings>
    <settings pass="windowsPE">
    
        <component name="Microsoft-Windows-International-Core-WinPE" processorArchitecture="amd64" publicKeyToken="31bf3856ad364e35" language="neutral" versionScope="nonSxS">
            <SetupUILanguage>
                <UILanguage>it-IT</UILanguage>
            </SetupUILanguage>
            <InputLocale>0410:00000410</InputLocale>
            <SystemLocale>it-IT</SystemLocale>
            <UILanguage>it-IT</UILanguage>
            <UserLocale>it-IT</UserLocale>
        </component>
        
        <component name="Microsoft-Windows-Setup" processorArchitecture="amd64" publicKeyToken="31bf3856ad364e35" language="neutral" versionScope="nonSxS">
            <UserData>
                <ProductKey>
                    <Key>VK7JG-NPHTM-C97JM-9MPGT-3V66T</Key>
                </ProductKey>
                <AcceptEula>true</AcceptEula>
            </UserData>
            <RunSynchronous>
                <RunSynchronousCommand wcm:action="add">
                    <Order>1</Order>
                    <Path>reg.exe add "HKLM\SYSTEM\Setup\LabConfig" /v BypassTPMCheck /t REG_DWORD /d 1 /f</Path>
                </RunSynchronousCommand>
                <RunSynchronousCommand wcm:action="add">
                    <Order>2</Order>
                    <Path>reg.exe add "HKLM\SYSTEM\Setup\LabConfig" /v BypassSecureBootCheck /t REG_DWORD /d 1 /f</Path>
                </RunSynchronousCommand>
                <RunSynchronousCommand wcm:action="add">
                    <Order>3</Order>
                    <Path>reg.exe add "HKLM\SYSTEM\Setup\LabConfig" /v BypassRAMCheck /t REG_DWORD /d 1 /f</Path>
                </RunSynchronousCommand>
            </RunSynchronous>
        </component>
        </settings>
        
    <settings pass="generalize"></settings>
    <settings pass="specialize">
        <component name="Microsoft-Windows-Deployment" processorArchitecture="amd64" publicKeyToken="31bf3856ad364e35" language="neutral" versionScope="nonSxS">
            <RunSynchronous>
                <RunSynchronousCommand wcm:action="add">
                    <Order>1</Order>
                    <Path>reg.exe add "HKLM\SOFTWARE\Microsoft\Windows\CurrentVersion\OOBE" /v BypassNRO /t REG_DWORD /d 1 /f</Path>
                </RunSynchronousCommand>
                <RunSynchronousCommand wcm:action="add">
                    <Order>2</Order>
                    <Path>net.exe accounts /maxpwage:UNLIMITED</Path>
                </RunSynchronousCommand>
                <RunSynchronousCommand wcm:action="add">
                    <Order>3</Order>
                    <Path>reg.exe load "HKU\DefaultUser" "C:\Users\Default\NTUSER.DAT"</Path>
                </RunSynchronousCommand>
                <RunSynchronousCommand wcm:action="add">
                    <Order>4</Order>
                    <Path>reg.exe add "HKU\DefaultUser\SOFTWARE\Microsoft\Windows\CurrentVersion\Explorer\Advanced" /v "HideFileExt" /t REG_DWORD /d 0 /f</Path>
                </RunSynchronousCommand>
                <RunSynchronousCommand wcm:action="add">
                    <Order>5</Order>
                    <Path>reg.exe unload "HKU\DefaultUser"</Path>
                </RunSynchronousCommand>
                <RunSynchronousCommand wcm:action="add">
                    <Order>6</Order>
                    <Path>reg.exe load "HKU\DefaultUser" "C:\Users\Default\NTUSER.DAT"</Path>
                </RunSynchronousCommand>
                <RunSynchronousCommand wcm:action="add">
                    <Order>7</Order>
                    <Path>reg.exe add "HKU\DefaultUser\Software\Microsoft\Windows\CurrentVersion\RunOnce" /v "SearchboxTaskbarMode" /t REG_SZ /d "reg.exe add HKCU\Software\Microsoft\Windows\CurrentVersion\Search /v SearchboxTaskbarMode /t REG_DWORD /d 2 /f" /f</Path>
                </RunSynchronousCommand>
                <RunSynchronousCommand wcm:action="add">
                    <Order>8</Order>
                    <Path>reg.exe unload "HKU\DefaultUser"</Path>
                </RunSynchronousCommand>
            </RunSynchronous>
        </component>
    </settings>
    
    <!-- User Account and Local Account-->
    <settings pass="auditSystem"></settings>
    <settings pass="auditUser"></settings>
    <settings pass="oobeSystem">
        <component name="Microsoft-Windows-International-Core" processorArchitecture="amd64" publicKeyToken="31bf3856ad364e35" language="neutral" versionScope="nonSxS">
            <InputLocale>0410:00000410</InputLocale>
            <SystemLocale>it-IT</SystemLocale>
            <UILanguage>it-IT</UILanguage>
            <UserLocale>it-IT</UserLocale>
        </component>
        <component name="Microsoft-Windows-Shell-Setup" processorArchitecture="amd64" publicKeyToken="31bf3856ad364e35" language="neutral" versionScope="nonSxS">
            <UserAccounts>
                <LocalAccounts>
                    <LocalAccount wcm:action="add">
                        <Name>Admin</Name>
                        <Group>Administrators</Group>
                        <Password>
                            <Value>password</Value>
                            <PlainText>true</PlainText>
                        </Password>
                    </LocalAccount>
                    <LocalAccount wcm:action="add">
                        <Name>User</Name>
                        <Group>Users</Group>
                        <Password>
                            <Value>password</Value>
                            <PlainText>true</PlainText>
                        </Password>
                    </LocalAccount>
                </LocalAccounts>
            </UserAccounts>
            <AutoLogon>
                <Username>Admin</Username>
                <Enabled>true</Enabled>
                <LogonCount>1</LogonCount>
                <Password>
                    <Value>password</Value>
                    <PlainText>true</PlainText>
                </Password>
            </AutoLogon>
    
    
            <OOBE>
                <ProtectYourPC>3</ProtectYourPC>
                <HideEULAPage>true</HideEULAPage>
                <HideWirelessSetupInOOBE>true</HideWirelessSetupInOOBE>
            </OOBE>
            
            <FirstLogonCommands>
                <SynchronousCommand wcm:action="add">
                    <Order>1</Order>
                    <CommandLine>reg.exe add "HKLM\SOFTWARE\Microsoft\Windows NT\CurrentVersion\Winlogon" /v AutoLogonCount /t REG_DWORD /d 0 /f</CommandLine>
                </SynchronousCommand>
            </FirstLogonCommands>
        </component>
    </settings>
    
</unattend>
 

My Computer My Computer

At a glance

W11CPU AMD Ryzen 9 7950XG.Skill Flare X5 32GB Kit DDR5-6000 CL32 (F5-...
OS
W11
Computer type
PC/Desktop
CPU
CPU AMD Ryzen 9 7950X
Motherboard
ASUS ROG Strix X670E-F Gaming WiFi
Memory
G.Skill Flare X5 32GB Kit DDR5-6000 CL32 (F5-6000J3238F16GX2-FX5)
Monitor(s) Displays
LG E2381VR
Screen Resolution
1920x1080
Hard Drives
1x Samsung Memorie MZ-V8P1T0B 980 PRO SSD 1TB
2x Western Digital WD Red Nas 4TB
PSU
SEASONIC FOCUS PX-850 Plus Platinum
Case
Corsair 4000D Airflow
Cooling
ARCTIC Liquid Freezer II 280 A-RGB
Keyboard
Logitech G510
Mouse
Logitech G502 HERO
Browser
Firefox
Antivirus
Avg free
Other Info
Download: 90 Mbps
Upload: 20Mbps
"<?xml version="1.0" encoding="utf-8"?>" must be the first line.
 

My Computer My Computer

At a glance

Windows 7
OS
Windows 7
  • Like
Reactions: DMD
OK. Thank you
However, the generated script works with the 24H2 version.
 

My Computer My Computer

At a glance

W11CPU AMD Ryzen 9 7950XG.Skill Flare X5 32GB Kit DDR5-6000 CL32 (F5-...
OS
W11
Computer type
PC/Desktop
CPU
CPU AMD Ryzen 9 7950X
Motherboard
ASUS ROG Strix X670E-F Gaming WiFi
Memory
G.Skill Flare X5 32GB Kit DDR5-6000 CL32 (F5-6000J3238F16GX2-FX5)
Monitor(s) Displays
LG E2381VR
Screen Resolution
1920x1080
Hard Drives
1x Samsung Memorie MZ-V8P1T0B 980 PRO SSD 1TB
2x Western Digital WD Red Nas 4TB
PSU
SEASONIC FOCUS PX-850 Plus Platinum
Case
Corsair 4000D Airflow
Cooling
ARCTIC Liquid Freezer II 280 A-RGB
Keyboard
Logitech G510
Mouse
Logitech G502 HERO
Browser
Firefox
Antivirus
Avg free
Other Info
Download: 90 Mbps
Upload: 20Mbps
With a modification to the script I was able to get the two options during installation.
With this procedure on a virtual machine I was able to enable Audit mode to update the wim file with the sysprep procedure.
Code:
<?xml version="1.0" encoding="utf-8"?>
<!-- SCRIPT FOR WINDOWS 11 version 24H2 x64 version ITA-->

<unattend xmlns="urn:schemas-microsoft-com:unattend">
 
    <!-- windowsPE with 2 components: International-Core-WinPE amd64 e Setup amd64-->
    <settings pass="windowsPE">
        <component name="Microsoft-Windows-International-Core-WinPE" processorArchitecture="amd64" publicKeyToken="31bf3856ad364e35" language="neutral" versionScope="nonSxS" xmlns:wcm="http://schemas.microsoft.com/WMIConfig/2002/State" xmlns:xsi="http://www.w3.org/2001/XMLSchema-instance">
            <SetupUILanguage>
                <UILanguage>it-IT</UILanguage>
            </SetupUILanguage>
            <InputLocale>it-IT</InputLocale>
            <SystemLocale>it-IT</SystemLocale>
            <UILanguage>it-IT</UILanguage>
            <UserLocale>it-IT</UserLocale>
        </component>
        <component name="Microsoft-Windows-Setup" processorArchitecture="amd64" publicKeyToken="31bf3856ad364e35" language="neutral" versionScope="nonSxS" xmlns:wcm="http://schemas.microsoft.com/WMIConfig/2002/State" xmlns:xsi="http://www.w3.org/2001/XMLSchema-instance">
            <ImageInstall>
                <OSImage>
                    <InstallFrom>
                        <MetaData wcm:action="add">
                            <Key>/IMAGE/INDEX</Key>
                            <Value>1</Value>
                        </MetaData>
                    </InstallFrom>
                </OSImage>
            </ImageInstall>
            <UserData>
               <ProductKey>
                    <Key>VK7JG-NPHTM-C97JM-9MPGT-3V66T</Key>
                </ProductKey>
                <AcceptEula>true</AcceptEula>
            </UserData>
            <RunSynchronous>
                <RunSynchronousCommand wcm:action="add">
                    <Order>1</Order>
                    <Path>reg.exe add "HKLM\SYSTEM\Setup\LabConfig" /v BypassTPMCheck /t REG_DWORD /d 1 /f</Path>
                </RunSynchronousCommand>
                <RunSynchronousCommand wcm:action="add">
                    <Order>2</Order>
                    <Path>reg.exe add "HKLM\SYSTEM\Setup\LabConfig" /v BypassSecureBootCheck /t REG_DWORD /d 1 /f</Path>
                </RunSynchronousCommand>
                <RunSynchronousCommand wcm:action="add">
                    <Order>3</Order>
                    <Path>reg.exe add "HKLM\SYSTEM\Setup\LabConfig" /v BypassRAMCheck /t REG_DWORD /d 1 /f</Path>
                </RunSynchronousCommand>
            </RunSynchronous>
    </component>
    </settings>
    
    <!-- oobeSystem with 3 components: International-Core amd64, Shell-Setup amd64 e Shell-Setup x86-->
    <settings pass="oobeSystem">
        <component name="Microsoft-Windows-International-Core" processorArchitecture="amd64" publicKeyToken="31bf3856ad364e35" language="neutral" versionScope="nonSxS" xmlns:wcm="http://schemas.microsoft.com/WMIConfig/2002/State" xmlns:xsi="http://www.w3.org/2001/XMLSchema-instance">
            <InputLocale>it-IT</InputLocale>
            <SystemLocale>it-IT</SystemLocale>
            <UILanguage>it-IT</UILanguage>
            <UserLocale>it-IT</UserLocale>
        </component>
        <component name="Microsoft-Windows-Shell-Setup" processorArchitecture="amd64" publicKeyToken="31bf3856ad364e35" language="neutral" versionScope="nonSxS" xmlns:wcm="http://schemas.microsoft.com/WMIConfig/2002/State" xmlns:xsi="http://www.w3.org/2001/XMLSchema-instance">
            <OOBE>
                <HideEULAPage>true</HideEULAPage>
                <HideOnlineAccountScreens>true</HideOnlineAccountScreens>
                <HideWirelessSetupInOOBE>true</HideWirelessSetupInOOBE>
                <ProtectYourPC>3</ProtectYourPC>
            </OOBE>         
         </component>
         <component name="Microsoft-Windows-Shell-Setup" processorArchitecture="x86" publicKeyToken="31bf3856ad364e35" language="neutral" versionScope="nonSxS" xmlns:wcm="http://schemas.microsoft.com/WMIConfig/2002/State" xmlns:xsi="http://www.w3.org/2001/XMLSchema-instance">
            <FirstLogonCommands>
                <SynchronousCommand wcm:action="add">
                    <CommandLine>CMD /c REG.exe add "HKEY_LOCAL_MACHINE\SOFTWARE\Microsoft\Windows\CurrentVersion\UserProfileEngagement" /v "ScoobeSystemSettingEnabled" /t REG_DWORD /d 0 /f</CommandLine>
                    <Description>Disable OOBE Screen - Get even more out of Windows</Description>
                    <Order>1</Order>
                </SynchronousCommand>
                <SynchronousCommand wcm:action="add">
                    <CommandLine>CMD /c REG.exe add "HKEY_LOCAL_MACHINE\SOFTWARE\Policies\Microsoft\Windows\System" /v "AllowCrossDeviceClipboard" /t REG_DWORD /d 0 /f</CommandLine>
                    <Description>Disable OOBE Screen - Synchronize the activities</Description>
                    <Order>2</Order>
                </SynchronousCommand>
                <SynchronousCommand wcm:action="add">
                    <CommandLine>CMD /c REG.exe add "HKEY_LOCAL_MACHINE\SOFTWARE\Policies\Microsoft\Windows\System" /v "EnableActivityFeed" /t REG_DWORD /d 0 /f</CommandLine>
                    <Description>Disable OOBE Screen - Synchronize the activities</Description>
                    <Order>3</Order>
                </SynchronousCommand>
                <SynchronousCommand wcm:action="add">
                    <CommandLine>CMD /c REG.exe add "HKEY_LOCAL_MACHINE\SOFTWARE\Policies\Microsoft\Windows\System" /v "PublishUserActivities" /t REG_DWORD /d 0 /f</CommandLine>
                    <Description>Disable OOBE Screen - Synchronize the activities</Description>
                    <Order>4</Order>
                </SynchronousCommand>
                <SynchronousCommand wcm:action="add">
                    <CommandLine>CMD /c REG.exe add "HKEY_LOCAL_MACHINE\SOFTWARE\Policies\Microsoft\Windows\System" /v "UploadUserActivities" /t REG_DWORD /d 0 /f</CommandLine>
                    <Description>Disable OOBE Screen - Synchronize the activities</Description>
                    <Order>5</Order>
                </SynchronousCommand>
            </FirstLogonCommands> 
        </component>
     </settings>
</unattend>

But I detected other problem, the captured vim file, even without any processing inside it and reinserted in the ISO, trying to install generates the same kind of error at the 75% rate “Windows 11 installation failed”.
At this point I can't capier if it is the sys prep procedure that generates the vim file that causes problems.
I didn't think I would find these difficulties with the 24H2 version downloaded from Media Creation Tool.
 

My Computer My Computer

At a glance

W11CPU AMD Ryzen 9 7950XG.Skill Flare X5 32GB Kit DDR5-6000 CL32 (F5-...
OS
W11
Computer type
PC/Desktop
CPU
CPU AMD Ryzen 9 7950X
Motherboard
ASUS ROG Strix X670E-F Gaming WiFi
Memory
G.Skill Flare X5 32GB Kit DDR5-6000 CL32 (F5-6000J3238F16GX2-FX5)
Monitor(s) Displays
LG E2381VR
Screen Resolution
1920x1080
Hard Drives
1x Samsung Memorie MZ-V8P1T0B 980 PRO SSD 1TB
2x Western Digital WD Red Nas 4TB
PSU
SEASONIC FOCUS PX-850 Plus Platinum
Case
Corsair 4000D Airflow
Cooling
ARCTIC Liquid Freezer II 280 A-RGB
Keyboard
Logitech G510
Mouse
Logitech G502 HERO
Browser
Firefox
Antivirus
Avg free
Other Info
Download: 90 Mbps
Upload: 20Mbps

Same advice I gave to @hsehestedt:

You need to capture the \Windows\Panther logs, and see if there's any clues. Usually you start reading backwards on setupact.log & setuperr.log. The last lines are not terribly useful, it's Setup "cleaning up" after a failed install. But scrolling backwards you might get to an important error message. That's how I debugged some of my Unattended failures.
 

My Computer My Computer

At a glance

Windows 7
OS
Windows 7
It's not an unattend failure if it happens without unattend files.
 

My Computer My Computer

At a glance

Windows 11 Enterprise 25H2 [rev. 8893]
OS
Windows 11 Enterprise 25H2 [rev. 8893]
I checked, and @Kari's old posts say its \Windows\System32\Sysprep\Panther
 

My Computer My Computer

At a glance

Windows 7
OS
Windows 7
Are you talking to me or OP, garlin? I believe I already resolved this in the post to which I linked. (check out that grammar!!)
 

My Computer My Computer

At a glance

Windows 11 Enterprise 25H2 [rev. 8893]
OS
Windows 11 Enterprise 25H2 [rev. 8893]
No, he resolved the original Unattended problem which was caused by an incorrectly located comment line, but now the sysprepped image fails somewhere else.
So my comment about the Sysprep log still stands.
 

My Computer My Computer

At a glance

Windows 7
OS
Windows 7
Oh okay. My comment was about the sysprep failure.
 

My Computer My Computer

At a glance

Windows 11 Enterprise 25H2 [rev. 8893]
OS
Windows 11 Enterprise 25H2 [rev. 8893]
Good morning.
Even inserting the file created by the generator I get the same error, I tried not inserting any autounattend file and the installation was successful, obviously with all the requirements.
So I assume the incompatibility is created by the autounattend file after the procedure with sys prep.
 

My Computer My Computer

At a glance

W11CPU AMD Ryzen 9 7950XG.Skill Flare X5 32GB Kit DDR5-6000 CL32 (F5-...
OS
W11
Computer type
PC/Desktop
CPU
CPU AMD Ryzen 9 7950X
Motherboard
ASUS ROG Strix X670E-F Gaming WiFi
Memory
G.Skill Flare X5 32GB Kit DDR5-6000 CL32 (F5-6000J3238F16GX2-FX5)
Monitor(s) Displays
LG E2381VR
Screen Resolution
1920x1080
Hard Drives
1x Samsung Memorie MZ-V8P1T0B 980 PRO SSD 1TB
2x Western Digital WD Red Nas 4TB
PSU
SEASONIC FOCUS PX-850 Plus Platinum
Case
Corsair 4000D Airflow
Cooling
ARCTIC Liquid Freezer II 280 A-RGB
Keyboard
Logitech G510
Mouse
Logitech G502 HERO
Browser
Firefox
Antivirus
Avg free
Other Info
Download: 90 Mbps
Upload: 20Mbps

The issue with a sysprepped image getting to 76% or so and failing occurs even when you don’t use an unattend file, so it’s not related to those files.
 

My Computer My Computer

At a glance

Windows 11 Enterprise 25H2 [rev. 8893]
OS
Windows 11 Enterprise 25H2 [rev. 8893]
I don't know. My recent experience with 24H2's new Setup is that it likes to fail around 75% due to something in the specialize pass. Though it really doesn't report what it's objecting to.

The clue is it works under 23H2, and my unattended files are very clean. If you had to ask me, it's because 24H2 is treating a clean install like an in-place upgrade (with the whole Windows.old nonsense on a diskpart wiped disk). Entire sections of my specialize RunSynchronousCommands are allegedly processed according to setupact.log, but don't appear to have been run.

MS has to yet to comment on what's different for 24H2 Setup. Unless it's the normal "9 months to catch up" before publishing a revised learn.microsoft.com article.
 

My Computer My Computer

At a glance

Windows 7
OS
Windows 7
My unattends work fine. And again, the sysprepped image failure thing happens even when no unattend files are in play.
 

My Computer My Computer

At a glance

Windows 11 Enterprise 25H2 [rev. 8893]
OS
Windows 11 Enterprise 25H2 [rev. 8893]
Here we are a few weeks later ... is Microsoft to release any new step by step instructions for proper creation of an autounattend.xml file with the SIM? I hear that 24H2 is very "picky" about various things, e.g. local account creation, but I wonder where to find the authorized procedures?
 

My Computer My Computer

At a glance

Windows 11various
OS
Windows 11
Computer type
PC/Desktop
Manufacturer/Model
Lenovo
CPU
various
Motherboard
many
I finally found the compromise for my ISO with only the two prompts (username and password) and elimination of most bloatware.
The only problem to solve is how to delete the shortcut in the “Outlook (new)” task bar without deleting the File Explorer and Edge shortcuts. my autounattend file

User name and password prompts

Screenshot-1154.png


Immagine-2024-10-30-120856.png
 

My Computer My Computer

At a glance

W11CPU AMD Ryzen 9 7950XG.Skill Flare X5 32GB Kit DDR5-6000 CL32 (F5-...
OS
W11
Computer type
PC/Desktop
CPU
CPU AMD Ryzen 9 7950X
Motherboard
ASUS ROG Strix X670E-F Gaming WiFi
Memory
G.Skill Flare X5 32GB Kit DDR5-6000 CL32 (F5-6000J3238F16GX2-FX5)
Monitor(s) Displays
LG E2381VR
Screen Resolution
1920x1080
Hard Drives
1x Samsung Memorie MZ-V8P1T0B 980 PRO SSD 1TB
2x Western Digital WD Red Nas 4TB
PSU
SEASONIC FOCUS PX-850 Plus Platinum
Case
Corsair 4000D Airflow
Cooling
ARCTIC Liquid Freezer II 280 A-RGB
Keyboard
Logitech G510
Mouse
Logitech G502 HERO
Browser
Firefox
Antivirus
Avg free
Other Info
Download: 90 Mbps
Upload: 20Mbps

DMD are you setting up computers for a computer lab? A lot of "bloatware" elimination going on. Can you say why you wanted to eliminate the Outlook(New) shortcut? I have been wondering about that one. It appeared recently. It seems to have replaced the old Windows Mail application.
Thanks!
 

My Computer My Computer

At a glance

Windows 11various
OS
Windows 11
Computer type
PC/Desktop
Manufacturer/Model
Lenovo
CPU
various
Motherboard
many

Latest Support Threads

Back
Top Bottom