windows 11 simple upgrade


NICK ADSL UK

Well-known member
MVP
Member
VIP
Local time
5:09 AM
Posts
63
Location
London/Gatwick
OS
Windows 11
I know of all the hacks that are in circulation and have tried them all without success. so I gave it some thought and came to the conclusion that I would delete the appraiserres.dll file in the windows 11 iso sources folder and not like someone else suggested replace it from a windows 10 build which didn't work for me. now this worked for me and am sure it won't work for everyone but if like me you are finding the going difficult it's worth trying
 

My Computer

System One

  • OS
    Windows 11
I gave it a try but unable to delete appraiserres.dll file from bootable USB made with .iso.
 

My Computers

System One System Two

  • OS
    Windows 11 Home(226313296.32)23H2
    Computer type
    Laptop
    Manufacturer/Model
    Acer Swift SFG14-72
    CPU
    i7-155h
    Motherboard
    Coral_MTH
    Memory
    LPDDR5X 32GB
    Graphics Card(s)
    Intel Arc Graphics
    Sound Card
    Realtek
    Monitor(s) Displays
    SamsungATNA40YK 11-0
    Screen Resolution
    2880x1800
    Hard Drives
    1TB NVMe Gen 4 M.2 SSD
    Keyboard
    Generic
    Browser
    Edge
    Antivirus
    Windows Defender
  • Operating System
    Windows 11Home(26058.1400)24H2
    Computer type
    Laptop
    Manufacturer/Model
    Acer Predator Triton PT516-51S
    CPU
    i7-11800H
    Motherboard
    Countryman_TLS
    Memory
    16GB DDR4 3200 MHz
    Graphics card(s)
    RTX 3070
    Sound Card
    Realtek
    Monitor(s) Displays
    NE160QDM-NY1
    Screen Resolution
    2560x1600
    Hard Drives
    WD PC SN810 512GB
    Browser
    Edge, Google Chrome
    Antivirus
    Windows Defender
I gave it a try but unable to delete appraiserres.dll file from bootable USB made with .iso.
you need to create a new folder and then transfer the contents from the iso folder into the folder you have just created and then you will be able to delete that file as it will no longer be an iso file. you then just click on set up and away you go. now if you click on to keep files and folders you will be none the wiser that Windows 11 has been installed as everything will be just as you've left it. the only way you will know that windows11 has been installed is because the taskbar and icons will be placed in the centre. I dual boot both 10 and 11 having made a clone of my windows 10 first and then just installed 11 onto that 2nd drive keeping my files and folders. everyone's got their own way of doing things but for me, I've found this the simplest way to upgrade to 11
 

My Computer

System One

  • OS
    Windows 11
you need to create a new folder and then transfer the contents from the iso folder into the folder you have just created and then you will be able to delete that file as it will no longer be an iso file. you then just click on set up and away you go. now if you click on to keep files and folders you will be none the wiser that Windows 11 has been installed as everything will be just as you've left it. the only way you will know that windows11 has been installed is because the taskbar and icons will be placed in the centre. I dual boot both 10 and 11 having made a clone of my windows 10 first and then just installed 11 onto that 2nd drive keeping my files and folders. everyone's got their own way of doing things but for me, I've found this the simplest way to upgrade to 11
so far all my software works as expected and I have a vast amount so that's a plus. having said that software like start menu x which normally resides bottom left. on windows 11 however, it's now placed as an app along with icons that load up next to the clock
 

My Computer

System One

  • OS
    Windows 11
I decided yesterday to back up my main computer and install windows 11 via WU on my main partition. All is good and all programs work as expected. I really expected that Macrium would be reinstalling my previous RELEASE PREVIEW but don’t think I need to. Happy!
 

My Computers

System One System Two

  • OS
    windows 10 & 11
    Computer type
    PC/Desktop
    Manufacturer/Model
    iBuyPower (special build)
    CPU
    AMD Ryzen 7X
    Motherboard
    Asus Prime x370 Pro
    Memory
    64Gb
    Graphics Card(s)
    Radeon RX 480 8Gb
    Monitor(s) Displays
    Samsung UHD 27 inch
    Screen Resolution
    UHD
    Hard Drives
    3 Samsung 1 TB SSD each; 1 Samsung PCIe M.2 at 2 TB
  • Operating System
    Windows 11 pro
    Computer type
    PC/Desktop
    Manufacturer/Model
    IBuyPower
    CPU
    AMD 9 5900X
    Motherboard
    Asus x570 ROG Crosshair VIII Dark Hero WI-FI 6E ARGB
    Memory
    32 Gb
    Graphics card(s)
    Nvidia GeForce RTX 3080 Ti 12 GB GDDR6X
    Sound Card
    3D PREMIUM surround sound onboard
    Monitor(s) Displays
    Samsung 32 inch UHD curved monitor
    Screen Resolution
    UHD
    Hard Drives
    Samsung 980 pro 2 tb gen 4 NVMe ssd
    PSU
    850 watt consair RM850X
    Case
    Lian Li LANCOOL ONE tempered glass RGB gaming case
    Cooling
    DEEPCOOL GAMERSTORM RGB 240 mm CASTLE 240EX liquid cooler
    Mouse
    Ares m.2 gaming optical mouse
    Keyboard
    Ares m.2 gaming keyboard
    Internet Speed
    450
    Browser
    Firefox / Edge
    Antivirus
    Windows defender
    Other Info
    With all this gaming rig I am not a gamer!
you need to create a new folder and then transfer the contents from the iso folder into the folder you have just created and then you will be able to delete that file as it will no longer be an iso file. you then just click on set up and away you go. now if you click on to keep files and folders you will be none the wiser that Windows 11 has been installed as everything will be just as you've left it. the only way you will know that windows11 has been installed is because the taskbar and icons will be placed in the centre. I dual boot both 10 and 11 having made a clone of my windows 10 first and then just installed 11 onto that 2nd drive keeping my files and folders. everyone's got their own way of doing things but for me, I've found this the simplest way to upgrade to 11
Thank you, will try in the morning :)
 

My Computers

System One System Two

  • OS
    Windows 11 Home(226313296.32)23H2
    Computer type
    Laptop
    Manufacturer/Model
    Acer Swift SFG14-72
    CPU
    i7-155h
    Motherboard
    Coral_MTH
    Memory
    LPDDR5X 32GB
    Graphics Card(s)
    Intel Arc Graphics
    Sound Card
    Realtek
    Monitor(s) Displays
    SamsungATNA40YK 11-0
    Screen Resolution
    2880x1800
    Hard Drives
    1TB NVMe Gen 4 M.2 SSD
    Keyboard
    Generic
    Browser
    Edge
    Antivirus
    Windows Defender
  • Operating System
    Windows 11Home(26058.1400)24H2
    Computer type
    Laptop
    Manufacturer/Model
    Acer Predator Triton PT516-51S
    CPU
    i7-11800H
    Motherboard
    Countryman_TLS
    Memory
    16GB DDR4 3200 MHz
    Graphics card(s)
    RTX 3070
    Sound Card
    Realtek
    Monitor(s) Displays
    NE160QDM-NY1
    Screen Resolution
    2560x1600
    Hard Drives
    WD PC SN810 512GB
    Browser
    Edge, Google Chrome
    Antivirus
    Windows Defender
@NICK ADSL UK
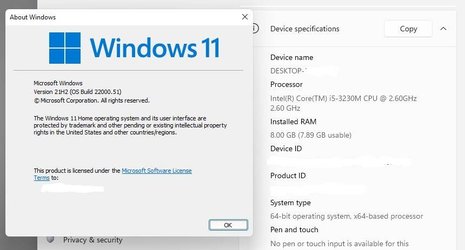
Thank you very much, success with your method 👌 I have managed to install in this 7yrs old laptop, yes this is the most easiest workaround and Thank you, I will play around with it for a while and revert back to the original OS(Win 8.1 Pro).
Capture.JPG
 

My Computers

System One System Two

  • OS
    Windows 11 Home(226313296.32)23H2
    Computer type
    Laptop
    Manufacturer/Model
    Acer Swift SFG14-72
    CPU
    i7-155h
    Motherboard
    Coral_MTH
    Memory
    LPDDR5X 32GB
    Graphics Card(s)
    Intel Arc Graphics
    Sound Card
    Realtek
    Monitor(s) Displays
    SamsungATNA40YK 11-0
    Screen Resolution
    2880x1800
    Hard Drives
    1TB NVMe Gen 4 M.2 SSD
    Keyboard
    Generic
    Browser
    Edge
    Antivirus
    Windows Defender
  • Operating System
    Windows 11Home(26058.1400)24H2
    Computer type
    Laptop
    Manufacturer/Model
    Acer Predator Triton PT516-51S
    CPU
    i7-11800H
    Motherboard
    Countryman_TLS
    Memory
    16GB DDR4 3200 MHz
    Graphics card(s)
    RTX 3070
    Sound Card
    Realtek
    Monitor(s) Displays
    NE160QDM-NY1
    Screen Resolution
    2560x1600
    Hard Drives
    WD PC SN810 512GB
    Browser
    Edge, Google Chrome
    Antivirus
    Windows Defender
Well, you can not use this method.. TPM and processor requirements is turned down in the Insider versions of W11. for now,
 

My Computer

System One

  • OS
    EndeavourOS, Windows 11 Pro
    Computer type
    PC/Desktop
    Manufacturer/Model
    custom PC
    CPU
    Core i5 8400
    Motherboard
    Gigabyte B360M-HD3
    Memory
    8gb DDR4-2400
    Graphics Card(s)
    iGPU
    Sound Card
    Realtek
    Monitor(s) Displays
    some generic 1080p 75hz monitor * 2
    Screen Resolution
    1080p * 2
    Hard Drives
    GIGABYTE NVMe SSD 256GB (GP-GSM2NE3256GNTD)
    Internet Speed
    200MBit/s
    Antivirus
    WD
Well, you can not use this method.. TPM and processor requirements is turned down in the Insider versions of W11. for now,
I tried to do WU yesterday. No go. Computer is on insider program. Again, it reported tpm not ver 2.0 cannot install
 

My Computers

System One System Two

  • OS
    windows 10 & 11
    Computer type
    PC/Desktop
    Manufacturer/Model
    iBuyPower (special build)
    CPU
    AMD Ryzen 7X
    Motherboard
    Asus Prime x370 Pro
    Memory
    64Gb
    Graphics Card(s)
    Radeon RX 480 8Gb
    Monitor(s) Displays
    Samsung UHD 27 inch
    Screen Resolution
    UHD
    Hard Drives
    3 Samsung 1 TB SSD each; 1 Samsung PCIe M.2 at 2 TB
  • Operating System
    Windows 11 pro
    Computer type
    PC/Desktop
    Manufacturer/Model
    IBuyPower
    CPU
    AMD 9 5900X
    Motherboard
    Asus x570 ROG Crosshair VIII Dark Hero WI-FI 6E ARGB
    Memory
    32 Gb
    Graphics card(s)
    Nvidia GeForce RTX 3080 Ti 12 GB GDDR6X
    Sound Card
    3D PREMIUM surround sound onboard
    Monitor(s) Displays
    Samsung 32 inch UHD curved monitor
    Screen Resolution
    UHD
    Hard Drives
    Samsung 980 pro 2 tb gen 4 NVMe ssd
    PSU
    850 watt consair RM850X
    Case
    Lian Li LANCOOL ONE tempered glass RGB gaming case
    Cooling
    DEEPCOOL GAMERSTORM RGB 240 mm CASTLE 240EX liquid cooler
    Mouse
    Ares m.2 gaming optical mouse
    Keyboard
    Ares m.2 gaming keyboard
    Internet Speed
    450
    Browser
    Firefox / Edge
    Antivirus
    Windows defender
    Other Info
    With all this gaming rig I am not a gamer!
I know of all the hacks that are in circulation and have tried them all without success. so I gave it some thought and came to the conclusion that I would delete the appraiserres.dll file in the windows 11 iso sources folder and not like someone else suggested replace it from a windows 10 build which didn't work for me. now this worked for me and am sure it won't work for everyone but if like me you are finding the going difficult it's worth trying
I did a similar thing but I replaced BOTH of the appraiser... dlls. Replacing only the one you (and others) mentioned did not work for me.
 

My Computer

System One

  • OS
    Windows 11
    Computer type
    PC/Desktop
    Manufacturer/Model
    Custom built
    CPU
    Ryzen 5600X
    Motherboard
    ASRock Steel Legend
    Memory
    16GB
    Graphics Card(s)
    EVGA GT 710
    Sound Card
    None
    Monitor(s) Displays
    23",24", 19" - flat panels
    Screen Resolution
    1920x1200
    Hard Drives
    None - only M.2 SATA and NVMe drives
    PSU
    750W
    Case
    Antec
    Cooling
    stock Wraith cooler
    Keyboard
    Corsair gaming
    Mouse
    Logitech M720
    Internet Speed
    1Gb

Latest Support Threads

Back
Top Bottom