Installation and Upgrade WinPE - Create a Custom Windows Install USB


Win11USB Banner.png

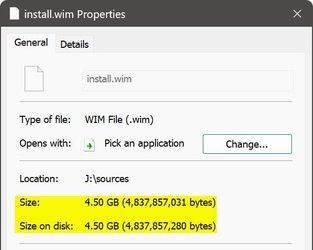
As you all (should) already know, Windows Setup's install.wim file is growing with each new feature upgrade. It's coming close and soon going over the 4 GB size limit of a FAT32 formatted install media. Today, as I write this, (22-FEB-2022), downloading WIM-based most current public release install media as told here in Shawn Brink's tutorial, the install.wim file is 4.5 GB (UK English Windows 11).

There’s nothing in the UEFI specifications that prevents booting a computer from an NTFS formatted USB flash drive. In fact, this so-called limitation is entirely artificial, caused by the single fact that manufacturer has not included correct drivers in UEFI. Luckily, most modern computers can boot from a single-partition NTFS formatted USB flash drive, and install Windows 11 from a single partition USB media containing WIM image larger than 4 GB (maximum file size on FAT32 media).

But, what to do if the WIM file is over 4 GB, and your computer cannot boot from an NTFS formatted media?

This tutorial will show how to create a USB flash drive containing a FAT32 formatted WinPE partition, and a bigger NTFS formatted Windows Setup partition. When computer is booted from this USB flash drive, the WinPE partition takes care of boot, then runs Windows Setup from bigger setup partition on same USB.

The whole process takes 10 to 20 minutes, but only needs to be done once. In the future, the Windows Setup files on USB can be replaced with newer version of Windows 11.


Contents

Use links to jump to any part, browser back button to return to this table


Part One:Create WinPE
Part Two:Edit WinPE boot.wim
Part Three:Make WinPE ISO
Part Four:Partition USB flash drive
Part Five:Create bootable USB install media

Please notice: I have prepared a custom WinPE ISO image for you. You can download it from my OneDrive: WinPEx64.iso. File size is 474 MB.

Parts One, Two and Three in this tutorial will show how I edited and customized this WinPE image, and are intended to those users who want to learn how to do it by themselves.

Short: if you want to make this easy, download the provided WinPE ISO, and start from Part Four, and you are done in three minutes.


Part One

Create WinPE


1.1 Download and install both Windows 11 ADK (Assessment and Deployment Kit), and Windows PE add-on for the ADK, installing ADK first:

Download ADK.jpg

(Click screenshot thumbnails to open images enlarged.)

1.2 When installing ADK, for purpose of this tutorial, you will only need the Deployment Tools module. Unselecting everything else, download size is less than 100 MB:

ADK Install.jpg


1.3 When both ADK and WinPE add-on have been installed, open an elevated ADK Deployment and Imaging Tools Environment, a special mode of Command Prompt. You will find it in Start > All Apps > W > Windows Kits:

Run Tool.jpg


1.4 The prompt is quite long. Shorten it by jumping to root of the drive where ADK was installed with command cd \ (#1 in next screenshot)

1.5 Create 64-bit WinPE files with following command (#2 in next screenshot), where folder D:\WPEx64 is the folder where WinPE files will be created. Folder will be created automatically, it does not need to exist:

copype amd64 D:\WPEx64

Create PE Folder.jpg


For 32-bit WinPE, the command is as follows:

copype x86 D:\WPEx86


Part Two

Edit WinPE boot.wim


2.1 Depending on which bit architecture you selected, either folder D:\WPEx86 or D:\WPEx64 now contains all files and folders to create a WinPE ISO.

2.2 To edit it, we must mount WinPE boot.wim file for offline servicing. First, create a mount point folder. In this example, I made a folder C:\Mount. Open an elevated PowerShell, and enter following command to mount boot.wim:

Mount-WindowsImage -ImagePath D:\WPEx64\Media\Sources\boot.wim -Index 1 -Path C:\Mount

Change -ImagePath folder WPEx64 to WPEx32 if working with 32-bit WinPE.

2.3 Folder C:\Mount now contains WinPE image, and we can edit it. First thing I made when editing the provided custom WinPE image, I added PowerShell support. By default, WinPE does not support PowerShell.

To enable PowerShell in WinPE, copy and paste the following commands to elevated PowerShell:. Notice that you can copy all commands at once, and paste them all to elevated PowerShell, which will then run them one by one:

Code:
Dism /Add-Package /Image:"C:\Mount" /PackagePath:"C:\Program Files (x86)\Windows Kits\10\Assessment and Deployment Kit\Windows Preinstallation Environment\amd64\WinPE_OCs\WinPE-WMI.cab"
Dism /Add-Package /Image:"C:\Mount" /PackagePath:"C:\Program Files (x86)\Windows Kits\10\Assessment and Deployment Kit\Windows Preinstallation Environment\amd64\WinPE_OCs\en-us\WinPE-WMI_en-us.cab"
Dism /Add-Package /Image:"C:\Mount" /PackagePath:"C:\Program Files (x86)\Windows Kits\10\Assessment and Deployment Kit\Windows Preinstallation Environment\amd64\WinPE_OCs\WinPE-NetFX.cab"
Dism /Add-Package /Image:"C:\Mount" /PackagePath:"C:\Program Files (x86)\Windows Kits\10\Assessment and Deployment Kit\Windows Preinstallation Environment\amd64\WinPE_OCs\en-us\WinPE-NetFX_en-us.cab"
Dism /Add-Package /Image:"C:\Mount" /PackagePath:"C:\Program Files (x86)\Windows Kits\10\Assessment and Deployment Kit\Windows Preinstallation Environment\amd64\WinPE_OCs\WinPE-Scripting.cab"
Dism /Add-Package /Image:"C:\Mount" /PackagePath:"C:\Program Files (x86)\Windows Kits\10\Assessment and Deployment Kit\Windows Preinstallation Environment\amd64\WinPE_OCs\en-us\WinPE-Scripting_en-us.cab"
Dism /Add-Package /Image:"C:\Mount" /PackagePath:"C:\Program Files (x86)\Windows Kits\10\Assessment and Deployment Kit\Windows Preinstallation Environment\amd64\WinPE_OCs\WinPE-PowerShell.cab"
Dism /Add-Package /Image:"C:\Mount" /PackagePath:"C:\Program Files (x86)\Windows Kits\10\Assessment and Deployment Kit\Windows Preinstallation Environment\amd64\WinPE_OCs\en-us\WinPE-PowerShell_en-us.cab"
Dism /Add-Package /Image:"C:\Mount" /PackagePath:"C:\Program Files (x86)\Windows Kits\10\Assessment and Deployment Kit\Windows Preinstallation Environment\amd64\WinPE_OCs\WinPE-StorageWMI.cab"
Dism /Add-Package /Image:"C:\Mount" /PackagePath:"C:\Program Files (x86)\Windows Kits\10\Assessment and Deployment Kit\Windows Preinstallation Environment\amd64\WinPE_OCs\en-us\WinPE-StorageWMI_en-us.cab"
Dism /Add-Package /Image:"C:\Mount" /PackagePath:"C:\Program Files (x86)\Windows Kits\10\Assessment and Deployment Kit\Windows Preinstallation Environment\amd64\WinPE_OCs\WinPE-DismCmdlets.cab"
Dism /Add-Package /Image:"C:\Mount" /PackagePath:"C:\Program Files (x86)\Windows Kits\10\Assessment and Deployment Kit\Windows Preinstallation Environment\amd64\WinPE_OCs\en-us\WinPE-DismCmdlets_en-us.cab"

The above commands will add PowerShell to a 64-bit WinPE. If you are creating a 32-bit WinPE, change the folder amd64 at the end of long path, near end of each command to x86. An example using the first of above listed commands:

64-bit WinPE:

Rich (BB code):
Dism /Add-Package /Image:"C:\Mount" /PackagePath:"C:\Program Files (x86)\Windows Kits\10\Assessment and Deployment Kit\Windows Preinstallation Environment\amd64\WinPE_OCs\WinPE-WMI.cab"

32-bit WinPE:

Rich (BB code):
Dism /Add-Package /Image:"C:\Mount" /PackagePath:"C:\Program Files (x86)\Windows Kits\10\Assessment and Deployment Kit\Windows Preinstallation Environment\x86\WinPE_OCs\WinPE-WMI.cab"

2.4 This custom WinPE requires two scripts, a PowerShell script to find out drive letter of the NTFS partition on USB containing setup files, and then run Windows Setup, and a batch file to run that PS script.

Opening mount point folder C:\Mount, I created a folder Scripts on its root to store these two scripts:

Scripts folder created.jpg


2.5 First the small PS script. To save to mount point folder requires elevated rights, so we need to open Notepad elevated (run as administrator). Copy and paste the following code to it:

Powershell:
$SetupVolume = (Get-Volume -FileSystemLabel Setup).DriveLetter
$SetupFile = $SetupVolume + ':\setup.exe'
cmd /c $SetupFile

First line will search the USB for volume (partition) labelled Setup, and set its drive letter in variable $SetupVolume. Second line then creates variable $SetupFile, adding the important :\setup.exe to drive letter found in first line. For instance, if $SetupVolume is F, $SetupFile is F:\setup.exe.

Last line then executes command setup.exe from bigger NTFS partition Setup, which starts Windows Setup.

Save the file in folder C:\Mount\Scripts as SetupW10.ps1. In Save As dialog, remember to select Save As Type as All files:

Save PS Script.jpg


2.6 Next, short batch file. Copy and paste following code to an elevated Notepad:

Code:
@echo off
rem
rem Run PowerShell script to start Windows Setup
rem
cls
echo.
echo Starting windows Setup...
powershell -ExecutionPolicy bypass -file "X:\Scripts\SetupW11.ps1"

Only important line in this batch file is the last one. It executes the PS script made in step 2.5.

Save it to folder C:\Mount\Scripts as WinSetup.cmd. Again, as with the PS script, in Save As dialog, remember to select Save As Type as All files.

2.7 Last but not least, we need to edit file C:\Mount\Windows\System32\startnet.cmd. Startnet.cmd functions exactly like autoexec.bat did in Windows XP and older Windows versions, running every command in it automatically when WinPE boots.

By default, startnet.cmd only contains one command, wpeinit, which enables WinPE networking capabilities. We add two other commands to it.

Open startnet.cmd in an elevated Notepad. Copy and paste following code to it:

Code:
wpeinit
powercfg /s 8c5e7fda-e8bf-4a96-9a85-a6e23a8c635c
X:\Scripts\WinSetup.cmd

The first line is the default command to initialize networking. In second line, we set a High Performance power plan to speed up Windows installation. In last line, we execute the batch file created in step 2.6.

When computer is booted from WinPE media, the contents of WinPE will be copied to RAM disk X. This is why we can use the path X:\Scripts on last command line, there being no need to find out the drive letter for volume containing the Scripts folder.

2.8 In an elevated PowerShell, enter following command to save changes to WinPE:

Dismount-WindowsImage -Path C:\Mount -Save


Part Three

Make WinPE ISO


3.1 Open an elevated ADK Deployment and Imaging Tools Environment as told in step 1.3.

3.2 Enter following command to create WinPE ISO:

MakeWinPEMedia /ISO D:\WPEx64 F:\WinPEx64.iso

Change path D:\WPEx64 to D:\WPEx86 if creating a 32-bit WinPE ISO. Path F:\WinPEx64.iso is the path and name of the ISO file that will be created.


Part Four

Partition USB flash drive


4.1 Plug in an at least 8 GB USB lash drive. Open an elevated PowerShell, start Windows Disk Partitioning utility with command DISKPART.

Enter command LIST DISK to show all attached disks, find out the disk ID for your USB Flash Drive. In my case now, the USB is DISK 3:

Diskpart.jpg


Be careful, absolutely sure that you find out correct Disk ID! In following step, the selected disk will be wiped clean, and new partitions will be created. Selecting wrong disk may cause Windows or data disks being formatted, all data lost.


4.2 Still in DISKPART, run following commands one by one. In first command, replace X (disk ID) with actual Disk ID for your USB flash drive:

select disk X
clean
create partition primary size=1024
format quick fs=fat32 label="Boot"
assign
create partition primary
format quick fs=ntfs label="Setup"
assign

4.3 Quit DISKPART with command EXIT. Your USB flash drive is now correctly partitioned, containing a 1 GB partition Boot, and partition Setup which occupies the rest of the USB:

USB Boot and Setup partitions.jpg


Part Five

Create bootable USB install media


5.1 Mount the WinPE ISO image created in Step 3.2 as a virtual CD / DVD drive (right click, select Mount). Copy its contents, all files and folders, to partition Boot on USB.

5.2 Mount a Windows 11 ISO image as a virtual CD / DVD drive (right click, select Mount). Copy its contents, all files and folders, to partition Setup on USB.

That's it! You have now a bootable USB flash drive to install Windows, even if the install.wim or install.esd file is bigger than FAT32 size limit 4 GB. In the future, when you need install media for a new Windows version, simply format the Setup partition on USB, and copy contents of new ISO to it.

Kari
 

Attachments

  • WIM Size.jpg
    WIM Size.jpg
    24.6 KB · Views: 173
  • win11usb.png
    win11usb.png
    8.1 KB · Views: 126
Last edited:
Okay, so let's start with this:

The updates you want depend upon what version of Windows you ISO image is. If your image is version 23H2, then you only need updates specifically for 23H2.

Next, bear in mind that there are two kinds of updates. Most updates are "cumulative". That means that you only need the most recent update of that kind. Cumulative updates always include all the updates from previous releases. Updates that are non-cumulative need to all be installed since newer updates of that kind do not contain the changes from previous releases of the same kind.

In your case, kb5031455 is a cumulative update for Windows. Put another way, it is the main cumulative update for Windows (note the relatively large size of this update and how it gets larger every month).

So, for that update, you only need the most recent update. In this case, that would be kb5033375. Note that tomorrow is Patch Tuesday so at 10AM US Pacific Time, a new cumulative update for Windows will be released that will replace KB5033375.

NOTE: Let's say that today you add KB5033375 to your image. Tomorrow, you can add whatever the new update is to your image. The update will be smart enough to look at your image and realize that all of the updates from previous months have already been applied and so it will not try to add those in again. It will only add what is new since the last update. However, if you were to update an original 23H2 image that you have never updated previously, it will add all of the updates since no previous updates were ever installed. It can do that because, as a cumulative update, it contains all the previous updates.

So, here is a little bit of guide for the various update types:

Windows Cumulative Update, Windows .NET updates - These are released every month and are both cumulative, so you only need the most recent release. As an example, as of today (January 8, 2024), the most recent release for both is the December update. Tomorrow, a new update for both should be released. If you already installed the December update, it's fine to add the January update since it will be smart enough to add only the new changes from that update.

NOTE: In theory, it's possible that there may be no new .NET update tomorrow, although that would be a very rare case. In that case, the December update would remain the most recent.

Windows Safe OS Dynamic Update and the Setup Dynamic Update - These are NOT released every month, however, they are cumulative. As a result, you would work your way back in the list of updates until you find the most recent update of that kind (if one even exists). If you are updating an image that you already updated previously, there is no need to add that same update again, unless a newer one exists. However, it won't hurt if you reapply the same update again because it will be smart enough to realize that those updates were already applied.

OOBE ZDP Updates - The only update that is NOT cumulative is the OOBE ZDP Updates. So, for that kind of update, you want to grab all of them, not just the most recent.

Here is a sample of what my updates folder looks like. Naturally, this will get updated tomorrow:

Image1.jpg


NOTE: Not to make things confusing, but just one more item that you should be aware of:

Both the .NET and Windows Cumulative Update get updated once a month as I noted earlier. However, they also publish a PREVIEW update for these. The preview update of the Windows Cumulative is known as a "non-security" release. The Cumulative update contains fixes and security updates. The PREVIEW release contains the fixes that will be included in the next cumulative update but not the security update. If you are going to install a preview update, treat it the same as the full update, in other words, only grab the most recent preview update OR full update, not both.

Release Schedule

Full update - Released the 2nd Tuesday of every month at 10AM US Pacific Time
Preview Update - Released the 4th Tuesday of every month at 10AM US Pacific Time

Exception: There was no preview update in December due to the Holidays.

I know that I just threw a lot of info at you, so please do feel free to ask questions if anything is not clear. I may not always do the best job explaining things :-)
 

My Computers

System One System Two

  • OS
    Win11 Pro 23H2
    Computer type
    PC/Desktop
    Manufacturer/Model
    Home Built
    CPU
    Intel i7-11700K
    Motherboard
    ASUS Prime Z590-A
    Memory
    128GB Crucial Ballistix 3200MHz DRAM
    Graphics Card(s)
    No GPU - CPU graphics only (for now)
    Sound Card
    Realtek (on motherboard)
    Monitor(s) Displays
    HP Envy 32
    Screen Resolution
    2560 x 1440
    Hard Drives
    1 x 1TB NVMe Gen 4 x 4 SSD
    1 x 2TB NVMe Gen 3 x 4 SSD
    2 x 512GB 2.5" SSDs
    2 x 8TB HD
    PSU
    Corsair HX850i
    Case
    Corsair iCue 5000X RGB
    Cooling
    Noctua NH-D15 chromax.black cooler + 10 case fans
    Keyboard
    CODE backlit mechanical keyboard
    Mouse
    Logitech MX Master 3
    Internet Speed
    1Gb Up / 1 Gb Down
    Browser
    Edge
    Antivirus
    Windows Defender
    Other Info
    Additional options installed:
    WiFi 6E PCIe adapter
    ASUS ThunderboltEX 4 PCIe adapter
  • Operating System
    Win11 Pro 23H2
    Computer type
    Laptop
    Manufacturer/Model
    Lenovo ThinkBook 13x Gen 2
    CPU
    Intel i7-1255U
    Memory
    16 GB
    Graphics card(s)
    Intel Iris Xe Graphics
    Sound Card
    Realtek® ALC3306-CG codec
    Monitor(s) Displays
    13.3-inch IPS Display
    Screen Resolution
    WQXGA (2560 x 1600)
    Hard Drives
    2 TB 4 x 4 NVMe SSD
    PSU
    USB-C / Thunderbolt 4 Power / Charging
    Mouse
    Buttonless Glass Precision Touchpad
    Keyboard
    Backlit, spill resistant keyboard
    Internet Speed
    1Gb Up / 1Gb Down
    Browser
    Edge
    Antivirus
    Windows Defender
    Other Info
    WiFi 6e / Bluetooth 5.1 / Facial Recognition / Fingerprint Sensor / ToF (Time of Flight) Human Presence Sensor
Thanks hsehestedt! Your post contains great info. I was aware that some updates are comprehensive and some are not but you laid out the variations in a comprehensive way I've never seen anywhere before. This is very helpful.

There are a couple things that I'd like your take on. The version of ISO that I plan to go with is 23H2.

Is there any good reason that I should go with 22H2 instead?

Is there an advantage to incorporate the various recent updates into the ISO vs just installing the ISO as is then performing Windows Updates? I had read somewhere that incorporating the updates into the ISO would require less storage space from "store" folders/files created during standard Windows updates. I am hoping to have less data on the hard drive to make future backup images smaller.

For a sneak peek at learning what updates Windows 11 would want to install I was considering initially just installing the ISO as is then take note of which updates I should add to the ISO.

What are your thoughts on if I incorporate various updates into ISO but maybe not incorporate the preview updates? My guess is that preview updates have the potential to have new issues/problems and I don't want to be too bleeding edge and have to deal with potentially new issues that weren't previously existing.

Thanks again!
 

My Computer

System One

  • OS
    Windows 10 Pro
    Computer type
    PC/Desktop
    Manufacturer/Model
    ASUS
    CPU
    AMD 5900X
    Motherboard
    ASUS TUF Gaming X570-PRO (WiFi 6) AM4 Zen 3 Ryzen 5000 & 3rd Gen Ryzen ATX Motherboard (PCIe 4.0, 2.5Gb LAN, BIOS Flashback, HDMI 2.1, USB 3.2 Gen 2
    Memory
    G.SKILL Trident Z Neo (For AMD Ryzen) Series 32GB (2 x 16GB) 288-Pin RGB DDR4 SDRAM DDR4 3600 (PC4 28800) Desktop Memory Model F4-3600C16D-32GTZN
    Graphics Card(s)
    NVIDIA GeForce GTX750 Ti
    Sound Card
    Realtek (on motherboard)
    Monitor(s) Displays
    Acer CZ350CK, Wasabi Mango QHD275 Supreme
    Screen Resolution
    3440 x 1440, 2560 x 1440
    Hard Drives
    1 TB Western Digital SN850 Gen 4 x 4 NVMe
    128GB Crucial CT128M4SSD1 2.5" SSD
    1TB Seagate Barracuda ST1000DM003-9YN162 HD
    16TB Western Digital WD161KRYZ-01AGBB0 HD
    PSU
    EVGA SuperNOVA 750 GT, 80 Plus Gold 750W
    Case
    Phanteks Eclipse P500A
    Cooling
    be quiet! 250W TDP Dark Rock Pro 4
    Keyboard
    Logitech
    Mouse
    IBM
    Internet Speed
    1Gbps
    Browser
    Firefox
    Antivirus
    Malwarebytes
My personal preference would be to start with 23H2, after all, you are probably going to end up upgrading to 23H2 anyway even if you install 22H2, right? That way, you have one less step to do in the upgrades.

As for integrating the updates into the ISO vs. just installing the updates through Windows update, my feeling is that for by far the majority of people, just allowing Windows update to do its thing is the best way to go.

I'm just a geek who likes to make sure that all of my images are the very latest. I also do a LOT of testing. For example, I probably install a clean installation of Windows multiple times to a VM every single day. As a result, for my workflow, it a HUGE timesaver to have the updates already itegrated into my images rather than to install them afterward because installation of updates can take quite some time.

As for the space, you are correct that having the updates already in your image will save some space but note that you can remove the Windows update components if storage space is a concern for you.

Image1.jpg


Does that help?
 

My Computers

System One System Two

  • OS
    Win11 Pro 23H2
    Computer type
    PC/Desktop
    Manufacturer/Model
    Home Built
    CPU
    Intel i7-11700K
    Motherboard
    ASUS Prime Z590-A
    Memory
    128GB Crucial Ballistix 3200MHz DRAM
    Graphics Card(s)
    No GPU - CPU graphics only (for now)
    Sound Card
    Realtek (on motherboard)
    Monitor(s) Displays
    HP Envy 32
    Screen Resolution
    2560 x 1440
    Hard Drives
    1 x 1TB NVMe Gen 4 x 4 SSD
    1 x 2TB NVMe Gen 3 x 4 SSD
    2 x 512GB 2.5" SSDs
    2 x 8TB HD
    PSU
    Corsair HX850i
    Case
    Corsair iCue 5000X RGB
    Cooling
    Noctua NH-D15 chromax.black cooler + 10 case fans
    Keyboard
    CODE backlit mechanical keyboard
    Mouse
    Logitech MX Master 3
    Internet Speed
    1Gb Up / 1 Gb Down
    Browser
    Edge
    Antivirus
    Windows Defender
    Other Info
    Additional options installed:
    WiFi 6E PCIe adapter
    ASUS ThunderboltEX 4 PCIe adapter
  • Operating System
    Win11 Pro 23H2
    Computer type
    Laptop
    Manufacturer/Model
    Lenovo ThinkBook 13x Gen 2
    CPU
    Intel i7-1255U
    Memory
    16 GB
    Graphics card(s)
    Intel Iris Xe Graphics
    Sound Card
    Realtek® ALC3306-CG codec
    Monitor(s) Displays
    13.3-inch IPS Display
    Screen Resolution
    WQXGA (2560 x 1600)
    Hard Drives
    2 TB 4 x 4 NVMe SSD
    PSU
    USB-C / Thunderbolt 4 Power / Charging
    Mouse
    Buttonless Glass Precision Touchpad
    Keyboard
    Backlit, spill resistant keyboard
    Internet Speed
    1Gb Up / 1Gb Down
    Browser
    Edge
    Antivirus
    Windows Defender
    Other Info
    WiFi 6e / Bluetooth 5.1 / Facial Recognition / Fingerprint Sensor / ToF (Time of Flight) Human Presence Sensor
Apologies, it just dawned on me that I neglected to answer one of your questions. About the Preview Updates, I agree with you. I think that most people probably skip the preview updates.

Because I use my program to apply updates and it makes it such a trivial operation, I will create a new image with the preview updates, but I still also keep the previous ISO image before applying the preview updates.

But for most people, I suspect that they skip the previews, but I have no hard data to back up that assumption.
 

My Computers

System One System Two

  • OS
    Win11 Pro 23H2
    Computer type
    PC/Desktop
    Manufacturer/Model
    Home Built
    CPU
    Intel i7-11700K
    Motherboard
    ASUS Prime Z590-A
    Memory
    128GB Crucial Ballistix 3200MHz DRAM
    Graphics Card(s)
    No GPU - CPU graphics only (for now)
    Sound Card
    Realtek (on motherboard)
    Monitor(s) Displays
    HP Envy 32
    Screen Resolution
    2560 x 1440
    Hard Drives
    1 x 1TB NVMe Gen 4 x 4 SSD
    1 x 2TB NVMe Gen 3 x 4 SSD
    2 x 512GB 2.5" SSDs
    2 x 8TB HD
    PSU
    Corsair HX850i
    Case
    Corsair iCue 5000X RGB
    Cooling
    Noctua NH-D15 chromax.black cooler + 10 case fans
    Keyboard
    CODE backlit mechanical keyboard
    Mouse
    Logitech MX Master 3
    Internet Speed
    1Gb Up / 1 Gb Down
    Browser
    Edge
    Antivirus
    Windows Defender
    Other Info
    Additional options installed:
    WiFi 6E PCIe adapter
    ASUS ThunderboltEX 4 PCIe adapter
  • Operating System
    Win11 Pro 23H2
    Computer type
    Laptop
    Manufacturer/Model
    Lenovo ThinkBook 13x Gen 2
    CPU
    Intel i7-1255U
    Memory
    16 GB
    Graphics card(s)
    Intel Iris Xe Graphics
    Sound Card
    Realtek® ALC3306-CG codec
    Monitor(s) Displays
    13.3-inch IPS Display
    Screen Resolution
    WQXGA (2560 x 1600)
    Hard Drives
    2 TB 4 x 4 NVMe SSD
    PSU
    USB-C / Thunderbolt 4 Power / Charging
    Mouse
    Buttonless Glass Precision Touchpad
    Keyboard
    Backlit, spill resistant keyboard
    Internet Speed
    1Gb Up / 1Gb Down
    Browser
    Edge
    Antivirus
    Windows Defender
    Other Info
    WiFi 6e / Bluetooth 5.1 / Facial Recognition / Fingerprint Sensor / ToF (Time of Flight) Human Presence Sensor
Thanks for the info. Your posts help greatly!

Yes, it seems best to start with latest 23H2 ISO and go from there. I do like the thought of incorporating updates into the ISO rather than after installation. It just seems cleaner.

For the process that you're using I can see why your program would be such a timesaver to keep everything squeaky clean and current.

On your Windows Update Cleanup how in the world does it know what to go after and what can be deleted? Is it removing temporary files? I seem to remember seeing something about system store (or something like that) where files should remain intact. Do I have that right?

I am making some progress (but unfortunately not enough progress) in evaluating/consolidating/bookmarking/closing the open tabs from my 2 OS's to allow final backup of those OS's to then start on Windows 11 implementation.
 

My Computer

System One

  • OS
    Windows 10 Pro
    Computer type
    PC/Desktop
    Manufacturer/Model
    ASUS
    CPU
    AMD 5900X
    Motherboard
    ASUS TUF Gaming X570-PRO (WiFi 6) AM4 Zen 3 Ryzen 5000 & 3rd Gen Ryzen ATX Motherboard (PCIe 4.0, 2.5Gb LAN, BIOS Flashback, HDMI 2.1, USB 3.2 Gen 2
    Memory
    G.SKILL Trident Z Neo (For AMD Ryzen) Series 32GB (2 x 16GB) 288-Pin RGB DDR4 SDRAM DDR4 3600 (PC4 28800) Desktop Memory Model F4-3600C16D-32GTZN
    Graphics Card(s)
    NVIDIA GeForce GTX750 Ti
    Sound Card
    Realtek (on motherboard)
    Monitor(s) Displays
    Acer CZ350CK, Wasabi Mango QHD275 Supreme
    Screen Resolution
    3440 x 1440, 2560 x 1440
    Hard Drives
    1 TB Western Digital SN850 Gen 4 x 4 NVMe
    128GB Crucial CT128M4SSD1 2.5" SSD
    1TB Seagate Barracuda ST1000DM003-9YN162 HD
    16TB Western Digital WD161KRYZ-01AGBB0 HD
    PSU
    EVGA SuperNOVA 750 GT, 80 Plus Gold 750W
    Case
    Phanteks Eclipse P500A
    Cooling
    be quiet! 250W TDP Dark Rock Pro 4
    Keyboard
    Logitech
    Mouse
    IBM
    Internet Speed
    1Gbps
    Browser
    Firefox
    Antivirus
    Malwarebytes
Good news hsehestedt. I worked through all open browser tabs from both previous OS's and organized/bookmarked them. I have downloaded the 23H2 installation ISO. My copy also has Windows 11 Pro as index #6.

I have also identified the current updates to be downloaded. I have gone through your supplied process pdf and it is really impressive what you've done! It lays things out unbelievably well. The illustrations from the MS Catalog were especially helpful in understanding which updates to target.

I do have a question on that that puzzles me. I found one situation where there are 2 Cumulative updates regarding .NET Framework, and, although one does have a later date, both show "n/a" under the "replaces" and "replaced by" area in the description link. They are:

2023-09 Cumulative Update for .NET Framework 3.5 and 4.8.1 for Windows 11, version 23H2 for x64 (KB5029921) Windows 11 Security Updates 10/31/2023
2024-01 Cumulative Update for .NET Framework 3.5 and 4.8.1 for Windows 11, version 23H2 for x64 (KB5033920) Windows 11 Security Updates 1/9/2024

These are the only ones that don't show one replacing the other (other than the OOBE ones). Are you able to help clarify why this would be?

On a side note, when I updated the ISO on Windows Server 2008 R2 I didn't do much with updating WINRE.WIM because although I knew its purpose I was super confused how it should be handled. Your explanation there is also fabulous.

Thanks so much also for displaying in what order (and where) updates should be applied. Thanks also for placing the language items and features on demand in parentheses along with the explanation. I've never run across this before. Can you expand a little more on the final item (step 26) under the "new media" column?

Currently, as of today, it appears that KB5034123 is the LCU replacing KB5033375. Can you give me an example of a Dynamic LCU that I should not be using? I'm just a little foggy on that.

Thanks,
Bob
 

My Computer

System One

  • OS
    Windows 10 Pro
    Computer type
    PC/Desktop
    Manufacturer/Model
    ASUS
    CPU
    AMD 5900X
    Motherboard
    ASUS TUF Gaming X570-PRO (WiFi 6) AM4 Zen 3 Ryzen 5000 & 3rd Gen Ryzen ATX Motherboard (PCIe 4.0, 2.5Gb LAN, BIOS Flashback, HDMI 2.1, USB 3.2 Gen 2
    Memory
    G.SKILL Trident Z Neo (For AMD Ryzen) Series 32GB (2 x 16GB) 288-Pin RGB DDR4 SDRAM DDR4 3600 (PC4 28800) Desktop Memory Model F4-3600C16D-32GTZN
    Graphics Card(s)
    NVIDIA GeForce GTX750 Ti
    Sound Card
    Realtek (on motherboard)
    Monitor(s) Displays
    Acer CZ350CK, Wasabi Mango QHD275 Supreme
    Screen Resolution
    3440 x 1440, 2560 x 1440
    Hard Drives
    1 TB Western Digital SN850 Gen 4 x 4 NVMe
    128GB Crucial CT128M4SSD1 2.5" SSD
    1TB Seagate Barracuda ST1000DM003-9YN162 HD
    16TB Western Digital WD161KRYZ-01AGBB0 HD
    PSU
    EVGA SuperNOVA 750 GT, 80 Plus Gold 750W
    Case
    Phanteks Eclipse P500A
    Cooling
    be quiet! 250W TDP Dark Rock Pro 4
    Keyboard
    Logitech
    Mouse
    IBM
    Internet Speed
    1Gbps
    Browser
    Firefox
    Antivirus
    Malwarebytes
On a side note, should I apply any updates to either the Windows 11 ADK or the WinPE?
 

My Computer

System One

  • OS
    Windows 10 Pro
    Computer type
    PC/Desktop
    Manufacturer/Model
    ASUS
    CPU
    AMD 5900X
    Motherboard
    ASUS TUF Gaming X570-PRO (WiFi 6) AM4 Zen 3 Ryzen 5000 & 3rd Gen Ryzen ATX Motherboard (PCIe 4.0, 2.5Gb LAN, BIOS Flashback, HDMI 2.1, USB 3.2 Gen 2
    Memory
    G.SKILL Trident Z Neo (For AMD Ryzen) Series 32GB (2 x 16GB) 288-Pin RGB DDR4 SDRAM DDR4 3600 (PC4 28800) Desktop Memory Model F4-3600C16D-32GTZN
    Graphics Card(s)
    NVIDIA GeForce GTX750 Ti
    Sound Card
    Realtek (on motherboard)
    Monitor(s) Displays
    Acer CZ350CK, Wasabi Mango QHD275 Supreme
    Screen Resolution
    3440 x 1440, 2560 x 1440
    Hard Drives
    1 TB Western Digital SN850 Gen 4 x 4 NVMe
    128GB Crucial CT128M4SSD1 2.5" SSD
    1TB Seagate Barracuda ST1000DM003-9YN162 HD
    16TB Western Digital WD161KRYZ-01AGBB0 HD
    PSU
    EVGA SuperNOVA 750 GT, 80 Plus Gold 750W
    Case
    Phanteks Eclipse P500A
    Cooling
    be quiet! 250W TDP Dark Rock Pro 4
    Keyboard
    Logitech
    Mouse
    IBM
    Internet Speed
    1Gbps
    Browser
    Firefox
    Antivirus
    Malwarebytes
@robra,

thanks for the feedback and status update. I was wondering how things were going.

To tell you the truth, I don't ever really even look at the notes about what update replaced what update so that was not something I had noticed. Bear in mind that the .NET Framework updates are cumulative updates, so you only need to download the latest one. Simply by being a cumulative update, a newer update will always replace an older update. So, in the case of the two updates that you referenced, one is September 2023 update, the other is the January 2024 update. The January 2024 update is the only one that you need.

To be honest, why some updates would say that it replaces another update and why some don't say that I find that a little confusing.

For cumulative updates, simply go by the latest update.

As for the "New Media" item: Notice how the updates get applied get applied to Windows Image Files (.WIM files) such as the install.wim, the boot.wim, or the winre.wim. However, if you look at the ISO image or an actual Windows installation media, you will see that there are other support files and folders aside from these image files. All of those files are considered the "New Media". Does that help explain your question?

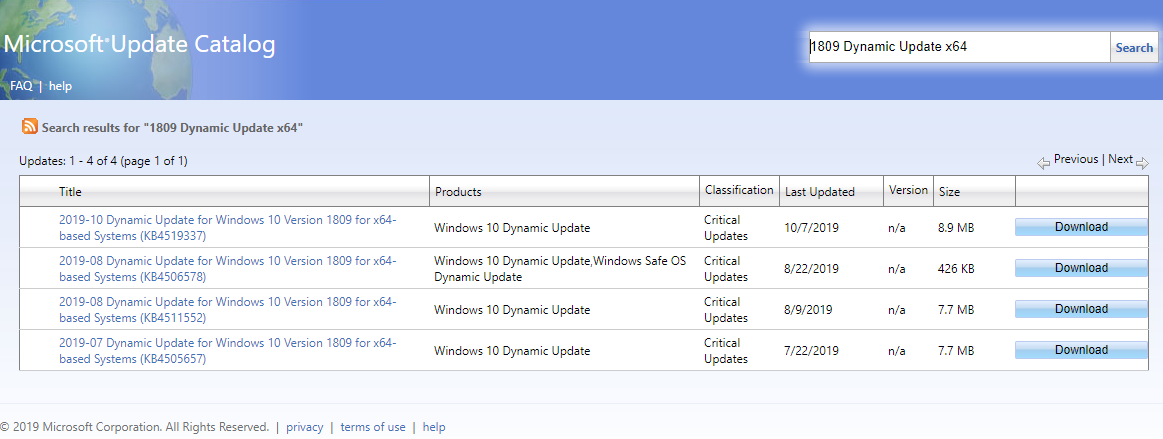
Finally, on the topic of the Dynamic Cumulative Update for Windows, what's interesting is that I don't see this for Windows 11 right now, but take a look at this screenshot showing Windows 10 updates:

Image1.jpg


Notice that the same KB number is shown with one of them listed as a dynamic update and one not indicating dynamic. I believe that those that are listed as dynamic are really meant for use with some of the Microsoft corporate update tools, but to be honest, I have not looked into that in detail. All I can say for a certainty is that I have only testing my processes and program using the update not listed as "dynamic".

However, you have reminded me that this is something that I have really wanted to test, so here is what I will do: I will test this tomorrow. If it turns out that the dynamic update works, then I will revise my statement to say that you can grab either update, but you only need one or the other. Stay tuned, I will report results tomorrow. Thanks for for bringing this to my attention!

I hope I've properly answered all the questions that you had so far. Please do feel free to let me know if anything at all is not clear or if you have additional questions.
 

My Computers

System One System Two

  • OS
    Win11 Pro 23H2
    Computer type
    PC/Desktop
    Manufacturer/Model
    Home Built
    CPU
    Intel i7-11700K
    Motherboard
    ASUS Prime Z590-A
    Memory
    128GB Crucial Ballistix 3200MHz DRAM
    Graphics Card(s)
    No GPU - CPU graphics only (for now)
    Sound Card
    Realtek (on motherboard)
    Monitor(s) Displays
    HP Envy 32
    Screen Resolution
    2560 x 1440
    Hard Drives
    1 x 1TB NVMe Gen 4 x 4 SSD
    1 x 2TB NVMe Gen 3 x 4 SSD
    2 x 512GB 2.5" SSDs
    2 x 8TB HD
    PSU
    Corsair HX850i
    Case
    Corsair iCue 5000X RGB
    Cooling
    Noctua NH-D15 chromax.black cooler + 10 case fans
    Keyboard
    CODE backlit mechanical keyboard
    Mouse
    Logitech MX Master 3
    Internet Speed
    1Gb Up / 1 Gb Down
    Browser
    Edge
    Antivirus
    Windows Defender
    Other Info
    Additional options installed:
    WiFi 6E PCIe adapter
    ASUS ThunderboltEX 4 PCIe adapter
  • Operating System
    Win11 Pro 23H2
    Computer type
    Laptop
    Manufacturer/Model
    Lenovo ThinkBook 13x Gen 2
    CPU
    Intel i7-1255U
    Memory
    16 GB
    Graphics card(s)
    Intel Iris Xe Graphics
    Sound Card
    Realtek® ALC3306-CG codec
    Monitor(s) Displays
    13.3-inch IPS Display
    Screen Resolution
    WQXGA (2560 x 1600)
    Hard Drives
    2 TB 4 x 4 NVMe SSD
    PSU
    USB-C / Thunderbolt 4 Power / Charging
    Mouse
    Buttonless Glass Precision Touchpad
    Keyboard
    Backlit, spill resistant keyboard
    Internet Speed
    1Gb Up / 1Gb Down
    Browser
    Edge
    Antivirus
    Windows Defender
    Other Info
    WiFi 6e / Bluetooth 5.1 / Facial Recognition / Fingerprint Sensor / ToF (Time of Flight) Human Presence Sensor
On a side note, should I apply any updates to either the Windows 11 ADK or the WinPE?
There were some WinPE updates some months back, but if you are using the latest ADK and Windows PE (the September 2023 update), then you do not need to apply any kind of updates because that already includes those updates.
 

My Computers

System One System Two

  • OS
    Win11 Pro 23H2
    Computer type
    PC/Desktop
    Manufacturer/Model
    Home Built
    CPU
    Intel i7-11700K
    Motherboard
    ASUS Prime Z590-A
    Memory
    128GB Crucial Ballistix 3200MHz DRAM
    Graphics Card(s)
    No GPU - CPU graphics only (for now)
    Sound Card
    Realtek (on motherboard)
    Monitor(s) Displays
    HP Envy 32
    Screen Resolution
    2560 x 1440
    Hard Drives
    1 x 1TB NVMe Gen 4 x 4 SSD
    1 x 2TB NVMe Gen 3 x 4 SSD
    2 x 512GB 2.5" SSDs
    2 x 8TB HD
    PSU
    Corsair HX850i
    Case
    Corsair iCue 5000X RGB
    Cooling
    Noctua NH-D15 chromax.black cooler + 10 case fans
    Keyboard
    CODE backlit mechanical keyboard
    Mouse
    Logitech MX Master 3
    Internet Speed
    1Gb Up / 1 Gb Down
    Browser
    Edge
    Antivirus
    Windows Defender
    Other Info
    Additional options installed:
    WiFi 6E PCIe adapter
    ASUS ThunderboltEX 4 PCIe adapter
  • Operating System
    Win11 Pro 23H2
    Computer type
    Laptop
    Manufacturer/Model
    Lenovo ThinkBook 13x Gen 2
    CPU
    Intel i7-1255U
    Memory
    16 GB
    Graphics card(s)
    Intel Iris Xe Graphics
    Sound Card
    Realtek® ALC3306-CG codec
    Monitor(s) Displays
    13.3-inch IPS Display
    Screen Resolution
    WQXGA (2560 x 1600)
    Hard Drives
    2 TB 4 x 4 NVMe SSD
    PSU
    USB-C / Thunderbolt 4 Power / Charging
    Mouse
    Buttonless Glass Precision Touchpad
    Keyboard
    Backlit, spill resistant keyboard
    Internet Speed
    1Gb Up / 1Gb Down
    Browser
    Edge
    Antivirus
    Windows Defender
    Other Info
    WiFi 6e / Bluetooth 5.1 / Facial Recognition / Fingerprint Sensor / ToF (Time of Flight) Human Presence Sensor
Thanks for the clarification (and example) on the Dynamic Cumulative Update issue. It appears that in most/all cases this situation involves duplicate KB numbers. It does seem logical to ignore those.

if you look at the ISO image or an actual Windows installation media, you will see that there are other support files and folders aside from these image files.

On the step 26 "New Media" I have noticed the other files and folders that you're referring to. The difficulty I'm having is understanding what actions I should be taking to be sure that I adequately complete this step. Are you referring to the fact that after I complete updates of the 3 WIM files there will be files and folders created/changed (in the mounted images) as a part of incorporating the various updates and that I need to replace the files and folders in the original ISO with all the contents of the mounted images?


There were some WinPE updates some months back, but if you are using the latest ADK and Windows PE (the September 2023 update), then you do not need to apply any kind of updates because that already includes those updates.

I downloaded the ADK/WinPE files released in September that you referenced.

After I posted earlier today asking whether I should perform any updates on the Windows 11 ADK/WinPE (from September) I did some additional research. On a MS website with instructions for downloading and installing ADK/WinPE. They suggested adding the most recent cumulative update. I found it odd that they seemed to be referring to a single cumulative update since there are multiple different types of cumulative updates. After reading through it they seemed to be referring to a Security cumulative update. They suggested performing a MS catalog search using the format "2024-01 cumulative update for Windows 11" (with quotation marks) starting with the current yyyy-mm and working backwards until the latest is found. I see your point that 23H2 is so recent that it might be overkill to update the ADK/WinPE with the latest update into its BOOT.WIM file.

I don't plan to incorporate this update on the ADK/WinPE but have a question on my search results (generally for future reference). When I performed the catalog search as they suggested (they didn't mention including the 23H2 probably because they were giving more general instructions) I received the two results immediately below. In these results they both have the same release date of 1/9/2024 but they have different KB numbers.

2024-01 Cumulative Update for Windows 11 for x64-based Systems (KB5034121) Windows 11 Security Updates 1/9/2024 356.5 MB
2024-01 Cumulative Update for Windows 11 Version 23H2 for x64-based Systems (KB5034123) Windows 11 Security Updates 1/9/2024 638.4 MB

Generally speaking, in the future, if I receive results such as these would I reject the one that doesn't have the reference to 23H2? Also, it seems odd that the one specific to the more recent 23H2 is almost twice as large as the other one.

Thanks much,
Bob
 

My Computer

System One

  • OS
    Windows 10 Pro
    Computer type
    PC/Desktop
    Manufacturer/Model
    ASUS
    CPU
    AMD 5900X
    Motherboard
    ASUS TUF Gaming X570-PRO (WiFi 6) AM4 Zen 3 Ryzen 5000 & 3rd Gen Ryzen ATX Motherboard (PCIe 4.0, 2.5Gb LAN, BIOS Flashback, HDMI 2.1, USB 3.2 Gen 2
    Memory
    G.SKILL Trident Z Neo (For AMD Ryzen) Series 32GB (2 x 16GB) 288-Pin RGB DDR4 SDRAM DDR4 3600 (PC4 28800) Desktop Memory Model F4-3600C16D-32GTZN
    Graphics Card(s)
    NVIDIA GeForce GTX750 Ti
    Sound Card
    Realtek (on motherboard)
    Monitor(s) Displays
    Acer CZ350CK, Wasabi Mango QHD275 Supreme
    Screen Resolution
    3440 x 1440, 2560 x 1440
    Hard Drives
    1 TB Western Digital SN850 Gen 4 x 4 NVMe
    128GB Crucial CT128M4SSD1 2.5" SSD
    1TB Seagate Barracuda ST1000DM003-9YN162 HD
    16TB Western Digital WD161KRYZ-01AGBB0 HD
    PSU
    EVGA SuperNOVA 750 GT, 80 Plus Gold 750W
    Case
    Phanteks Eclipse P500A
    Cooling
    be quiet! 250W TDP Dark Rock Pro 4
    Keyboard
    Logitech
    Mouse
    IBM
    Internet Speed
    1Gbps
    Browser
    Firefox
    Antivirus
    Malwarebytes
On the step 26 "New Media" I have noticed the other files and folders that you're referring to. The difficulty I'm having is understanding what actions I should be taking to be sure that I adequately complete this step. Are you referring to the fact that after I complete updates of the 3 WIM files there will be files and folders created/changed (in the mounted images) as a part of incorporating the various updates and that I need to replace the files and folders in the original ISO with all the contents of the mounted images?
First, for clarification, these are files NOT contained in any .WIM file. They are files located in the Sources folder of your ISO image or Windows installation media.

Note that the only item that gets applied to the New Media is the Setup Dynamic Update.

Image1.jpg


Updating the Base Image ("New Media")

For the Setup Dynamic Update we simply extract the contents to our media directly. To do so, run this command (replace SetupDU.CAB with the name of your Setup Dynamic Update file). In the example below note the following:

C:\Project\Setup_DU\SetupDU.CAB is the path to the Setup Dynamic Update file.
C:\Project\ISO_Files\Sources is the path to the Sources folder for your Windows media.
The F: is NOT a drive letter. Don't change this!

Here is the command to run (modify as noted above):

Expand "C:\Project\Setup_DU\SetupDU.CAB" -F:* "C:\Project\ISO_Files\Sources"

As for Windows PE, only the Windows PE on Your Windows installation media needs to be updated. Note that the boot.wim file on the Windows media actually has two indices. One of these is Windows PE and the other is Windows Setup (also based upon Windows PE). If you install the ADK and the Windows PE add-on, Microsoft doesn't have a mechanism for updating these other than to release a new version of the Windows PE add-on. The one exception to that was back in May of 2023 where a security update was needed, but no updates are required for that now.

Hope this helps!
 

My Computers

System One System Two

  • OS
    Win11 Pro 23H2
    Computer type
    PC/Desktop
    Manufacturer/Model
    Home Built
    CPU
    Intel i7-11700K
    Motherboard
    ASUS Prime Z590-A
    Memory
    128GB Crucial Ballistix 3200MHz DRAM
    Graphics Card(s)
    No GPU - CPU graphics only (for now)
    Sound Card
    Realtek (on motherboard)
    Monitor(s) Displays
    HP Envy 32
    Screen Resolution
    2560 x 1440
    Hard Drives
    1 x 1TB NVMe Gen 4 x 4 SSD
    1 x 2TB NVMe Gen 3 x 4 SSD
    2 x 512GB 2.5" SSDs
    2 x 8TB HD
    PSU
    Corsair HX850i
    Case
    Corsair iCue 5000X RGB
    Cooling
    Noctua NH-D15 chromax.black cooler + 10 case fans
    Keyboard
    CODE backlit mechanical keyboard
    Mouse
    Logitech MX Master 3
    Internet Speed
    1Gb Up / 1 Gb Down
    Browser
    Edge
    Antivirus
    Windows Defender
    Other Info
    Additional options installed:
    WiFi 6E PCIe adapter
    ASUS ThunderboltEX 4 PCIe adapter
  • Operating System
    Win11 Pro 23H2
    Computer type
    Laptop
    Manufacturer/Model
    Lenovo ThinkBook 13x Gen 2
    CPU
    Intel i7-1255U
    Memory
    16 GB
    Graphics card(s)
    Intel Iris Xe Graphics
    Sound Card
    Realtek® ALC3306-CG codec
    Monitor(s) Displays
    13.3-inch IPS Display
    Screen Resolution
    WQXGA (2560 x 1600)
    Hard Drives
    2 TB 4 x 4 NVMe SSD
    PSU
    USB-C / Thunderbolt 4 Power / Charging
    Mouse
    Buttonless Glass Precision Touchpad
    Keyboard
    Backlit, spill resistant keyboard
    Internet Speed
    1Gb Up / 1Gb Down
    Browser
    Edge
    Antivirus
    Windows Defender
    Other Info
    WiFi 6e / Bluetooth 5.1 / Facial Recognition / Fingerprint Sensor / ToF (Time of Flight) Human Presence Sensor
@robra, thanks to your questions I have found some new information:

The chart that I have been providing to you comes from here:


Now, take a look at this article and the chart that they provide:


Notice that there is now an item 27 and 28.

That article was updated Dec 5, 2023, so it would appear to have some very new information. I'll have to review this but I don't know how quickly I can get to this. I'll update you again once I have had a chance to review this.
 

My Computers

System One System Two

  • OS
    Win11 Pro 23H2
    Computer type
    PC/Desktop
    Manufacturer/Model
    Home Built
    CPU
    Intel i7-11700K
    Motherboard
    ASUS Prime Z590-A
    Memory
    128GB Crucial Ballistix 3200MHz DRAM
    Graphics Card(s)
    No GPU - CPU graphics only (for now)
    Sound Card
    Realtek (on motherboard)
    Monitor(s) Displays
    HP Envy 32
    Screen Resolution
    2560 x 1440
    Hard Drives
    1 x 1TB NVMe Gen 4 x 4 SSD
    1 x 2TB NVMe Gen 3 x 4 SSD
    2 x 512GB 2.5" SSDs
    2 x 8TB HD
    PSU
    Corsair HX850i
    Case
    Corsair iCue 5000X RGB
    Cooling
    Noctua NH-D15 chromax.black cooler + 10 case fans
    Keyboard
    CODE backlit mechanical keyboard
    Mouse
    Logitech MX Master 3
    Internet Speed
    1Gb Up / 1 Gb Down
    Browser
    Edge
    Antivirus
    Windows Defender
    Other Info
    Additional options installed:
    WiFi 6E PCIe adapter
    ASUS ThunderboltEX 4 PCIe adapter
  • Operating System
    Win11 Pro 23H2
    Computer type
    Laptop
    Manufacturer/Model
    Lenovo ThinkBook 13x Gen 2
    CPU
    Intel i7-1255U
    Memory
    16 GB
    Graphics card(s)
    Intel Iris Xe Graphics
    Sound Card
    Realtek® ALC3306-CG codec
    Monitor(s) Displays
    13.3-inch IPS Display
    Screen Resolution
    WQXGA (2560 x 1600)
    Hard Drives
    2 TB 4 x 4 NVMe SSD
    PSU
    USB-C / Thunderbolt 4 Power / Charging
    Mouse
    Buttonless Glass Precision Touchpad
    Keyboard
    Backlit, spill resistant keyboard
    Internet Speed
    1Gb Up / 1Gb Down
    Browser
    Edge
    Antivirus
    Windows Defender
    Other Info
    WiFi 6e / Bluetooth 5.1 / Facial Recognition / Fingerprint Sensor / ToF (Time of Flight) Human Presence Sensor
Okay, I have had a chance to look over that new article. This was extremely enlightening.

They are FINALLY addressing a couple of bugs, or at least items I never found documented, that I had to figure out via research on my own. But they have also added one more small detail that I was unaware of previously. So, expect me to go radio silent as I test, then update my procedures, batch files, and program to incorporate all of these changes.

Thanks again for asking the questions that allowed me to stumble upon all of this!
 

My Computers

System One System Two

  • OS
    Win11 Pro 23H2
    Computer type
    PC/Desktop
    Manufacturer/Model
    Home Built
    CPU
    Intel i7-11700K
    Motherboard
    ASUS Prime Z590-A
    Memory
    128GB Crucial Ballistix 3200MHz DRAM
    Graphics Card(s)
    No GPU - CPU graphics only (for now)
    Sound Card
    Realtek (on motherboard)
    Monitor(s) Displays
    HP Envy 32
    Screen Resolution
    2560 x 1440
    Hard Drives
    1 x 1TB NVMe Gen 4 x 4 SSD
    1 x 2TB NVMe Gen 3 x 4 SSD
    2 x 512GB 2.5" SSDs
    2 x 8TB HD
    PSU
    Corsair HX850i
    Case
    Corsair iCue 5000X RGB
    Cooling
    Noctua NH-D15 chromax.black cooler + 10 case fans
    Keyboard
    CODE backlit mechanical keyboard
    Mouse
    Logitech MX Master 3
    Internet Speed
    1Gb Up / 1 Gb Down
    Browser
    Edge
    Antivirus
    Windows Defender
    Other Info
    Additional options installed:
    WiFi 6E PCIe adapter
    ASUS ThunderboltEX 4 PCIe adapter
  • Operating System
    Win11 Pro 23H2
    Computer type
    Laptop
    Manufacturer/Model
    Lenovo ThinkBook 13x Gen 2
    CPU
    Intel i7-1255U
    Memory
    16 GB
    Graphics card(s)
    Intel Iris Xe Graphics
    Sound Card
    Realtek® ALC3306-CG codec
    Monitor(s) Displays
    13.3-inch IPS Display
    Screen Resolution
    WQXGA (2560 x 1600)
    Hard Drives
    2 TB 4 x 4 NVMe SSD
    PSU
    USB-C / Thunderbolt 4 Power / Charging
    Mouse
    Buttonless Glass Precision Touchpad
    Keyboard
    Backlit, spill resistant keyboard
    Internet Speed
    1Gb Up / 1Gb Down
    Browser
    Edge
    Antivirus
    Windows Defender
    Other Info
    WiFi 6e / Bluetooth 5.1 / Facial Recognition / Fingerprint Sensor / ToF (Time of Flight) Human Presence Sensor
Thanks for your response. When I went to that newer article my eyes immediately went to the 2 steps added to the "new media" column. This really is a moving target! :oops:

Also, in that table, I see they have now changed the column order so that the install.wim updates are to occur PRIOR to the boot.wim updates.

I have a much better idea now what is needed on the new media piece. I think that I need to start getting more sleep.

I'm much more comfortable with using the most recent update on the cumulative updates. Having said that, I was hoping that you could give me your take on the .NET Framework updates. The 2 Classifications there are Security Updates and Updates. Am I correct that the latest of each should be included? If that is the case, in the listing of updates below, I can see that Security Update dated 1/9/2024 should be included. However, there are 2 Updates both dated 10/31/2023. Which of those should be used?

2024-01 Cumulative Update for .NET Framework 3.5 and 4.8.1 for Windows 11, version 23H2 for x64 (KB5033920) Windows 11 Security Updates 1/9/2024 60.9 MB
2023-11 Cumulative Update for .NET Framework 3.5 and 4.8.1 for Windows 11, version 23H2 for x64 (KB5032007) Windows 11 Security Updates 11/14/2023 60.5 MB
2023-10 Cumulative Update for .NET Framework 3.5 and 4.8.1 for Windows 11, version 23H2 for x64 (KB5030651) Windows 11 Updates 10/31/2023 60.6 MB
2023-10 Cumulative Update for .NET Framework 3.5 and 4.8.1 for Windows 11, version 23H2 for x64 (KB5031324) Windows 11 Updates 10/31/2023 60.6 MB
2023-09 Cumulative Update for .NET Framework 3.5 and 4.8.1 for Windows 11, version 23H2 for x64 (KB5029921) Windows 11 Security Updates 10/31/2023 60.6 MB
2023-09 Cumulative Update for .NET Framework 3.5 and 4.8.1 for Windows 11, version 23H2 for x64 (KB5031086) Windows 11 Security Updates 10/31/2023 60.6 MB

I see the LCU ((Latest Cumulative Update) term being used in various places. Just so I'm clear is that referring to the title that begins with "Cumulative Update for Windows 11" with the classification of "Security Updates"?

There is no huge rush from my end at this point. The short term actions that I'll be working on are to update my BIOS prior to installing 11, addressing any settings issues that arise from that, installing ADK and WinPE, and setting up the file folders as you've suggested. From there I can probably start incorporating the updates prior to the New Media column.

Thanks again,
Bob
 

My Computer

System One

  • OS
    Windows 10 Pro
    Computer type
    PC/Desktop
    Manufacturer/Model
    ASUS
    CPU
    AMD 5900X
    Motherboard
    ASUS TUF Gaming X570-PRO (WiFi 6) AM4 Zen 3 Ryzen 5000 & 3rd Gen Ryzen ATX Motherboard (PCIe 4.0, 2.5Gb LAN, BIOS Flashback, HDMI 2.1, USB 3.2 Gen 2
    Memory
    G.SKILL Trident Z Neo (For AMD Ryzen) Series 32GB (2 x 16GB) 288-Pin RGB DDR4 SDRAM DDR4 3600 (PC4 28800) Desktop Memory Model F4-3600C16D-32GTZN
    Graphics Card(s)
    NVIDIA GeForce GTX750 Ti
    Sound Card
    Realtek (on motherboard)
    Monitor(s) Displays
    Acer CZ350CK, Wasabi Mango QHD275 Supreme
    Screen Resolution
    3440 x 1440, 2560 x 1440
    Hard Drives
    1 TB Western Digital SN850 Gen 4 x 4 NVMe
    128GB Crucial CT128M4SSD1 2.5" SSD
    1TB Seagate Barracuda ST1000DM003-9YN162 HD
    16TB Western Digital WD161KRYZ-01AGBB0 HD
    PSU
    EVGA SuperNOVA 750 GT, 80 Plus Gold 750W
    Case
    Phanteks Eclipse P500A
    Cooling
    be quiet! 250W TDP Dark Rock Pro 4
    Keyboard
    Logitech
    Mouse
    IBM
    Internet Speed
    1Gbps
    Browser
    Firefox
    Antivirus
    Malwarebytes
Bob, the order in which those are updated (the main install.wim and the boot.wim) don't really matter.

In the end, what matters is that both of them get updated. I can see why they list it that way now, but it won't make a difference.

I'm working on updating my procedures and my program to reflect the changes. They seem simple, but it's a lot of work :-)
 

My Computers

System One System Two

  • OS
    Win11 Pro 23H2
    Computer type
    PC/Desktop
    Manufacturer/Model
    Home Built
    CPU
    Intel i7-11700K
    Motherboard
    ASUS Prime Z590-A
    Memory
    128GB Crucial Ballistix 3200MHz DRAM
    Graphics Card(s)
    No GPU - CPU graphics only (for now)
    Sound Card
    Realtek (on motherboard)
    Monitor(s) Displays
    HP Envy 32
    Screen Resolution
    2560 x 1440
    Hard Drives
    1 x 1TB NVMe Gen 4 x 4 SSD
    1 x 2TB NVMe Gen 3 x 4 SSD
    2 x 512GB 2.5" SSDs
    2 x 8TB HD
    PSU
    Corsair HX850i
    Case
    Corsair iCue 5000X RGB
    Cooling
    Noctua NH-D15 chromax.black cooler + 10 case fans
    Keyboard
    CODE backlit mechanical keyboard
    Mouse
    Logitech MX Master 3
    Internet Speed
    1Gb Up / 1 Gb Down
    Browser
    Edge
    Antivirus
    Windows Defender
    Other Info
    Additional options installed:
    WiFi 6E PCIe adapter
    ASUS ThunderboltEX 4 PCIe adapter
  • Operating System
    Win11 Pro 23H2
    Computer type
    Laptop
    Manufacturer/Model
    Lenovo ThinkBook 13x Gen 2
    CPU
    Intel i7-1255U
    Memory
    16 GB
    Graphics card(s)
    Intel Iris Xe Graphics
    Sound Card
    Realtek® ALC3306-CG codec
    Monitor(s) Displays
    13.3-inch IPS Display
    Screen Resolution
    WQXGA (2560 x 1600)
    Hard Drives
    2 TB 4 x 4 NVMe SSD
    PSU
    USB-C / Thunderbolt 4 Power / Charging
    Mouse
    Buttonless Glass Precision Touchpad
    Keyboard
    Backlit, spill resistant keyboard
    Internet Speed
    1Gb Up / 1Gb Down
    Browser
    Edge
    Antivirus
    Windows Defender
    Other Info
    WiFi 6e / Bluetooth 5.1 / Facial Recognition / Fingerprint Sensor / ToF (Time of Flight) Human Presence Sensor
Status Update:

Bob, I'll get you some updated docs soon (likely tomorrow) as well as an updated version of my program. I've been hammering everything and testing it, and all is working well. Here is a summary of the changes based upon that latest information from Microsoft:

1) The latest Microsoft info indicates that there may be rare instances where a Standalone SSSU (Serving Stack Update) may be released. Normally, the SSU update is bundled with the Latest Cumulative Update (LCU). I have never seen the SSU as a standalone update, at least not since Microsoft started combining the two a couple years ago. However, this was super easy to implement, and my program handles it now. The only change for the user is that along with all the folders created currently for Windows updates, you should create one additional folder called "SSU". Note that this is only necessary if a Standalone SSU is actually released. Not having that folder in place will not hurt anything.

2) After updating all the components of Windows, there is a procedure for syncing files between the Windows PE image and the base installation (files outside of any WIM) because certain files need to match each other. From the latest Microsoft docs, I found that there is one more file that needs to be synced that I was not previously aware of. Again, this was easy to implement.

3) The latest Microsoft procedure swaps the order in which the boot.wim and the install.wim are updated. After looking into this, I can see that this makes no material difference to the outcome, so no change was needed to accommodate this.
 

My Computers

System One System Two

  • OS
    Win11 Pro 23H2
    Computer type
    PC/Desktop
    Manufacturer/Model
    Home Built
    CPU
    Intel i7-11700K
    Motherboard
    ASUS Prime Z590-A
    Memory
    128GB Crucial Ballistix 3200MHz DRAM
    Graphics Card(s)
    No GPU - CPU graphics only (for now)
    Sound Card
    Realtek (on motherboard)
    Monitor(s) Displays
    HP Envy 32
    Screen Resolution
    2560 x 1440
    Hard Drives
    1 x 1TB NVMe Gen 4 x 4 SSD
    1 x 2TB NVMe Gen 3 x 4 SSD
    2 x 512GB 2.5" SSDs
    2 x 8TB HD
    PSU
    Corsair HX850i
    Case
    Corsair iCue 5000X RGB
    Cooling
    Noctua NH-D15 chromax.black cooler + 10 case fans
    Keyboard
    CODE backlit mechanical keyboard
    Mouse
    Logitech MX Master 3
    Internet Speed
    1Gb Up / 1 Gb Down
    Browser
    Edge
    Antivirus
    Windows Defender
    Other Info
    Additional options installed:
    WiFi 6E PCIe adapter
    ASUS ThunderboltEX 4 PCIe adapter
  • Operating System
    Win11 Pro 23H2
    Computer type
    Laptop
    Manufacturer/Model
    Lenovo ThinkBook 13x Gen 2
    CPU
    Intel i7-1255U
    Memory
    16 GB
    Graphics card(s)
    Intel Iris Xe Graphics
    Sound Card
    Realtek® ALC3306-CG codec
    Monitor(s) Displays
    13.3-inch IPS Display
    Screen Resolution
    WQXGA (2560 x 1600)
    Hard Drives
    2 TB 4 x 4 NVMe SSD
    PSU
    USB-C / Thunderbolt 4 Power / Charging
    Mouse
    Buttonless Glass Precision Touchpad
    Keyboard
    Backlit, spill resistant keyboard
    Internet Speed
    1Gb Up / 1Gb Down
    Browser
    Edge
    Antivirus
    Windows Defender
    Other Info
    WiFi 6e / Bluetooth 5.1 / Facial Recognition / Fingerprint Sensor / ToF (Time of Flight) Human Presence Sensor
It does sound like you're keeping yourself plenty busy. ;-)

Your instructions must be pretty good because I was able to create the Installation WinPE. I booted it up and it wants to install Windows 11! I haven't slipstreamed any updates to it yet. It was just sort of a dry run to see if I was able to set it up correctly. I also created the bootable WinPE that doesn't include the installation setup (using ADK).

On a side note, I don't seem to be able to find my LAN driver in the boot.wim (looked in both index 1 and index 2) or in the install.wim in the installation ISO. I also couldn't find it in the boot.wim from ADK. Also, when I was booted to the Win 11 WinPE USB from ADK today I was not able to connect to my network and I have always been able to connect with previous WinPE versions (Win 7 & Win 10).

I did some googling and found lots of complaints about connection loss with our I225-V LAN specifically when going to Windows 11. From what I've read previously, it took Intel 3 revisions in Windows 10 to get it right so maybe they still don't have it right?

Anyway, I went out and looked at LAN driver revisions available from both Intel and ASUS for both your and my MBs and this is what I found:

Bob's LAN - Intel I225-V (revision 3) - Compatible ID in Device Manager (PCI\VEN_8086&DEV_15F3&REV_03)
- MB: ASUS TUF Gaming X570-PRO (WiFi 6) (FYI - my CPU is AMD)

Bob - driver installed on current Windows 10 ASUS
- Intel LAN driver e2f68 version 1.0.2.8 dated 11/8/2020
- 10.0.1..17763 applicable OS range referenced in inf file

- latest driver available from ASUS website for my LAN
- e2fn version 2.1.3.3 dated 2/9/2023 (notice that I've apparently been switched from my current e2F68 to e2fn)
- NTamd64.10.0...21390 applicable OS range referenced in inf file

- latest driver available from Intel website for my LAN
- e2fn version 2.1.4.2 dated 10/3/2023 (NOTE: in driver zip file from Intel website it states that e2fn is for Windows 11)
- NTamd64.10.0.1..22000 applicable OS range referenced in inf file


hsehestedt Z590-A MB: latest LAN driver available on ASUS website
- e2f version 1.1.4.38 dated 2/9/2023 (NOTE: in driver zip file from Intel website it states that e2f is for Windows 10)
- NTamd64.10.0.1..17763 applicable OS range referenced in inf file

------------------------------------------------
Pertinent Windows Builds:
17763 (Win 10 Redstone 5 version 1809)
21390 (maybe a late Win 10? because I believe 1st Win 11 was 22000)
22000 (Win 11 21H2)
22361 (Win 11 23H2)

Which driver are you running for your I225-V? If I'm interpreting this correctly there is no LAN driver for I225-V that has been updated to use on Win 11 23H2. Should I be worried? Do I need to modify my inf file to incorporate Build 22361?

Thanks,
Bob
 
Last edited:

My Computer

System One

  • OS
    Windows 10 Pro
    Computer type
    PC/Desktop
    Manufacturer/Model
    ASUS
    CPU
    AMD 5900X
    Motherboard
    ASUS TUF Gaming X570-PRO (WiFi 6) AM4 Zen 3 Ryzen 5000 & 3rd Gen Ryzen ATX Motherboard (PCIe 4.0, 2.5Gb LAN, BIOS Flashback, HDMI 2.1, USB 3.2 Gen 2
    Memory
    G.SKILL Trident Z Neo (For AMD Ryzen) Series 32GB (2 x 16GB) 288-Pin RGB DDR4 SDRAM DDR4 3600 (PC4 28800) Desktop Memory Model F4-3600C16D-32GTZN
    Graphics Card(s)
    NVIDIA GeForce GTX750 Ti
    Sound Card
    Realtek (on motherboard)
    Monitor(s) Displays
    Acer CZ350CK, Wasabi Mango QHD275 Supreme
    Screen Resolution
    3440 x 1440, 2560 x 1440
    Hard Drives
    1 TB Western Digital SN850 Gen 4 x 4 NVMe
    128GB Crucial CT128M4SSD1 2.5" SSD
    1TB Seagate Barracuda ST1000DM003-9YN162 HD
    16TB Western Digital WD161KRYZ-01AGBB0 HD
    PSU
    EVGA SuperNOVA 750 GT, 80 Plus Gold 750W
    Case
    Phanteks Eclipse P500A
    Cooling
    be quiet! 250W TDP Dark Rock Pro 4
    Keyboard
    Logitech
    Mouse
    IBM
    Internet Speed
    1Gbps
    Browser
    Firefox
    Antivirus
    Malwarebytes
Bob, I'm using the latest driver from ASUS. If I recall correctly, when I used the generic driver from Intel, I was having difficulty getting Wake On LAN to work correctly, but that works just fine using the driver from ASUS.

BTW, Windows 10 drivers work just fine on Windows 11. There is no need for new drivers when going to Windows 11.

TIP: If you have Windows 10 running on a machine with all your drivers installed. Simply export the drivers from Windows 10, then, after you install Windows 11, import the drivers back in. That way you will have all your drivers without having to install then one by one. Here is how:

On Windows create a folder to store all your drivers. Use whatever you like, but in this example, I created a folder called C:\Drivers_Backup

Open an elevated command prompt and run this command:

pnputil /export-driver * C:\Drivers_Backup

That is all for the exporting - very easy. Now, just save that folder to someplace safe that you can access after you install Windows 11. A thumb drive or external hard drive would be a good place for this.

After you install Windows 11, import all your drivers back in again. In this example, I have put that folder created above onto a thumb drive as D:\Drivers_Backup

Run this command from an elevated command prompt:

pnputil /add-driver *.inf /subdirs /install

Note: This will likely take a few minutes and the screen may flash or temporarily go blank at the point where the display driver is being installed. This is normal. Be patient and allow the drivers to finish installing.

That's it! A really easy way to backup your drivers in Win 10 and reinstall them after you install Win 11.
 

My Computers

System One System Two

  • OS
    Win11 Pro 23H2
    Computer type
    PC/Desktop
    Manufacturer/Model
    Home Built
    CPU
    Intel i7-11700K
    Motherboard
    ASUS Prime Z590-A
    Memory
    128GB Crucial Ballistix 3200MHz DRAM
    Graphics Card(s)
    No GPU - CPU graphics only (for now)
    Sound Card
    Realtek (on motherboard)
    Monitor(s) Displays
    HP Envy 32
    Screen Resolution
    2560 x 1440
    Hard Drives
    1 x 1TB NVMe Gen 4 x 4 SSD
    1 x 2TB NVMe Gen 3 x 4 SSD
    2 x 512GB 2.5" SSDs
    2 x 8TB HD
    PSU
    Corsair HX850i
    Case
    Corsair iCue 5000X RGB
    Cooling
    Noctua NH-D15 chromax.black cooler + 10 case fans
    Keyboard
    CODE backlit mechanical keyboard
    Mouse
    Logitech MX Master 3
    Internet Speed
    1Gb Up / 1 Gb Down
    Browser
    Edge
    Antivirus
    Windows Defender
    Other Info
    Additional options installed:
    WiFi 6E PCIe adapter
    ASUS ThunderboltEX 4 PCIe adapter
  • Operating System
    Win11 Pro 23H2
    Computer type
    Laptop
    Manufacturer/Model
    Lenovo ThinkBook 13x Gen 2
    CPU
    Intel i7-1255U
    Memory
    16 GB
    Graphics card(s)
    Intel Iris Xe Graphics
    Sound Card
    Realtek® ALC3306-CG codec
    Monitor(s) Displays
    13.3-inch IPS Display
    Screen Resolution
    WQXGA (2560 x 1600)
    Hard Drives
    2 TB 4 x 4 NVMe SSD
    PSU
    USB-C / Thunderbolt 4 Power / Charging
    Mouse
    Buttonless Glass Precision Touchpad
    Keyboard
    Backlit, spill resistant keyboard
    Internet Speed
    1Gb Up / 1Gb Down
    Browser
    Edge
    Antivirus
    Windows Defender
    Other Info
    WiFi 6e / Bluetooth 5.1 / Facial Recognition / Fingerprint Sensor / ToF (Time of Flight) Human Presence Sensor
I have read back through all of the posts and documentation that you have provided and I'm ready to rollup my sleeves and get going!

That sounds lick a slick feature to be able to export drivers from Windows 10. I will definitely do that. My dilemma is that although I'm a pretty big proponent of if it ain't broke don't fix it, in this case, my current Win 10 drivers are the original drivers from when I built this PC 2 1/2 years ago. Part of me thinks that it may be time to update them. I'm definitely going to export them though (I'll try it on 2008 R2 also if it will work there).

I'm really close to getting down to the nitty gritty so let me throw a few final questions at you:

1) When we refer to the LCU are we talking about the cum "Security Update" or are we talking about the cum "Update"? I'm confused about if the two are different or do I just take whichever of the two is the latest.

2) I'm finalizing the list of updates to include in the installation but there are 2 cum "Updates" for .NET Framework 3.5 and 4.8.1 but they both have release dates of 10/31/2023 (KB5030651 and KB5031324). Should I include both? This will give me a grand total of 7 or 8 updates depending on how many of these 2 that I include. In looking back at the pdf write-up that you provided I see that you didn't highlight either one of these .NET Framework "Updates". Am I making a mistake by differentiating between "Update" and "Security Update"? I am also planning to include .NET Framework "Security Update" KB5033920 released on 1/9/2024.

3) Do you have any recommendations for preventing bloatware during installation? I really like the idea of starting out skinny and if I want it I'll add it later.

4) On a subtopic of bloatware, after installation, I plan to install MS Office 2021 and would like to prevent installation of Office 365 during Win 11 installation, if possible.

5) I believe that I'm going to take your earlier recommendation to either manually install drivers after installation (or import the drivers from Win 10 that I exported) so if I'm correct that my network driver is not included in the boot.wim then I'll be performing the installation offline. I read somewhere that installing offline is sometimes recommended if you want to set up users locally anyway. Any thoughts on this?

6) Will any of the media creation steps be done from Deployment Servicing and Management tool? If I recall correctly, your instructions have me doing everything from a regular elevated command prompt or Powershell.

7) Currently, I do NOT have Virtualization enabled in my BIOS. It sounds like it may be a good idea to enable it. My AMD CPU is 12 core/24 threads. Do you think that enabling Virtualization is beneficial?

Thanks,
Bob
 

My Computer

System One

  • OS
    Windows 10 Pro
    Computer type
    PC/Desktop
    Manufacturer/Model
    ASUS
    CPU
    AMD 5900X
    Motherboard
    ASUS TUF Gaming X570-PRO (WiFi 6) AM4 Zen 3 Ryzen 5000 & 3rd Gen Ryzen ATX Motherboard (PCIe 4.0, 2.5Gb LAN, BIOS Flashback, HDMI 2.1, USB 3.2 Gen 2
    Memory
    G.SKILL Trident Z Neo (For AMD Ryzen) Series 32GB (2 x 16GB) 288-Pin RGB DDR4 SDRAM DDR4 3600 (PC4 28800) Desktop Memory Model F4-3600C16D-32GTZN
    Graphics Card(s)
    NVIDIA GeForce GTX750 Ti
    Sound Card
    Realtek (on motherboard)
    Monitor(s) Displays
    Acer CZ350CK, Wasabi Mango QHD275 Supreme
    Screen Resolution
    3440 x 1440, 2560 x 1440
    Hard Drives
    1 TB Western Digital SN850 Gen 4 x 4 NVMe
    128GB Crucial CT128M4SSD1 2.5" SSD
    1TB Seagate Barracuda ST1000DM003-9YN162 HD
    16TB Western Digital WD161KRYZ-01AGBB0 HD
    PSU
    EVGA SuperNOVA 750 GT, 80 Plus Gold 750W
    Case
    Phanteks Eclipse P500A
    Cooling
    be quiet! 250W TDP Dark Rock Pro 4
    Keyboard
    Logitech
    Mouse
    IBM
    Internet Speed
    1Gbps
    Browser
    Firefox
    Antivirus
    Malwarebytes
1) LCU = Latest Cumulative Update. The LCU includes not only fixes and possibly feature enhancements but also the security updates. Note that on the 4th Tuesday of the month, when the "Preview" version of the LCU is released, this contains everything EXCEPT for the security updates.

2) You do not want either of those updates. Those are from October of 2023. Bear in mind that since these are cumulative updates, you only want the very latest version. In this case, the latest .NET update for Windows 11, 23H2 is KB5033920 dated January 9, 2024.

Image1.jpg


Here is a thought: For the next several months, until you get a good feel for this, why don't I provide you a list of all the latest updates that I am using. You can make your own list and then compare it to what I have to see if you came to the same conclusions that I did.

So as of now (January 20, 2024), here is my list of Windows 11 updates:

LCU - KB5034123
Safe OS Dynamic Update - KB5034234
Setup Dynamic Update - KB5033205
Standalone SSU (Servicing Stack Update) - None Available
Other - KB5033920 (.Net Update), KB5033055 (OOBE ZDP Update), KB5033204 (Another OOBE ZDP Update)

This Tuesday (Jan 23, 2024) will see the release of the preview updates. Normally, a "Preview" LCU and .NET update is released on that 4th Tuesday of the month. You can skip these if you like, but I'm more than happy to update you with what KBs to grab on that day should you wish to do so.

3) Yes! This is one of my favorite tricks, I use this now every time I install Windows:


4) Office 365 does not get installed during installation of Windows. Only a "placeholder" icon is installed which you can simply right-click on and choose "uninstall". I don't recall if it still gets placed on your system if you try the trick in #3 above. Try it and see what happens!

5) I'm a bit surprised that your Intel adapter is not working after a clean install. On my system, it works just fine, but I still install the latest driver from ASUS by importing my previously backed up drivers. As for setting up a local user account, there are several ways to that. My personal preference is to use an unattended answer file. Normally, you would use an unattended answer file to perform a completly unattended installation of Windows. However, if you prefer to do a manual installation, you can use a very minimal answer file that does nothing but create a local user account for you automatically. If you have any preference, let me know. I can provide to you the steps to do this manually or I can provide a copy of the answer file that I use. Of course, if you would like to see both, I can do that as well so that you can pick and choose or experiment as you see fit.

6) The actual creation of the media does not need the windows ADK. The only exception might be that if you want to use the Microsoft OSCDIMG utility to create the final ISO image, that utility is installed with the ADK.

7) As for virtualization, if you don't plan to do anything involving virtualization, you could certainly leave it off. However, I know that in Windows 11 especially, the OS tries to use virtualization for some things to help protect system components, so it still might be a good idea to enable it, but it is not strictly necessary. I do a lot of stuff with Hyper-V. To me, it is an indispensible tool for testing a lot of things like the very items we are discussing here. So I always enable virtualization on all of my systems.

Final Thoughts:

I know that you said that you don't do anything with virtualization. However, if you have the Pro edition of Win 10 or 11, you might want to consider diving into that at some point. Once you have done it a couple of times it becomes second nature and it is absolutely invaluable for testing stuff like this. One of the best things about setting up a Virtual Machine is that you can create "checkpoints" at any time. You can then do about anything you want in the VM, even screw it up royally, and just revert right back to the checkpoint to undo whatever you did. That allows you to freely experiment without having to reinstall from scratch repeatedly. I could no longer live without it :-).

Any more questions? Fire away! I'm here to help as much as you need.
 

My Computers

System One System Two

  • OS
    Win11 Pro 23H2
    Computer type
    PC/Desktop
    Manufacturer/Model
    Home Built
    CPU
    Intel i7-11700K
    Motherboard
    ASUS Prime Z590-A
    Memory
    128GB Crucial Ballistix 3200MHz DRAM
    Graphics Card(s)
    No GPU - CPU graphics only (for now)
    Sound Card
    Realtek (on motherboard)
    Monitor(s) Displays
    HP Envy 32
    Screen Resolution
    2560 x 1440
    Hard Drives
    1 x 1TB NVMe Gen 4 x 4 SSD
    1 x 2TB NVMe Gen 3 x 4 SSD
    2 x 512GB 2.5" SSDs
    2 x 8TB HD
    PSU
    Corsair HX850i
    Case
    Corsair iCue 5000X RGB
    Cooling
    Noctua NH-D15 chromax.black cooler + 10 case fans
    Keyboard
    CODE backlit mechanical keyboard
    Mouse
    Logitech MX Master 3
    Internet Speed
    1Gb Up / 1 Gb Down
    Browser
    Edge
    Antivirus
    Windows Defender
    Other Info
    Additional options installed:
    WiFi 6E PCIe adapter
    ASUS ThunderboltEX 4 PCIe adapter
  • Operating System
    Win11 Pro 23H2
    Computer type
    Laptop
    Manufacturer/Model
    Lenovo ThinkBook 13x Gen 2
    CPU
    Intel i7-1255U
    Memory
    16 GB
    Graphics card(s)
    Intel Iris Xe Graphics
    Sound Card
    Realtek® ALC3306-CG codec
    Monitor(s) Displays
    13.3-inch IPS Display
    Screen Resolution
    WQXGA (2560 x 1600)
    Hard Drives
    2 TB 4 x 4 NVMe SSD
    PSU
    USB-C / Thunderbolt 4 Power / Charging
    Mouse
    Buttonless Glass Precision Touchpad
    Keyboard
    Backlit, spill resistant keyboard
    Internet Speed
    1Gb Up / 1Gb Down
    Browser
    Edge
    Antivirus
    Windows Defender
    Other Info
    WiFi 6e / Bluetooth 5.1 / Facial Recognition / Fingerprint Sensor / ToF (Time of Flight) Human Presence Sensor

Latest Support Threads

Back
Top Bottom