Installation and Upgrade WinPE - Create a Custom Windows Install USB


Win11USB Banner.png

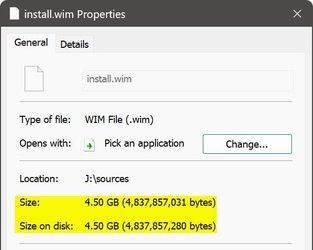
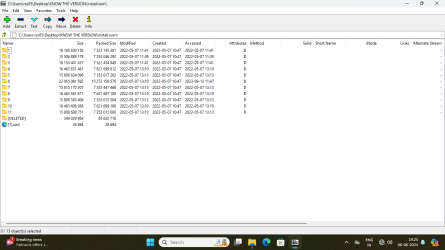
As you all (should) already know, Windows Setup's install.wim file is growing with each new feature upgrade. It's coming close and soon going over the 4 GB size limit of a FAT32 formatted install media. Today, as I write this, (22-FEB-2022), downloading WIM-based most current public release install media as told here in Shawn Brink's tutorial, the install.wim file is 4.5 GB (UK English Windows 11).

There’s nothing in the UEFI specifications that prevents booting a computer from an NTFS formatted USB flash drive. In fact, this so-called limitation is entirely artificial, caused by the single fact that manufacturer has not included correct drivers in UEFI. Luckily, most modern computers can boot from a single-partition NTFS formatted USB flash drive, and install Windows 11 from a single partition USB media containing WIM image larger than 4 GB (maximum file size on FAT32 media).

But, what to do if the WIM file is over 4 GB, and your computer cannot boot from an NTFS formatted media?

This tutorial will show how to create a USB flash drive containing a FAT32 formatted WinPE partition, and a bigger NTFS formatted Windows Setup partition. When computer is booted from this USB flash drive, the WinPE partition takes care of boot, then runs Windows Setup from bigger setup partition on same USB.

The whole process takes 10 to 20 minutes, but only needs to be done once. In the future, the Windows Setup files on USB can be replaced with newer version of Windows 11.


Contents

Use links to jump to any part, browser back button to return to this table


Part One:Create WinPE
Part Two:Edit WinPE boot.wim
Part Three:Make WinPE ISO
Part Four:Partition USB flash drive
Part Five:Create bootable USB install media

Please notice: I have prepared a custom WinPE ISO image for you. You can download it from my OneDrive: WinPEx64.iso. File size is 474 MB.

Parts One, Two and Three in this tutorial will show how I edited and customized this WinPE image, and are intended to those users who want to learn how to do it by themselves.

Short: if you want to make this easy, download the provided WinPE ISO, and start from Part Four, and you are done in three minutes.


Part One

Create WinPE


1.1 Download and install both Windows 11 ADK (Assessment and Deployment Kit), and Windows PE add-on for the ADK, installing ADK first:

Download ADK.jpg

(Click screenshot thumbnails to open images enlarged.)

1.2 When installing ADK, for purpose of this tutorial, you will only need the Deployment Tools module. Unselecting everything else, download size is less than 100 MB:

ADK Install.jpg


1.3 When both ADK and WinPE add-on have been installed, open an elevated ADK Deployment and Imaging Tools Environment, a special mode of Command Prompt. You will find it in Start > All Apps > W > Windows Kits:

Run Tool.jpg


1.4 The prompt is quite long. Shorten it by jumping to root of the drive where ADK was installed with command cd \ (#1 in next screenshot)

1.5 Create 64-bit WinPE files with following command (#2 in next screenshot), where folder D:\WPEx64 is the folder where WinPE files will be created. Folder will be created automatically, it does not need to exist:

copype amd64 D:\WPEx64

Create PE Folder.jpg


For 32-bit WinPE, the command is as follows:

copype x86 D:\WPEx86


Part Two

Edit WinPE boot.wim


2.1 Depending on which bit architecture you selected, either folder D:\WPEx86 or D:\WPEx64 now contains all files and folders to create a WinPE ISO.

2.2 To edit it, we must mount WinPE boot.wim file for offline servicing. First, create a mount point folder. In this example, I made a folder C:\Mount. Open an elevated PowerShell, and enter following command to mount boot.wim:

Mount-WindowsImage -ImagePath D:\WPEx64\Media\Sources\boot.wim -Index 1 -Path C:\Mount

Change -ImagePath folder WPEx64 to WPEx32 if working with 32-bit WinPE.

2.3 Folder C:\Mount now contains WinPE image, and we can edit it. First thing I made when editing the provided custom WinPE image, I added PowerShell support. By default, WinPE does not support PowerShell.

To enable PowerShell in WinPE, copy and paste the following commands to elevated PowerShell:. Notice that you can copy all commands at once, and paste them all to elevated PowerShell, which will then run them one by one:

Code:
Dism /Add-Package /Image:"C:\Mount" /PackagePath:"C:\Program Files (x86)\Windows Kits\10\Assessment and Deployment Kit\Windows Preinstallation Environment\amd64\WinPE_OCs\WinPE-WMI.cab"
Dism /Add-Package /Image:"C:\Mount" /PackagePath:"C:\Program Files (x86)\Windows Kits\10\Assessment and Deployment Kit\Windows Preinstallation Environment\amd64\WinPE_OCs\en-us\WinPE-WMI_en-us.cab"
Dism /Add-Package /Image:"C:\Mount" /PackagePath:"C:\Program Files (x86)\Windows Kits\10\Assessment and Deployment Kit\Windows Preinstallation Environment\amd64\WinPE_OCs\WinPE-NetFX.cab"
Dism /Add-Package /Image:"C:\Mount" /PackagePath:"C:\Program Files (x86)\Windows Kits\10\Assessment and Deployment Kit\Windows Preinstallation Environment\amd64\WinPE_OCs\en-us\WinPE-NetFX_en-us.cab"
Dism /Add-Package /Image:"C:\Mount" /PackagePath:"C:\Program Files (x86)\Windows Kits\10\Assessment and Deployment Kit\Windows Preinstallation Environment\amd64\WinPE_OCs\WinPE-Scripting.cab"
Dism /Add-Package /Image:"C:\Mount" /PackagePath:"C:\Program Files (x86)\Windows Kits\10\Assessment and Deployment Kit\Windows Preinstallation Environment\amd64\WinPE_OCs\en-us\WinPE-Scripting_en-us.cab"
Dism /Add-Package /Image:"C:\Mount" /PackagePath:"C:\Program Files (x86)\Windows Kits\10\Assessment and Deployment Kit\Windows Preinstallation Environment\amd64\WinPE_OCs\WinPE-PowerShell.cab"
Dism /Add-Package /Image:"C:\Mount" /PackagePath:"C:\Program Files (x86)\Windows Kits\10\Assessment and Deployment Kit\Windows Preinstallation Environment\amd64\WinPE_OCs\en-us\WinPE-PowerShell_en-us.cab"
Dism /Add-Package /Image:"C:\Mount" /PackagePath:"C:\Program Files (x86)\Windows Kits\10\Assessment and Deployment Kit\Windows Preinstallation Environment\amd64\WinPE_OCs\WinPE-StorageWMI.cab"
Dism /Add-Package /Image:"C:\Mount" /PackagePath:"C:\Program Files (x86)\Windows Kits\10\Assessment and Deployment Kit\Windows Preinstallation Environment\amd64\WinPE_OCs\en-us\WinPE-StorageWMI_en-us.cab"
Dism /Add-Package /Image:"C:\Mount" /PackagePath:"C:\Program Files (x86)\Windows Kits\10\Assessment and Deployment Kit\Windows Preinstallation Environment\amd64\WinPE_OCs\WinPE-DismCmdlets.cab"
Dism /Add-Package /Image:"C:\Mount" /PackagePath:"C:\Program Files (x86)\Windows Kits\10\Assessment and Deployment Kit\Windows Preinstallation Environment\amd64\WinPE_OCs\en-us\WinPE-DismCmdlets_en-us.cab"

The above commands will add PowerShell to a 64-bit WinPE. If you are creating a 32-bit WinPE, change the folder amd64 at the end of long path, near end of each command to x86. An example using the first of above listed commands:

64-bit WinPE:

Rich (BB code):
Dism /Add-Package /Image:"C:\Mount" /PackagePath:"C:\Program Files (x86)\Windows Kits\10\Assessment and Deployment Kit\Windows Preinstallation Environment\amd64\WinPE_OCs\WinPE-WMI.cab"

32-bit WinPE:

Rich (BB code):
Dism /Add-Package /Image:"C:\Mount" /PackagePath:"C:\Program Files (x86)\Windows Kits\10\Assessment and Deployment Kit\Windows Preinstallation Environment\x86\WinPE_OCs\WinPE-WMI.cab"

2.4 This custom WinPE requires two scripts, a PowerShell script to find out drive letter of the NTFS partition on USB containing setup files, and then run Windows Setup, and a batch file to run that PS script.

Opening mount point folder C:\Mount, I created a folder Scripts on its root to store these two scripts:

Scripts folder created.jpg


2.5 First the small PS script. To save to mount point folder requires elevated rights, so we need to open Notepad elevated (run as administrator). Copy and paste the following code to it:

Powershell:
$SetupVolume = (Get-Volume -FileSystemLabel Setup).DriveLetter
$SetupFile = $SetupVolume + ':\setup.exe'
cmd /c $SetupFile

First line will search the USB for volume (partition) labelled Setup, and set its drive letter in variable $SetupVolume. Second line then creates variable $SetupFile, adding the important :\setup.exe to drive letter found in first line. For instance, if $SetupVolume is F, $SetupFile is F:\setup.exe.

Last line then executes command setup.exe from bigger NTFS partition Setup, which starts Windows Setup.

Save the file in folder C:\Mount\Scripts as SetupW10.ps1. In Save As dialog, remember to select Save As Type as All files:

Save PS Script.jpg


2.6 Next, short batch file. Copy and paste following code to an elevated Notepad:

Code:
@echo off
rem
rem Run PowerShell script to start Windows Setup
rem
cls
echo.
echo Starting windows Setup...
powershell -ExecutionPolicy bypass -file "X:\Scripts\SetupW11.ps1"

Only important line in this batch file is the last one. It executes the PS script made in step 2.5.

Save it to folder C:\Mount\Scripts as WinSetup.cmd. Again, as with the PS script, in Save As dialog, remember to select Save As Type as All files.

2.7 Last but not least, we need to edit file C:\Mount\Windows\System32\startnet.cmd. Startnet.cmd functions exactly like autoexec.bat did in Windows XP and older Windows versions, running every command in it automatically when WinPE boots.

By default, startnet.cmd only contains one command, wpeinit, which enables WinPE networking capabilities. We add two other commands to it.

Open startnet.cmd in an elevated Notepad. Copy and paste following code to it:

Code:
wpeinit
powercfg /s 8c5e7fda-e8bf-4a96-9a85-a6e23a8c635c
X:\Scripts\WinSetup.cmd

The first line is the default command to initialize networking. In second line, we set a High Performance power plan to speed up Windows installation. In last line, we execute the batch file created in step 2.6.

When computer is booted from WinPE media, the contents of WinPE will be copied to RAM disk X. This is why we can use the path X:\Scripts on last command line, there being no need to find out the drive letter for volume containing the Scripts folder.

2.8 In an elevated PowerShell, enter following command to save changes to WinPE:

Dismount-WindowsImage -Path C:\Mount -Save


Part Three

Make WinPE ISO


3.1 Open an elevated ADK Deployment and Imaging Tools Environment as told in step 1.3.

3.2 Enter following command to create WinPE ISO:

MakeWinPEMedia /ISO D:\WPEx64 F:\WinPEx64.iso

Change path D:\WPEx64 to D:\WPEx86 if creating a 32-bit WinPE ISO. Path F:\WinPEx64.iso is the path and name of the ISO file that will be created.


Part Four

Partition USB flash drive


4.1 Plug in an at least 8 GB USB lash drive. Open an elevated PowerShell, start Windows Disk Partitioning utility with command DISKPART.

Enter command LIST DISK to show all attached disks, find out the disk ID for your USB Flash Drive. In my case now, the USB is DISK 3:

Diskpart.jpg


Be careful, absolutely sure that you find out correct Disk ID! In following step, the selected disk will be wiped clean, and new partitions will be created. Selecting wrong disk may cause Windows or data disks being formatted, all data lost.


4.2 Still in DISKPART, run following commands one by one. In first command, replace X (disk ID) with actual Disk ID for your USB flash drive:

select disk X
clean
create partition primary size=1024
format quick fs=fat32 label="Boot"
assign
create partition primary
format quick fs=ntfs label="Setup"
assign

4.3 Quit DISKPART with command EXIT. Your USB flash drive is now correctly partitioned, containing a 1 GB partition Boot, and partition Setup which occupies the rest of the USB:

USB Boot and Setup partitions.jpg


Part Five

Create bootable USB install media


5.1 Mount the WinPE ISO image created in Step 3.2 as a virtual CD / DVD drive (right click, select Mount). Copy its contents, all files and folders, to partition Boot on USB.

5.2 Mount a Windows 11 ISO image as a virtual CD / DVD drive (right click, select Mount). Copy its contents, all files and folders, to partition Setup on USB.

That's it! You have now a bootable USB flash drive to install Windows, even if the install.wim or install.esd file is bigger than FAT32 size limit 4 GB. In the future, when you need install media for a new Windows version, simply format the Setup partition on USB, and copy contents of new ISO to it.

Kari
 

Attachments

  • WIM Size.jpg
    WIM Size.jpg
    24.6 KB · Views: 175
  • win11usb.png
    win11usb.png
    8.1 KB · Views: 128
Last edited:
Hi there,

thank you all for the listed informations here.

I have one question on top. Somehow I guess my brain does not want to get it together after my accident.

Perhaps someone is so nice to help me with it....

I want to create the windows PE (and update it).

I installed Windows ADK + PE Addon with winget:

winget install --id Microsoft.WindowsADK --override "/q /features OptionID.DeploymentTools /CEIP off /norestart
winget install --id Microsoft.ADKPEAddon --override "/q /CEIP off /norestart


after that I startet the Deployment cmd.box

cd C:\Program Files (x86)\Windows Kits\10\Assessment and Deployment Kit\Windows Preinstallation Environment\amd64

md C:\WinPE_amd64\mount
Dism /Mount-Image /ImageFile:"en-us\winpe.wim" /index:1 /MountDir:"C:\WinPE_amd64\mount"

so far so good....

Microsoft says:
Important
The April 9, 2024 Windows security updates should be applied to the Windows PE add-on for the Windows ADK 10.1.25398.1 (September 2023) and earlier, for the ADK for Windows Server 2022, and for the ADK for Windows 10 version 2004 and earlier.

Download latest Update from update catalogue

Dism /Add-Package /Image:"C:\WinPE_amd64\mount" /PackagePath:"d:\windows11.0-kb5036980-x64_6bfd0dfab47b1e42a5235ebff07e37700b72269c.msu"

Dism /Unmount-Image /MountDir:"C:\WinPE_amd64\mount" /commit

It still says 10.0.25398.1
so I guess my update is not installed ?
what am I doing wrong ?
 

My Computer

System One

  • OS
    Windows 10
    Computer type
    PC/Desktop
    Manufacturer/Model
    Custom
    CPU
    Ryzen 7 5700X
    Motherboard
    Gigabyte B550 Aorus Elite V2
    Memory
    2 x 16 GB DDR 4 - 3200 - G.Skill RipJaws V
    Graphics Card(s)
    ASUS TUF Gaming GeForce RTX 4070
    Sound Card
    OnBoard Realtek
    Monitor(s) Displays
    2 x Dell S2721DGF
    Screen Resolution
    2560 x 1440 @ 165 MHZ
    Hard Drives
    1 TB Kingston KC3000 M.2PCIe 4.0
    PSU
    be quiet! Pure Power 12 M Modular 80+ Gold
    Case
    Phanteks Eclipse P600s
    Cooling
    be quit! Dark Rock Pro 4
    Keyboard
    Logitech G213 Prodigy
    Mouse
    Logitech G502 Hero
    Internet Speed
    1000 MBit Cable DSL
    Browser
    Firefox
    Antivirus
    Microsoft Defender
@adu78,

These Windows RE and Windows PE security updates are something that I have tried to become very familiar with. It falls under the category of injecting Windows updates into Windows images that I have taken on as a specialty of mine. Unfortunately, this update somehow slipped right past me. I completely missed this until I saw your post.

I'm a little under the weather today so I'm not sure if I really want to deal with this today :-). I'm going to work my way through this and if no one else has responded back with any definitive answers for you, I'll get you some answers. Just bear with me for a day or two.

Hopefully someone will beat me to it and get you some answers quicker. My post here is just to let you know that your query has been seen and you will get answers soon, with a slight delay :-).

<Rant Mode = On>

I don't know what it is about these Windows PE updates. Couldn't Microsoft simply release a new version of the Windows PE addon that already incorporates these fixes rather than making us poor end users jump through all kinds of hoops? That way, we could simply uninstall the old version and install the new one with the fixes. Yes, I am capable of figuring this out but it's a huge waste of time and your average user is never, ever going to do all this.

<Rant Mode = Off>
 

My Computers

System One System Two

  • OS
    Win11 Pro 23H2
    Computer type
    PC/Desktop
    Manufacturer/Model
    Home Built
    CPU
    Intel i7-11700K
    Motherboard
    ASUS Prime Z590-A
    Memory
    128GB Crucial Ballistix 3200MHz DRAM
    Graphics Card(s)
    No GPU - CPU graphics only (for now)
    Sound Card
    Realtek (on motherboard)
    Monitor(s) Displays
    HP Envy 32
    Screen Resolution
    2560 x 1440
    Hard Drives
    1 x 1TB NVMe Gen 4 x 4 SSD
    1 x 2TB NVMe Gen 3 x 4 SSD
    2 x 512GB 2.5" SSDs
    2 x 8TB HD
    PSU
    Corsair HX850i
    Case
    Corsair iCue 5000X RGB
    Cooling
    Noctua NH-D15 chromax.black cooler + 10 case fans
    Keyboard
    CODE backlit mechanical keyboard
    Mouse
    Logitech MX Master 3
    Internet Speed
    1Gb Up / 1 Gb Down
    Browser
    Edge
    Antivirus
    Windows Defender
    Other Info
    Additional options installed:
    WiFi 6E PCIe adapter
    ASUS ThunderboltEX 4 PCIe adapter
  • Operating System
    Win11 Pro 23H2
    Computer type
    Laptop
    Manufacturer/Model
    Lenovo ThinkBook 13x Gen 2
    CPU
    Intel i7-1255U
    Memory
    16 GB
    Graphics card(s)
    Intel Iris Xe Graphics
    Sound Card
    Realtek® ALC3306-CG codec
    Monitor(s) Displays
    13.3-inch IPS Display
    Screen Resolution
    WQXGA (2560 x 1600)
    Hard Drives
    2 TB 4 x 4 NVMe SSD
    PSU
    USB-C / Thunderbolt 4 Power / Charging
    Mouse
    Buttonless Glass Precision Touchpad
    Keyboard
    Backlit, spill resistant keyboard
    Internet Speed
    1Gb Up / 1Gb Down
    Browser
    Edge
    Antivirus
    Windows Defender
    Other Info
    WiFi 6e / Bluetooth 5.1 / Facial Recognition / Fingerprint Sensor / ToF (Time of Flight) Human Presence Sensor
@adu78,

Could you tell me how you are checking the version number of the Windows PE Add-on?

If you are simply going into Settings > Apps > Installed Apps and looking at the version number for WinPE here, I don't believe that this gets updated.

More Information:

The April 9, 2024 updates (or later) that you are applying include new mitigations for the BlackLotus UEFI Bootkit vulnerability. The need to update Windows PE is all part of the mitigation for that vulnerability. I have previously addressed this issue in great detail here:


You will note that in that posting, I have a batch file that will update Windows PE for you. I ran this today, updating my Windows PE installation and I notice that when I go into settings my version number for Windows PE does not change. My suspicion is that this is normal. While you are applying a patch, I don't believe that it changes the build number.

I have several projects for which I need to create a Windows PE boot.wim file. After applying the April 9, 2024 update to my Windows PE image, the resulting boot.wim file has a different size so that tells me that Windows PE was definitely changed, even if it is not showing a different build number.

If you know of a better way to check the Windows PE version other than going into Settings, please do let me know. Thus far, I have not been able to find another way.

If you are certain about the methodology that you used, I encourage you to take a look at the link above and try my batch file.

NOTE: Since this is all related to the BlackLotus UEFI Bootkit issue, I feel that I should point out that while investigating this issue, I had to take a deep dive into that whole issue again. Along with the April 9, 2024 Windows updates, Microsoft has completely revised the procedures for mitigating that issue. On my primary desktop system, I am thus far completely unable to apply the certificate according to the latest procedure. I'll post back here and in the above linked location.

One final note: Microsoft includes in the latest mitigation instructions this gem of a note that pretty much set my hair on fire:

Firmware Issues: Not all device firmware will successfully update the Secure Boot DB or DBX. In the cases that we are aware of, we have reported the issue to the device manufacturer. See KB5016061: Secure Boot DB and DBX variable update events for details on logged events. Please contact the device manufacturer for firmware updates. If the device is not in support, Microsoft recommends upgrading the device.

My primary desktop system on which I cannot seem to perform this update is an 11th Gen Intel based system using as ASUS motherboard.

Anyway, I'll post back when I have more information. I will also need to update the link above with the latest info, so I'll address that at the same time.
 

My Computers

System One System Two

  • OS
    Win11 Pro 23H2
    Computer type
    PC/Desktop
    Manufacturer/Model
    Home Built
    CPU
    Intel i7-11700K
    Motherboard
    ASUS Prime Z590-A
    Memory
    128GB Crucial Ballistix 3200MHz DRAM
    Graphics Card(s)
    No GPU - CPU graphics only (for now)
    Sound Card
    Realtek (on motherboard)
    Monitor(s) Displays
    HP Envy 32
    Screen Resolution
    2560 x 1440
    Hard Drives
    1 x 1TB NVMe Gen 4 x 4 SSD
    1 x 2TB NVMe Gen 3 x 4 SSD
    2 x 512GB 2.5" SSDs
    2 x 8TB HD
    PSU
    Corsair HX850i
    Case
    Corsair iCue 5000X RGB
    Cooling
    Noctua NH-D15 chromax.black cooler + 10 case fans
    Keyboard
    CODE backlit mechanical keyboard
    Mouse
    Logitech MX Master 3
    Internet Speed
    1Gb Up / 1 Gb Down
    Browser
    Edge
    Antivirus
    Windows Defender
    Other Info
    Additional options installed:
    WiFi 6E PCIe adapter
    ASUS ThunderboltEX 4 PCIe adapter
  • Operating System
    Win11 Pro 23H2
    Computer type
    Laptop
    Manufacturer/Model
    Lenovo ThinkBook 13x Gen 2
    CPU
    Intel i7-1255U
    Memory
    16 GB
    Graphics card(s)
    Intel Iris Xe Graphics
    Sound Card
    Realtek® ALC3306-CG codec
    Monitor(s) Displays
    13.3-inch IPS Display
    Screen Resolution
    WQXGA (2560 x 1600)
    Hard Drives
    2 TB 4 x 4 NVMe SSD
    PSU
    USB-C / Thunderbolt 4 Power / Charging
    Mouse
    Buttonless Glass Precision Touchpad
    Keyboard
    Backlit, spill resistant keyboard
    Internet Speed
    1Gb Up / 1Gb Down
    Browser
    Edge
    Antivirus
    Windows Defender
    Other Info
    WiFi 6e / Bluetooth 5.1 / Facial Recognition / Fingerprint Sensor / ToF (Time of Flight) Human Presence Sensor
@hsehestedt
Thanks for your post above 9.04am (in my timezone).

This revocation/mitigation issue really is as messily dangerous as we had feared.

Upgrade the device, indeed !!
 

My Computer

System One

  • OS
    Windows 11
    Computer type
    Laptop
    Manufacturer/Model
    HP 15s_du1xxx
    CPU
    Intel i5 10210U
    Motherboard
    85F1
    Memory
    16Gb
    Graphics Card(s)
    Intel UHD
    Sound Card
    Realtek
    Screen Resolution
    1920 x 1080
Thank you for the Link, will work through it today and respond.

I checked:

dism /get-wiminfo /wimfile:"C:\Program Files (x86)\Windows Kits\10\Assessment and Deployment Kit\Windows Preinstallation Environment\amd64\en-us\winpe.wim.orig" /index:1

on winpe.wim and winpe.wim.orig
both showing Version 10.0.2598
both have the same size.

So I chearched for a tool to inspect the wim and found DISM++
DISM++ shows 10.0.25398.1
 

My Computer

System One

  • OS
    Windows 10
    Computer type
    PC/Desktop
    Manufacturer/Model
    Custom
    CPU
    Ryzen 7 5700X
    Motherboard
    Gigabyte B550 Aorus Elite V2
    Memory
    2 x 16 GB DDR 4 - 3200 - G.Skill RipJaws V
    Graphics Card(s)
    ASUS TUF Gaming GeForce RTX 4070
    Sound Card
    OnBoard Realtek
    Monitor(s) Displays
    2 x Dell S2721DGF
    Screen Resolution
    2560 x 1440 @ 165 MHZ
    Hard Drives
    1 TB Kingston KC3000 M.2PCIe 4.0
    PSU
    be quiet! Pure Power 12 M Modular 80+ Gold
    Case
    Phanteks Eclipse P600s
    Cooling
    be quit! Dark Rock Pro 4
    Keyboard
    Logitech G213 Prodigy
    Mouse
    Logitech G502 Hero
    Internet Speed
    1000 MBit Cable DSL
    Browser
    Firefox
    Antivirus
    Microsoft Defender
Read through your linked Thread. I will wait a few days for your new "Tutorial" on that and I bet I will learn a lot, like allways :)
We are so lucky that people like you share knowledge.
 

My Computer

System One

  • OS
    Windows 10
    Computer type
    PC/Desktop
    Manufacturer/Model
    Custom
    CPU
    Ryzen 7 5700X
    Motherboard
    Gigabyte B550 Aorus Elite V2
    Memory
    2 x 16 GB DDR 4 - 3200 - G.Skill RipJaws V
    Graphics Card(s)
    ASUS TUF Gaming GeForce RTX 4070
    Sound Card
    OnBoard Realtek
    Monitor(s) Displays
    2 x Dell S2721DGF
    Screen Resolution
    2560 x 1440 @ 165 MHZ
    Hard Drives
    1 TB Kingston KC3000 M.2PCIe 4.0
    PSU
    be quiet! Pure Power 12 M Modular 80+ Gold
    Case
    Phanteks Eclipse P600s
    Cooling
    be quit! Dark Rock Pro 4
    Keyboard
    Logitech G213 Prodigy
    Mouse
    Logitech G502 Hero
    Internet Speed
    1000 MBit Cable DSL
    Browser
    Firefox
    Antivirus
    Microsoft Defender
What you're seeing is a known limitation with DISM and several image tools. When the image is written, DISM doesn't record the updated build version (Winver) as installed. Instead it provides a base kernel version which doesn't reflect the UBR (Update Build Revision). This is present not in the WIM's metadata, but from the image's mounted registry hive.

W10 20H2 thru 22H2 are virtual editions, all reporting as version 19041.
W11 23H2 reports as 22621, and not 22631.

In order to know the true updated version, you can't use DISM. Instead it requires a script or tool which extracts the image's "HKLM\SOFTWARE\Microsoft\Windows NT\CurrentVersion\UBR" key.

W11 23H2 v2 ISO from official MS download -> true version 22631.2861

Dism++ reports: 22621.2506

1714722276201.png


Code:
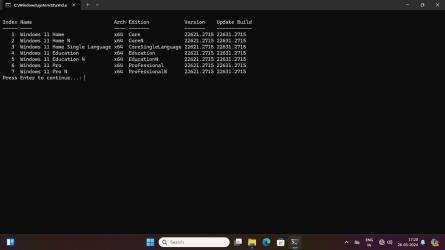
CorrectVersion.bat D:\path\to\Win11_23H2_English_x64v2\sources\install.wim

Index Name           Arch Edition      Version    Update Build
----- ----           ---- -------      -------    ------------
   1  Windows 11 Pro x64  Professional 22621.2506 22631.2861

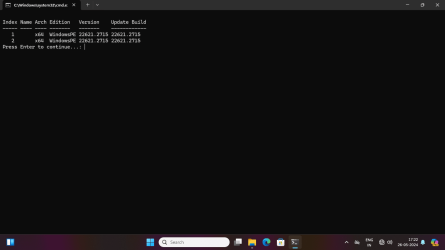
CorrectVersion.bat D:\path\to\Win11_23H2_English_x64v2\sources\boot.wim

Index Name Arch Edition   Version    Update Build
----- ---- ---- -------   -------    ------------
   1       x64  WindowsPE 22621.2861 22621.2861  
   2       x64  WindowsPE 22621.2506 22621.2861
 
Last edited:

My Computer

System One

  • OS
    Windows 7
Thank you for that clarification.
Would you be willing to share the content of your "CorrectVersion.bat" ?
 

My Computer

System One

  • OS
    Windows 10
    Computer type
    PC/Desktop
    Manufacturer/Model
    Custom
    CPU
    Ryzen 7 5700X
    Motherboard
    Gigabyte B550 Aorus Elite V2
    Memory
    2 x 16 GB DDR 4 - 3200 - G.Skill RipJaws V
    Graphics Card(s)
    ASUS TUF Gaming GeForce RTX 4070
    Sound Card
    OnBoard Realtek
    Monitor(s) Displays
    2 x Dell S2721DGF
    Screen Resolution
    2560 x 1440 @ 165 MHZ
    Hard Drives
    1 TB Kingston KC3000 M.2PCIe 4.0
    PSU
    be quiet! Pure Power 12 M Modular 80+ Gold
    Case
    Phanteks Eclipse P600s
    Cooling
    be quit! Dark Rock Pro 4
    Keyboard
    Logitech G213 Prodigy
    Mouse
    Logitech G502 Hero
    Internet Speed
    1000 MBit Cable DSL
    Browser
    Firefox
    Antivirus
    Microsoft Defender
This script doesn't require any Admin rights to run. It downloads wimlib & offlinereg from their official sites, and unzips the 4 files it needs.

wimlib-imagex will extract the WIM's reported version (same as DISM), and dump the SOFTWARE registry hive from each image in turn. offlinereg allows the script to parse the registry's actual UBR version. The script will cache a copy of wimlib & offlinereg in the same folder as the script, for future re-use. Because wimlib-imagex & offlinereg both work on normal files, there is no need for special privileges or mounting & unmounting images.

CorrectVersion.bat \path\to\any\wimfile
 

Attachments

  • CorrectVersion.bat
    3.3 KB · Views: 1

My Computer

System One

  • OS
    Windows 7
Thank you.
My C:\Program Files (x86)\Windows Kits\10\Assessment and Deployment Kit\Windows Preinstallation Environment\amd64\en-us\winpe.wim says.

Index Name Arch Edition Version Update Build
----- ---- ---- ------- ------- ------------
1 x64 WindowsPE 25398.1 25398.1

so it seems that the Update have not been installed.
 

My Computer

System One

  • OS
    Windows 10
    Computer type
    PC/Desktop
    Manufacturer/Model
    Custom
    CPU
    Ryzen 7 5700X
    Motherboard
    Gigabyte B550 Aorus Elite V2
    Memory
    2 x 16 GB DDR 4 - 3200 - G.Skill RipJaws V
    Graphics Card(s)
    ASUS TUF Gaming GeForce RTX 4070
    Sound Card
    OnBoard Realtek
    Monitor(s) Displays
    2 x Dell S2721DGF
    Screen Resolution
    2560 x 1440 @ 165 MHZ
    Hard Drives
    1 TB Kingston KC3000 M.2PCIe 4.0
    PSU
    be quiet! Pure Power 12 M Modular 80+ Gold
    Case
    Phanteks Eclipse P600s
    Cooling
    be quit! Dark Rock Pro 4
    Keyboard
    Logitech G213 Prodigy
    Mouse
    Logitech G502 Hero
    Internet Speed
    1000 MBit Cable DSL
    Browser
    Firefox
    Antivirus
    Microsoft Defender
Back
Top Bottom