Installation and Upgrade WinPE - Create a Custom Windows Install USB


Win11USB Banner.png

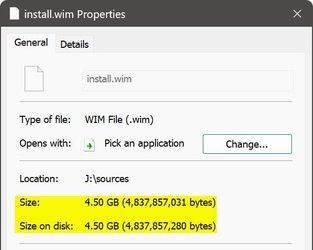
As you all (should) already know, Windows Setup's install.wim file is growing with each new feature upgrade. It's coming close and soon going over the 4 GB size limit of a FAT32 formatted install media. Today, as I write this, (22-FEB-2022), downloading WIM-based most current public release install media as told here in Shawn Brink's tutorial, the install.wim file is 4.5 GB (UK English Windows 11).

There’s nothing in the UEFI specifications that prevents booting a computer from an NTFS formatted USB flash drive. In fact, this so-called limitation is entirely artificial, caused by the single fact that manufacturer has not included correct drivers in UEFI. Luckily, most modern computers can boot from a single-partition NTFS formatted USB flash drive, and install Windows 11 from a single partition USB media containing WIM image larger than 4 GB (maximum file size on FAT32 media).

But, what to do if the WIM file is over 4 GB, and your computer cannot boot from an NTFS formatted media?

This tutorial will show how to create a USB flash drive containing a FAT32 formatted WinPE partition, and a bigger NTFS formatted Windows Setup partition. When computer is booted from this USB flash drive, the WinPE partition takes care of boot, then runs Windows Setup from bigger setup partition on same USB.

The whole process takes 10 to 20 minutes, but only needs to be done once. In the future, the Windows Setup files on USB can be replaced with newer version of Windows 11.


Contents

Use links to jump to any part, browser back button to return to this table


Part One:Create WinPE
Part Two:Edit WinPE boot.wim
Part Three:Make WinPE ISO
Part Four:Partition USB flash drive
Part Five:Create bootable USB install media

Please notice: I have prepared a custom WinPE ISO image for you. You can download it from my OneDrive: WinPEx64.iso. File size is 474 MB.

Parts One, Two and Three in this tutorial will show how I edited and customized this WinPE image, and are intended to those users who want to learn how to do it by themselves.

Short: if you want to make this easy, download the provided WinPE ISO, and start from Part Four, and you are done in three minutes.


Part One

Create WinPE


1.1 Download and install both Windows 11 ADK (Assessment and Deployment Kit), and Windows PE add-on for the ADK, installing ADK first:

Download ADK.jpg

(Click screenshot thumbnails to open images enlarged.)

1.2 When installing ADK, for purpose of this tutorial, you will only need the Deployment Tools module. Unselecting everything else, download size is less than 100 MB:

ADK Install.jpg


1.3 When both ADK and WinPE add-on have been installed, open an elevated ADK Deployment and Imaging Tools Environment, a special mode of Command Prompt. You will find it in Start > All Apps > W > Windows Kits:

Run Tool.jpg


1.4 The prompt is quite long. Shorten it by jumping to root of the drive where ADK was installed with command cd \ (#1 in next screenshot)

1.5 Create 64-bit WinPE files with following command (#2 in next screenshot), where folder D:\WPEx64 is the folder where WinPE files will be created. Folder will be created automatically, it does not need to exist:

copype amd64 D:\WPEx64

Create PE Folder.jpg


For 32-bit WinPE, the command is as follows:

copype x86 D:\WPEx86


Part Two

Edit WinPE boot.wim


2.1 Depending on which bit architecture you selected, either folder D:\WPEx86 or D:\WPEx64 now contains all files and folders to create a WinPE ISO.

2.2 To edit it, we must mount WinPE boot.wim file for offline servicing. First, create a mount point folder. In this example, I made a folder C:\Mount. Open an elevated PowerShell, and enter following command to mount boot.wim:

Mount-WindowsImage -ImagePath D:\WPEx64\Media\Sources\boot.wim -Index 1 -Path C:\Mount

Change -ImagePath folder WPEx64 to WPEx32 if working with 32-bit WinPE.

2.3 Folder C:\Mount now contains WinPE image, and we can edit it. First thing I made when editing the provided custom WinPE image, I added PowerShell support. By default, WinPE does not support PowerShell.

To enable PowerShell in WinPE, copy and paste the following commands to elevated PowerShell:. Notice that you can copy all commands at once, and paste them all to elevated PowerShell, which will then run them one by one:

Code:
Dism /Add-Package /Image:"C:\Mount" /PackagePath:"C:\Program Files (x86)\Windows Kits\10\Assessment and Deployment Kit\Windows Preinstallation Environment\amd64\WinPE_OCs\WinPE-WMI.cab"
Dism /Add-Package /Image:"C:\Mount" /PackagePath:"C:\Program Files (x86)\Windows Kits\10\Assessment and Deployment Kit\Windows Preinstallation Environment\amd64\WinPE_OCs\en-us\WinPE-WMI_en-us.cab"
Dism /Add-Package /Image:"C:\Mount" /PackagePath:"C:\Program Files (x86)\Windows Kits\10\Assessment and Deployment Kit\Windows Preinstallation Environment\amd64\WinPE_OCs\WinPE-NetFX.cab"
Dism /Add-Package /Image:"C:\Mount" /PackagePath:"C:\Program Files (x86)\Windows Kits\10\Assessment and Deployment Kit\Windows Preinstallation Environment\amd64\WinPE_OCs\en-us\WinPE-NetFX_en-us.cab"
Dism /Add-Package /Image:"C:\Mount" /PackagePath:"C:\Program Files (x86)\Windows Kits\10\Assessment and Deployment Kit\Windows Preinstallation Environment\amd64\WinPE_OCs\WinPE-Scripting.cab"
Dism /Add-Package /Image:"C:\Mount" /PackagePath:"C:\Program Files (x86)\Windows Kits\10\Assessment and Deployment Kit\Windows Preinstallation Environment\amd64\WinPE_OCs\en-us\WinPE-Scripting_en-us.cab"
Dism /Add-Package /Image:"C:\Mount" /PackagePath:"C:\Program Files (x86)\Windows Kits\10\Assessment and Deployment Kit\Windows Preinstallation Environment\amd64\WinPE_OCs\WinPE-PowerShell.cab"
Dism /Add-Package /Image:"C:\Mount" /PackagePath:"C:\Program Files (x86)\Windows Kits\10\Assessment and Deployment Kit\Windows Preinstallation Environment\amd64\WinPE_OCs\en-us\WinPE-PowerShell_en-us.cab"
Dism /Add-Package /Image:"C:\Mount" /PackagePath:"C:\Program Files (x86)\Windows Kits\10\Assessment and Deployment Kit\Windows Preinstallation Environment\amd64\WinPE_OCs\WinPE-StorageWMI.cab"
Dism /Add-Package /Image:"C:\Mount" /PackagePath:"C:\Program Files (x86)\Windows Kits\10\Assessment and Deployment Kit\Windows Preinstallation Environment\amd64\WinPE_OCs\en-us\WinPE-StorageWMI_en-us.cab"
Dism /Add-Package /Image:"C:\Mount" /PackagePath:"C:\Program Files (x86)\Windows Kits\10\Assessment and Deployment Kit\Windows Preinstallation Environment\amd64\WinPE_OCs\WinPE-DismCmdlets.cab"
Dism /Add-Package /Image:"C:\Mount" /PackagePath:"C:\Program Files (x86)\Windows Kits\10\Assessment and Deployment Kit\Windows Preinstallation Environment\amd64\WinPE_OCs\en-us\WinPE-DismCmdlets_en-us.cab"

The above commands will add PowerShell to a 64-bit WinPE. If you are creating a 32-bit WinPE, change the folder amd64 at the end of long path, near end of each command to x86. An example using the first of above listed commands:

64-bit WinPE:

Rich (BB code):
Dism /Add-Package /Image:"C:\Mount" /PackagePath:"C:\Program Files (x86)\Windows Kits\10\Assessment and Deployment Kit\Windows Preinstallation Environment\amd64\WinPE_OCs\WinPE-WMI.cab"

32-bit WinPE:

Rich (BB code):
Dism /Add-Package /Image:"C:\Mount" /PackagePath:"C:\Program Files (x86)\Windows Kits\10\Assessment and Deployment Kit\Windows Preinstallation Environment\x86\WinPE_OCs\WinPE-WMI.cab"

2.4 This custom WinPE requires two scripts, a PowerShell script to find out drive letter of the NTFS partition on USB containing setup files, and then run Windows Setup, and a batch file to run that PS script.

Opening mount point folder C:\Mount, I created a folder Scripts on its root to store these two scripts:

Scripts folder created.jpg


2.5 First the small PS script. To save to mount point folder requires elevated rights, so we need to open Notepad elevated (run as administrator). Copy and paste the following code to it:

Powershell:
$SetupVolume = (Get-Volume -FileSystemLabel Setup).DriveLetter
$SetupFile = $SetupVolume + ':\setup.exe'
cmd /c $SetupFile

First line will search the USB for volume (partition) labelled Setup, and set its drive letter in variable $SetupVolume. Second line then creates variable $SetupFile, adding the important :\setup.exe to drive letter found in first line. For instance, if $SetupVolume is F, $SetupFile is F:\setup.exe.

Last line then executes command setup.exe from bigger NTFS partition Setup, which starts Windows Setup.

Save the file in folder C:\Mount\Scripts as SetupW10.ps1. In Save As dialog, remember to select Save As Type as All files:

Save PS Script.jpg


2.6 Next, short batch file. Copy and paste following code to an elevated Notepad:

Code:
@echo off
rem
rem Run PowerShell script to start Windows Setup
rem
cls
echo.
echo Starting windows Setup...
powershell -ExecutionPolicy bypass -file "X:\Scripts\SetupW11.ps1"

Only important line in this batch file is the last one. It executes the PS script made in step 2.5.

Save it to folder C:\Mount\Scripts as WinSetup.cmd. Again, as with the PS script, in Save As dialog, remember to select Save As Type as All files.

2.7 Last but not least, we need to edit file C:\Mount\Windows\System32\startnet.cmd. Startnet.cmd functions exactly like autoexec.bat did in Windows XP and older Windows versions, running every command in it automatically when WinPE boots.

By default, startnet.cmd only contains one command, wpeinit, which enables WinPE networking capabilities. We add two other commands to it.

Open startnet.cmd in an elevated Notepad. Copy and paste following code to it:

Code:
wpeinit
powercfg /s 8c5e7fda-e8bf-4a96-9a85-a6e23a8c635c
X:\Scripts\WinSetup.cmd

The first line is the default command to initialize networking. In second line, we set a High Performance power plan to speed up Windows installation. In last line, we execute the batch file created in step 2.6.

When computer is booted from WinPE media, the contents of WinPE will be copied to RAM disk X. This is why we can use the path X:\Scripts on last command line, there being no need to find out the drive letter for volume containing the Scripts folder.

2.8 In an elevated PowerShell, enter following command to save changes to WinPE:

Dismount-WindowsImage -Path C:\Mount -Save


Part Three

Make WinPE ISO


3.1 Open an elevated ADK Deployment and Imaging Tools Environment as told in step 1.3.

3.2 Enter following command to create WinPE ISO:

MakeWinPEMedia /ISO D:\WPEx64 F:\WinPEx64.iso

Change path D:\WPEx64 to D:\WPEx86 if creating a 32-bit WinPE ISO. Path F:\WinPEx64.iso is the path and name of the ISO file that will be created.


Part Four

Partition USB flash drive


4.1 Plug in an at least 8 GB USB lash drive. Open an elevated PowerShell, start Windows Disk Partitioning utility with command DISKPART.

Enter command LIST DISK to show all attached disks, find out the disk ID for your USB Flash Drive. In my case now, the USB is DISK 3:

Diskpart.jpg


Be careful, absolutely sure that you find out correct Disk ID! In following step, the selected disk will be wiped clean, and new partitions will be created. Selecting wrong disk may cause Windows or data disks being formatted, all data lost.


4.2 Still in DISKPART, run following commands one by one. In first command, replace X (disk ID) with actual Disk ID for your USB flash drive:

select disk X
clean
create partition primary size=1024
format quick fs=fat32 label="Boot"
assign
create partition primary
format quick fs=ntfs label="Setup"
assign

4.3 Quit DISKPART with command EXIT. Your USB flash drive is now correctly partitioned, containing a 1 GB partition Boot, and partition Setup which occupies the rest of the USB:

USB Boot and Setup partitions.jpg


Part Five

Create bootable USB install media


5.1 Mount the WinPE ISO image created in Step 3.2 as a virtual CD / DVD drive (right click, select Mount). Copy its contents, all files and folders, to partition Boot on USB.

5.2 Mount a Windows 11 ISO image as a virtual CD / DVD drive (right click, select Mount). Copy its contents, all files and folders, to partition Setup on USB.

That's it! You have now a bootable USB flash drive to install Windows, even if the install.wim or install.esd file is bigger than FAT32 size limit 4 GB. In the future, when you need install media for a new Windows version, simply format the Setup partition on USB, and copy contents of new ISO to it.

Kari
 

Attachments

  • WIM Size.jpg
    WIM Size.jpg
    24.6 KB · Views: 168
  • win11usb.png
    win11usb.png
    8.1 KB · Views: 125
Last edited:
I have to inject some drivers into boot.wim, and found a 1 GB fat32 partition was not quite enough, so I always make it 2 GB just to allow for that.

Obviously that might make an 8 GB drive a bit tight, but for custom isos, you probably need a 16GB drive anyway.

In the end, each users needs will vary.

I had a 40 GB installation that I created a custom iso of approx 22 GB, so a 32 GB flash drive waa needed

I have used the custom iso method (no sysprep) plus injected drivers to transfer OS from an AMD 10 laptop to an Intel 7 laptop (having exported all the oem drivers from its oem preinstalled version of windows) and it worked perfectly.

I actually injected every driver into install.wim and when new laptop booted, I only had to sort out a couple of drivers in device manager. Some drivers were older and just got updated automatically.

So I now use custom iso and driver injection to move OSs to different devices, and it works great (if you have all key drivers from new laptop). I have a couple of batch files that do all the hard work.

As an aside, one thing I did find when creating a custom iso, is it sometimes falls over with spurious issues relating to onedrive. So now I uninstall onedrive first, then reinstall afterwards.
 

My Computer

System One

  • OS
    Windows 10 Pro + others in VHDs
    Computer type
    Laptop
    Manufacturer/Model
    ASUS Vivobook 14
    CPU
    I7
    Motherboard
    Yep, Laptop has one.
    Memory
    16 GB
    Graphics Card(s)
    Integrated Intel Iris XE
    Sound Card
    Realtek built in
    Monitor(s) Displays
    N/A
    Screen Resolution
    1920x1080
    Hard Drives
    1 TB Optane NVME SSD, 1 TB NVME SSD
    PSU
    Yep, got one
    Case
    Yep, got one
    Cooling
    Stella Artois
    Keyboard
    Built in
    Mouse
    Bluetooth , wired
    Internet Speed
    72 Mb/s :-(
    Browser
    Edge mostly
    Antivirus
    Defender
    Other Info
    TPM 2.0
Hi there
Thanks for the iso

I simply created a phyical vhdx file on an external SSD where I already have some Windows versions, did dism /apply-image using the /sources/boot.wim as the image file and updated bcdboot so now that PE system is available on the boot menu.

Then to install any windows I always use a physical vhdx file - boot from the winpe system, create appropriate vdisk, apply image from the Windows install iso and update bcdboot.

Cheers
jimbo
 

My Computer

System One

  • OS
    Windows XP,7,10,11 Linux Arch Linux
    Computer type
    PC/Desktop
    CPU
    2 X Intel i7
You can use Split-WindowsImage
 

My Computer

System One

  • OS
    Microsoft Windows 11 Home
    Computer type
    PC/Desktop
    Manufacturer/Model
    MSI MS-7D98
    CPU
    Intel Core i5-13490F
    Motherboard
    MSI B760 GAMING PLUS WIFI
    Memory
    2 x 16 Patriot Memory (PDP Systems) PSD516G560081
    Graphics Card(s)
    GIGABYTE GeForce RTX 4070 WINDFORCE OC 12G (GV-N4070WF3OC-12GD)
    Sound Card
    Bluetooth Аудио
    Monitor(s) Displays
    INNOCN 15K1F
    Screen Resolution
    1920 x 1080
    Hard Drives
    WD_BLACK SN770 250GB
    KINGSTON SNV2S1000G (ELFK0S.6)
    PSU
    Thermaltake Toughpower GF3 1000W
    Case
    CG560 - DeepCool
    Cooling
    ID-COOLING SE-224-XTS / 2 x 140Mm Fan - rear and top; 3 x 120Mm - front
    Keyboard
    Corsair K70 RGB TKL
    Mouse
    Corsair KATAR PRO XT
    Internet Speed
    100 Mbps
    Browser
    Firefox
    Antivirus
    Microsoft Defender Antivirus
    Other Info
    https://www.userbenchmark.com/UserRun/66553205
Kari,

I hit a problem following this tutorial.

Before starting I ensured I had the latest official MS .ISO by downloading it from the MS Windows 11 Media Creation Tools site.

When I tried to install from the created Boot usb, I was presented with the following message -

Get-Volume : No MSFT-Volume Objects found with property

'Filesystenlabel' equal to ;Setup;. Verify the property and retry

At X:\Scripts\SetupWin11.psl char 17

+$Setupvolume = (Get-volume - FileSystemLabel Setup) Deiveletter

+Category Info : ObjectNotfound: (Setup:String [GetVolume], Sim Job Exception

+FullQualifiedID : CmdletizationQuery - Not Found - FileSystemLabel, Get-Volume

(LINE SPACING INCREASED FOR CLARITY)

The 'Diskpart' informatiom for the USB is

br #01.png


Any reason for this error?
 

My Computer

System One

  • OS
    Windows 11 Pro v 23H2 (Build 22631.3374)
    Computer type
    PC/Desktop
    Manufacturer/Model
    Dell Precision 3660 Tower Workstation
    CPU
    12th Gen Intel(R) Core(TM) i9-12900 5.10 GHz
    Motherboard
    64-bit operating system, x64-based processor
    Memory
    32.00 GB
    Graphics Card(s)
    Intel UHD Graphics 770
    Sound Card
    Realtek Audio
    Monitor(s) Displays
    Dell P2714H Monitor
    Screen Resolution
    1920 x 1080
    Hard Drives
    1 x 512GB NVME PC801 NVMe SK hynix Boot
    1 x 1TB Seagate ST1000LM049-2GH172 Internal HDD
    1 x 1TB Seagate STGX4000400 External HDD
    1 x 2TB Seagate STGX4000400 External HDD
    1 x 4TB Seagate STGX4000400 External HDD
    PSU
    300 Watts
    Cooling
    Air
    Keyboard
    Microsoft Wired Keyboard 600
    Mouse
    Microsoft USB Basic Optical Mouse v2.0
    Browser
    Firefox
    Antivirus
    Windows Defender + Malwarebytes Premium
    Other Info
    BaseBoard Manufacturer Dell Inc.
    BaseBoard Product 0J1CP3
    BaseBoard Version A01
EDIT: Rewording due to brain not being tapped into sufficient caffeine supply.

I'm sure that there must be advantages to the method presented, but I use a super simple method:

Prepare the flash drive with diskpart, make it MBR, and create two partitions. For example, a 2GB FAT32 partition and a 10GB NTFS partition.

Then simply do this:

Mount a Windows ISO image. In all the below, when I say to copy files, the source is the mounted Windows ISO image.

1) Copy ALL files and folders EXCEPT the \sources folder to the FAT32 partition.

2) Create a \sources folder on the FAT32 partition.

3) Copy \sources\boot.wim to \sources on the FAT32 partition.

4) Copy the entire \sources folder to the NTFS partition with the exception of the boot.wim file.

Done! You have a bootable disk with no 4GB limit.

NOTE: With only minor modification, you can create a boot disk with a menu. For example, mine allows me to boot Win 10, Win 11, or Macrium Reflect Rescue media.
 
Last edited:

My Computers

System One System Two

  • OS
    Win11 Pro 23H2
    Computer type
    PC/Desktop
    Manufacturer/Model
    Home Built
    CPU
    Intel i7-11700K
    Motherboard
    ASUS Prime Z590-A
    Memory
    128GB Crucial Ballistix 3200MHz DRAM
    Graphics Card(s)
    No GPU - CPU graphics only (for now)
    Sound Card
    Realtek (on motherboard)
    Monitor(s) Displays
    HP Envy 32
    Screen Resolution
    2560 x 1440
    Hard Drives
    1 x 1TB NVMe Gen 4 x 4 SSD
    1 x 2TB NVMe Gen 3 x 4 SSD
    2 x 512GB 2.5" SSDs
    2 x 8TB HD
    PSU
    Corsair HX850i
    Case
    Corsair iCue 5000X RGB
    Cooling
    Noctua NH-D15 chromax.black cooler + 10 case fans
    Keyboard
    CODE backlit mechanical keyboard
    Mouse
    Logitech MX Master 3
    Internet Speed
    1Gb Up / 1 Gb Down
    Browser
    Edge
    Antivirus
    Windows Defender
    Other Info
    Additional options installed:
    WiFi 6E PCIe adapter
    ASUS ThunderboltEX 4 PCIe adapter
  • Operating System
    Win11 Pro 23H2
    Computer type
    Laptop
    Manufacturer/Model
    Lenovo ThinkBook 13x Gen 2
    CPU
    Intel i7-1255U
    Memory
    16 GB
    Graphics card(s)
    Intel Iris Xe Graphics
    Sound Card
    Realtek® ALC3306-CG codec
    Monitor(s) Displays
    13.3-inch IPS Display
    Screen Resolution
    WQXGA (2560 x 1600)
    Hard Drives
    2 TB 4 x 4 NVMe SSD
    PSU
    USB-C / Thunderbolt 4 Power / Charging
    Mouse
    Buttonless Glass Precision Touchpad
    Keyboard
    Backlit, spill resistant keyboard
    Internet Speed
    1Gb Up / 1Gb Down
    Browser
    Edge
    Antivirus
    Windows Defender
    Other Info
    WiFi 6e / Bluetooth 5.1 / Facial Recognition / Fingerprint Sensor / ToF (Time of Flight) Human Presence Sensor
EDIT: Had a small bug in the batch file below. I've now corrected that.

Below is a batch file that will do all the work of creating a dual partition boot disk for you.

To use, open it in an editor and review the comments near the start for the user definable variables that you should set before running.

Batch:
@echo off
setlocal enabledelayedexpansion
setlocal enableextensions
cd /d %~dp0

:::::::::::::::::::::::::::::::::::::::::::::::::::::::::::::::::::::::::::::::::::::::::::::::::::::::::::::::
:: This batch file will allow you to create a Windows installation disk. This can be a flash drive or a HD.  ::
:: It is designed to create a drive that will boot on either a BIOS or UEFI based system and it is perfectly ::
:: fine for any files in the installation media to be larger than 4 GB.                                      ::
::                                                                                                           ::
:: Note that Windows 11 is only available in 64-bit editions, while Windows 10 is available in both 32-bit   ::
:: and 64-bit editions. Since this batch file is perfectly capable of creating dual architecture media it is ::
:: perfectly suitable for the creation of both Windows 10 and Windows 11 boot media.                         ::
::                                                                                                           ::
:: Originally created December 2020 by HSehestedt and ZTrucker                                               ::
:: Updates created and maintaned by HSehestedt                                                               ::
:: Last updated February 22, 2022                                                                            ::
::                                                                                                           ::
:: Version 1.21.03                                                                                           ::
:::::::::::::::::::::::::::::::::::::::::::::::::::::::::::::::::::::::::::::::::::::::::::::::::::::::::::::::

::::::::::::::::::::::::::::::::::::::::::::::::::::::::::::::::::::::::::::::::::::::::::::::::::::::::::::::::::::
:: Explanation of User Customizable Settings ::                                                                   ::
:::::::::::::::::::::::::::::::::::::::::::::::                                                                   ::
:: Set the variables below to customize the behavior of the batch file.                                           ::
::                                                                                                                ::
:: Important: Values are case sensitive.                                                                          ::
::                                                                                                                ::
:: HideDetails - Set to "Y" to hide the details of every file being copied. Set to "N" or anything other than     ::
::    "Y" to show the detailed copy status. May be helpful for troubleshooting.                                   ::
::                                                                                                                ::
:: Partition1Size - This specifies the size in MB to create the first FAT32 partition. Suggestion: 1000 MB        ::
::    (roughly 1GB) should be a good value for most situations. Use a number only (no MB after the number). If    ::
::    use a customized image with many Windows editions, it's possible that you may need to increase the size of  ::
::    this partition.                                                                                             ::
::                                                                                                                ::
:: Part2SizeLimit - Set to either "N" or a numerical value. If you set this to "N", the size of the 2nd           ::
::    partition will be unlimited and will be created with all the remaining space not used by partition 1. If    ::
::    you would like to limit the size of the partition, specify a size in MB to create this partition.           ::
::    Note: 1 GB would be 1000 and 1 TB would be 1000000 (DON'T USE A COMMA IN VALUE!). Limiting the size is      ::
::    useful if you want to add other partitions to the drive. For example, I have a flash drive that I can       ::
::    install Windows from, but it also has another partition that is BitLocker protected with all my software    ::
::    applications, personal documents, etc.                                                                      ::
::                                                                                                                ::
:: Part2FS - This sets the filesystem type to use on the 2nd partition. Either exFAT or NTFS can be specified.    ::
::    Set this value to either "NTFS" or "exFAT". CAUTION: This IS case sensitive.                                ::
::                                                                                                                ::
:: Partition1Name - This is the volume label to give the first partition. Since this is a FAT32 partition, the    ::
::    volume label is limited to 11 characters.                                                                   ::
::                                                                                                                ::
:: Partition2Name - This is the volume label to give the second partition. If you choose to use exFAT you are     ::
::    limited to 11 characters. With NTFS you have up to 32 characters.                                           ::
::                                                                                                                ::
:: PartType - Set to either MBR or GPT. Normally, leave this set to MBR. An MBR partition type will allow for the ::
::    greatest compatibility with both BIOS and UEFI based systems. However, it is limited to disks with up to    ::
::    2TB in size. If you plan to use a disk larger than 2TB you must specify a GPT partition type. Please be     ::
::    aware that doing this will limit compatibility so that it will not work on BIOS based systems.              ::
::                                                                                                                ::
:: AutoDismount - Set this to Y if you want the source ISO image to be automatically dismounted by this batch     ::
::    file when it is done running. If you do NOT want the image dismounted, set this to N. NOTE: Technically,    ::
::    the image will be dismounted when set to asnything other than N.                                            ::
::::::::::::::::::::::::::::::::::::::::::::::::::::::::::::::::::::::::::::::::::::::::::::::::::::::::::::::::::::

set HideDetails=N
set Partition1Size=2000
set Part2SizeLimit=N
set Part2FS=NTFS
set Partition1Name=PAR-1-FAT32
set Partition2Name=PAR-2-%Part2FS%
set PartType=MBR
set AutoDismount=Y

:start

:::::::::::::::::::::::::::::::::::::::::::::::::::::::::::::::::::::::::::::::::::::::::::::::::::::::::
:: If the user wants to hide the details of files being copied, we append a "/nfl /ndl" to the end     ::
:: of robocopy commands. By setting a flag to either nothing or to "/nfl /ndl" we can use the same     ::
:: commands and the variable "flag" at the end of each command will determine how the command behaves. ::
:::::::::::::::::::::::::::::::::::::::::::::::::::::::::::::::::::::::::::::::::::::::::::::::::::::::::

if %HideDetails%==Y (
set flag=/nfl /ndl
) ELSE (
set flag=
)

::::::::::::::::::::::::::::::::::::::::::::::::::::::::::::::::::::::::::::::::::::::::::::::::::::::::::::
:: Check to see if this batch file is being run as Administrator. If it is not, then rerun the batch file ::
:: automatically as admin and terminate the intial instance of the batch file.                            ::
::::::::::::::::::::::::::::::::::::::::::::::::::::::::::::::::::::::::::::::::::::::::::::::::::::::::::::

(Fsutil Dirty Query %SystemDrive%>Nul)||(PowerShell start """%~f0""" -verb RunAs & Exit /B)

::::::::::::::::::::::::::::::::::::::::::::::::
:: End Routine to check if being run as Admin ::
::::::::::::::::::::::::::::::::::::::::::::::::

:::::::::::::::::::::::::::::::::::::::::::::::::::::::::::::
:: We reach this point once the batch file is run as admin ::
:::::::::::::::::::::::::::::::::::::::::::::::::::::::::::::

::::::::::::::::::::::::::::::::::::::::::::::::::::::::::::::::::
:: Change the console mode to 120 columns wide by 25 lines high ::
::::::::::::::::::::::::::::::::::::::::::::::::::::::::::::::::::

mode con: cols=120 lines=25

::::::::::::::::::::::::::::::::::::::::::::::::::::::::::::::::::::::::::::::::::::::::::::::
:: Ask user for location of mounted ISO image or the directory containing the Windows files ::
::::::::::::::::::::::::::::::::::::::::::::::::::::::::::::::::::::::::::::::::::::::::::::::

cls
echo Introduction
echo ============
echo.
echo This batch file will create a bootable flash drive from a mounted Windows ISO image or an image extracted to disk.
echo If you are using an ISO image, mount it before you continue by double-clicking the ISO image and note the drive
echo letter to which it is mounted.
echo.
echo You will be asked if you want to wipe the destination disk or perform a refresh operation. If this is the first
echo time preparing the disk, use the WIPE option. Be aware that this will destroy ALL data currently on the disk^^!
echo.
echo If you choose the REFRESH option, you will be asked for the drive letter of the two partitions previously
echo created on the disk. We will then replace the files on these partitions with those from the source that you
echo specify. This is especially helpful if you create additional partitions on the disk because it will leave
echo those partitions intact.
echo.
pause
cls
echo Do you want to perform a WIPE operation or a REFRESH operation?
echo.
choice /C WR /N /M "Press W or R to respond:"
if errorlevel 2 set WipeRefresh=REFRESH & goto GetSourcePath
if errorlevel 1 set WipeRefresh=WIPE & goto GetSourcePath

:GetSourcePath

:::::::::::::::::::::::::::::::::::::::::::::::::::::::::::::::::::::::::
:: Get the path to the Windows source files.                           ::
:: Tip: The path can end with or without a backslash (\). For example, ::
:: either D:, D:\, D:\ISO_Files, D:\ISO_Files\ are all valid paths.    ::
:::::::::::::::::::::::::::::::::::::::::::::::::::::::::::::::::::::::::

cls
echo Enter the path to the SOURCE where your Windows files are located below. Example: E:\
echo.
:GetSourcePath
set /p SourcePath="Enter source path: "

:: Add a trailing backslash (\) if one does not exist

IF NOT "%SourcePath:~-1%"=="\" (
set SourcePath=%SourcePath%\
)

:::::::::::::::::::::::::::::::::::::::::::::::::::::::::::::::::::::::::::::::::::::::::::::::::::::::::::::::::
:: Any valid Windows boot media will have a file called "boot\bootfix.bin" on the drive. This is true for both ::
:: single architecture images (x64 or x86) or for images with dual architectures. We will do a simple check to ::
:: see if such a file exists as a basic test for a valid source image location.                                ::
:::::::::::::::::::::::::::::::::::::::::::::::::::::::::::::::::::::::::::::::::::::::::::::::::::::::::::::::::

if NOT EXIST %SourcePath%boot\bootfix.bin (
cls
echo The location that you specified does not contain a valid Windows image. Please try another location.
echo If you are specifying a location on disk, please be sure to specify the location to the root of the
echo Windows image. If you are using an ISO image, you should double-click the ISO image to mount it and
echo note the drive letter to which it was mounted.
echo.
goto GetSourcePath
)

::::::::::::::::::::::::::::::::::::::::::::::::::::::::::::::::::::::::::::::::::::::::::::::::::::::::::::::::::
:: The directory structure for a dual architecture image (one that has BOTH x64 and x86 images) will include    ::
:: \x64 and \x86 folders. In order for us to properly handle this, we need to determine if the source specified ::
:: is a single of dual architecture image. To do so, we will simply check for the existance on a \x64 folder.   ::
:: The variable Architecture will be set to either SINGLE or DUAL.                                              ::
::::::::::::::::::::::::::::::::::::::::::::::::::::::::::::::::::::::::::::::::::::::::::::::::::::::::::::::::::

if exist %SourcePath%\x64 (
set Architecture=DUAL
) ELSE (
set Architecture=SINGLE
)

:::::::::::::::::::::::::::::::::::::::::::::::::::::::::::::::::::::::::::::::::::::::::::::::::::::::
:: If a refresh operation was selected, then we need to ask the user for the drive letter associated ::
:: with the partitions. Otherwise, we need to identify what disk will be wiped.                      ::
:::::::::::::::::::::::::::::::::::::::::::::::::::::::::::::::::::::::::::::::::::::::::::::::::::::::

If %WipeRefresh%==WIPE goto GetDiskNum

:GetPar1Letter

cls
echo Please enter the drive letter of the FIRST partition (the FAT32 partition) on the disk that we will refresh. Please
echo enter a drive letter only with no colon (:).
echo.
set /P Partition1="Drive letter of FIRST partition: "

:::::::::::::::::::::::::::::::::::::::::::::::::::::::::::::::::::::::::::::::::::::
:: As a safety check, verify that the first partition has a file \boot\bootfix.bin ::
:::::::::::::::::::::::::::::::::::::::::::::::::::::::::::::::::::::::::::::::::::::

if exist %Partition1%:\boot\bootfix.bin goto GetPar2Letter
cls
echo ERROR! Either the drive letter you specified does not exist or it does not seem to contain a previously
echo created partition with suitable Windows installation files.
echo.
echo Please verify that you have specified the correct drive letter.
echo.
pause
goto GetPar1Letter

:GetPar2Letter

cls
echo Please enter the drive letter of the SECOND partition (the exFAT or NTFS partition) on the disk that we will
echo refresh. Please enter a drive letter only with no colon (:).
echo.
set /P Partition2="Drive letter of SECOND partition: "

::::::::::::::::::::::::::::::::::::::::::::::::::::::::::::::::::::::::::::::::::::::::::::::::
:: As a safety check, verify that the second partition has either a \Sources or a \x64 folder ::
::::::::::::::::::::::::::::::::::::::::::::::::::::::::::::::::::::::::::::::::::::::::::::::::

if exist %Partition2%:\Sources goto Par2Valid
if exist %Partition2%:\x64 goto Par2Valid

cls
echo ERROR! Either the drive letter you specified does not exist or it does not seem to contain a previously
echo created partition with suitable Windows installation files.
echo.
echo Please verify that you have specified the correct drive letter.
echo.
pause
goto GetPar2Letter

:Par2Valid

::::::::::::::::::::::::::::::::::::::::::::::::::::::::::::::::::::::::::::::::::::::::::::::::::::::::
:: Since we are performing a refresh operation, there is no need for us to get a disk number. We will ::
:: skip that and proceed to the summary screen.                                                       ::
::::::::::::::::::::::::::::::::::::::::::::::::::::::::::::::::::::::::::::::::::::::::::::::::::::::::

goto Summary

:GetDiskNum

:::::::::::::::::::::::::::::::::::::::::::::::::
:: Display a list of disks seen by the system. ::
:::::::::::::::::::::::::::::::::::::::::::::::::

cls
(echo list disk
echo exit
) | diskpart

echo.
echo Above is a list of disks connected to your system. Scroll up if the list is too long.
echo CAUTION: *MAKE SURE* that you specify the correct disk because it will be erased. Press CTRL-C to abort.
echo.
set /p DiskID="Enter the disk number for the DESTINATION disk (Enter only the number and press ENTER): "

if [%DiskID%] EQU [] Goto GetDiskNum

:Summary

:::::::::::::::::::::::::::::::::::::::::::::::::::::::::::::::::::::::::
:: Display a summary of options that will be used and get confirmation ::
:::::::::::::::::::::::::::::::::::::::::::::::::::::::::::::::::::::::::

cls
echo Summary of options you have selected:
echo.

:::::::::::::::::::::::::::::::::::::::::::::::::::::::::::::::::::
:: These summary items apply to both WIPE and REFRESH operations ::
:::::::::::::::::::::::::::::::::::::::::::::::::::::::::::::::::::

echo Path for the source files: %SourcePath%

if %HideDetails%==Y (
echo File copy status details WILL NOT be displayed
) ELSE (
echo File copy status details WILL be displayed
)

::::::::::::::::::::::::::::::::::::::::::::::::::::::::::::::::::::
:: The summary items below apply only to WIPE operations, so if a ::
:: REFRESH is being performed, skip this section                  ::
::::::::::::::::::::::::::::::::::::::::::::::::::::::::::::::::::::

if %WipeRefresh%==REFRESH goto RefreshSummary

echo Drive number to make bootable: %DiskID%
echo Partition type: %PartType%
echo Partition 1 size: %Partition1Size% MB
echo Partition 2 filesystem type: %Part2FS%

if NOT %Part2SizeLimit%==N (
echo Partition 2 size: %Part2SizeLimit% MB
) ELSE (
echo Partition 2 size: Use all remaining space
)

echo Partition 1 volume label: %Partition1Name%
echo Partition 2 volume label: %Partition2Name%

goto GetConfirmation

:RefreshSummary

::::::::::::::::::::::::::::::::::::::::::::::::::::
:: These items apply only to a REFRESH operation. ::
::::::::::::::::::::::::::::::::::::::::::::::::::::

echo Drive letter of FIRST partition to refresh: %Partition1%:
echo Drive letter of SECOND partition to refresh: %Partition2%:

:GetConfirmation

::::::::::::::::::::::::::::::::::::::::::::::::::::::::::::::::::::::::::::
:: Time to get final confirmation from user. If the user does not confirm ::
:: that everything is correct, show some possible resolutions.            ::
::::::::::::::::::::::::::::::::::::::::::::::::::::::::::::::::::::::::::::

echo.
choice /C YN /N /M "Is this correct? (Press Y or N to respond):"
if errorlevel 2 (
cls
echo.
echo        Symptom                                            Corrective Action
echo        =======                                            =================
echo Source path is wrong:                 Run the program again and respond with the correct path
echo Wrong drive number for a WIPE:        Run the program again and respond with the correct drive number
echo Wrong drive letters for a REFRESH:    Run the program again and respond with the correct drive letters
echo File copy status display incorrect:   Change the setting of "HideDetails" at start of program
echo Wrong partition sizes:                Change the setting of "Partition1Size" or "Part2SizeLimit" at start of program
echo Wrong volume labels for a WIPE:       Change the setting of "Partition1Name" or "Partition2Name" at start of program
echo Wrong partition type:                 Change the setting of "PartType" at start of program
echo.
pause
exit
)

::::::::::::::::::::::::::::::::::::::::::::::::::::::::::::::::::::::::::::::::::::::::::::::::::::::::::::::
:: We are creating 2 partions. A FAT32 partition and an exFAT or NTFS partition. We only need the sources   ::
:: folder on the exFAT or NTFS partition. On the FAT32 partition, we want everything else. We also want the ::
:: single file called BOOT.WIM in the sources folder on the FAT32 partition.                                ::
::::::::::::::::::::::::::::::::::::::::::::::::::::::::::::::::::::::::::::::::::::::::::::::::::::::::::::::

cls
if %WipeRefresh%==WIPE echo We are performing initial partitioning the destination drive to free up any used drive letters.
if %WipeRefresh%==REFRESH echo We are formatting drives %Partition1%: and %Partition2%:    and copying files. Other partitions will be left alone.
echo Please be patient^^! This can take a while if your drive is slow.
echo.

:::::::::::::::::::::::::::::::::::::::::::::::::::::::::::::::::::::::::::::::::::::
:: If we are performing a REFRESH, then there are a lot of steps that we can skip. ::
:: As a result, we will skip to the CopyOperations section.                        ::
:::::::::::::::::::::::::::::::::::::::::::::::::::::::::::::::::::::::::::::::::::::

if %WipeRefresh%==REFRESH goto CopyOperations

::::::::::::::::::::::::::::::::::::::::::::::::::::::::::::::::::::::::::::::::::::::::::::::::::::::::::::
:: We will first wipe the selected disk. This will free up any drive letters currently used by that disk. ::
::::::::::::::::::::::::::::::::::::::::::::::::::::::::::::::::::::::::::::::::::::::::::::::::::::::::::::

:: NOTE: A problem has been observed recently where the CLEAN command run within DiskPart will fail the first
::       time that it is run. It often succeeds the 2nd time, but not always. However, this problem only
::       happens when the disk is MBR, not GPT. As a result, we try to perform a clean and convert to GPT.
::       Then, we finally set the disk to the correct type (MBR or GPT) based on user preference.

(echo select disk %DiskID%
echo clean
echo convert gpt
echo clean
echo convert gpt
echo clean
echo convert %PartType%
echo rescan
echo exit
) | diskpart > nul

:::::::::::::::::::::::::::::::::::::::::::::::::::::::::::::::::::::::::::::::::::::
:: Ask user for drive letters to assign to the partitions on the destination drive ::
:::::::::::::::::::::::::::::::::::::::::::::::::::::::::::::::::::::::::::::::::::::

:GetPar1DriveLetter

cls
echo Please enter the drive letter to assign to the FIRST partition (the FAT32 partition). Please enter
echo a drive letter only with no colon (:).
echo.
set /p Partition1="Enter the drive letter to assign to Partition #1: "

if exist %Partition1%: (
echo.
echo That drive letter is already in use. Please choose another.
echo.
pause
goto GetPar1DriveLetter
)

:GetPar2DriveLetter

cls
echo Please enter the drive letter to assign to the SECOND partition (the NTFS partition). Please enter
echo a drive letter only with no colon (:).
echo.
set /p Partition2="Enter the drive letter to assign to Partition #2: "

if exist %Partition2%: (
echo.
echo That drive letter is already in use. Please choose another.
echo.
pause
goto GetPar2DriveLetter
)

:::::::::::::::::::::::::::::::::
:: Prepare the first partition ::
:::::::::::::::::::::::::::::::::

cls
echo The first partition will be assigned drive letter %Partition1%: and will be formatted with FAT32.

(echo select disk %DiskID%
echo create partition primary size=%Partition1Size%
echo format fs=fat32 quick
echo assign letter=%Partition1%
echo active
echo rescan
echo exit
) | diskpart > nul

::::::::::::::::::::::::::::::::::
:: Prepare the second partition ::
::::::::::::::::::::::::::::::::::

echo The second partition will be assigned drive letter %Partition2%: and will be formatted with %Part2FS%.
echo.

if %Part2SizeLimit%==N goto NoSizeLimit

::::::::::::::::::::::::::::::::::::::::::::::::::::::::::::::::::::::::::
:: User has elected to create the second partition with a specific size ::
::::::::::::::::::::::::::::::::::::::::::::::::::::::::::::::::::::::::::

(echo select disk %DiskID%
echo create partition primary size=%Part2SizeLimit%
echo format fs=%Part2FS% quick
echo assign letter=%Partition2%
echo rescan
echo exit
) | diskpart > nul

goto PartitionsCreated

:NoSizeLimit

:::::::::::::::::::::::::::::::::::::::::::::::::::::::::::::::::::::::::::
:: User has elected create the second partition with all remaining space ::
:::::::::::::::::::::::::::::::::::::::::::::::::::::::::::::::::::::::::::

(echo select disk %DiskID%
echo create partition primary
echo format fs=%Part2FS% quick
echo assign letter=%Partition2%
echo rescan
echo exit
) | diskpart > NUL

:PartitionsCreated

:::::::::::::::::::::::::::::::::::::::::::::::::::::::::::::::::::
:: Set volume labels on the two partitions that we just created. ::
:::::::::::::::::::::::::::::::::::::::::::::::::::::::::::::::::::

label %Partition1%:%Partition1Name%
label %Partition2%:%Partition2Name%

:CopyOperations

::::::::::::::::::::::::::::::::::::::::::::::::::::::::::::::::::::::::
:: This section is for the copy operations from SOURCE to DESTINATION ::
::::::::::::::::::::::::::::::::::::::::::::::::::::::::::::::::::::::::

::::::::::::::::::::::::::::::::::::::::::::::::::::::::::::::::::::::::::::::::::::::::::::::::::::::::::::::::::::::
:: Technical Notes:                                                                                                 ::
::                                                                                                                  ::
:: Some flash drives present themselves as a fixed disk and as a result they my have a recyle bin folder on them.   ::
:: We are excluding the system folders which includes the recycle bin from the following operation. The /njh and    ::
:: /njs switches prevent robocopy from displaying the header and summary information. If you want to stop robocopy  ::
:: from displaying file copy progress just add a /nfl /ndl (No File Listing and No Directory Listing) to each       ::
:: robocopy command. Note that if the user elected to hide details of the copy operation, then the variable "flag"  ::
:: will be set to "/nfl /ndl" which will hide the directory and file listings.                                      ::
::                                                                                                                  ::
:: For reasons unknown to me, sometimes a path enclosed in quotes does not work in robocopy unless you add a        ::
:: trailing space. In the below commands I found this to be true only on the first robocopy command but I've added  ::
:: the space to all commands for consistency. We need the quotes just in case a path with spaces in the name is     ::
:: specified.                                                                                                       ::
::                                                                                                                  ::
:: It was previously necessary to create a file named ei.cfg in the \Sources foler. Technically, this file is only  ::
:: needed if you are NOT using an AUTOUNATTEND.XML answer file, but it won't hurt to have it there anyway. However, ::
:: in my testing, it seems that this file is no longer necessary. As a result, the code to create that file is      ::
:: commented out below but I have not removed it just in case it is needed again.                                   ::
::::::::::::::::::::::::::::::::::::::::::::::::::::::::::::::::::::::::::::::::::::::::::::::::::::::::::::::::::::::

if %Architecture%==DUAL goto DualArchitecture

:: Copying files to the FAT32 partition

robocopy "%SourcePath% " %Partition1%:\ /mir /xd sources "system volume information" $recycle.bin /njh /njs %flag%
if %ERRORLEVEL% gtr 3 goto ErrorHandler1
robocopy "%SourcePath%sources " %Partition1%:\sources boot.wim /njh /njs %flag%
if %ERRORLEVEL% gtr 3 goto ErrorHandler1

:: Copying files to the exFAT or NTFS partition

robocopy "%SourcePath%sources " %Partition2%:\sources /mir /njh /njs /xf boot.wim %flag%
if %ERRORLEVEL% gtr 3 goto ErrorHandler2
robocopy %Partition1%:\ %Partition2%:\ /mov autounattend*.xml %flag%
if %ERRORLEVEL% gtr 3 goto ErrorHandler2

::::::::::::::::::::::::::::::::::::::::::::::::::::::::::::::::::::::::::::::::::::::::::::::::::::::::::::::::::::
:: Technical note: It was previously necessary to create a file named ei.cfg in the \Sources foler. Technically,  ::
:: this file is only needed if you are NOT using an AUTOUNATTEND.XML answer file, but it won't hurt to have it    ::
:: there anyway. However, in my testing, it seems that this file is no longer necessary. As a result, the code to ::
:: create that file is commented out below but I have not removed it just in case it is needed again.             ::
::::::::::::::::::::::::::::::::::::::::::::::::::::::::::::::::::::::::::::::::::::::::::::::::::::::::::::::::::::

:: echo [CHANNEL] > %Partition2%:\sources\ei.cfg
:: echo Retail >> %Partition2%:\sources\ei.cfg

goto DoneCopying

:DualArchitecture

:: Copying files to the FAT32 partition

robocopy "%SourcePath% " %Partition1%:\ /mir /xd sources x64 x86 "system volume information" $recycle.bin /njh /njs %flag%
if %ERRORLEVEL% gtr 3 goto ErrorHandler1
robocopy "%SourcePath%x64\sources " %Partition1%:\x64\sources boot.wim /njh /njs %flag%
if %ERRORLEVEL% gtr 3 goto ErrorHandler1
robocopy "%SourcePath%x86\sources " %Partition1%:\x86\sources boot.wim /njh /njs %flag%
if %ERRORLEVEL% gtr 3 goto ErrorHandler1

:: Copying files to the exFAT or NTFS partition

robocopy "%SourcePath%x64\sources " %Partition2%:\x64\sources /mir /njh /njs /xf boot.wim %flag%
if %ERRORLEVEL% gtr 3 goto ErrorHandler2
robocopy "%SourcePath%x86\sources " %Partition2%:\x86\sources /mir /njh /njs /xf boot.wim %flag%
if %ERRORLEVEL% gtr 3 goto ErrorHandler2
robocopy %Partition1%:\ %Partition2%:\ /mov autounattend*.xml %flag%
if %ERRORLEVEL% gtr 3 goto ErrorHandler2

::::::::::::::::::::::::::::::::::::::::::::::::::::::::::::::::::::::::::::::::::::::::::::::::::::::::::::::::::::
:: Technical note: It was previously necessary to create a file named ei.cfg in the \Sources foler. Technically,  ::
:: this file is only needed if you are NOT using an AUTOUNATTEND.XML answer file, but it won't hurt to have it    ::
:: there anyway. However, in my testing, it seems that this file is no longer necessary. As a result, the code to ::
:: create that file is commented out below but I have not removed it just in case it is needed again.             ::
::::::::::::::::::::::::::::::::::::::::::::::::::::::::::::::::::::::::::::::::::::::::::::::::::::::::::::::::::::

:: echo [CHANNEL] > %Partition2%:\x64\sources\ei.cfg
:: echo Retail >> %Partition2%:\x64\sources\ei.cfg

:: echo [CHANNEL] > %Partition2%:\x86\sources\ei.cfg
:: echo Retail >> %Partition2%:\x86\sources\ei.cfg

:DoneCopying

:::::::::::::::::::::::::::::
:: Dismount the disk image ::
:::::::::::::::::::::::::::::

IF %AutoDismount%==N goto DismountDone

:: Strip the backslash from the path
IF "!SourcePath:~-1!"=="\" SET SourcePath=!SourcePath:~,-1!

:: Dismount the image
powershell.exe -command "Dismount-DiskImage -DevicePath \\.\%SourcePath%" > NUL

:DismountDone

:::::::::::::::::::::::::::::::::::::::::::::::::::::::::::::::::::::::::::::::::
:: Inform the user that we are done. Also, as a precaution, check to see if an ::
:: unattended setupanswer file is present and warn the user if it is.          ::
:::::::::::::::::::::::::::::::::::::::::::::::::::::::::::::::::::::::::::::::::

cls
echo All operations have been completed.
echo.

if exist %Partition2%:\autounattend.xml (
echo ^^!CAUTION^^! An unattended setup file ^(autounattend.xml^) is present on the 2nd partition.
echo As a result, if you boot from this disk, an unattended installation will begin. This has
echo the potential to wipe out the contents of disks attached to your system without warning.
echo.
echo It might be a wise idea to carefully label the bootable media to reflect this situation.
echo As an alternative, consider temporarily renaming the autounattend.xml to something else.
echo.
)
pause

:END

exit


:::::::::::::::::::::::::::::
:: Error Handling Routines ::
:::::::::::::::::::::::::::::

:ErrorHandler1
cls
echo There was an error copying files to partition #1. Please verify that partition #1 has sufficient space available.
echo Please correct the situation and run the script again. If you are changing the partition sizes, then you will
echo need to use the WIPE operation to create new partitions with the newly specified sizes.
echo.
pause
goto END

:ErrorHandler2
cls
echo There was an error copying files to partition #2. Please verify that partition #2 has sufficient space available.
echo Please correct the situation and run the script again. If you are changing the partition sizes, then you will
echo need to use the WIPE operation to create new partitions with the newly specified sizes.
echo.
pause
goto END
 
Last edited by a moderator:

My Computers

System One System Two

  • OS
    Win11 Pro 23H2
    Computer type
    PC/Desktop
    Manufacturer/Model
    Home Built
    CPU
    Intel i7-11700K
    Motherboard
    ASUS Prime Z590-A
    Memory
    128GB Crucial Ballistix 3200MHz DRAM
    Graphics Card(s)
    No GPU - CPU graphics only (for now)
    Sound Card
    Realtek (on motherboard)
    Monitor(s) Displays
    HP Envy 32
    Screen Resolution
    2560 x 1440
    Hard Drives
    1 x 1TB NVMe Gen 4 x 4 SSD
    1 x 2TB NVMe Gen 3 x 4 SSD
    2 x 512GB 2.5" SSDs
    2 x 8TB HD
    PSU
    Corsair HX850i
    Case
    Corsair iCue 5000X RGB
    Cooling
    Noctua NH-D15 chromax.black cooler + 10 case fans
    Keyboard
    CODE backlit mechanical keyboard
    Mouse
    Logitech MX Master 3
    Internet Speed
    1Gb Up / 1 Gb Down
    Browser
    Edge
    Antivirus
    Windows Defender
    Other Info
    Additional options installed:
    WiFi 6E PCIe adapter
    ASUS ThunderboltEX 4 PCIe adapter
  • Operating System
    Win11 Pro 23H2
    Computer type
    Laptop
    Manufacturer/Model
    Lenovo ThinkBook 13x Gen 2
    CPU
    Intel i7-1255U
    Memory
    16 GB
    Graphics card(s)
    Intel Iris Xe Graphics
    Sound Card
    Realtek® ALC3306-CG codec
    Monitor(s) Displays
    13.3-inch IPS Display
    Screen Resolution
    WQXGA (2560 x 1600)
    Hard Drives
    2 TB 4 x 4 NVMe SSD
    PSU
    USB-C / Thunderbolt 4 Power / Charging
    Mouse
    Buttonless Glass Precision Touchpad
    Keyboard
    Backlit, spill resistant keyboard
    Internet Speed
    1Gb Up / 1Gb Down
    Browser
    Edge
    Antivirus
    Windows Defender
    Other Info
    WiFi 6e / Bluetooth 5.1 / Facial Recognition / Fingerprint Sensor / ToF (Time of Flight) Human Presence Sensor
EDIT: Rewording due to brain not being tapped into sufficient caffeine supply.

I'm sure that there must be advantages to the method presented, but I use a super simple method:
Thanks for the info; I'll give it a whirl later and respond on my efforts.
 

My Computer

System One

  • OS
    Windows 11 Pro v 23H2 (Build 22631.3374)
    Computer type
    PC/Desktop
    Manufacturer/Model
    Dell Precision 3660 Tower Workstation
    CPU
    12th Gen Intel(R) Core(TM) i9-12900 5.10 GHz
    Motherboard
    64-bit operating system, x64-based processor
    Memory
    32.00 GB
    Graphics Card(s)
    Intel UHD Graphics 770
    Sound Card
    Realtek Audio
    Monitor(s) Displays
    Dell P2714H Monitor
    Screen Resolution
    1920 x 1080
    Hard Drives
    1 x 512GB NVME PC801 NVMe SK hynix Boot
    1 x 1TB Seagate ST1000LM049-2GH172 Internal HDD
    1 x 1TB Seagate STGX4000400 External HDD
    1 x 2TB Seagate STGX4000400 External HDD
    1 x 4TB Seagate STGX4000400 External HDD
    PSU
    300 Watts
    Cooling
    Air
    Keyboard
    Microsoft Wired Keyboard 600
    Mouse
    Microsoft USB Basic Optical Mouse v2.0
    Browser
    Firefox
    Antivirus
    Windows Defender + Malwarebytes Premium
    Other Info
    BaseBoard Manufacturer Dell Inc.
    BaseBoard Product 0J1CP3
    BaseBoard Version A01
EDIT: Rewording due to brain not being tapped into sufficient caffeine supply.

I'm sure that there must be advantages to the method presented, but I use a super simple method:

Prepare the flash drive with diskpart, make it MBR, and create two partitions. For example, a 2GB FAT32 partition and a 10GB NTFS partition.

Then simply do this:

Mount a Windows ISO image. In all the below, when I say to copy files, the source is the mounted Windows ISO image.

1) Copy ALL files and folders EXCEPT the \sources folder to the FAT32 partition.

2) Create a \sources folder on the FAT32 partition.

3) Copy \sources\boot.wim to \sources on the FAT32 partition.

4) Copy the entire \sources folder to the NTFS partition with the exception of the boot.wim file.

Done! You have a bootable disk with no 4GB limit.

NOTE: With only minor modification, you can create a boot disk with a menu. For example, mine allows me to boot Win 10, Win 11, or Macrium Reflect Rescue media.
Yep - exactly how I do it.

That is same as tutorial method in Tenforums (I developed the basis for it and @Brink made it into a nice format).

I have a simple batch file that does it all.

As an aside, I use exfat rather than ntfs and then drive will work on macs or linux as well.

Batch:
echo on
REM =========================================================================================
REM ======BIG WARNING - FIRST TWO PARAMETERS MUST BE CONFIGURED CORRECTLY ===================
REM =========================================================================================

REM SET DRIVE NUMBER OF MOUNTED USB DRIVE - WARNING THIS MUST BE CORRECT.
REM IT IS USUALLY LAST ONE IN DRIVE NUMBER LIST
REM VERY BIG WARNING - IF  YOU CHOOSE WRONG DRIVE YOU WILL WIPE IT!!!
REM SET TO 99 INITIALLY TO PREVENT RISK OF ACCIDENTAL DELETION
set USBDRIVE=99

REM  SET DRIVE LETTER OF MOUNTED DRIVE - IF DRIVE LETTER IS WRONG, BATCH WILL NOT WORK.
set ISODRIVE=G

REM =========================================================================================
REM ================== ALL OTHER PARAMETERS CAN NOMRALLY BE LEFT ALONE ======================
REM ============== ONLY CHANGE DRIVE LETTERS IF NEEDED E.G. USED ELSEWHERE ==================
REM =========================================================================================

REM SET DRIVE OF TEMPORARY FILES
set USBTDRV=C


REM SET DRIVE LETTER OF FAT32 PARTITION
set FAT32=Q

REM SET DRIVE LETTER OF EXFAT PARTITION
set EXFAT=R

REM CREATE WORKING DIRECTORY
%USBTDRV%:
cd\
rd usbcreate /s /q
md usbcreate
pause

REM LIST DISKS AND CHECK USB DRIVE NUMBER IS SET
echo LIST DISK > %USBTDRV%:\usbcreate\listdisk.txt
CLS
diskpart /s %USBTDRV%:\usbcreate\listdisk.txt
IF %USBDRIVE%==99 goto :NOTSET
pause
GOTO :CONT1
:NOTSET
echo off
echo.
echo XXXXXXXXXXXXXXXXXXXXXXXXXXXXXXXXXXXXXXXXXXXXXXXXXXXXXXXXXXXXXX
echo X                                                            X
echo X YOU HAVE NOT SET DRIVE NUMBER OF USB DRIVE                 X
echo X IT IS USUALLY LAST ONE IN THE ABOVE LIST BUT CAN DIFFER    X
echo X                                                            X
echo X MAKE SURE USB DRIVE IS PLUGGED IN                          X
echo X                                                            X
echo X WARNING - MAKE SURE DRIVE NUMBER IS RIGHT                  X
echo X OR ELSE YOU COULD WIPE WRONG DRIVE                         X
echo X                                                            X
echo X I ACCEPT NO RESPONSIBILITY FOR ANY MISTAKES                X
echo X YOU HAVE BEEN WARNED!!!!!                                  X
echo X                                                            X
echo XXXXXXXXXXXXXXXXXXXXXXXXXXXXXXXXXXXXXXXXXXXXXXXXXXXXXXXXXXXXXX
PAUSE
GOTO :ENDPROG
:CONT1

REM CREATE EI.CFG
echo [CHANNEL] > %USBTDRV%:\usbcreate\ei.cfg
echo Retail >> %USBTDRV%:\usbcreate\ei.cfg

REM FORMAT USB DRIVE
echo select disk %USBDRIVE% > %USBTDRV%:\usbcreate\formatdisk.txt
echo clean >> %USBTDRV%:\usbcreate\formatdisk.txt
echo convert mbr >> %USBTDRV%:\usbcreate\formatdisk.txt
echo create partition primary size=2000 >> %USBTDRV%:\usbcreate\formatdisk.txt
echo create partition primary >> %USBTDRV%:\usbcreate\formatdisk.txt
echo select partition 1 >> %USBTDRV%:\usbcreate\formatdisk.txt
echo format fs=fat32 quick >> %USBTDRV%:\usbcreate\formatdisk.txt
echo assign letter=Q >> %USBTDRV%:\usbcreate\formatdisk.txt
echo active >> %USBTDRV%:\usbcreate\formatdisk.txt
echo select partition 2 >> %USBTDRV%:\usbcreate\formatdisk.txt
echo format fs=exFat quick >> %USBTDRV%:\usbcreate\formatdisk.txt
echo assign letter=R >> %USBTDRV%:\usbcreate\formatdisk.txt
echo exit >> %USBTDRV%:\usbcreate\formatdisk.txt
diskpart /s %USBTDRV%:\usbcreate\formatdisk.txt
pause
REM CREATE DRIVE
cd \usbcreate
md baseiso
xcopy %ISODRIVE%:\*.* %USBTDRV%:\usbcreate\baseiso\ /s /y

REM COPY ALL FILES TO EXFAT FOLDER
label %EXFAT%:USB-EXFAT
%USBTDRV%:
cd \usbcreate\baseiso
xcopy *.* %EXFAT%:\ /s /y
xcopy %USBTDRV%:\usbcreate\ei.cfg %EXFAT%:\sources /s /y

REM COPY ALL FILES EXCEPT THOSE IN SOURCES FOLDER (DELETE FROM BASEISO)
label %FAT32%:USB-FAT32
del %USBTDRV%:\usbcreate\baseiso\sources\*.* /q
cd %USBTDRV%:\usbcreate\baseiso
rd sources /s /q

%USBTDRV%:
cd \usbcreate\baseiso
xcopy *.* %FAT32%:\ /s /y
cd %FAT32%:\
md sources
xcopy %EXFAT%:\sources\boot.wim %FAT32%:\sources\boot.* /s /y

REM DELETE WORKING DIRECTORY
%USBTDRV%:
cd\
rd usbcreate /s /q
:ENDPROG

pause
 

My Computer

System One

  • OS
    Windows 10 Pro + others in VHDs
    Computer type
    Laptop
    Manufacturer/Model
    ASUS Vivobook 14
    CPU
    I7
    Motherboard
    Yep, Laptop has one.
    Memory
    16 GB
    Graphics Card(s)
    Integrated Intel Iris XE
    Sound Card
    Realtek built in
    Monitor(s) Displays
    N/A
    Screen Resolution
    1920x1080
    Hard Drives
    1 TB Optane NVME SSD, 1 TB NVME SSD
    PSU
    Yep, got one
    Case
    Yep, got one
    Cooling
    Stella Artois
    Keyboard
    Built in
    Mouse
    Bluetooth , wired
    Internet Speed
    72 Mb/s :-(
    Browser
    Edge mostly
    Antivirus
    Defender
    Other Info
    TPM 2.0
Yep - exactly how I do it.

That is same as tutorial method in Tenforums (I developed the basis for it and @Brink made it into a nice format).
I think that's where I learned it from. I'm sure it's in my favorite tutorials list :)

That's my absolute favorite way of creating a boot disk. It works with BIOS and UEFI, x86, x64, combined x86 & x64 media - everything. I have never had this method fail for me.
 

My Computers

System One System Two

  • OS
    Win11 Pro 23H2
    Computer type
    PC/Desktop
    Manufacturer/Model
    Home Built
    CPU
    Intel i7-11700K
    Motherboard
    ASUS Prime Z590-A
    Memory
    128GB Crucial Ballistix 3200MHz DRAM
    Graphics Card(s)
    No GPU - CPU graphics only (for now)
    Sound Card
    Realtek (on motherboard)
    Monitor(s) Displays
    HP Envy 32
    Screen Resolution
    2560 x 1440
    Hard Drives
    1 x 1TB NVMe Gen 4 x 4 SSD
    1 x 2TB NVMe Gen 3 x 4 SSD
    2 x 512GB 2.5" SSDs
    2 x 8TB HD
    PSU
    Corsair HX850i
    Case
    Corsair iCue 5000X RGB
    Cooling
    Noctua NH-D15 chromax.black cooler + 10 case fans
    Keyboard
    CODE backlit mechanical keyboard
    Mouse
    Logitech MX Master 3
    Internet Speed
    1Gb Up / 1 Gb Down
    Browser
    Edge
    Antivirus
    Windows Defender
    Other Info
    Additional options installed:
    WiFi 6E PCIe adapter
    ASUS ThunderboltEX 4 PCIe adapter
  • Operating System
    Win11 Pro 23H2
    Computer type
    Laptop
    Manufacturer/Model
    Lenovo ThinkBook 13x Gen 2
    CPU
    Intel i7-1255U
    Memory
    16 GB
    Graphics card(s)
    Intel Iris Xe Graphics
    Sound Card
    Realtek® ALC3306-CG codec
    Monitor(s) Displays
    13.3-inch IPS Display
    Screen Resolution
    WQXGA (2560 x 1600)
    Hard Drives
    2 TB 4 x 4 NVMe SSD
    PSU
    USB-C / Thunderbolt 4 Power / Charging
    Mouse
    Buttonless Glass Precision Touchpad
    Keyboard
    Backlit, spill resistant keyboard
    Internet Speed
    1Gb Up / 1Gb Down
    Browser
    Edge
    Antivirus
    Windows Defender
    Other Info
    WiFi 6e / Bluetooth 5.1 / Facial Recognition / Fingerprint Sensor / ToF (Time of Flight) Human Presence Sensor
I used this script

Powershell:
# Check PowerShell is running as Administrator

$Principal = ([Security.Principal.WindowsPrincipal] [Security.Principal.WindowsIdentity]::GetCurrent())


If (-Not ($Principal.IsInRole([Security.Principal.WindowsBuiltInRole]::Administrator))) {

    Write-Warning "You do not have Administrator rights to run this script.  Please run PowerShell as an Administrator."

    Break

}


# Define Path to the Windows ISO

$ISOFile = "C:\Users\Admin\Downloads\Windows11_InsiderPreview_Client_x64_en-us_22000.iso"

# Disk

$NameDisk = "SanDisk Ultra USB 3.0"


#If the file does not exist, create it.

if (-not(Test-Path -Path $ISOFile -PathType Leaf)) {

     try {

         Write-Host "`nThe file [$ISOFile] not exist.`n" -ForegroundColor Red

     }

     catch {

         throw $_.Exception.Message

     }

 }

 else

 {


Write-Host "`nCreate a USB Drive for Windows Installation.`n`n" -ForegroundColor Magenta


# Get the USB Drive you want to use, copy the friendly name

#Get-Disk | Where BusType -eq "USB" | Format-Table -AutoSize FriendlyName,Number,Size,PartitionStyle


# Get the right USB Drive (You will need to change the FriendlyName)

$USBDrive = Get-Disk | Where FriendlyName -eq $NameDisk


# Replace the Friendly Name to clean the USB Drive (THIS WILL REMOVE EVERYTHING)

$USBDrive | Clear-Disk -RemoveData -Confirm:$true -PassThru


# Convert Disk to GPT

$USBDrive | Set-Disk -PartitionStyle GPT


# Create partition primary and format to FAT32

$Volume = $USBDrive | New-Partition -UseMaximumSize -AssignDriveLetter | Format-Volume -FileSystem FAT32 -NewFileSystemLabel Windows


# Mount iso

$ISOMounted = Mount-DiskImage -ImagePath $ISOFile -StorageType ISO -PassThru


# Driver letter

$ISODriveLetter = ($ISOMounted | Get-Volume).DriveLetter


$WIM = ($ISODriveLetter +":\sources\install.wim")


if ((Get-Item "$WIM").length -gt 4gb) {

    Copy-Item -Path ($ISODriveLetter +":\*") -Destination ($Volume.DriveLetter + ":\") -Recurse -Exclude install.wim

    Copy-Item -Path $WIM -Destination "$env:TEMP\install.wim"

    Set-ItemProperty -Path "$env:TEMP\install.wim" -Name IsReadOnly -Value $false | Out-Null

    Split-WindowsImage -FileSize 1000 -ImagePath "$env:TEMP\install.wim" -SplitImagePath "$env:TEMP\install.swm" | Out-Null

    Copy-Item -Path ("$env:TEMP\*.swm") -Destination ($Volume.DriveLetter + ":\sources\")


}

else {

# Copy Files to USB

Copy-Item -Path ($ISODriveLetter +":\*") -Destination ($Volume.DriveLetter + ":\") -Recurse

# 1-Home; Get-WindowsImage -ImagePath "F:\sources\install.wim"

#$ImageIndex = 1

#Export-WindowsImage -SourceImagePath $WIM -SourceIndex 1 -CompressionType max -DestinationImagePath ($Volume.DriveLetter + ":\sources\") -DestinationName "Windows 11"

}


# Dismount ISO

Dismount-DiskImage -ImagePath $ISOFile

}


Read-Host -Prompt 'Press any key to continue...'
 

My Computer

System One

  • OS
    Microsoft Windows 11 Home
    Computer type
    PC/Desktop
    Manufacturer/Model
    MSI MS-7D98
    CPU
    Intel Core i5-13490F
    Motherboard
    MSI B760 GAMING PLUS WIFI
    Memory
    2 x 16 Patriot Memory (PDP Systems) PSD516G560081
    Graphics Card(s)
    GIGABYTE GeForce RTX 4070 WINDFORCE OC 12G (GV-N4070WF3OC-12GD)
    Sound Card
    Bluetooth Аудио
    Monitor(s) Displays
    INNOCN 15K1F
    Screen Resolution
    1920 x 1080
    Hard Drives
    WD_BLACK SN770 250GB
    KINGSTON SNV2S1000G (ELFK0S.6)
    PSU
    Thermaltake Toughpower GF3 1000W
    Case
    CG560 - DeepCool
    Cooling
    ID-COOLING SE-224-XTS / 2 x 140Mm Fan - rear and top; 3 x 120Mm - front
    Keyboard
    Corsair K70 RGB TKL
    Mouse
    Corsair KATAR PRO XT
    Internet Speed
    100 Mbps
    Browser
    Firefox
    Antivirus
    Microsoft Defender Antivirus
    Other Info
    https://www.userbenchmark.com/UserRun/66553205
EDIT: Had a small bug in the batch file below. I've now corrected that.
Below is a batch file that will do all the work of creating a dual partition boot disk for you.
I finally got round to trying your batch script - thank you.

Created a bootable USB with the following partitions -
A.png

B.png


The USB booted OK, but the installation failed thus -
Boot USB.png

I used the latest MS Media Creation tools to create the .iso, and I always end up with this no matter what method I use to create a bootable USB.

Do you have any idea as to what is / is not happening?
 

My Computer

System One

  • OS
    Windows 11 Pro v 23H2 (Build 22631.3374)
    Computer type
    PC/Desktop
    Manufacturer/Model
    Dell Precision 3660 Tower Workstation
    CPU
    12th Gen Intel(R) Core(TM) i9-12900 5.10 GHz
    Motherboard
    64-bit operating system, x64-based processor
    Memory
    32.00 GB
    Graphics Card(s)
    Intel UHD Graphics 770
    Sound Card
    Realtek Audio
    Monitor(s) Displays
    Dell P2714H Monitor
    Screen Resolution
    1920 x 1080
    Hard Drives
    1 x 512GB NVME PC801 NVMe SK hynix Boot
    1 x 1TB Seagate ST1000LM049-2GH172 Internal HDD
    1 x 1TB Seagate STGX4000400 External HDD
    1 x 2TB Seagate STGX4000400 External HDD
    1 x 4TB Seagate STGX4000400 External HDD
    PSU
    300 Watts
    Cooling
    Air
    Keyboard
    Microsoft Wired Keyboard 600
    Mouse
    Microsoft USB Basic Optical Mouse v2.0
    Browser
    Firefox
    Antivirus
    Windows Defender + Malwarebytes Premium
    Other Info
    BaseBoard Manufacturer Dell Inc.
    BaseBoard Product 0J1CP3
    BaseBoard Version A01
I'm not sure why you are getting that message. Try making sure that the files are not read only.

On both partitions run this command:

attrib D:\*.* -h -s -r /s /d

Substitute the correct drive letters for D:.

What's odd to me is that you are getting the same error when you use the media creation tool to create the bootable media.

Finally, for this batch file, could you copy the section with the user defined variables and post it here? I'd like to see what settings you are using.
 

My Computers

System One System Two

  • OS
    Win11 Pro 23H2
    Computer type
    PC/Desktop
    Manufacturer/Model
    Home Built
    CPU
    Intel i7-11700K
    Motherboard
    ASUS Prime Z590-A
    Memory
    128GB Crucial Ballistix 3200MHz DRAM
    Graphics Card(s)
    No GPU - CPU graphics only (for now)
    Sound Card
    Realtek (on motherboard)
    Monitor(s) Displays
    HP Envy 32
    Screen Resolution
    2560 x 1440
    Hard Drives
    1 x 1TB NVMe Gen 4 x 4 SSD
    1 x 2TB NVMe Gen 3 x 4 SSD
    2 x 512GB 2.5" SSDs
    2 x 8TB HD
    PSU
    Corsair HX850i
    Case
    Corsair iCue 5000X RGB
    Cooling
    Noctua NH-D15 chromax.black cooler + 10 case fans
    Keyboard
    CODE backlit mechanical keyboard
    Mouse
    Logitech MX Master 3
    Internet Speed
    1Gb Up / 1 Gb Down
    Browser
    Edge
    Antivirus
    Windows Defender
    Other Info
    Additional options installed:
    WiFi 6E PCIe adapter
    ASUS ThunderboltEX 4 PCIe adapter
  • Operating System
    Win11 Pro 23H2
    Computer type
    Laptop
    Manufacturer/Model
    Lenovo ThinkBook 13x Gen 2
    CPU
    Intel i7-1255U
    Memory
    16 GB
    Graphics card(s)
    Intel Iris Xe Graphics
    Sound Card
    Realtek® ALC3306-CG codec
    Monitor(s) Displays
    13.3-inch IPS Display
    Screen Resolution
    WQXGA (2560 x 1600)
    Hard Drives
    2 TB 4 x 4 NVMe SSD
    PSU
    USB-C / Thunderbolt 4 Power / Charging
    Mouse
    Buttonless Glass Precision Touchpad
    Keyboard
    Backlit, spill resistant keyboard
    Internet Speed
    1Gb Up / 1Gb Down
    Browser
    Edge
    Antivirus
    Windows Defender
    Other Info
    WiFi 6e / Bluetooth 5.1 / Facial Recognition / Fingerprint Sensor / ToF (Time of Flight) Human Presence Sensor
Run with Command Prompt - Administrator

Microsoft Windows [Version 10.0.22000.527]
(c) Microsoft Corporation. All rights reserved.
C:\Users\ifmos>attrib S:\*.* -h -s -r /s /d

C:\Users\ifmos>attrib T:\*.* -h -s -r /s /d

Access denied - T:\System Volume Information

C:\Users\ifmos>


From the batch file

set HideDetails=Y
set Partition1Size=2048
set Part2SizeLimit=N
set Part2FS=NTFS
set Partition1Name=BOOT
set Partition2Name=Setup
set PartType=MBR
set AutoDismount=Y


I'm using a 60GB USB flash drive.

EDIT: I tried to run the install again and it failed as before
 
Last edited:

My Computer

System One

  • OS
    Windows 11 Pro v 23H2 (Build 22631.3374)
    Computer type
    PC/Desktop
    Manufacturer/Model
    Dell Precision 3660 Tower Workstation
    CPU
    12th Gen Intel(R) Core(TM) i9-12900 5.10 GHz
    Motherboard
    64-bit operating system, x64-based processor
    Memory
    32.00 GB
    Graphics Card(s)
    Intel UHD Graphics 770
    Sound Card
    Realtek Audio
    Monitor(s) Displays
    Dell P2714H Monitor
    Screen Resolution
    1920 x 1080
    Hard Drives
    1 x 512GB NVME PC801 NVMe SK hynix Boot
    1 x 1TB Seagate ST1000LM049-2GH172 Internal HDD
    1 x 1TB Seagate STGX4000400 External HDD
    1 x 2TB Seagate STGX4000400 External HDD
    1 x 4TB Seagate STGX4000400 External HDD
    PSU
    300 Watts
    Cooling
    Air
    Keyboard
    Microsoft Wired Keyboard 600
    Mouse
    Microsoft USB Basic Optical Mouse v2.0
    Browser
    Firefox
    Antivirus
    Windows Defender + Malwarebytes Premium
    Other Info
    BaseBoard Manufacturer Dell Inc.
    BaseBoard Product 0J1CP3
    BaseBoard Version A01
Ian, the error on System Volume Information is expected, so that part is okay.

I have some ideas about what may be happening here, but I'm also going to ask a few questions to make sure that I understand what we are working with.

First, could you tell me a little bit about the ISO image that you are using? Is it one that you downloaded directly from Microsoft or is it customized / modified in any way?

Second, the error that you are seeing can be a result of the standard Windows setup disk not having a driver needed by your system to access the disks. So the following questions are related to that.

What type of disks are in your system? Are they NVMe, SATA, SCSI, etc.?

If you are using SATA disks, how are the BIOS settings for SATA configured? Is it configured for standard AHCI, RAID, etc.?

How were you able to install windows on this system previously? Did it come with Windows preinstalled or did you ever perform a clean installation on this system in the past?

Finally, could you tell me the make and model of the system? If it was a system you put together then what I am interested in is the make and model of the motherboard.
 

My Computers

System One System Two

  • OS
    Win11 Pro 23H2
    Computer type
    PC/Desktop
    Manufacturer/Model
    Home Built
    CPU
    Intel i7-11700K
    Motherboard
    ASUS Prime Z590-A
    Memory
    128GB Crucial Ballistix 3200MHz DRAM
    Graphics Card(s)
    No GPU - CPU graphics only (for now)
    Sound Card
    Realtek (on motherboard)
    Monitor(s) Displays
    HP Envy 32
    Screen Resolution
    2560 x 1440
    Hard Drives
    1 x 1TB NVMe Gen 4 x 4 SSD
    1 x 2TB NVMe Gen 3 x 4 SSD
    2 x 512GB 2.5" SSDs
    2 x 8TB HD
    PSU
    Corsair HX850i
    Case
    Corsair iCue 5000X RGB
    Cooling
    Noctua NH-D15 chromax.black cooler + 10 case fans
    Keyboard
    CODE backlit mechanical keyboard
    Mouse
    Logitech MX Master 3
    Internet Speed
    1Gb Up / 1 Gb Down
    Browser
    Edge
    Antivirus
    Windows Defender
    Other Info
    Additional options installed:
    WiFi 6E PCIe adapter
    ASUS ThunderboltEX 4 PCIe adapter
  • Operating System
    Win11 Pro 23H2
    Computer type
    Laptop
    Manufacturer/Model
    Lenovo ThinkBook 13x Gen 2
    CPU
    Intel i7-1255U
    Memory
    16 GB
    Graphics card(s)
    Intel Iris Xe Graphics
    Sound Card
    Realtek® ALC3306-CG codec
    Monitor(s) Displays
    13.3-inch IPS Display
    Screen Resolution
    WQXGA (2560 x 1600)
    Hard Drives
    2 TB 4 x 4 NVMe SSD
    PSU
    USB-C / Thunderbolt 4 Power / Charging
    Mouse
    Buttonless Glass Precision Touchpad
    Keyboard
    Backlit, spill resistant keyboard
    Internet Speed
    1Gb Up / 1Gb Down
    Browser
    Edge
    Antivirus
    Windows Defender
    Other Info
    WiFi 6e / Bluetooth 5.1 / Facial Recognition / Fingerprint Sensor / ToF (Time of Flight) Human Presence Sensor
First, could you tell me a little bit about the ISO image that you are using? Is it one that you downloaded directly from Microsoft or is it customized / modified in any way?

Directly downloaded from the MS MCT site with no modificatiom.

Second, the error that you are seeing can be a result of the standard Windows setup disk not having a driver needed by your system to access the disks. So the following questions are related to that.

Device Manager.png

System Information.png


if you are using SATA disks, how are the BIOS settings for SATA configured? Is it configured for standard AHCI, RAID, etc.?

BIOS
SATA Operation

No Disabled
No AHCI
Yes RAID On

'SATA is configured to support RAID mode'

How were you able to install windows on this system previously? Did it come with Windows preinstalled or did you ever perform a clean installation on this system in the past?

Windows 11, from 10, installed 23 October 2021 using a bootable USB (which I still have & is still works) using MS's MCT site

Finally, could you tell me the make and model of the system? If it was a system you put together then what I am interested in is the make and model of the motherboard.

Purchased this Inpiron 3670 as a 'retail purchase' from Dell and not modified since.
 

My Computer

System One

  • OS
    Windows 11 Pro v 23H2 (Build 22631.3374)
    Computer type
    PC/Desktop
    Manufacturer/Model
    Dell Precision 3660 Tower Workstation
    CPU
    12th Gen Intel(R) Core(TM) i9-12900 5.10 GHz
    Motherboard
    64-bit operating system, x64-based processor
    Memory
    32.00 GB
    Graphics Card(s)
    Intel UHD Graphics 770
    Sound Card
    Realtek Audio
    Monitor(s) Displays
    Dell P2714H Monitor
    Screen Resolution
    1920 x 1080
    Hard Drives
    1 x 512GB NVME PC801 NVMe SK hynix Boot
    1 x 1TB Seagate ST1000LM049-2GH172 Internal HDD
    1 x 1TB Seagate STGX4000400 External HDD
    1 x 2TB Seagate STGX4000400 External HDD
    1 x 4TB Seagate STGX4000400 External HDD
    PSU
    300 Watts
    Cooling
    Air
    Keyboard
    Microsoft Wired Keyboard 600
    Mouse
    Microsoft USB Basic Optical Mouse v2.0
    Browser
    Firefox
    Antivirus
    Windows Defender + Malwarebytes Premium
    Other Info
    BaseBoard Manufacturer Dell Inc.
    BaseBoard Product 0J1CP3
    BaseBoard Version A01

My Computers

System One System Two

  • OS
    Windows 11 PRO x64 Dev
    Manufacturer/Model
    Hyper-V Virtual Machine (host in System 2 specs)
    CPU
    Intel Core i7-8550U
    Memory
    6 GB
    Graphics Card(s)
    Microsoft Hyper-V Video
    Monitor(s) Displays
    Laptop display (17.1") & Samsung U28E590 (27.7")
  • Operating System
    Windows 11 PRO x64 Dev Channel
    Computer type
    Laptop
    Manufacturer/Model
    HP HP ProBook 470 G5
    CPU
    Intel Core i7-8550U
    Motherboard
    HP 837F KBC Version 02.3D.00
    Memory
    16 GB
    Graphics card(s)
    Intel(R) UHD Graphics 620 & NVIDIA GeForce 930MX
    Sound Card
    Conexant ISST Audio
    Monitor(s) Displays
    Laptop display (17.1") & Samsung U28E590 (27.7")
    Hard Drives
    128 GB SSD & 1 TB HDD
    Mouse
    Wireless Logitech MSX mouse
    Keyboard
    Wireless Logitech MK710 keyboard
    Internet Speed
    100 Mbps down, 20 Mbps up
    Browser
    Edge Chromium Dev Channel
    Antivirus
    Windows Defender
    Other Info
    2 * 3 TB USB HDD
    6 TB WD Mirror NAS
No I haven't.

I'll follow the tutorial and respond back when completed.
 
Last edited:

My Computer

System One

  • OS
    Windows 11 Pro v 23H2 (Build 22631.3374)
    Computer type
    PC/Desktop
    Manufacturer/Model
    Dell Precision 3660 Tower Workstation
    CPU
    12th Gen Intel(R) Core(TM) i9-12900 5.10 GHz
    Motherboard
    64-bit operating system, x64-based processor
    Memory
    32.00 GB
    Graphics Card(s)
    Intel UHD Graphics 770
    Sound Card
    Realtek Audio
    Monitor(s) Displays
    Dell P2714H Monitor
    Screen Resolution
    1920 x 1080
    Hard Drives
    1 x 512GB NVME PC801 NVMe SK hynix Boot
    1 x 1TB Seagate ST1000LM049-2GH172 Internal HDD
    1 x 1TB Seagate STGX4000400 External HDD
    1 x 2TB Seagate STGX4000400 External HDD
    1 x 4TB Seagate STGX4000400 External HDD
    PSU
    300 Watts
    Cooling
    Air
    Keyboard
    Microsoft Wired Keyboard 600
    Mouse
    Microsoft USB Basic Optical Mouse v2.0
    Browser
    Firefox
    Antivirus
    Windows Defender + Malwarebytes Premium
    Other Info
    BaseBoard Manufacturer Dell Inc.
    BaseBoard Product 0J1CP3
    BaseBoard Version A01
In step 3.4 of the tutorial, there is no 'install.wim' file; however, there is an 'install.esd' file.

Do I ned to use this .esd file instead of .wim file?

EDIT

Got this error message when trying to use the 'install.esd' file -

Windows PowerShell
Copyright (C) Microsoft Corporation. All rights reserved.
Install the latest PowerShell for new features and improvements! Migrating from Windows PowerShell 5.1 to PowerShell 7 - PowerShell

PS C:\Users\ifmos> Dism /Mount-Image /ImageFile:J:\ISO_Files\Sources\install.esd /Index:6 /MountDir:C:\Mount

Deployment Image Servicing and Management tool
Version: 10.0.22000.1
Error: 11
An attempt was made to load a program with an incorrect format.
The DISM log file can be found at C:\WINDOWS\Logs\DISM\dism.log
PS C:\Users\ifmos>
 

My Computer

System One

  • OS
    Windows 11 Pro v 23H2 (Build 22631.3374)
    Computer type
    PC/Desktop
    Manufacturer/Model
    Dell Precision 3660 Tower Workstation
    CPU
    12th Gen Intel(R) Core(TM) i9-12900 5.10 GHz
    Motherboard
    64-bit operating system, x64-based processor
    Memory
    32.00 GB
    Graphics Card(s)
    Intel UHD Graphics 770
    Sound Card
    Realtek Audio
    Monitor(s) Displays
    Dell P2714H Monitor
    Screen Resolution
    1920 x 1080
    Hard Drives
    1 x 512GB NVME PC801 NVMe SK hynix Boot
    1 x 1TB Seagate ST1000LM049-2GH172 Internal HDD
    1 x 1TB Seagate STGX4000400 External HDD
    1 x 2TB Seagate STGX4000400 External HDD
    1 x 4TB Seagate STGX4000400 External HDD
    PSU
    300 Watts
    Cooling
    Air
    Keyboard
    Microsoft Wired Keyboard 600
    Mouse
    Microsoft USB Basic Optical Mouse v2.0
    Browser
    Firefox
    Antivirus
    Windows Defender + Malwarebytes Premium
    Other Info
    BaseBoard Manufacturer Dell Inc.
    BaseBoard Product 0J1CP3
    BaseBoard Version A01
In step 3.4 of the tutorial, there is no 'install.wim' file; however, there is an 'install.esd' file.
My apologies, I forgot to mention, that DISM offline servicing (editing / modifying WIM) does not work with ESD file. Media Creation Tool ISO images are compressed, ESD based. You need a WIM based install media.

Go to Microsoft's official Windows 11 download site:

Download

... and download a WIM based ISO:

Download WIM ISO.jpg


Kari
 
Last edited:

My Computers

System One System Two

  • OS
    Windows 11 PRO x64 Dev
    Manufacturer/Model
    Hyper-V Virtual Machine (host in System 2 specs)
    CPU
    Intel Core i7-8550U
    Memory
    6 GB
    Graphics Card(s)
    Microsoft Hyper-V Video
    Monitor(s) Displays
    Laptop display (17.1") & Samsung U28E590 (27.7")
  • Operating System
    Windows 11 PRO x64 Dev Channel
    Computer type
    Laptop
    Manufacturer/Model
    HP HP ProBook 470 G5
    CPU
    Intel Core i7-8550U
    Motherboard
    HP 837F KBC Version 02.3D.00
    Memory
    16 GB
    Graphics card(s)
    Intel(R) UHD Graphics 620 & NVIDIA GeForce 930MX
    Sound Card
    Conexant ISST Audio
    Monitor(s) Displays
    Laptop display (17.1") & Samsung U28E590 (27.7")
    Hard Drives
    128 GB SSD & 1 TB HDD
    Mouse
    Wireless Logitech MSX mouse
    Keyboard
    Wireless Logitech MK710 keyboard
    Internet Speed
    100 Mbps down, 20 Mbps up
    Browser
    Edge Chromium Dev Channel
    Antivirus
    Windows Defender
    Other Info
    2 * 3 TB USB HDD
    6 TB WD Mirror NAS

Latest Support Threads

Back
Top Bottom