This tutorial will show you how to add and remove repository folders used for File Explorer version control for your account in Windows 11.
File Explorer version control integration provides version control information directly in File Explorer.
File Explorer + version control provides the ability to display Git information directly inside File Explorer. Simply select your repository folder and File Explorer will display information such as your branch, diff count, last commit message, and more.
Added repository folder references are saved to unique subkeys under the registry key below.
HKEY_CURRENT_USER\Software\Microsoft\Windows\CurrentVersion\Explorer\PerFolderRoots
Reference:

File Explorer Version Control Integration
Learn how to use File Explorer and version control integration inside Windows Advanced settings.
learn.microsoft.com
Here's How:
1 Open Settings (Win+I).
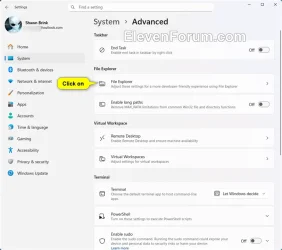
2 Click/tap on System on the left side, and click/tap on Advanced on the right side. (see screenshot below)
3 Click/tap on File Explorer. (see screenshot below)
4 Do step 5 (add) or step 6 (remove) below for what you want.
5 Add Repository Folder for File Explorer + version control
A) Under "File Explorer + version control", click/tap on the Choose folder button. (see screenshot below)
B) Navigate to and select your repository folder, and click/tap on Select Folder. (see screenshot below)
C) The selected repository folder will now be added. (see screenshot below)
6 Remove Repository Folder for File Explorer + version control
A) Under "File Explorer + version control", click/tap on the More options (3 dots) button of the repository folder you want to remove. (see screenshot below)
B) Click/tap on Remove.
That's it,
Shawn Brink
Attachments
Last edited: