cant delete imageres.dll.mun


stinky

Member
Local time
8:37 PM
Posts
6
OS
Windows 11
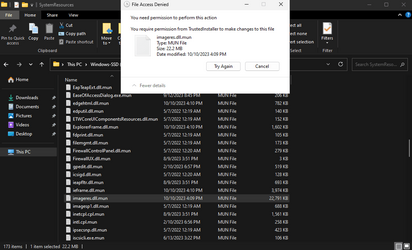
ive deleted it before and honestly i forgot i switched my win 11 icons with the 10 because i have been using them for so long and i accidentally updated windows and now i cant delete the mun file it says you require permission from TrustedInstaller.exe i already am the owner of trusted installer atleast i think i am i have no clue whats going on i use to be able to delete the mun file without no problem now i cant
 
Windows Build/Version
Version 22H2

Attachments

  • Screenshot 2023-11-02 015616.png
    Screenshot 2023-11-02 015616.png
    29.7 KB · Views: 2

My Computer

System One

  • OS
    Windows 11
    Computer type
    Laptop
    Manufacturer/Model
    Lenovo
    CPU
    Ryzen 7 5800H
    Motherboard
    Lenovo 82JU
    Memory
    Crucial CT16G4SFD832A.C16FN 2x16GB
    Graphics Card(s)
    Nvidia RTX 3060 (Laptop)
    Sound Card
    Realtek(R) Audio
    Monitor(s) Displays
    LG 24GN600-B UltraGear Gaming Monitor
    Screen Resolution
    1920x1080
    Hard Drives
    Samsung MZVLB1T0HBLR-000L2 1TB
    Keyboard
    Hyper X Alloy Origins 65%
    Mouse
    Logitech G PRO X SUPERLIGHT
    Browser
    Chrome
    Antivirus
    Windows Defender
The workaround is to rename imageres.dll.mun to another filename (because the file is loaded in memory). Now you can copy a new file using the original filename. After the next reboot, the renamed old file can be deleted.
 

My Computer

System One

  • OS
    Windows 7
The workaround is to rename imageres.dll.mun to another filename (because the file is loaded in memory). Now you can copy a new file using the original filename. After the next reboot, the renamed old file can be deleted.
it doesnt let me rename the file
 

My Computer

System One

  • OS
    Windows 11
    Computer type
    Laptop
    Manufacturer/Model
    Lenovo
    CPU
    Ryzen 7 5800H
    Motherboard
    Lenovo 82JU
    Memory
    Crucial CT16G4SFD832A.C16FN 2x16GB
    Graphics Card(s)
    Nvidia RTX 3060 (Laptop)
    Sound Card
    Realtek(R) Audio
    Monitor(s) Displays
    LG 24GN600-B UltraGear Gaming Monitor
    Screen Resolution
    1920x1080
    Hard Drives
    Samsung MZVLB1T0HBLR-000L2 1TB
    Keyboard
    Hyper X Alloy Origins 65%
    Mouse
    Logitech G PRO X SUPERLIGHT
    Browser
    Chrome
    Antivirus
    Windows Defender
I thought you said you took ownership of the file? If not, use PowerRun to get TI privileges.
 

My Computer

System One

  • OS
    Windows 7
I thought you said you took ownership of the file? If not, use PowerRun to get TI privileges.
my mistake i took ownership of TrustedInstaller Not the mun file
 

My Computer

System One

  • OS
    Windows 11
    Computer type
    Laptop
    Manufacturer/Model
    Lenovo
    CPU
    Ryzen 7 5800H
    Motherboard
    Lenovo 82JU
    Memory
    Crucial CT16G4SFD832A.C16FN 2x16GB
    Graphics Card(s)
    Nvidia RTX 3060 (Laptop)
    Sound Card
    Realtek(R) Audio
    Monitor(s) Displays
    LG 24GN600-B UltraGear Gaming Monitor
    Screen Resolution
    1920x1080
    Hard Drives
    Samsung MZVLB1T0HBLR-000L2 1TB
    Keyboard
    Hyper X Alloy Origins 65%
    Mouse
    Logitech G PRO X SUPERLIGHT
    Browser
    Chrome
    Antivirus
    Windows Defender
I thought you said you took ownership of the file? If not, use PowerRun to get TI privileges.
i used power run to delete the mun now when i try to move the new mun it says You need permission to perform this action
 

My Computer

System One

  • OS
    Windows 11
    Computer type
    Laptop
    Manufacturer/Model
    Lenovo
    CPU
    Ryzen 7 5800H
    Motherboard
    Lenovo 82JU
    Memory
    Crucial CT16G4SFD832A.C16FN 2x16GB
    Graphics Card(s)
    Nvidia RTX 3060 (Laptop)
    Sound Card
    Realtek(R) Audio
    Monitor(s) Displays
    LG 24GN600-B UltraGear Gaming Monitor
    Screen Resolution
    1920x1080
    Hard Drives
    Samsung MZVLB1T0HBLR-000L2 1TB
    Keyboard
    Hyper X Alloy Origins 65%
    Mouse
    Logitech G PRO X SUPERLIGHT
    Browser
    Chrome
    Antivirus
    Windows Defender
The correct sequence would be:

1. Rename existing imageres.dll.mun to imageres.dll.mun.OLD
2. Copy new file to imageres.dll.mun
3. "taskkill /f /im explorer.exe && start explorer" to restart Explorer. This releases the system hold on imageres.dll.mun.OLD
4. Delete imageres.dll.mun.OLD
 

My Computer

System One

  • OS
    Windows 7
The correct sequence would be:

1. Rename existing imageres.dll.mun to imageres.dll.mun.OLD
2. Copy new file to imageres.dll.mun
3. "taskkill /f /im explorer.exe && start explorer" to restart Explorer. This releases the system hold on imageres.dll.mun.OLD
4. Delete imageres.dll.mun.OLD
i fixed it by deleting mun through power run and moving the file through power run thank you i now have the old windows 10 icons on win 11!! :p
 

My Computer

System One

  • OS
    Windows 11
    Computer type
    Laptop
    Manufacturer/Model
    Lenovo
    CPU
    Ryzen 7 5800H
    Motherboard
    Lenovo 82JU
    Memory
    Crucial CT16G4SFD832A.C16FN 2x16GB
    Graphics Card(s)
    Nvidia RTX 3060 (Laptop)
    Sound Card
    Realtek(R) Audio
    Monitor(s) Displays
    LG 24GN600-B UltraGear Gaming Monitor
    Screen Resolution
    1920x1080
    Hard Drives
    Samsung MZVLB1T0HBLR-000L2 1TB
    Keyboard
    Hyper X Alloy Origins 65%
    Mouse
    Logitech G PRO X SUPERLIGHT
    Browser
    Chrome
    Antivirus
    Windows Defender

Latest Support Threads

Back
Top Bottom