This tutorial will show you how to turn on or off File Explorer window preloading for faster launch times for your account in Windows 11.
Preloading File Explorer in the background helps improve File Explorer launch performance.
Contents
- Option One: Enable or Disable Preloading File Explorer in Folder Options
- Option Two: Enable or Disable Preloading File Explorer using REG file
1 Open Folder Options.
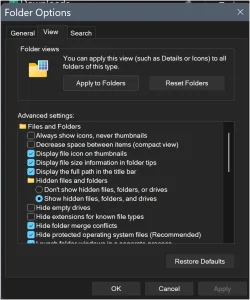
2 Click/tap on the View tab. (see screenshot below)
3 Check (enable - default) or uncheck (disable) Enable window preloading for faster launch times for what you want.
4 Click/tap on OK.
1 Do step 2 (enable) or step 3 (disable) below for what you would like to do.
2 Enable Preloading File Explorer
This is the default setting.
A) Click/tap on the Download button below to download the file below, and go to step 4 below.
Turn_ON_Preloading_FileExplorer_in_background.reg
Download
(Contents of REG file for reference)
Code:
Windows Registry Editor Version 5.00

[HKEY_CURRENT_USER\Software\Microsoft\Windows\CurrentVersion\Explorer\Advanced]
"ShouldPrelaunchFileExplorer"=dword:00000001
3 Disable Preloading File Explorers
A) Click/tap on the Download button below to download the file below, and go to step 4 below.
Turn_OFF_Preloading_FileExplorer_in_background.reg
Download
(Contents of REG file for reference)
Code:
Windows Registry Editor Version 5.00

[HKEY_CURRENT_USER\Software\Microsoft\Windows\CurrentVersion\Explorer\Advanced]
"ShouldPrelaunchFileExplorer"=dword:00000000
4 Save the .reg file to your desktop.
5 If you have Smart App Control turned on, you will need to unblock the downloaded REG file.
6 Double click/tap on the downloaded .reg file to merge it.
7 When prompted, click/tap on Run, Yes (UAC), Yes, and OK to approve the merge.
8 You can now delete the downloaded .reg file if you like.
That's it,
Shawn Brink
Attachments
Last edited: