This tutorial will show you how to enable or disable showing snap layouts when dragging a window to the top of the screen for your account in Windows 11.
The Snap windows feature in Windows allows you to automatically resize and arrange windows on your screen.
Windows 11 includes a Snap Layouts feature that allows you to select how to snap the current window.
Reference:

Support snap layouts for desktop apps on Windows 11 - Windows apps
Support the snap layouts menu in your desktop application.
learn.microsoft.com
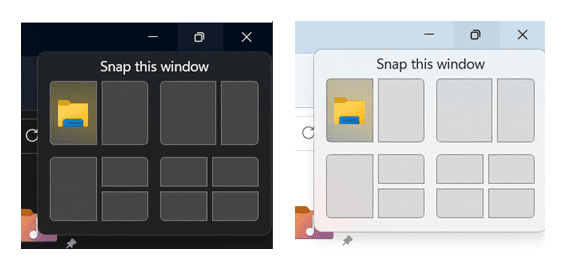
Starting with Windows 11 build 22557, Microsoft added a new way to snap windows into snap layouts that works wonderfully with both touch and mouse! To try it out, just drag a window to the top of the screen to reveal the snap layouts, drop the window on top of a zone to snap it, and use snap assist to finish building your layout.
Starting with Windows 11 build 25300, Microsoft is trying out different treatments for snap layouts with Windows Insiders in the Dev Channel. Microsoft is investigating ways to improve the discoverability and usage of the snap layouts such as decreasing the hover time required to invoke the flyout when you mouse over the maximum/restore button in an app’s title bar. In addition to a few other tweaks, you’ll notice some treatments will also pull in the icon of the app window you are working in and adding a descriptive title. If you see one of these treatments, give Microsoft feedback on what you think. As a reminder, it is normal for Microsoft to try out different concepts in the Dev Channel to get feedback.
Starting with Windows 11 build 22631.3374, Microsoft is trying out suggestions in Snap Layouts that help you instantly snap multiple app windows together. When hovering over the Minimize or Maximize button on an app (or WIN + Z) to launch the layout box, you will see app icons displayed in various layout options to help recommend the best layout option that works best. This experience is beginning to roll out so not all Windows Insiders in the Dev Channel will see it right away.

Starting with Windows 11 build 22635.4371 (Beta), Microsoft is trying out a behind-the-scenes change to improve what apps are suggested for snapping in snap layouts. Try out snapping different apps and let Microsoft know if you see improvements in what apps you see suggested.
Contents
- Option One: Enable or Disable Snap Layouts on Top of Screen in Settings
- Option Two: Enable or Disable Snap Layouts on Top of Screen using REG file
- Option Three: Enable or Disable Snap Layouts on Top of Screen in Registry Editor
EXAMPLE: Show snap layouts when you drag a window to the top of the screen
1 Open Settings (Win+I).
2 Click/tap on System on the left side, and click/tap on Multitasking on the right side. (see screenshot below)
Open Multitasking settings
3 Click/tap on Snap windows on the right side to expand it open. (see screenshot below step 4)
4 Check (enable - default) or Uncheck (disable) Show snap layouts when I drag a window to the top of my screen for what you want.
The Show snap layouts when I drag a window to the top of my screen setting will be disabled and grayed out if Snap windows is not turned on.
5 You can now close Settings if you like.
This option will not work when Administrator protection is turned on.
1 Do step 2 (enable) or step 3 (disable) below for what you would like to do.
2 To Enable Snap Layouts on Top of Screen
This is the default setting.
A) Click/tap on the Download button below to download the file below, and go to step 4 below.
Enable_show_snap_layouts_when_drag_window_to_top_of_screen.reg
Download
(Contents of REG file for reference)
Code:
Windows Registry Editor Version 5.00

[HKEY_CURRENT_USER\Control Panel\Desktop]
"WindowArrangementActive"="1"

[HKEY_CURRENT_USER\Software\Microsoft\Windows\CurrentVersion\Explorer\Advanced]
"EnableSnapBar"=dword:00000001
3 To Disable Snap Layouts on Top of Screen
A) Click/tap on the Download button below to download the file below, and go to step 4 below.
Disable_show_snap_layouts_when_drag_window_to_top_of_screen.reg
Download
(Contents of REG file for reference)
Code:
Windows Registry Editor Version 5.00

[HKEY_CURRENT_USER\Software\Microsoft\Windows\CurrentVersion\Explorer\Advanced]
"EnableSnapBar"=dword:00000000
4 Save the .reg file to your desktop.
5 Double click/tap on the downloaded .reg file to merge it.
6 When prompted, click/tap on Run, Yes (UAC), Yes, and OK to approve the merge.
7 Either sign out and sign in or restart the computer to apply.
8 You can now delete the downloaded .reg file if you like.
1 Open Registry Editor (regedit.exe).
2 Navigate to the key location below in the left pane of Registry Editor. (see screenshot below step 3)
HKEY_USERS\<SID>\Software\Microsoft\Windows\CurrentVersion\Explorer\Advanced
Substitute <SID> in the key path above with the actual SID for the account you want to apply this to.
For example:
HKEY_USERS\S-1-5-21-2498639629-3946114050-4100787084-1001\Software\Microsoft\Windows\CurrentVersion\Explorer\Advanced
3 In the right pane of the Advanced key, double click/tap on the EnableSnapBar DWORD to modify it. (see screenshot below)
4 Enter 0 (disable) or 1 (enable - default) for what you want, and click/tap on OK. (see screenshot below)
5 You can now close Registry Editor if you like.
That's it,
Shawn Brink
Related Tutorials
- Snap windows into Layouts in Windows 11
- Turn On or Off Snap windows in Windows 11
- Enable or Disable Snap Assist in Windows 11
- Enable or Disable Snap Layouts for Maximize Button in Windows 11
- Enable or Disable Drag to Snap windows in Windows 11
- Enable or Disable Snap Window without Dragging All the Way to Screen Edge in Windows 11
- Enable or Disable Simultaneously Resize any Adjacent Snapped window in Windows 11
- Enable or Disable Show Snap Groups on Alt+Tab, Task View, and Taskbar in Windows 11
Attachments
Last edited: