Solved garlin's PowerShell scripts for updating Secure Boot CA 2023


When you write too many entries, it overflows the maximum space that's been reserved for Secure Boot storage.
IIRC, I think ASUS had that issue earlier this year...

That really lowers the value of Secure Boot...is that a viable trade-off? 2023 certs with no DBX?
 
Last edited:

My Computer My Computer

At a glance

Windows 11 Pro 25H2
OS
Windows 11 Pro 25H2
Computer type
Laptop
Manufacturer/Model
Toshiba
I think ASUS had that issue earlier this year...
Tons of Acer PC's had this issue, and they spent most of late Spring/Summer shipping new BIOS releases to address this problem.
 

My Computer My Computer

At a glance

Windows 7
OS
Windows 7
That's right...it was Acer.

At least they got the BIOS fix.

We got nothing from Toshiba.

We updated successfully anyway, thanks to Mosby, and your scripts.
 

My Computer My Computer

At a glance

Windows 11 Pro 25H2
OS
Windows 11 Pro 25H2
Computer type
Laptop
Manufacturer/Model
Toshiba
When I do the uefi 2023 update without doing a DBX update, would I still apply:
schtasks /change /disable /tn "\Microsoft\Windows\PI\Secure-Boot-Update"
If so, will windows update the certs through updates without updating DBX or will I apply new certs manually?
Could this be a possibility: when I select “clear or delete all keys”, it sets my bios to manually insert keys? What should I do in that case?
I’m planning on doing the Udate uefi 2023 update without DBX. Wouldn’t it be better to do this instead of having no 2023 certs?
Normally the Secure Boot task checks if there's a new Windows boot manager which it can deploy. Disabling the task (to prevent DBX changes) also disables this operation. There is no opt-out for only blocking DBX changes. So the Secure Boot task either runs (and does everything it's created to do) or it doesn't.

In the short term, if the task isn't running then Windows isn't negatively impacted. But you're at a security risk since a newer boot file is available, but you're not using it at the moment. You would either manually copy the boot file (not that hard) or just run the update script because it's easier.

At this point you're overthinking the problem. Delete all keys, and then run the update script from Windows. You will end up in the correct KEK + DB state. No DBX entries will be added. Then disable the task, and ponder any future steps. This way you can at least run Windows out of the box.
 

My Computer My Computer

At a glance

Windows 7
OS
Windows 7
At this point you're overthinking the problem. Delete all keys, and then run the update script from Windows. You will end up in the correct KEK + DB state. No DBX entries will be added. Then disable the task, and ponder any future steps. This way you can at least run Windows out of the box.
Perfect! This is the answer I was looking for! I just needed the info, knowledge, support, and to see if my thought of only updating to 2023 certs w/o DBX update and still some positive effect on my 2012 laptop.
i don’t surf on the internet with this anyways so I hope that alone will help to avoid boot malware.
I’ll let you know when I perform the update with outcome.
But for right now, consider this success since happy with decision.
Truly, can’t thank you enough for putting so much time you put in to help me!
Just maybe, other’s with very old unsupported pc’s might want to go this route if nothing else works?
Thanks again, Bob
PS, so I won’t be using “schtasks /change /disable /tn "\Microsoft\Windows\PI\Secure-Boot-Update"?
 

My Computer My Computer

At a glance

Windows 11 25H2Intel Core i7-3632QM 2.20GHZ / 3.20GHZ8MB DDR3-1600 SDRAM (SODRAM)Intel HD4000
OS
Windows 11 25H2
Computer type
Laptop
Manufacturer/Model
Sony Vaio sve15128cxs
CPU
Intel Core i7-3632QM 2.20GHZ / 3.20GHZ
Motherboard
Ivy Bridge, Insyde Bios- R0200D5 (9/26/2016)
Memory
8MB DDR3-1600 SDRAM (SODRAM)
Graphics Card(s)
Intel HD4000
Hard Drives
1 TB-HDD Western Digital WDC WD10JPVT-55A1YT0
Cooling
3 fan cooling pad plus internal.
Mouse
Logitech ERGO
Antivirus
Norton365, Norton AntiTrack.
Other Info
Sony doesn’t support anymore and has deleted all firmware and software from their site.
On some BIOS'es, the total count of banned EFI files (including SVN's which masquerade as EFI file hashes) can reach nearly 500. When you write too many entries, it overflows the maximum space that's been reserved for Secure Boot storage. This leads to truncated data. A number of BIOS'es implementations aren't smart enough to handle this situation in a graceful manner and will brick themselves.

Therefore your only strategy is to avoid adding more DBX entries if possible.
Hi.

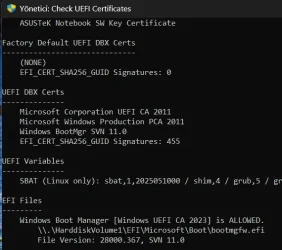
My dbx entries have reached 455. It is still less than 500 if this is a general set point. Is there a way to find certificate storage space (total kB and used kB) and to erase, if necessary, some entries to reduce used kB size other than erasing all UEFI entries and starting all over again ?

Screenshot 2026-09-21 125232.webp
 

My Computers My Computers

  • At a glance

    Windows 11 Pro build 26200.8524Intel i7-4790Teams DDR3-1600 4x4 GBMSI Nvidia GeForce GTX 1050Ti
    OS
    Windows 11 Pro build 26200.8524
    Computer type
    PC/Desktop
    Manufacturer/Model
    Home Built
    CPU
    Intel i7-4790
    Motherboard
    Asus H97 Pro Gamer with add-on TPM1.2 module
    Memory
    Teams DDR3-1600 4x4 GB
    Graphics Card(s)
    MSI Nvidia GeForce GTX 1050Ti
    Sound Card
    Realtek ALC1150
    Monitor(s) Displays
    Dell P2425D
    Screen Resolution
    2560 by 1440 pixels
    Hard Drives
    Corsair NVMe M.2 Core XT 1000 GB (Windows 11 v.25H2); Samsung SATA Evo 870 500 GB (Windows 11 v.25H2);
    PSU
    Corsair HX850
    Case
    Gigabyte Solo 210
    Cooling
    Zalman CNPS7X Tower
    Keyboard
    Microsoft AIO Wireless (includes touchpad)
    Mouse
    HP S1000 Plus Wireless
    Internet Speed
    500 Mb fiber optic
    Browser
    Chrome; MS Edge
    Antivirus
    Windows Defender
  • At a glance

    MacOS 12 MontereyIntel Core i58 GBIntel integrated
    Operating System
    MacOS 12 Monterey
    Computer type
    Laptop
    Manufacturer/Model
    Apple Macbook Air
    CPU
    Intel Core i5
    Memory
    8 GB
    Graphics card(s)
    Intel integrated
    Screen Resolution
    1440 by 900 pixels
    Hard Drives
    128 GB
    Keyboard
    Built-in
    Mouse
    Microsoft Wireless
    Internet Speed
    802.11 ac
    Browser
    Chrome; Safari
    Antivirus
    N/A
[SOLVED] Gigabyte G5 KC / FB08 – Secure Boot CA 2023, Event 1803, 0x4004 – no BIOS update required

I managed to fully update the Secure Boot certificates on a Gigabyte G5 KC / RC45KC with InsydeH2O BIOS FB08, without a new BIOS, BIOS mod, cross-flash, deleting the Platform Key, or entering Setup Mode.

My problem was specifically the missing Microsoft Corporation KEK 2K CA 2023.

Initial state​

Run all commands below in PowerShell as Administrator.

Confirm-SecureBootUEFI

Mine returned:

True
Check CA 2023 status:

Get-ItemProperty 'HKLM:\SYSTEM\CurrentControlSet\Control\SecureBoot\Servicing' -ErrorAction SilentlyContinue | Select-Object UEFICA2023Status,UEFICA2023Error,UEFICA2023ErrorEvent,WindowsUEFICA2023Capable,ConfidenceLevel
Check AvailableUpdates:

$u = Get-ItemPropertyValue 'HKLM:\SYSTEM\CurrentControlSet\Control\SecureBoot' -Name AvailableUpdates -ErrorAction SilentlyContinue; "AvailableUpdates = 0x{0:X4}" -f $u
My result was:

UEFICA2023Status = InProgress
AvailableUpdates = 0x4004
UEFICA2023ErrorEvent = 1803
Event 1803 said Windows could not find a KEK signed by the PK for this device.

This procedure is specifically relevant if you are stuck at:

0x4004 + Event ID 1803
If your system is still at 0x5944, 0x5904, 0x5104, 0x4104, etc., do not assume you have the same problem.


1. Detect the real Downloads folder​

This also works if Downloads was moved to another drive:

$Downloads = [Environment]::ExpandEnvironmentVariables((Get-ItemProperty 'HKCU:\Software\Microsoft\Windows\CurrentVersion\Explorer\User Shell Folders').'{374DE290-123F-4565-9164-39C4925E467B}'); $Downloads

2. Back up Secure Boot variables​

$dir = Join-Path $Downloads 'SecureBoot_Backup'; New-Item -ItemType Directory -Path $dir -Force | Out-Null
Get-SecureBootUEFI -Name PK -OutputFilePath "$dir\PK.bin"
Get-SecureBootUEFI -Name KEK -OutputFilePath "$dir\KEK.bin"
Get-SecureBootUEFI -Name db -OutputFilePath "$dir\db.bin"
Get-SecureBootUEFI -Name dbx -OutputFilePath "$dir\dbx.bin"
Keep your BitLocker recovery key available before changing Secure Boot settings.


3. Download the official Microsoft KEK 2023 certificate​

Microsoft certificate:

Microsoft Corporation KEK 2K CA 2023
SHA-1: 459AB6FB5E284D272D5E3E6ABC8ED663829D632B
Signature Owner GUID: 77fa9abd-0359-4d32-bd60-28f4e78f784b
Download:

$arquivo = Join-Path $Downloads 'Microsoft_KEK_2K_CA_2023.der'; Invoke-WebRequest -Uri 'https://go.microsoft.com/fwlink/?linkid=2239775' -OutFile $arquivo
Verify SHA-1:

Get-FileHash $arquivo -Algorithm SHA1
It MUST return:

459AB6FB5E284D272D5E3E6ABC8ED663829D632B
Verify the certificate:

$cert = [System.Security.Cryptography.X509Certificates.X509Certificate2]::new([IO.File]::ReadAllBytes($arquivo)); $cert | Format-List Subject,Issuer,Thumbprint,NotBefore,NotAfter
You should see:

CN=Microsoft Corporation KEK 2K CA 2023

4. Important G5 KC / InsydeH2O detail: use​

My FB08 BIOS file browser did not display the .der file.

I simply made an identical copy with a .cer extension:

$arquivoCer = Join-Path $Downloads 'Microsoft_KEK_2K_CA_2023.cer'; Copy-Item $arquivo $arquivoCer -Force
Verify both files are identical:

Get-FileHash $arquivo -Algorithm SHA256; Get-FileHash $arquivoCer -Algorithm SHA256
The two hashes must match.

Copy:

Microsoft_KEK_2K_CA_2023.cer
to the root of a FAT32 USB drive.


5. Enroll the KEK manually in BIOS​

Enter BIOS with F2.

On my G5 KC FB08:

Security
→ Administer Secure Boot
→ KEK Options
→ Enroll KEK
If the Secure Boot administration options are greyed out, you may need to temporarily set a Supervisor Password.

Select:

Microsoft_KEK_2K_CA_2023.cer
If the firmware asks for the certificate type, this is an X.509 DER certificate.

If it asks for the Signature Owner GUID:

77fa9abd-0359-4d32-bd60-28f4e78f784b
IMPORTANT: the goal is to ADD/ENROLL the new KEK.

Do NOT use:

Clear KEK
Delete KEK
Replace KEK
Delete PK
Clear PK
Erase Secure Boot Keys
Reset to Setup Mode
Restore Factory Keys
Install Factory Default Keys
I kept the existing PK, KEKs, DB and DBX unchanged.

Save with F10 and reboot.


6. Confirm the KEK was installed​

Back in Windows, PowerShell as Administrator:

[System.Text.Encoding]::ASCII.GetString((Get-SecureBootUEFI KEK).Bytes) -match 'Microsoft Corporation KEK 2K CA 2023'
Mine returned:

True
Also verify:

Confirm-SecureBootUEFI
It should remain:

True

7. Let Windows finish the migration​

Run:

Start-ScheduledTask -TaskPath '\Microsoft\Windows\PI\' -TaskName 'Secure-Boot-Update'
Then reboot.

Check again:

$u = Get-ItemPropertyValue 'HKLM:\SYSTEM\CurrentControlSet\Control\SecureBoot' -Name AvailableUpdates; "AvailableUpdates = 0x{0:X4}" -f $u
Mine changed from:

0x4004
to:

0x4000
Then:

Get-ItemProperty 'HKLM:\SYSTEM\CurrentControlSet\Control\SecureBoot\Servicing' | Select-Object UEFICA2023Status,UEFICA2023Error,UEFICA2023ErrorEvent,WindowsUEFICA2023Capable
Final result:

UEFICA2023Status : Updated
UEFICA2023Error :
UEFICA2023ErrorEvent :
WindowsUEFICA2023Capable : 2
Finally, check Events 1803/1808:

Get-WinEvent -FilterHashtable @{LogName='System';ProviderName='Microsoft-Windows-TPM-WMI';Id=1803,1808} -MaxEvents 10 | Select-Object TimeCreated,Id,Message | Format-List
After the fix I got a new:

Event ID 1808
showing:

Windows UEFI CA 2023 (DB)
Option ROM CA 2023 (DB)
3P UEFI CA 2023 (DB)
KEK 2023
Boot Manager (2023)
So the migration was fully completed.

My confirmed configuration​

Gigabyte G5 KC
SKU RC45KC
InsydeH2O BIOS FB08
Secure Boot enabled
Before:

UEFICA2023Status = InProgress
AvailableUpdates = 0x4004
Event 1803
After:

Microsoft Corporation KEK 2K CA 2023 = present
UEFICA2023Status = Updated
AvailableUpdates = 0x4000
Event 1808
My Gigabyte Platform Key was:

CN=GIGABYTE
SHA-1: D8D027127DA4A8F9CF2F361D4E27116DE5FC8630
Windows did not have an OEM-signed KEK update matching this PK, which explains Event 1803. The InsydeH2O firmware, however, allowed local physical-presence enrollment of the official Microsoft KEK 2023 certificate.

After adding only that certificate, Windows completed everything normally.

Official references​

Microsoft Secure Boot troubleshooting:
Secure Boot troubleshooting guide | Microsoft Support

Microsoft Event IDs 1803/1808:
Secure Boot DB and DBX variable update events | Microsoft Support

Microsoft Secure Boot key management:
Windows Secure Boot Key Creation and Management Guidance

Microsoft Secure Boot objects repository:
GitHub - microsoft/secureboot_objects: Secure boot objects recommended by Microsoft.

KEK 2023 certificate:
secureboot_objects/PreSignedObjects/KEK/Certificates/microsoft corporation kek 2k ca 2023.der at main · microsoft/secureboot_objects

Obviously, Secure Boot key changes carry some risk. Back up your variables and BitLocker recovery key first. This is a confirmed result on my G5 KC / FB08; do not blindly apply it to unrelated firmware implementations.

 

My Computer My Computer

At a glance

windows 11
OS
windows 11
Computer type
PC/Desktop
My dbx entries have reached 455. It is still less than 500 if this is a general set point. Is there a way to find certificate storage space (total kB and used kB) and to erase, if necessary, some entries to reduce used kB size other than erasing all UEFI entries and starting all over again ?
500 isn't a magic number. It's roughly the upper bound that is reported by some users.

The total count of DBX file hashes is the unique set of [factory default hashes] + [dbxupdate.bin hashes]. No duplicate entries are allowed. It's not so much the count of EFI hashes, as the total size of the DBX variable that matters the most.
Code:
> (Get-SecureBootUEFI dbx).Bytes.Count
18131

Does knowing the exact byte count help you? Depends, but mostly no unless you have inside information on this BIOS.

Unless you know from personal experience, or reading someone's story of how the DBX update bricked their BIOS, the size at where a failure occurs is dependent on the design of the BIOS chip and how the firmware was written.

From some industry sources, 32 KB is considered a limit. But that's the total storage for all NVRAM items (which include non-Secure Boot data). The actual limit for bricking on a problem BIOS could be far less than that.

If you want to reduce the size of the DBX list, then you have to return to the BIOS menu and check if there's an easy option to delete ALL of the DBX keys. When you don't have that choice, you will have to manually delete the individual keys (455) one by one. For security reasons, you cannot delete Secure Boot keys that are already written (from Windows), as long as the PK is still installed.

One option to see if you can drop 154 entries is reset to factory defaults, and re-apply the Secure Boot changes. PC's which updated DBX before April 2026 used a larger version of the dbxupdate.bin. Using the April 2026 dbxupdate.bin file will end up with a shorter DBX list. Since there's no way to clear the 154 entries that are no longer included, you need a factory reset.

The rate of new DBX growth should slow down now that the SVN and SBAT mechanisms exist to block multiple Windows and Linux boot files in bulk, rather than use individual entries for each file. Only the new SVN's will make the DBX list grow longer.
 
Last edited:

My Computer My Computer

At a glance

Windows 7
OS
Windows 7

3. Download the official Microsoft KEK 2023 certificate​

Microsoft certificate:

Microsoft Corporation KEK 2K CA 2023
SHA-1: 459AB6FB5E284D272D5E3E6ABC8ED663829D632B
Signature Owner GUID: 77fa9abd-0359-4d32-bd60-28f4e78f784b
Download:

$arquivo = Join-Path $Downloads 'Microsoft_KEK_2K_CA_2023.der'; Invoke-WebRequest -Uri 'https://go.microsoft.com/fwlink/?linkid=2239775' -OutFile $arquivo
Verify SHA-1:

Get-FileHash $arquivo -Algorithm SHA1
It MUST return:

459AB6FB5E284D272D5E3E6ABC8ED663829D632B
Verify the certificate:

$cert = [System.Security.Cryptography.X509Certificates.X509Certificate2]::new([IO.File]::ReadAllBytes($arquivo)); $cert | Format-List Subject,Issuer,Thumbprint,NotBefore,NotAfter
You should see:

CN=Microsoft Corporation KEK 2K CA 2023

4. Important G5 KC / InsydeH2O detail: use​

My FB08 BIOS file browser did not display the .der file.

I simply made an identical copy with a .cer extension:

$arquivoCer = Join-Path $Downloads 'Microsoft_KEK_2K_CA_2023.cer'; Copy-Item $arquivo $arquivoCer -Force
Verify both files are identical:

Get-FileHash $arquivo -Algorithm SHA256; Get-FileHash $arquivoCer -Algorithm SHA256
The two hashes must match.

Copy:

Microsoft_KEK_2K_CA_2023.cer
to the root of a FAT32 USB drive.

I don't know if you bothered to read the first post, or look at the script. When a post-signed KEK CA 2023 isn't available from the MS GitHub, the update script downloads the KEK CA 2023 cert file from MS and copies it to the EFI volume for you.

Manual installation of [KEK 2K CA 2023]
=======================================

1. Shutdown Windows, and enter your UEFI's Secure Boot menu.

2. Enter "KEK Options / Enroll KEK / Enroll KEK Using File" or "Key Management / KEK Management / Append Key".
The menu options may be different for your BIOS.

- Browse the system drive's EFI partition
- Enter the <EFI> folder
- Enter the <Certs> sub-folder

3. Find the file "Microsoft Corporation KEK 2K CA 2023.der". Add this certificate.
If you encounter an error, try the file "Microsoft Corporation KEK 2K CA 2023.crt".

4. Save changes and exit.

5. Start Windows, and re-run the 'Update-UEFI_CA2023.ps1' script.

The update script supports all three modes:
1. Using a post-signed KEK from the MS GitHub (when available)
2. Copying the KEK certificate to the EFI, and asking the user to do manual enrollment.
3. Using Setup Mode if your BIOS doesn't allow manual enrollment, but allows Delete All Keys.
 

My Computer My Computer

At a glance

Windows 7
OS
Windows 7
I have 501 dbx.
I might reset the BIOS before revoking the PCA 2011 certificate to clear out entries.
 

My Computer My Computer

At a glance

windows 11
OS
windows 11
MS tried to help the situation by dropping 154 "redundant" entries which are covered by the PCA 2011 revocation. Those entries are older versions of the Windows boot manager immediately banned in the wake of Black Lotus. Since they're all signed by the PCA 2011, banning 2011 does the same thing and those explicit MS entries don't need to exist for the same effect.

If you were to reset everything:
1. Disable Secure Boot.
2. Reset to factory defaults.
3. Re-apply changes.
4. Enable Secure Boot.

The next time you perform the revoke operation, your Windows will have the shorter version of the dbxupdate.bin to apply. When you reset, your BIOS will have some fixed number of factory-provided DBX entries. This number can vary from OEM to OEM, and across BIOS versions. There isn't a standard count for factory entries. It's whatever they captured on their list for the image.

Sometimes the factory list can overlap the Windows dbxupdate.bin, so the final count doesn't grow as much.
 

My Computer My Computer

At a glance

Windows 7
OS
Windows 7
If you want to reduce the size of the DBX list, then you have to return to the BIOS menu and check if there's an easy option to delete ALL of the DBX keys. When you don't have that choice, you will have to manually delete the individual keys (455) one by one. For security reasons, you cannot delete Secure Boot keys that are already written (from Windows), as long as the PK is still installed.

One option to see if you can drop 154 entries is reset to factory defaults, and re-apply the Secure Boot changes. PC's which updated DBX before April 2026 used a larger version of the dbxupdate.bin. Using the April 2026 dbxupdate.bin file will end up with a shorter DBX list. Since there's no way to clear the 154 entries that are no longer included, you need a factory reset.
Hi.

Thanks for your advice.

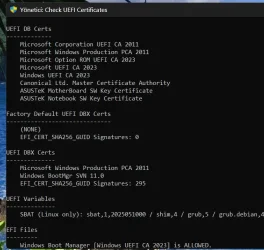
My BIOS allowed me to delete DBX signatures and I deleted them. After checking the SecureBoot state with your script, it advised running a reg file.

I ran that reg file and here is the result:

dbx.webp

The number of dbx signatures dropped from 455 to 295.

Thanks again.
 

My Computers My Computers

  • At a glance

    Windows 11 Pro build 26200.8524Intel i7-4790Teams DDR3-1600 4x4 GBMSI Nvidia GeForce GTX 1050Ti
    OS
    Windows 11 Pro build 26200.8524
    Computer type
    PC/Desktop
    Manufacturer/Model
    Home Built
    CPU
    Intel i7-4790
    Motherboard
    Asus H97 Pro Gamer with add-on TPM1.2 module
    Memory
    Teams DDR3-1600 4x4 GB
    Graphics Card(s)
    MSI Nvidia GeForce GTX 1050Ti
    Sound Card
    Realtek ALC1150
    Monitor(s) Displays
    Dell P2425D
    Screen Resolution
    2560 by 1440 pixels
    Hard Drives
    Corsair NVMe M.2 Core XT 1000 GB (Windows 11 v.25H2); Samsung SATA Evo 870 500 GB (Windows 11 v.25H2);
    PSU
    Corsair HX850
    Case
    Gigabyte Solo 210
    Cooling
    Zalman CNPS7X Tower
    Keyboard
    Microsoft AIO Wireless (includes touchpad)
    Mouse
    HP S1000 Plus Wireless
    Internet Speed
    500 Mb fiber optic
    Browser
    Chrome; MS Edge
    Antivirus
    Windows Defender
  • At a glance

    MacOS 12 MontereyIntel Core i58 GBIntel integrated
    Operating System
    MacOS 12 Monterey
    Computer type
    Laptop
    Manufacturer/Model
    Apple Macbook Air
    CPU
    Intel Core i5
    Memory
    8 GB
    Graphics card(s)
    Intel integrated
    Screen Resolution
    1440 by 900 pixels
    Hard Drives
    128 GB
    Keyboard
    Built-in
    Mouse
    Microsoft Wireless
    Internet Speed
    802.11 ac
    Browser
    Chrome; Safari
    Antivirus
    N/A
While we are discussing DBX files I checked mine:

Factory Default UEFI DBX Certs
------------------------------
(NONE)
EFI_CERT_SHA256_GUID Signatures: 77

UEFI DBX Certs
--------------
Microsoft Windows Production PCA 2011
Windows BootMgr SVN 11.0
EFI_CERT_SHA256_GUID Signatures: 506

Is it worth doing a full reset for just 77 signatures. Since we have no way of knowing the 'max' size what happens if the time comes there is no room at the INN ? Guess I should add its HP bios version F.54 latest and likely last, date 8/3/2025
 

My Computer My Computer

At a glance

Windows 11 Intel i5 10400 HD630 graphics chipi5-1040012 gbHD630 chipset
OS
Windows 11 Intel i5 10400 HD630 graphics chip
Computer type
PC/Desktop
Manufacturer/Model
HP
CPU
i5-10400
Memory
12 gb
Graphics Card(s)
HD630 chipset
Monitor(s) Displays
LG 24inch
Hard Drives
SSD, external usb drive 1tb for files/backups
Keyboard
wireless Logi
Mouse
ms 4000 wireless mouse
Internet Speed
10meg
Browser
Firefox
Antivirus
Defender
Other Info
Win11 Home 25h2 26200.9457 09/14/2026
The only guidance is the relative age of the PC. If it's more than 3-4 years old, there's more benefit to clearing the certs. The problem is the BIOS is a proprietary "black box" which the vendor doesn't have to reveal its inner workings.

If you updated your PC once before without any problems, there's no risk to repeating the process again.
 

My Computer My Computer

At a glance

Windows 7
OS
Windows 7

Latest Support Threads

Back
Top Bottom