If the PITR option is missing from WinRE do this:


rawintellect

Mr. Biscuit
Member
VIP
Local time
10:21 AM
Posts
410
OS
Windows 11 25H2
Frustrated with the restore option missing from WinRE? This fixed it for me! ;-)


1. Download or Mount the Windows ISO
    • Go to the Microsoft Software Download site or UUPDUMP and download an ISO for your exact Windows version (Windows 10 or Windows 11).
    • Once downloaded, right-click the ISO file and select Mount.
    • Open the mounted drive, go into the Sources folder, and locate the install.wim (or install.esd) file.

2. Extract winre.wim
    • Download and open the free 7-Zip utility.
    • Use 7-Zip to open your install.wim file and navigate to the following path within the ISO:
      \Windows\System32\Recovery\
    • Extract the winre.wim file to a temporary location on your PC, like C:\.

3. Place the File in Your System Directory
    • Open File Explorer, navigate to C:\Windows\System32\Recovery, and paste the winre.wim file you just extracted. (Note: You will need Administrator privileges to paste into this folder).
    • Ensure you have unhidden system files and folders to view the contents properly.

4. Re-enable WinRE in Command Prompt
    • Press Win + R, type cmd, and press Ctrl + Shift + Enter to open an Administrator Command Prompt.
    • Run the following command to disable the recovery agent:
      reagentc /disable
    • Point the system to your newly placed recovery image by running:
      reagentc /setreimage /path C:\Windows\System32\Recovery
    • Re-enable the environment by running:
      reagentc /enable
    • Verify that it was successfully restored by typing reagentc /info.
 

Attachments
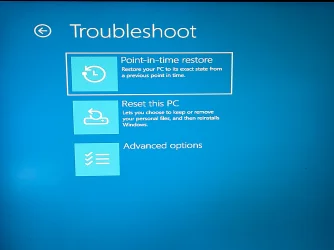
  • 20260718_032129.webp
    20260718_032129.webp
    444.6 KB · Views: 2
Last edited:

My Computer My Computer

At a glance

Windows 11 25H2AMD 9950X3d264GB Corsair vengeance DDR5 (6000 MHz) CL30AMD 9070XT
OS
Windows 11 25H2
Computer type
PC/Desktop
Manufacturer/Model
N/A
CPU
AMD 9950X3d2
Motherboard
Asus x870E Extreme
Memory
64GB Corsair vengeance DDR5 (6000 MHz) CL30
Graphics Card(s)
AMD 9070XT
Sound Card
Realtek
Monitor(s) Displays
N/A
Screen Resolution
1440p
PSU
Thermaltake 1200w
Case
Asus View 71 TG RGB
Cooling
Custom Cooling loop With an Alphacool 13339 VPP Apex Pump and EK Quantum surface radiator
Internet Speed
Xfinity 2300 mbps
Antivirus
Norton
Point the system to your newly placed recovery image by running:
reagentc /setreimage /path C:\Windows\System32\Recovery

C:\Windows\System32\Recovery is the default staging location for the Winre.wim file. If Winre.wim is present in C:\Windows\System32\Recovery, running reagentc /enable will automatically locate and register Windows RE, making reagentc /setreimage unnecessary.

Code:
REAGENTC.EXE <command> <arguments>

  /info        - Displays Windows RE and system reset configuration information.
  /setreimage  - Sets the location of the custom Windows RE image.
  /enable      - Enables Windows RE.
  /disable     - Disables Windows RE.

Disable WinRE

reagentc /disable (expected output: "Operation Successful")

- Moves Winre.wim from the Recovery partition (or other registered location) to C:\Windows\System32\Recovery, the default staging location for the Winre.wim file.
- Updates ReAgent.xml to mark WinRE as disabled and clear the registered recovery location.

C:\Windows\Logs\ReAgent\ReAgent.log:

Code:
winreCopyWIMBack moved WIM file from \\?\GLOBALROOT\device\harddisk0\partition4\Recovery\WindowsRE\ to C:\WINDOWS\system32\Recovery\Winre.wim successfully!
WinRE uninstall step 1 succeeded: copy WIM file back to its staging location

Note that Winre.wim is a hidden, protected system file by default, so it will not appear in the C:\Windows\System32\Recovery folder unless you enable the display of both hidden files and protected operating system files in File Explorer.

Enable WinRE

reagentc /enable (expected output: "Operation Successful")

- Searches for a valid recovery partition.
- Moves Winre.wim from C:\Windows\System32\Recovery (the default staging location) to the Recovery partition, or to C:\Recovery\WindowsRE if no recovery partition exists.
- Updates ReAgent.xml to enable WinRE and record the new recovery location.

ReAgent.log shows how reagentc /enable searches for the target partition.

In the following example, no recovery partition exists, so WinRE is created in the C:\Recovery\WindowsRE folder:

Code:
----Search target partition option #1: try existing WinRE partition
----Search target partition option #2: try first recovery partition
----Search target partition option #3: try system partition for MBR
----Search target partition option #4: try new recovery partition if allowed
----Search target partition option #5: try target OS partition
MeetPartitionRequirements Partition details: {Offset: 227540992, Free space: 959545180160, Total space: 998350254080}
MeetPartitionRequirements WinRE WIM size: 747474239
MeetPartitionRequirements Required free space: 356515840
Found target partition: use target OS partition, offset: 227540992

In the following example, a recovery partition exists, so WinRE is created on the recovery partition:

Code:
----Search target partition option #1: try existing WinRE partition
----Search target partition option #2: try first recovery partition
Found target partition: use the first recovery partition, offset: 997691752448
 
Last edited:

My Computers My Computers

  • At a glance

    Windows 11 ProAMD Ryzen 9 9950X3DKingston FURY Beast 64GB (2x32GB) DDR5 6000MT/sASUS TUF Gaming Radeon RX 9070 OC Edition 16G...
    OS
    Windows 11 Pro
    Computer type
    PC/Desktop
    CPU
    AMD Ryzen 9 9950X3D
    Motherboard
    ASRock B650E Taichi Lite
    Memory
    Kingston FURY Beast 64GB (2x32GB) DDR5 6000MT/s
    Graphics Card(s)
    ASUS TUF Gaming Radeon RX 9070 OC Edition 16GB GDDR6
    Hard Drives
    Solidigm P44 Pro 2TB M.2 NVMe SSD
  • At a glance

    Windows 11 HomeIntel Core Ultra 9 275HX64GB (2x 32GB) DDR5-6400NVIDIA GeForce RTX 5080 16GB GDDR7 Laptop GPU
    Operating System
    Windows 11 Home
    Computer type
    Laptop
    Manufacturer/Model
    Lenovo Legion Pro 7i Gen 10 16"
    CPU
    Intel Core Ultra 9 275HX
    Memory
    64GB (2x 32GB) DDR5-6400
    Graphics card(s)
    NVIDIA GeForce RTX 5080 16GB GDDR7 Laptop GPU
    Hard Drives
    2x 1TB M.2 NVMe SSD (SK Hynix)
Point the system to your newly placed recovery image by running:
reagentc /setreimage /path C:\Windows\System32\Recovery

I tested the command in a virtual machine. This command should not be used in this scenario. After execution, reagentc /enable installs Windows RE in C:\Recovery\WindowsRE on the Windows partition, rather than on the recovery partition.

reagentc /info

PS C:\Users\admin> reagentc /info
Windows Recovery Environment (Windows RE) and system reset configuration
Information:

Windows RE status: Enabled
Windows RE location: \\?\GLOBALROOT\device\harddisk0\partition3\Recovery\WindowsRE
Boot Configuration Data (BCD) identifier: e00a3ecc-82fb-11f1-b129-f46ce584cfd4
Recovery image location:
Recovery image index: 0
Custom image location:
Custom image index: 0
Windows RE Version: 10.0.26100.8875

REAGENTC.EXE: Operation Successful.

diskpart
list disk
select disk #
list partition
exit

PS C:\Users\admin> diskpart

Microsoft DiskPart version 10.0.26100.1150

Copyright (C) Microsoft Corporation.
On computer: DESKTOP-HI6SRD5

DISKPART> list disk

Disk ### Status Size Free Dyn Gpt
-------- ------------- ------- ------- --- ---
Disk 0 Online 930 GB 1024 KB *

DISKPART> select disk 0

Disk 0 is now the selected disk.

DISKPART> list partition

Partition ### Type Size Offset
------------- ---------------- ------- -------
Partition 1 System 200 MB 1024 KB
Partition 2 Reserved 16 MB 201 MB
Partition 3 Primary 928 GB 217 MB
Partition 4 Recovery 845 MB 929 GB

DISKPART> exit

Leaving DiskPart...

ChatGPT:

The problem is that after you explicitly ran:

reagentc /setreimage /path C:\Windows\System32\Recovery

you overrode the default behavior. ReAgentC now treats the Windows partition as the registered source location. As a result, reagentc /enable keeps Windows RE on the Windows partition instead of searching for a suitable recovery partition.

How to restore the default Windows RE configuration:

reagentc /disable
del C:\Windows\System32\Recovery\ReAgent.xml
reagentc /enable

Deleting ReAgent.xml forces ReAgentC to create a new configuration using its default logic. The next time you run reagentc /enable, it should search for a suitable recovery partition instead of treating the Windows partition as the preferred installation target.

The recovery partition can also be deleted and recreated using the default Windows RE configuration, so reagentc /setreimage is unnecessary. For example:

How to Delete and Recreate the Recovery Partition

Step 1.
Disable WinRE

reagentc /disable (expected output: "Operation Successful")

Note that Winre.wim is a hidden, protected system file by default, so it will not appear in the C:\Windows\System32\Recovery folder unless you enable the display of both hidden files and protected operating system files in File Explorer.

Note:

If you have previously specified the location of the Windows RE image using the reagentc /setreimage command, for example:

reagentc /setreimage /path R:\Recovery\WindowsRE

restore the default Windows RE configuration as follows before proceeding to step 2:

Manually copy Winre.wim to the C:\Windows\System32\Recovery folder if it isn't already there.

Then delete ReAgent.xml:

del C:\Windows\System32\Recovery\ReAgent.xml

(The next time you run reagentc /enable, ReAgentC will recreate its configuration using the default Windows RE behavior.)

Step 2. Delete the recovery partition

diskpart
list volume
select volume # (select the recovery partition)
delete partition override
exit

Step 3. Recreate the recovery partition

diskpart
select volume c
extend (extend the C: partition)
shrink desired=1000 (shrink the C: partition)
create partition primary size=1000
format quick fs=ntfs
set id=DE94BBA4-06D1-4D40-A16A-BFD50179D6AC
gpt attributes=0x8000000000000001
exit

Step 4. Enable WinRE

reagentc /enable (expected output: "Operation Successful")

Step 5. Running reagentc /info should now report "Windows RE status: Enabled" and display the "Windows RE location" for the recovery environment. It also displays the WinRE version.


Staging location for Winre.wim when Windows RE is disabled

With the default Windows RE configuration, C:\Windows\System32\Recovery is the default staging location for Winre.wim when Windows RE is disabled. If Winre.wim is present in C:\Windows\System32\Recovery, running reagentc /enable will automatically locate a suitable recovery partition, install and register Windows RE, making reagentc /setreimage unnecessary.

Example (reagentc /disable – ReAgent.log):

Code:
winreCopyWIMBack moved WIM file from \\?\GLOBALROOT\device\harddisk0\partition4\Recovery\WindowsRE\ to C:\WINDOWS\system32\Recovery\Winre.wim successfully!
WinRE uninstall step 1 succeeded: copy WIM file back to its staging location

If you have specified the location of the Windows RE image using the command reagentc /setreimage /path R:\Recovery\WindowsRE, ReAgentC uses the recovery partition instead of C:\Windows\System32\Recovery as the staging location for Winre.wim when Windows RE is disabled.

Example (reagentc /disable – ReAgent.log):

Code:
winreCopyWIMBack moved WIM file from \\?\GLOBALROOT\device\harddisk0\partition4\Recovery\WindowsRE\ to \\?\GLOBALROOT\device\harddisk0\partition4\Recovery\WindowsRE\ successfully!
WinRE uninstall step 1 succeeded: copy WIM file back to its staging location
 
Last edited:

My Computers My Computers

  • At a glance

    Windows 11 ProAMD Ryzen 9 9950X3DKingston FURY Beast 64GB (2x32GB) DDR5 6000MT/sASUS TUF Gaming Radeon RX 9070 OC Edition 16G...
    OS
    Windows 11 Pro
    Computer type
    PC/Desktop
    CPU
    AMD Ryzen 9 9950X3D
    Motherboard
    ASRock B650E Taichi Lite
    Memory
    Kingston FURY Beast 64GB (2x32GB) DDR5 6000MT/s
    Graphics Card(s)
    ASUS TUF Gaming Radeon RX 9070 OC Edition 16GB GDDR6
    Hard Drives
    Solidigm P44 Pro 2TB M.2 NVMe SSD
  • At a glance

    Windows 11 HomeIntel Core Ultra 9 275HX64GB (2x 32GB) DDR5-6400NVIDIA GeForce RTX 5080 16GB GDDR7 Laptop GPU
    Operating System
    Windows 11 Home
    Computer type
    Laptop
    Manufacturer/Model
    Lenovo Legion Pro 7i Gen 10 16"
    CPU
    Intel Core Ultra 9 275HX
    Memory
    64GB (2x 32GB) DDR5-6400
    Graphics card(s)
    NVIDIA GeForce RTX 5080 16GB GDDR7 Laptop GPU
    Hard Drives
    2x 1TB M.2 NVMe SSD (SK Hynix)
I have tested the reagentc /setreimage command multiple times in a virtual machine and confirmed that the default Windows RE configuration can be restored by:

1. Disable Windows RE (reagentc /disable).
2. Manually move Winre.wim to C:\Windows\System32\Recovery if it is not already there.
3. Delete the Windows RE configuration file (del C:\Windows\System32\Recovery\ReAgent.xml).
4. Re-enable Windows RE (reagentc /enable), allowing Windows to recreate the default Windows RE configuration.


Note: reagentc /setreimage changes the configured staging location stored in ReAgent.xml, which in turn changes how reagentc /enable and reagentc /disable behave.

The following summary shows how reagentc /setreimage changes Windows RE behavior by configuring a custom staging location.

Windows RE behavior with the default and custom staging locations

reagentc /enable


With the default Windows RE configuration:
  • Searches for a suitable recovery partition.
  • Moves Winre.wim from the default staging location (C:\Windows\System32\Recovery) to the recovery partition (or to C:\Recovery\WindowsRE if no suitable recovery partition exists).
  • Updates ReAgent.xml to enable Windows RE and record the registered Windows RE location.
If a custom staging location has been configured:
  • reagentc /setreimage /path R:\Recovery\WindowsRE
    If the recovery partition (the configured staging location) meets the Windows RE requirements, reagentc /enable keeps Winre.wim on that partition instead of searching for another suitable recovery partition.
  • reagentc /setreimage /path C:\Windows\System32\Recovery
    reagentc /enable moves Winre.wim from the configured staging location (C:\Windows\System32\Recovery) to C:\Recovery\WindowsRE on the Windows partition instead of to the recovery partition.
  • Updates ReAgent.xml to enable Windows RE and record the registered Windows RE location.
reagentc /disable

With the default Windows RE configuration:
  • Moves Winre.wim from the active Windows RE location (normally the recovery partition) to the default staging location (C:\Windows\System32\Recovery).
  • Updates ReAgent.xml to disable Windows RE. The registered Windows RE location is cleared.
If a custom staging location has been configured:
  • reagentc /setreimage /path R:\Recovery\WindowsRE
    reagentc /disable keeps Winre.wim on the configured staging location instead of moving it elsewhere.
  • reagentc /setreimage /path C:\Windows\System32\Recovery
    reagentc /disable moves Winre.wim from the active Windows RE location (C:\Recovery\WindowsRE) to the configured staging location (C:\Windows\System32\Recovery).
  • Updates ReAgent.xml to disable Windows RE. The registered Windows RE location is cleared, but the configured staging location is retained.


How the Windows RE configuration is stored in ReAgent.xml

Windows RE enabled


Default staging location (C:\Windows\System32\Recovery):

Code:
<WinreLocation path="\Recovery\WindowsRE" id="0" offset="997691752448" guid="{3122a9fd-d56a-45f8-a196-e134970f22dc}"/>
<ImageLocation path="" id="0" offset="0" guid="{00000000-0000-0000-0000-000000000000}"/>
<WinREStaged state="0"/>

Custom staging location (reagentc /setreimage /path R:\Recovery\WindowsRE):

Code:
<WinreLocation path="\Recovery\WindowsRE" id="0" offset="997691752448" guid="{3122a9fd-d56a-45f8-a196-e134970f22dc}"/>
<ImageLocation path="\Recovery\WindowsRE" id="0" offset="997691752448" guid="{3122a9fd-d56a-45f8-a196-e134970f22dc}"/>
<WinREStaged state="0"/>

Windows RE disabled

As the ReAgent.xml examples below show, the reagentc /disable command clears the registered Windows RE location. If a custom staging location has been configured using reagentc /setreimage, the configured staging location is retained.

Default staging location (C:\Windows\System32\Recovery):

Code:
<WinreLocation path="" id="0" offset="0" guid="{00000000-0000-0000-0000-000000000000}"/>
<ImageLocation path="" id="0" offset="0" guid="{00000000-0000-0000-0000-000000000000}"/>
<WinREStaged state="0"/>

Custom staging location (reagentc /setreimage /path R:\Recovery\WindowsRE):

Code:
<WinreLocation path="" id="0" offset="0" guid="{00000000-0000-0000-0000-000000000000}"/>
<ImageLocation path="\Recovery\WindowsRE" id="0" offset="997691752448" guid="{3122a9fd-d56a-45f8-a196-e134970f22dc}"/>
<WinREStaged state="1"/>

ChatGPT:

Based on your testing, I think these three elements can be described quite accurately, even though Microsoft doesn't formally document them. I'd be careful to present them as observed behavior rather than official definitions.

Putting the three elements together:
  • <WinreLocation> — Where Windows RE is currently registered and booted from.
  • <ImageLocation> — Where ReAgentC stores or expects the staged Winre.wim image (the configured staging location).
  • <WinREStaged> — A temporary state flag indicating that a staged Windows RE image is present while Windows RE is disabled.
I think this interpretation best fits all four of your ReAgent.xml examples. In particular, it explains why:
  • <WinreLocation> is cleared by reagentc /disable.
  • <ImageLocation> is retained only when you've configured a custom staging location.
  • <WinREStaged> changes to 1 only while Windows RE is disabled with a custom staging location, then returns to 0 after reagentc /enable completes.


reagentc /setreimage is primarily intended for deployment and customization scenarios where Winre.wim is stored in a custom (non-default) location.

Code:
@echo  == Register the location of the recovery tools ==
W:\Windows\System32\Reagentc /Setreimage /Path R:\Recovery\WindowsRE /Target W:\Windows

In this example, the Windows installation is offline (W:\Windows), and the recovery image is being explicitly registered at R:\Recovery\WindowsRE. The /Target parameter causes ReAgentC to modify the ReAgent.xml file of the offline Windows installation located at W:\Windows, not the ReAgent.xml file of the currently running Windows installation. As a result, the offline installation is configured to use R:\Recovery\WindowsRE as its Windows RE image location.

That's quite different from a normal installed system, where reagentc /enable automatically locates and registers Winre.wim.
 
Last edited:

My Computers My Computers

  • At a glance

    Windows 11 ProAMD Ryzen 9 9950X3DKingston FURY Beast 64GB (2x32GB) DDR5 6000MT/sASUS TUF Gaming Radeon RX 9070 OC Edition 16G...
    OS
    Windows 11 Pro
    Computer type
    PC/Desktop
    CPU
    AMD Ryzen 9 9950X3D
    Motherboard
    ASRock B650E Taichi Lite
    Memory
    Kingston FURY Beast 64GB (2x32GB) DDR5 6000MT/s
    Graphics Card(s)
    ASUS TUF Gaming Radeon RX 9070 OC Edition 16GB GDDR6
    Hard Drives
    Solidigm P44 Pro 2TB M.2 NVMe SSD
  • At a glance

    Windows 11 HomeIntel Core Ultra 9 275HX64GB (2x 32GB) DDR5-6400NVIDIA GeForce RTX 5080 16GB GDDR7 Laptop GPU
    Operating System
    Windows 11 Home
    Computer type
    Laptop
    Manufacturer/Model
    Lenovo Legion Pro 7i Gen 10 16"
    CPU
    Intel Core Ultra 9 275HX
    Memory
    64GB (2x 32GB) DDR5-6400
    Graphics card(s)
    NVIDIA GeForce RTX 5080 16GB GDDR7 Laptop GPU
    Hard Drives
    2x 1TB M.2 NVMe SSD (SK Hynix)
Back
Top Bottom