Install Windows 11 using WinPE usb on any partition by typing setup at command prompt.


E

e4rr0o

Guest
1) Install ADK and PE add on for windows 11.
2) Make bootable WinPE by using copype and MakeWinPEMedia commands with powershell(run as administrator) as below:
C:\program files (x86) \Windows Kits\10\Assessment and Deployment Kit\Deployment Tools>copype amd64 c:\WinPE_amd64_PS
C:\program files (x86) \Windows Kits\10\Assessment and Deployment Kit\Deployment Tools>MakeWinPEMedia /UFD C:\WinPE_amd64_PS T:
T: is usb drive used to make WinPE bootable.
3) Create 10 GB partition on your pc hard disk. (NTFS). Copy all contents of mounted iso of Windows 11 to this drive. Suppose letter is O: for 10 GB partition.
4) Create a new folder (Empty) name it as you like , I call it My Mounted Drive, location is C: drive.
5) Now boot from WinPE usb bootable drive just created.
6) You get
X:\Windows\System32>Diskpart (Press Enter)
DISKPART> list volume
Here C: partition on hard disk appears to be H: (Volume 5)
and O: partition appears to be G: (Volume 4)
7) DISKPART> select volume 4
volume 4 is the selected volume.
8) DISKPART>assign mount="H:\My Mounted Drive"
Diskpart successfully assigned the drive letter or mount point.
8) DISKPART>exit
9) x:\windows\system32>H:
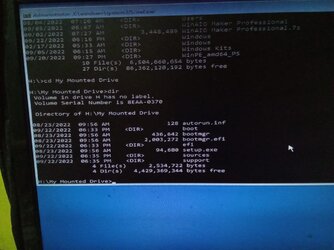
10) H:\>cd My Mounted Drive
11) H:\My Mounted Drive>setup (Press Enter)
Now setup starts, click Next and install windows 11 on desired partition.
 
Windows Build/Version
Windows 11 21H2 pro os build 22000.918

My Computer

Huh - this is like overkill. There are far easier ways to do this by booting from a usb installation drive


What is the point of going through all these convoluted steps to do what is easy?


Step 1 alone is beyond average user.
 

My Computer

System One

  • OS
    Windows 10 Pro + others in VHDs
    Computer type
    Laptop
    Manufacturer/Model
    ASUS Vivobook 14
    CPU
    I7
    Motherboard
    Yep, Laptop has one.
    Memory
    16 GB
    Graphics Card(s)
    Integrated Intel Iris XE
    Sound Card
    Realtek built in
    Monitor(s) Displays
    N/A
    Screen Resolution
    1920x1080
    Hard Drives
    1 TB Optane NVME SSD, 1 TB NVME SSD
    PSU
    Yep, got one
    Case
    Yep, got one
    Cooling
    Stella Artois
    Keyboard
    Built in
    Mouse
    Bluetooth , wired
    Internet Speed
    72 Mb/s :-(
    Browser
    Edge mostly
    Antivirus
    Defender
    Other Info
    TPM 2.0
1) Install ADK and PE add on for windows 11.
2) Make bootable WinPE by using copype and MakeWinPEMedia commands with powershell(run as administrator) as below:
C:\program files (x86) \Windows Kits\10\Assessment and Deployment Kit\Deployment Tools>copype amd64 c:\WinPE_amd64_PS
C:\program files (x86) \Windows Kits\10\Assessment and Deployment Kit\Deployment Tools>MakeWinPEMedia /UFD C:\WinPE_amd64_PS T:
T: is usb drive used to make WinPE bootable.
3) Create 10 GB partition on your pc hard disk. (NTFS). Copy all contents of mounted iso of Windows 11 to this drive. Suppose letter is O: for 10 GB partition.
4) Create a new folder (Empty) name it as you like , I call it My Mounted Drive, location is C: drive.
5) Now boot from WinPE usb bootable drive just created.
6) You get
X:\Windows\System32>Diskpart (Press Enter)
DISKPART> list volume
Here C: partition on hard disk appears to be H: (Volume 5)
and O: partition appears to be G: (Volume 4)
7) DISKPART> select volume 4
volume 4 is the selected volume.
8) DISKPART>assign mount="H:\My Mounted Drive"
Diskpart successfully assigned the drive letter or mount point.
8) DISKPART>exit
9) x:\windows\system32>H:
10) H:\>cd My Mounted Drive
11) H:\My Mounted Drive>setup (Press Enter)
Now setup starts, click Next and install windows 11 on desired partition.
Please see the images. Thanks.IMG-20220924-WA0000.jpgIMG-20220924-WA0002.jpgIMG-20220924-WA0001.jpg
Huh - this is like overkill. There are far easier ways to do this by booting from a usb installation drive


What is the point of going through all these convoluted steps to do what is easy?


Step 1 alone is beyond average user.
Hello @cereberus , a small partition of 10 GB on hard drive can be reserved for upcoming newer versions of Windows 11 , WinPE bootable usb is also forever.
Thanks for considering my thread.
 

My Computer

Please see the images. Thanks.View attachment 40032View attachment 40030View attachment 40031

Hello @cereberus , a small partition of 10 GB on hard drive can be reserved for upcoming newer versions of Windows 11 , WinPE bootable usb is also forever.
Thanks for considering my thread.
Windows can automatically reserve space for updates.


EDIT: Why feel the need to run setup from another partition? You can just drop the ISO on your C: drive (or any other drive), double-click it, and run setup from there.
 

My Computers

System One System Two

  • OS
    Win11 Pro 23H2
    Computer type
    PC/Desktop
    Manufacturer/Model
    Home Built
    CPU
    Intel i7-11700K
    Motherboard
    ASUS Prime Z590-A
    Memory
    128GB Crucial Ballistix 3200MHz DRAM
    Graphics Card(s)
    No GPU - CPU graphics only (for now)
    Sound Card
    Realtek (on motherboard)
    Monitor(s) Displays
    HP Envy 32
    Screen Resolution
    2560 x 1440
    Hard Drives
    1 x 1TB NVMe Gen 4 x 4 SSD
    1 x 2TB NVMe Gen 3 x 4 SSD
    2 x 512GB 2.5" SSDs
    2 x 8TB HD
    PSU
    Corsair HX850i
    Case
    Corsair iCue 5000X RGB
    Cooling
    Noctua NH-D15 chromax.black cooler + 10 case fans
    Keyboard
    CODE backlit mechanical keyboard
    Mouse
    Logitech MX Master 3
    Internet Speed
    1Gb Up / 1 Gb Down
    Browser
    Edge
    Antivirus
    Windows Defender
    Other Info
    Additional options installed:
    WiFi 6E PCIe adapter
    ASUS ThunderboltEX 4 PCIe adapter
  • Operating System
    Win11 Pro 23H2
    Computer type
    Laptop
    Manufacturer/Model
    Lenovo ThinkBook 13x Gen 2
    CPU
    Intel i7-1255U
    Memory
    16 GB
    Graphics card(s)
    Intel Iris Xe Graphics
    Sound Card
    Realtek® ALC3306-CG codec
    Monitor(s) Displays
    13.3-inch IPS Display
    Screen Resolution
    WQXGA (2560 x 1600)
    Hard Drives
    2 TB 4 x 4 NVMe SSD
    PSU
    USB-C / Thunderbolt 4 Power / Charging
    Mouse
    Buttonless Glass Precision Touchpad
    Keyboard
    Backlit, spill resistant keyboard
    Internet Speed
    1Gb Up / 1Gb Down
    Browser
    Edge
    Antivirus
    Windows Defender
    Other Info
    WiFi 6e / Bluetooth 5.1 / Facial Recognition / Fingerprint Sensor / ToF (Time of Flight) Human Presence Sensor
I just use the dism /apply-image command.
 

My Computers

System One System Two

  • OS
    Windows 11
    Computer type
    PC/Desktop
    Manufacturer/Model
    Homebuilt
    CPU
    AMD Ryzen 7 3800XT
    Motherboard
    ASUS ROG Crosshair VII Hero (WiFi)
    Memory
    32GB
    Graphics Card(s)
    EVGA GeForce GTX 1080 Ti
  • Operating System
    Windows 11 Education
    Computer type
    Laptop
    Manufacturer/Model
    Dell Inspiron 7773
    CPU
    Intel i7-8550U
    Memory
    32GB
    Graphics card(s)
    Nvidia Geforce MX150
    Sound Card
    Realtek
    Monitor(s) Displays
    17"
    Screen Resolution
    1920 x 1080
    Hard Drives
    Toshiba 512GB NVMe SSD
    SK Hynix 512GB SATA SSD
    Internet Speed
    Fast!
Windows can automatically reserve space for updates.


EDIT: Why feel the need to run setup from another partition? You can just drop the ISO on your C: drive (or any other drive), double-click it, and run setup from there.
We are installing windows 11 from WinPE usb , externally. So any partition can be selected to install windows 11. Double clicking setup file within windows starts updating the running windows.
Thanks.
 

My Computer

An idea is to avoid collecting .iso images and boot from Ventoy. Or to avoid making new bootable usb drive for installation of windows 11.
Delete the contents of 10GB partition and paste into it the contents of latest iso image of Windows 11.
 

My Computer

Been doing it for years on win7. Create a small partition at end of disk e.g. 10gb. Copy contents of install media onto it. It can be accessed via boot menu or by booting any pe , winre.wim, boot.wim etc and then run x:\setup which should find the media on the hard disk, or if it has been set with reagentc then it will feature as an entry in sys recov options, or reach down and run setup.exe on the recov partition, or use the apply method, etc, etc

Fancy variation is to replace recovery partition\sources\install.wim with your own captured custom install.wim which can be appended so there are several images each captured at a different time.

I like wimlib for this purpose, but you could use dism++ which is very easy and automatically does snapshot capture to create or append.

something like this:
wimlib-imagex append c:\ "R:\sources\install.wim"--snapshot --create --compress=fast --config="path-to-wimscript.ini"

That will create install.wim if it doesn't exist yet, or append if it already exists. The wimscript.ini excludes unnecessary stuff.

That is one way of doing backup images in the very useful .wim format.

To work out which image you want, you could add something to the command to give it different descriptions, or you can just have a look at the dates.
 
Last edited:

My Computers

System One System Two

  • OS
    Win7
    Computer type
    PC/Desktop
    CPU
    i5-8400
    Motherboard
    gigabyte b365m ds3h
    Memory
    2x8gb 3200mhz
    Monitor(s) Displays
    benq gw2480
    PSU
    bequiet pure power 11 400CM
    Cooling
    cryorig m9i
  • Operating System
    win7
    Computer type
    PC/Desktop
    CPU
    pentium g5400
    Motherboard
    gigabyte b365m ds3h
    Memory
    1x8gb 2400
    PSU
    xfx pro 450
Yes, we are lucky to read those brilliant tutorials by @Kari , thanks for those excellent tutorials.
Been doing it for years on win7. Create a small partition at end of disk e.g. 10gb. Copy contents of install media onto it. It can be accessed via boot menu or by booting any pe , winre.wim, boot.wim etc and then run x:\setup which should find the media on the hard disk, or if it has been set with reagentc then it will feature as an entry in sys recov options, or reach down and run setup.exe on the recov partition, or use the apply method, etc, etc

Fancy variation is to replace recovery partition\sources\install.wim with your own captured custom install.wim which can be appended so there are several images each captured at a different time.

I like wimlib for this purpose, but you could use dism++ which is very easy and automatically does snapshot capture to create or append.

something like this:
wimlib-imagex append c:\ "R:\sources\install.wim"--snapshot --create --compress=fast --config="path-to-wimscript.ini"
 

My Computer

I didn't know he had done tutorials on it. Then it will be easy because he has probably done screenshots.
 

My Computers

System One System Two

  • OS
    Win7
    Computer type
    PC/Desktop
    CPU
    i5-8400
    Motherboard
    gigabyte b365m ds3h
    Memory
    2x8gb 3200mhz
    Monitor(s) Displays
    benq gw2480
    PSU
    bequiet pure power 11 400CM
    Cooling
    cryorig m9i
  • Operating System
    win7
    Computer type
    PC/Desktop
    CPU
    pentium g5400
    Motherboard
    gigabyte b365m ds3h
    Memory
    1x8gb 2400
    PSU
    xfx pro 450
e4rr0o, It's always important to acknowledge and thank those who have helped you in online communities. One way to do this is by using the like button located at the bottom of each post. By clicking on the like button, you can show your appreciation and support for the helpful content that others have shared with you. This small gesture can go a long way in encouraging people to continue contributing and sharing their knowledge with you and others in the community.

So, please remember to use the like button to show your gratitude and support to those who have helped you along the way. It's important to note that a "like" gives 1 point, "Helpful" gives 5 points, and for exceptional help, "Great support" gives 10 points.

Latest Support Threads

Back
Top Bottom