Powershell script used to install software after os installation


jchambers777

Active member
Local time
2:14 PM
Posts
4
OS
windows 10
Hi,

I was needing some assistance in trying to get a powershell script to run right after os installation. The way I have it setup is the typical first login that's when the powershell script runs and installs the programs. The programs that are getting installed is: 7zip, chrome, adobereader and notepad++. The way this setup runs is this is what I have in my folder structure:

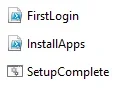
K:\Winbuild\Base\sources\$OEM$\$$\Setup\Scripts:
1762272758215.webp

This has proven to work as I ran the iso on a virtual machine it worked flawlessly. All programs got installed and shortcuts got created. However, when I create the usb flash drive in rufus with this same iso, for some reason it doesn't run the powershell script. I even split the .wim file and was able to create the flash drive as fat32. One thing I had read is because probably since it was ntfs could be why powershell wasn't running. Perhaps to creat the flashdrive as fat32 could help in running the powershell script. I tried still didn't work, but hey you will try anything to see if it works. I am not understanding why this is happening. This is on a dell pro 14 using UEFI and secure boot enabled. I have even cleared the partitions to let the autounattend file to recreate the partitions with a clean install. Still not working. It's just the powershell script not running at all and I am bashing my head on trying to figure that out. Any suggestions ahead of time would be very appreciated.
 

Attachments

  • 1762272735300.webp
    1762272735300.webp
    2.3 KB · Views: 4

My Computer

System One

  • OS
    windows 10
If you're running your script via unattend, the likely reason that it doesn't work with Rufus is that Rufus creates its own unattend, and that will supercede yours.
 

My Computer

System One

  • OS
    Windows 11 Pro 25H2
    Computer type
    PC/Desktop
    Manufacturer/Model
    Intel NUC12WSHi7
    CPU
    12th Gen Core i7-1260P
    Motherboard
    NUC12WSBi7
    Memory
    64 GB Micron PC4-25600
    Graphics Card(s)
    Intel Iris Xe Graphics
    Sound Card
    on-board Realtek HD Audio
    Monitor(s) Displays
    Dell U3219Q
    Screen Resolution
    3840 x 2160
    Hard Drives
    Samsung SSD 990 PRO 1TB
    Crucial MX500 2 TB
    Antivirus
    Microsoft Defender
You can mount the install.wim file and modify the registry to start the script you want.

Startup apps in the registry​


The startup applications in Windows can be stored in specific registry locations.


  • For applications that run at startup for all users, the registry paths are:

    • HKLM\Software\Wow6432Node\Microsoft\Windows\CurrentVersion\Run
    • HKLM\Software\Microsoft\Windows\CurrentVersion\Run
  • For applications that run at startup for the current user, the registry path is:

    • HKCU\Software\Microsoft\Windows\CurrentVersion\Run
 

My Computer

System One

  • OS
    Windows 11
    Computer type
    PC/Desktop
    Manufacturer/Model
    HP Pavilion
    CPU
    AMD Ryzen 7 5700G
    Motherboard
    Erica6
    Memory
    Micron Technology DDR4-3200 16GB
    Graphics Card(s)
    NVIDIA GeForce RTX 3060
    Sound Card
    Realtek ALC671
    Monitor(s) Displays
    Samsung SyncMaster U28E590
    Screen Resolution
    3840 x 2160
    Hard Drives
    SAMSUNG MZVLQ1T0HALB-000H1
You can mount the install.wim file and modify the registry to start the script you want
I wish someone had told me that 10 years and a couple thousand software setups ago...
 

My Computer

System One

  • OS
    Windows 11 22H2 Pro (X-lite Micro 11 version)
    Computer type
    Laptop
    Manufacturer/Model
    Dell/ Precision 7680
    CPU
    i7 13850HX (20 cores, 28 threads)
    Motherboard
    Dell
    Memory
    32GB DDR5
    Graphics Card(s)
    Intel UHD/ RTX 1000 ADA
    Sound Card
    Realtek
    Monitor(s) Displays
    4K UHD Touchscreen
    Screen Resolution
    3840 x 2400
    Hard Drives
    Samsung 512GB system drive
    WD Blue 1TB game drive
    PSU
    240W AC adapter, 1800W when docked
    Internet Speed
    1 gigabit symmetrical
    Browser
    Firefox, Librewolf
    Antivirus
    None. Manully configured so nobody except me can change any critical system files. (Don't ask how, it's probably against some rule somewhere)

My Computer

System One

  • OS
    Windows 11
    Computer type
    PC/Desktop
    Manufacturer/Model
    HP Pavilion
    CPU
    AMD Ryzen 7 5700G
    Motherboard
    Erica6
    Memory
    Micron Technology DDR4-3200 16GB
    Graphics Card(s)
    NVIDIA GeForce RTX 3060
    Sound Card
    Realtek ALC671
    Monitor(s) Displays
    Samsung SyncMaster U28E590
    Screen Resolution
    3840 x 2160
    Hard Drives
    SAMSUNG MZVLQ1T0HALB-000H1
MS for various reasons, skips running SetupComplete.cmd on any system where it finds an OEM product key for Windows in the BIOS.
An OS deployment task sequence doesn't continue - Configuration Manager

Which is practically every single Dell model (except for I guess the Linux-only specials). Other name-brand vendors like HP or Lenovo suffer the same fate.

You can add a RunSynchronousCommand to the unattended file's specialize pass to call your SetupComplete.cmd. There's two methods:
1. The traditional fix runs SetupComplete directly in specialize pass, but technically it runs before OOBE. This might not matter for your scripted commands.

2. You can add a reg key to run SetupComplete in the designated post-OOBE phase. This is the same method as when you manually run Setup.exe from WinPE, and specify an argument to run a custom post-Setup command.

If you follow either methods, your SetupComplete.cmd should delete itself as the last command in the script, otherwise running it on a generic PC (with no OEM key in BIOS) will end up running the script twice.

Code:
        <settings pass="specialize">
                <component name="Microsoft-Windows-Deployment" processorArchitecture="amd64" publicKeyToken="31bf3856ad364e35" language="neutral" versionScope="nonSxS" xmlns:wcm="http://schemas.microsoft.com/WMIConfig/2002/State" xmlns:xsi="http://www.w3.org/2001/XMLSchema-instance">
                        <RunSynchronous>
                                <RunSynchronousCommand wcm:action="add">
                                        <Order>1</Order>
                                        <Path>reg add "HKEY_LOCAL_MACHINE\SYSTEM\Setup\FirstBoot\PostOobe" /v "00" /t REG_SZ /d "cmd /c C:\Windows\Setup\Scripts\SetupComplete.cmd & exit /b 0 " /f</Path>
                                </RunSynchronousCommand>
                        </RunSynchronous>
                </component>
        </settings>
 

My Computer

System One

  • OS
    Windows 7
I added these two lines to my autounattend to ensure that it would work. Now I think I broke it.

RunSynchronous>
<RunSynchronousCommand wcm:action="add">
<Order>1</Order>
<Path>reg add "HKEY_LOCAL_MACHINE\SYSTEM\Setup\FirstBoot\PostOobe" /v "00" /t REG_SZ /d "cmd /c C:\Windows\Setup\Scripts\SetupComplete.cmd &amp; exit /b 0" /f</Path>
</RunSynchronousCommand>
</RunSynchronous>
</component>
</settings>

<settings pass="oobeSystem">
<component name="Microsoft-Windows-Shell-Setup"
processorArchitecture="amd64"
publicKeyToken="31bf3856ad364e35"
language="neutral"
versionScope="nonSxS">
<FirstLogonCommands>
<SynchronousCommand wcm:action="add">
<Order>1</Order>
<CommandLine>%SystemRoot%\System32\WindowsPowerShell\v1.0\powershell.exe -ExecutionPolicy Bypass -File "C:\Windows\Setup\Scripts\FirstLogin.ps1"</CommandLine>
<Description>Run post-install PowerShell setup</Description>
</SynchronousCommand>
</FirstLogonCommands>

However, I have since fixed it at least I hope. I will let you know. I added those 2 because I was hoping this would run the powershell script.
We shall see. Thank you all for your replies.
 

My Computer

System One

  • OS
    windows 10
I have tried so many different ways I just want to give up, but I really don't. I want to be able to automate by installing programs.
I have even asked ai to help me and it's been 4 days now and even Ai can't help me. I have tried so many recommended ways from Ai,
still can't get it right. I have a screen shot of what is happening if anyone wants to take a guess at it:
1762450531615.webp

Here is my autounattend file just to take a look nothing private on it:
<?xml version="1.0" encoding="utf-8"?>
<unattend xmlns="urn:schemas-microsoft-com:unattend"
xmlns:wcm="http://schemas.microsoft.com/WMIConfig/2002/State"
xmlns:xsi="http://www.w3.org/2001/XMLSchema-instance">

<!-- ===================== -->
<!-- WINDOWS PE PHASE -->
<!-- ===================== -->
<settings pass="windowsPE">
<component name="Microsoft-Windows-Setup" processorArchitecture="amd64"
publicKeyToken="31bf3856ad364e35" language="neutral" versionScope="nonSxS">

<DiskConfiguration>
<Disk wcm:action="add">
<DiskID>0</DiskID>
<WillWipeDisk>true</WillWipeDisk>
<CreatePartitions>
<CreatePartition wcm:action="add">
<Order>1</Order><Type>EFI</Type><Size>100</Size>
</CreatePartition>
<CreatePartition wcm:action="add">
<Order>2</Order><Type>MSR</Type><Size>128</Size>
</CreatePartition>
<CreatePartition wcm:action="add">
<Order>3</Order><Type>Primary</Type><Extend>true</Extend>
</CreatePartition>
</CreatePartitions>

<ModifyPartitions>
<ModifyPartition wcm:action="add">
<Order>1</Order><PartitionID>1</PartitionID><Label>System</Label><Format>FAT32</Format>
</ModifyPartition>
<ModifyPartition wcm:action="add">
<Order>2</Order><PartitionID>2</PartitionID>
</ModifyPartition>
<ModifyPartition wcm:action="add">
<Order>3</Order><PartitionID>3</PartitionID><Label>Windows</Label><Format>NTFS</Format><Letter>C</Letter>
</ModifyPartition>
</ModifyPartitions>
</Disk>
<WillShowUI>OnError</WillShowUI>
</DiskConfiguration>

<ImageInstall>
<OSImage>
<WillShowUI>OnError</WillShowUI>

<InstallFrom>
<MetaData wcm:action="add">
<Key>/IMAGE/NAME</Key>
<Value>Windows 11 Pro</Value>
</MetaData>
<MetaData wcm:action="add">
<Key>/IMAGE/INDEX</Key>
<Value>6</Value>
</MetaData>
</InstallFrom>

<InstallTo>
<DiskID>0</DiskID>
<PartitionID>3</PartitionID>
</InstallTo>
</OSImage>
</ImageInstall>

<UserData>
<AcceptEula>true</AcceptEula>
<FullName>Administrator</FullName>
<Organization>IT</Organization>
</UserData>
</component>
</settings>

<!-- ===================== -->
<!-- SPECIALIZE -->
<!-- ===================== -->
<settings pass="specialize">
<component name="Microsoft-Windows-Shell-Setup" processorArchitecture="amd64"
publicKeyToken="31bf3856ad364e35" language="neutral" versionScope="nonSxS">
<ComputerName>*</ComputerName>
<TimeZone>Central Standard Time</TimeZone>
</component>
</settings>

<!-- ===================== -->
<!-- OOBE -->
<!-- ===================== -->
<settings pass="oobeSystem">
<component name="Microsoft-Windows-Shell-Setup" processorArchitecture="amd64"
publicKeyToken="31bf3856ad364e35" language="neutral" versionScope="nonSxS">
<OOBE>
<HideEULAPage>true</HideEULAPage>
<HideOnlineAccountScreens>true</HideOnlineAccountScreens>
<ProtectYourPC>3</ProtectYourPC>
<SkipUserOOBE>true</SkipUserOOBE>
<SkipMachineOOBE>true</SkipMachineOOBE>
</OOBE>

<AutoLogon>
<Password><Value></Value><PlainText>true</PlainText></Password>
<Enabled>true</Enabled>
<Username>Administrator</Username>
</AutoLogon>

<UserAccounts>
<AdministratorPassword>
<Value></Value>
<PlainText>true</PlainText>
</AdministratorPassword>
</UserAccounts>

<TimeZone>Central Standard Time</TimeZone>
</component>
</settings>

<cpi:offlineImage cpi:source="wim://sources/install.wim#Windows 11 Pro"
xmlns:cpi="urn:schemas-microsoft-com:cpi" />
</unattend>


I am just at my wits end. I am so tired of trying every different solution , but nothing seems to work. AGAIN, I will tell you it works flawlessly on a vm.
It works exactly how I want it to work on a vm. I just can't seem to get it to work on a physical machine.
 

My Computer

System One

  • OS
    windows 10
If you're running your script via unattend, the likely reason that it doesn't work with Rufus is that Rufus creates its own unattend, and that will supercede yours.
Yeah I checked that and rufus didn't overtake my autounattend file. Seems to be working correctly.
 

My Computer

System One

  • OS
    windows 10
There's several issues with your unattended file:

1. No Recovery partition is created, which break's 24H2/25H2's newer Setup client (because it specifically wants to guarantee a WinRE partition exists to support BitLocker operations).

2. Duplicate use of <InstallFrom>, using both IMAGE/NAME and IMAGE/INDEX. Only one of them is valid, and INDEX normally wins out. Pick one of the two.

3. Need to provide a <Key> in winPE pass (even if it's blank) in order for RunSynchronousCommands to be executed.

4. You're using SkipMachineOOBE, which can be used, but is deprecated since later W10 and should be avoided.

Code:
<?xml version="1.0" encoding="utf-8"?>
<unattend xmlns="urn:schemas-microsoft-com:unattend" xmlns:wcm="http://schemas.microsoft.com/WMIConfig/2002/State" xmlns:xsi="http://www.w3.org/2001/XMLSchema-instance">
    <settings pass="windowsPE">
        <component name="Microsoft-Windows-Setup" processorArchitecture="amd64" publicKeyToken="31bf3856ad364e35" language="neutral" versionScope="nonSxS">
            <ImageInstall>
                <OSImage>
                    <WillShowUI>OnError</WillShowUI>
                    <InstallFrom>
                        <MetaData wcm:action="add">
                            <Key>/IMAGE/INDEX</Key>
                            <Value>6</Value>
                        </MetaData>
                    </InstallFrom>
                    <InstallTo>
                        <DiskID>0</DiskID>
                        <PartitionID>4</PartitionID>
                    </InstallTo>
                </OSImage>
            </ImageInstall>
            <DiskConfiguration>
                <WillShowUI>OnError</WillShowUI>
                <Disk wcm:action="add">
                    <DiskID>0</DiskID>
                    <WillWipeDisk>true</WillWipeDisk>
                    <CreatePartitions>
                        <CreatePartition wcm:action="add">
                            <Order>1</Order>
                            <Size>260</Size>
                            <Type>EFI</Type>
                        </CreatePartition>
                        <CreatePartition wcm:action="add">
                            <Order>2</Order>
                            <Size>16</Size>
                            <Type>MSR</Type>
                        </CreatePartition>
                        <CreatePartition wcm:action="add">
                            <Order>3</Order>
                            <Size>700</Size>
                            <Type>Primary</Type>
                        </CreatePartition>
                        <CreatePartition wcm:action="add">
                            <Extend>true</Extend>
                            <Order>4</Order>
                            <Type>Primary</Type>
                        </CreatePartition>
                    </CreatePartitions>
                    <ModifyPartitions>
                        <ModifyPartition wcm:action="add">
                            <Format>FAT32</Format>
                            <Order>1</Order>
                            <PartitionID>1</PartitionID>
                        </ModifyPartition>
                        <ModifyPartition wcm:action="add">
                            <Order>2</Order>
                            <PartitionID>2</PartitionID>
                        </ModifyPartition>
                        <ModifyPartition wcm:action="add">
                            <Format>NTFS</Format>
                            <Order>3</Order>
                            <PartitionID>3</PartitionID>
                            <TypeID>de94bba4-06d1-4d40-a16a-bfd50179d6ac</TypeID>
                        </ModifyPartition>
                        <ModifyPartition wcm:action="add">
                            <Format>NTFS</Format>
                            <Order>4</Order>
                            <PartitionID>4</PartitionID>
                        </ModifyPartition>
                    </ModifyPartitions>
                </Disk>
            </DiskConfiguration>
            <UserData>
                <AcceptEula>true</AcceptEula>
                <FullName>Administrator</FullName>
                <Organization>IT</Organization>
                <ProductKey>
                    <Key></Key>
                </ProductKey>
            </UserData>
        </component>
    </settings>
    <settings pass="specialize">
        <component name="Microsoft-Windows-Shell-Setup" processorArchitecture="amd64" publicKeyToken="31bf3856ad364e35" language="neutral" versionScope="nonSxS">
            <ComputerName>*</ComputerName>
            <TimeZone>Central Standard Time</TimeZone>
        </component>
        <component name="Microsoft-Windows-Deployment" processorArchitecture="amd64" publicKeyToken="31bf3856ad364e35" language="neutral" versionScope="nonSxS" xmlns:wcm="http://schemas.microsoft.com/WMIConfig/2002/State" xmlns:xsi="http://www.w3.org/2001/XMLSchema-instance">
            <RunSynchronous>
                <RunSynchronousCommand wcm:action="add">
                    <Order>1</Order>
                    <Path>reg add "HKEY_LOCAL_MACHINE\SYSTEM\Setup\FirstBoot\PostOobe" /v "00" /t REG_SZ /d "cmd /c C:\Windows\Setup\Scripts\SetupComplete.cmd & exit /b 0 " /f</Path>
                </RunSynchronousCommand>
            </RunSynchronous>
        </component>
    </settings>
    <settings pass="oobeSystem">
        <component name="Microsoft-Windows-Shell-Setup" processorArchitecture="amd64" publicKeyToken="31bf3856ad364e35" language="neutral" versionScope="nonSxS">
            <OOBE>
                <HideEULAPage>true</HideEULAPage>
                <HideOnlineAccountScreens>true</HideOnlineAccountScreens>
                <ProtectYourPC>3</ProtectYourPC>
                <SkipUserOOBE>true</SkipUserOOBE>
                <SkipMachineOOBE>true</SkipMachineOOBE>
            </OOBE>
            <AutoLogon>
                <Username>Administrator</Username>
                <Enabled>true</Enabled>
                <Password>
                    <Value></Value>
                    <PlainText>true</PlainText>
                </Password>
            </AutoLogon>
            <UserAccounts>
                <AdministratorPassword>
                    <PlainText>true</PlainText>
                    <Value></Value>
                </AdministratorPassword>
            </UserAccounts>
            <TimeZone>Central Standard Time</TimeZone>
        </component>
    </settings>
    <cpi:offlineImage cpi:source="wim://sources/install.wim#Windows 11 Pro" xmlns:cpi="urn:schemas-microsoft-com:cpi" />
</unattend>
 

My Computer

System One

  • OS
    Windows 7

Latest Support Threads

Back
Top Bottom