Recovery Partition reagentc /setreimage /path to a recovery partition not having an assigned volume letter?


Where is winre.wim now?
 

My Computers

System One System Two

  • OS
    Win7
    Computer type
    PC/Desktop
    CPU
    i5-8400
    Motherboard
    gigabyte b365m ds3h
    Memory
    2x8gb 3200mhz
    Monitor(s) Displays
    benq gw2480
    PSU
    bequiet pure power 11 400CM
    Cooling
    cryorig m9i
  • Operating System
    win7
    Computer type
    PC/Desktop
    CPU
    pentium g5400
    Motherboard
    gigabyte b365m ds3h
    Memory
    1x8gb 2400
    PSU
    xfx pro 450
Yeah, that's sort of a hail-mary solution, doing an in-place upgrade or disk image restoration. I was hoping, though, for some other solution not involving an in-place upgrade or disk image restoration.
Your system obviously have some more problems and In Place Upgrade is totally safe and fast if you choose to keep personal files and programs. It just replaces system files with rand new "virgin" ones.
 

My Computer

System One

  • OS
    W10 and Insider Dev.+ Linux Mint
    Computer type
    PC/Desktop
    Manufacturer/Model
    Home brewed
    CPU
    AMD Ryzen 9 7900x
    Motherboard
    ASROCK b650 PRO RS
    Memory
    2x8GB Kingston 6000MHz, Cl 32 @ 6200MHz Cl30
    Graphics Card(s)
    Gigabyte Rx 6600XT Gaming OC 8G Pro
    Sound Card
    MB, Realtek Ac1220p
    Monitor(s) Displays
    3 x 27"
    Screen Resolution
    1080p
    Hard Drives
    Kingston KC3000. 1TBSamsung 970 evo Plus 500GB, Crucial P1 NVMe 1TB, Lexar NVMe 2 TB, Silicon Power M.2 SATA 500GB
    PSU
    Seasonic 750W
    Case
    Custom Raidmax
    Cooling
    Arctic Liquid Freezer III 360mm
    Internet Speed
    20/19 mbps
Where is winre.wim now?
Following aubergine's steps, I copied the file to C:\Windows\System32\Recovery folder. It is no longer there after running reagentc /enable. I assume that it was moved to the recovery partition. Diskpart's list vol lists the volume 4 partition as RAW instead of NTFS. I can't get inside it.
 

My Computers

System One System Two

  • OS
    Windows 11 Pro 23H2 build 22631.2861
    Computer type
    PC/Desktop
    Manufacturer/Model
    Acer Aspire T3-715A
    CPU
    Intel(R) Core(TM) i7-6700 CPU @ 3.40GHz 3.40 GHz
    Motherboard
    Acer Aspire T3-715A
    Memory
    64 GBytes
    Graphics Card(s)
    AMD Radeon RX 7600
    Sound Card
    Intel Skylake PCH-H - High Definition Audio Controller
    Monitor(s) Displays
    Dual, Acer H236HL
    Screen Resolution
    1920x1080
    Hard Drives
    Samsung SSD 850 EVO 1TB
    Seagate ST2000DM001-1ER164
    WDC WD20NMVW-11AV3S2
    PSU
    500 Watt
    Case
    Tower
    Cooling
    Fan
    Keyboard
    Logitech K800
    Mouse
    Logitech M570
    Internet Speed
    125 Mbps, with VPN active
    Browser
    Brave
    Antivirus
    BitDefender Total Security
  • Operating System
    Windows 11 Pro 22H2 build 22621.382
    Computer type
    PC/Desktop
    Manufacturer/Model
    HP EliteDesk 705 G3 Microtower
    CPU
    AMD PRO A6-8570 R5, 8 COMPUTE CORES 2C+6G 3.50 Ghz
    Motherboard
    HP 8265
    Memory
    40.0 GB
    Graphics card(s)
    AMD Radeon RX 460
    Sound Card
    AMD Family 15h Models 60h-6Fh CPU
    Monitor(s) Displays
    Insignia NS-22E400NA14
    Screen Resolution
    1920x1080
    Hard Drives
    SAMSUNG SSD 860 EVO 1TB
    PSU
    650 Watt
    Case
    Tower
    Cooling
    Fan
    Mouse
    M570
    Keyboard
    Logitech K330
    Internet Speed
    125 Mbps, with VPN active
    Browser
    Brave
    Antivirus
    BitDefender Total Security
have a look with diskgenius and see if that throws any light.

check the id. Rt click the partition>modify partition parameters, that will tell you what it is
 
Last edited:

My Computers

System One System Two

  • OS
    Win7
    Computer type
    PC/Desktop
    CPU
    i5-8400
    Motherboard
    gigabyte b365m ds3h
    Memory
    2x8gb 3200mhz
    Monitor(s) Displays
    benq gw2480
    PSU
    bequiet pure power 11 400CM
    Cooling
    cryorig m9i
  • Operating System
    win7
    Computer type
    PC/Desktop
    CPU
    pentium g5400
    Motherboard
    gigabyte b365m ds3h
    Memory
    1x8gb 2400
    PSU
    xfx pro 450
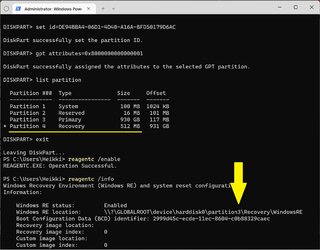
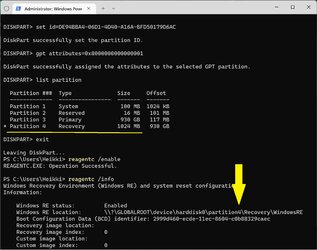
PS C:\Users\Heikki> diskpart

Microsoft DiskPart version 10.0.22000.653

Copyright (C) Microsoft Corporation.
On computer: DESKTOP-VCOT0Q9

DISKPART> list disk

Disk ### Status Size Free Dyn Gpt
-------- ------------- ------- ------- --- ---
Disk 0 Online 931 GB 1024 KB *

DISKPART> select disk 0

Disk 0 is now the selected disk.

DISKPART> list partition

Partition ### Type Size Offset
------------- ---------------- ------- -------
Partition 1 System 100 MB 1024 KB
Partition 2 Reserved 16 MB 101 MB
Partition 3 Primary 930 GB 117 MB
Partition 4 Recovery 1024 MB 930 GB

DISKPART> select partition 4

Partition 4 is now the selected partition.

DISKPART> format quick fs=ntfs

100 percent completed

DiskPart successfully formatted the volume.

DISKPART> set id=DE94BBA4-06D1-4D40-A16A-BFD50179D6AC

DiskPart successfully set the partition ID.

DISKPART> gpt attributes=0x8000000000000001

DiskPart successfully assigned the attributes to the selected GPT partition.

DISKPART> exit

Leaving DiskPart...

PS C:\Users\Heikki> reagentc /disable
REAGENTC.EXE: Windows RE is already disabled.

--------------------

- Extract ReAgent.xml and Winre.wim from your installation media using 7-Zip.
- You will find them in any of the images in the Windows\System32\Recovery folder.
- Copy them into your C:\Windows\System32\Recovery folder (overwrite the existing files).

--------------------

PS C:\Users\Heikki> reagentc /enable
REAGENTC.EXE: Operation Successful.

PS C:\Users\Heikki> reagentc /info
Windows Recovery Environment (Windows RE) and system reset configuration
Information:

Windows RE status: Enabled
Windows RE location: \\?\GLOBALROOT\device\harddisk0\partition4\Recovery\WindowsRE
Boot Configuration Data (BCD) identifier: 2999d45a-ecde-11ec-8604-c0b88329caec
Recovery image location:
Recovery image index: 0
Custom image location:
Custom image index: 0

REAGENTC.EXE: Operation Successful.

PS C:\Users\Heikki>
I follow these instructions and similar ones on a youtube video, and the RE location still ends up on the main partition (2) instead of my recovery partition (4).
Any ideas even with the correct ID set and gpt attributes set, when i run reagentc /info, it still is on the wrong partition?
I've tried deleting the ReAgent.xml file before enabling, as to force it to write a new one, but still wont go to the right partition.
 

My Computer

System One

  • OS
    Windows 10
    Computer type
    PC/Desktop
I follow these instructions and similar ones on a youtube video, and the RE location still ends up on the main partition (2) instead of my recovery partition (4).
Any ideas even with the correct ID set and gpt attributes set, when i run reagentc /info, it still is on the wrong partition?
I started this thread. Believe me, I tried every solution mentioned here to fix my recovery partition. Nothing suggested here "stuck" other than one -- deleting the recovery partition, re-formatting the unallocated partition as NTFS, settings its id and gpt attributes with diskpart and then performing an in-place upgrade with the same Win version.
 
Last edited:

My Computers

System One System Two

  • OS
    Windows 11 Pro 23H2 build 22631.2861
    Computer type
    PC/Desktop
    Manufacturer/Model
    Acer Aspire T3-715A
    CPU
    Intel(R) Core(TM) i7-6700 CPU @ 3.40GHz 3.40 GHz
    Motherboard
    Acer Aspire T3-715A
    Memory
    64 GBytes
    Graphics Card(s)
    AMD Radeon RX 7600
    Sound Card
    Intel Skylake PCH-H - High Definition Audio Controller
    Monitor(s) Displays
    Dual, Acer H236HL
    Screen Resolution
    1920x1080
    Hard Drives
    Samsung SSD 850 EVO 1TB
    Seagate ST2000DM001-1ER164
    WDC WD20NMVW-11AV3S2
    PSU
    500 Watt
    Case
    Tower
    Cooling
    Fan
    Keyboard
    Logitech K800
    Mouse
    Logitech M570
    Internet Speed
    125 Mbps, with VPN active
    Browser
    Brave
    Antivirus
    BitDefender Total Security
  • Operating System
    Windows 11 Pro 22H2 build 22621.382
    Computer type
    PC/Desktop
    Manufacturer/Model
    HP EliteDesk 705 G3 Microtower
    CPU
    AMD PRO A6-8570 R5, 8 COMPUTE CORES 2C+6G 3.50 Ghz
    Motherboard
    HP 8265
    Memory
    40.0 GB
    Graphics card(s)
    AMD Radeon RX 460
    Sound Card
    AMD Family 15h Models 60h-6Fh CPU
    Monitor(s) Displays
    Insignia NS-22E400NA14
    Screen Resolution
    1920x1080
    Hard Drives
    SAMSUNG SSD 860 EVO 1TB
    PSU
    650 Watt
    Case
    Tower
    Cooling
    Fan
    Mouse
    M570
    Keyboard
    Logitech K330
    Internet Speed
    125 Mbps, with VPN active
    Browser
    Brave
    Antivirus
    BitDefender Total Security
Well according to this > Windows RE location: \\?\GLOBALROOT\device\harddisk0\partition4\Recovery\WindowsRE
IT is on Partition 4

Some Partitions are Hidden - so may appear to be on another partition

Reagentc /info > is the correct way to determine WinRE Location
 

My Computer

System One

  • OS
    Windows
PS C:\Users\Heikki> diskpart

Microsoft DiskPart version 10.0.22000.653

Copyright (C) Microsoft Corporation.
On computer: DESKTOP-VCOT0Q9

DISKPART> list disk

Disk ### Status Size Free Dyn Gpt
-------- ------------- ------- ------- --- ---
Disk 0 Online 931 GB 1024 KB *

DISKPART> select disk 0

Disk 0 is now the selected disk.

DISKPART> list partition

Partition ### Type Size Offset
------------- ---------------- ------- -------
Partition 1 System 100 MB 1024 KB
Partition 2 Reserved 16 MB 101 MB
Partition 3 Primary 930 GB 117 MB
Partition 4 Recovery 1024 MB 930 GB

DISKPART> select partition 4

Partition 4 is now the selected partition.

DISKPART> format quick fs=ntfs

100 percent completed

DiskPart successfully formatted the volume.

DISKPART> set id=DE94BBA4-06D1-4D40-A16A-BFD50179D6AC

DiskPart successfully set the partition ID.

DISKPART> gpt attributes=0x8000000000000001

DiskPart successfully assigned the attributes to the selected GPT partition.

DISKPART> exit

Leaving DiskPart...

PS C:\Users\Heikki> reagentc /disable
REAGENTC.EXE: Windows RE is already disabled.

--------------------

- Extract ReAgent.xml and Winre.wim from your installation media using 7-Zip.
- You will find them in any of the images in the Windows\System32\Recovery folder.
- Copy them into your C:\Windows\System32\Recovery folder (overwrite the existing files).

--------------------

PS C:\Users\Heikki> reagentc /enable
REAGENTC.EXE: Operation Successful.

PS C:\Users\Heikki> reagentc /info
Windows Recovery Environment (Windows RE) and system reset configuration
Information:

Windows RE status: Enabled
Windows RE location: \\?\GLOBALROOT\device\harddisk0\partition4\Recovery\WindowsRE
Boot Configuration Data (BCD) identifier: 2999d45a-ecde-11ec-8604-c0b88329caec
Recovery image location:
Recovery image index: 0
Custom image location:
Custom image index: 0

REAGENTC.EXE: Operation Successful.

PS C:\Users\Heikki>
BTW, after following this procedure, diskpart correctly lists the recovery partition as NTFS and reagentc /info reports Enabled, but upon reboot reagentc /info reports Disabled and diskpart reports the recovery partition as RAW. This is consistent no matter how many times I repeat this procedure. I have no idea why the partition changes to RAW after a reboot.
 

My Computers

System One System Two

  • OS
    Windows 11 Pro 23H2 build 22631.2861
    Computer type
    PC/Desktop
    Manufacturer/Model
    Acer Aspire T3-715A
    CPU
    Intel(R) Core(TM) i7-6700 CPU @ 3.40GHz 3.40 GHz
    Motherboard
    Acer Aspire T3-715A
    Memory
    64 GBytes
    Graphics Card(s)
    AMD Radeon RX 7600
    Sound Card
    Intel Skylake PCH-H - High Definition Audio Controller
    Monitor(s) Displays
    Dual, Acer H236HL
    Screen Resolution
    1920x1080
    Hard Drives
    Samsung SSD 850 EVO 1TB
    Seagate ST2000DM001-1ER164
    WDC WD20NMVW-11AV3S2
    PSU
    500 Watt
    Case
    Tower
    Cooling
    Fan
    Keyboard
    Logitech K800
    Mouse
    Logitech M570
    Internet Speed
    125 Mbps, with VPN active
    Browser
    Brave
    Antivirus
    BitDefender Total Security
  • Operating System
    Windows 11 Pro 22H2 build 22621.382
    Computer type
    PC/Desktop
    Manufacturer/Model
    HP EliteDesk 705 G3 Microtower
    CPU
    AMD PRO A6-8570 R5, 8 COMPUTE CORES 2C+6G 3.50 Ghz
    Motherboard
    HP 8265
    Memory
    40.0 GB
    Graphics card(s)
    AMD Radeon RX 460
    Sound Card
    AMD Family 15h Models 60h-6Fh CPU
    Monitor(s) Displays
    Insignia NS-22E400NA14
    Screen Resolution
    1920x1080
    Hard Drives
    SAMSUNG SSD 860 EVO 1TB
    PSU
    650 Watt
    Case
    Tower
    Cooling
    Fan
    Mouse
    M570
    Keyboard
    Logitech K330
    Internet Speed
    125 Mbps, with VPN active
    Browser
    Brave
    Antivirus
    BitDefender Total Security
I follow these instructions and similar ones on a youtube video, and the RE location still ends up on the main partition (2) instead of my recovery partition (4).

This happens if the Recovery partition is too small (see screenshot below).

Recovery partition 512 MB.jpg

How to delete and recreate the Recovery partition

1.

- Open Windows PowerShell as administrator.

diskpart
list disk
select disk #
list partition
select partition # (replace # with the Recovery partition number)
delete partition override
list volume
exit

2.

- Open Disk Management.
- Extend the Windows partition to fill the freed space.

3.

- Open Windows PowerShell as administrator.

diskpart
list disk
select disk #
list partition
select partition # (replace # with the Windows partition number)
shrink desired=1024
create partition primary size=1024

format quick fs=ntfs
set id=DE94BBA4-06D1-4D40-A16A-BFD50179D6AC
gpt attributes=0x8000000000000001
list partition
exit

4.

- Extract ReAgent.xml and Winre.wim from your installation media using 7-Zip.
- You will find them in any of the images in the Windows\System32\Recovery folder.
- Copy them into your C:\Windows\System32\Recovery folder (overwrite the existing files).

5.

reagentc /enable
- This will move WinRe.wim to the Recovery partition and set the GUID and location in ReAgent.xml.

reagentc /info

Recovery partition 1024 MB.jpg
 

My Computer

System One

  • OS
    Windows 11
    Computer type
    Laptop
    Manufacturer/Model
    Lenovo Yoga C940
    CPU
    Intel Core i7-1065G7
    Memory
    16GB
This happens if the Recovery partition is too small (see screenshot below).

View attachment 36874

How to delete and recreate the Recovery partition

1.

- Open Windows PowerShell as administrator.

diskpart
list disk
select disk #
list partition
select partition # (replace # with the Recovery partition number)
delete partition override
list volume
exit

2.

- Open Disk Management.
- Extend the Windows partition to fill the freed space.

3.

- Open Windows PowerShell as administrator.

diskpart
list disk
select disk #
list partition
select partition # (replace # with the Windows partition number)
shrink desired=1024
create partition primary size=1024

format quick fs=ntfs
set id=DE94BBA4-06D1-4D40-A16A-BFD50179D6AC
gpt attributes=0x8000000000000001
list partition
exit

4.

- Extract ReAgent.xml and Winre.wim from your installation media using 7-Zip.
- You will find them in any of the images in the Windows\System32\Recovery folder.
- Copy them into your C:\Windows\System32\Recovery folder (overwrite the existing files).

5.

reagentc /enable
- This will move WinRe.wim to the Recovery partition and set the GUID and location in ReAgent.xml.

reagentc /info

View attachment 36875
Why bother - if winre.wim is in folder c:\recovery and enabled (partition 3), moving it to a separate winre partition 4 makes no functional difference to Winre actions. In fact, the partition can get in the way if you have spare unallocated space after the winre partition.
 

My Computer

System One

  • OS
    Windows 10 Pro + others in VHDs
    Computer type
    Laptop
    Manufacturer/Model
    ASUS Vivobook 14
    CPU
    I7
    Motherboard
    Yep, Laptop has one.
    Memory
    16 GB
    Graphics Card(s)
    Integrated Intel Iris XE
    Sound Card
    Realtek built in
    Monitor(s) Displays
    N/A
    Screen Resolution
    1920x1080
    Hard Drives
    1 TB Optane NVME SSD, 1 TB NVME SSD
    PSU
    Yep, got one
    Case
    Yep, got one
    Cooling
    Stella Artois
    Keyboard
    Built in
    Mouse
    Bluetooth , wired
    Internet Speed
    72 Mb/s :-(
    Browser
    Edge mostly
    Antivirus
    Defender
    Other Info
    TPM 2.0
Why bother - if winre.wim is in folder c:\recovery and enabled (partition 3), moving it to a separate winre partition 4 makes no functional difference to Winre actions. In fact, the partition can get in the way if you have spare unallocated space after the winre partition.

Source:

Recovery tools partition​


The recovery tools should be in a separate partition than the Windows partition to support automatic failover and to support booting partitions encrypted with Windows BitLocker Drive Encryption.

We recommend that you place this partition immediately after the Windows partition. This allows Windows to modify and recreate the partition later if future updates require a larger recovery image.

Partition layout​

The default partition layout for UEFI-based PCs is: a system partition, an MSR, a Windows partition, and a recovery tools partition.

diagram of default partition layout: system, msr, windows, and recovery


This layout lets you use Windows BitLocker Drive Encryption through both Windows and through the Windows Recovery Environment.
 

My Computer

System One

  • OS
    Windows 11
    Computer type
    Laptop
    Manufacturer/Model
    Lenovo Yoga C940
    CPU
    Intel Core i7-1065G7
    Memory
    16GB
Please run the V2 log collector and upload results directly into this thread.
For any problems uploading please post a share links using one drive, drop box, or google drive.


My Computer

System One

  • OS
    Windows 10
    Computer type
    Laptop
    Manufacturer/Model
    HP
    CPU
    Intel(R) Core(TM) i7-4800MQ CPU @ 2.70GHz
    Motherboard
    Product : 190A Version : KBC Version 94.56
    Memory
    16 GB Total: Manufacturer : Samsung MemoryType : DDR3 FormFactor : SODIMM Capacity : 8GB Speed : 1600
    Graphics Card(s)
    NVIDIA Quadro K3100M; Intel(R) HD Graphics 4600
    Sound Card
    IDT High Definition Audio CODEC; PNP Device ID HDAUDIO\FUNC_01&VEN_111D&DEV_76E0
    Hard Drives
    Model Hitachi HTS727575A9E364
    Antivirus
    Microsoft Defender
    Other Info
    Mobile Workstation

My Computer

System One

  • OS
    Windows 10 Pro + others in VHDs
    Computer type
    Laptop
    Manufacturer/Model
    ASUS Vivobook 14
    CPU
    I7
    Motherboard
    Yep, Laptop has one.
    Memory
    16 GB
    Graphics Card(s)
    Integrated Intel Iris XE
    Sound Card
    Realtek built in
    Monitor(s) Displays
    N/A
    Screen Resolution
    1920x1080
    Hard Drives
    1 TB Optane NVME SSD, 1 TB NVME SSD
    PSU
    Yep, got one
    Case
    Yep, got one
    Cooling
    Stella Artois
    Keyboard
    Built in
    Mouse
    Bluetooth , wired
    Internet Speed
    72 Mb/s :-(
    Browser
    Edge mostly
    Antivirus
    Defender
    Other Info
    TPM 2.0
PS C:\Users\Heikki> diskpart

Microsoft DiskPart version 10.0.22000.653

Copyright (C) Microsoft Corporation.
On computer: DESKTOP-VCOT0Q9

DISKPART> list disk

Disk ### Status Size Free Dyn Gpt
-------- ------------- ------- ------- --- ---
Disk 0 Online 931 GB 1024 KB *

DISKPART> select disk 0

Disk 0 is now the selected disk.

DISKPART> list partition

Partition ### Type Size Offset
------------- ---------------- ------- -------
Partition 1 System 100 MB 1024 KB
Partition 2 Reserved 16 MB 101 MB
Partition 3 Primary 930 GB 117 MB
Partition 4 Recovery 1024 MB 930 GB

DISKPART> select partition 4

Partition 4 is now the selected partition.

DISKPART> format quick fs=ntfs

100 percent completed

DiskPart successfully formatted the volume.

DISKPART> set id=DE94BBA4-06D1-4D40-A16A-BFD50179D6AC

DiskPart successfully set the partition ID.

DISKPART> gpt attributes=0x8000000000000001

DiskPart successfully assigned the attributes to the selected GPT partition.

DISKPART> exit

Leaving DiskPart...

PS C:\Users\Heikki> reagentc /disable
REAGENTC.EXE: Windows RE is already disabled.

--------------------

- Extract ReAgent.xml and Winre.wim from your installation media using 7-Zip.
- You will find them in any of the images in the Windows\System32\Recovery folder.
- Copy them into your C:\Windows\System32\Recovery folder (overwrite the existing files).

--------------------

PS C:\Users\Heikki> reagentc /enable
REAGENTC.EXE: Operation Successful.

PS C:\Users\Heikki> reagentc /info
Windows Recovery Environment (Windows RE) and system reset configuration
Information:

Windows RE status: Enabled
Windows RE location: \\?\GLOBALROOT\device\harddisk0\partition4\Recovery\WindowsRE
Boot Configuration Data (BCD) identifier: 2999d45a-ecde-11ec-8604-c0b88329caec
Recovery image location:
Recovery image index: 0
Custom image location:
Custom image index: 0

REAGENTC.EXE: Operation Successful.

PS C:\Users\Heikki>
When I follow your procedure, reagentc /info (last step) reports that Windows RE status is enabled and diskpart lists the fs of the recovery partition as NTFS.

After a reboot though, diskpart lists the recovery partition as RAW and reagentc /info reports that Windows RE status is Disabled.

Trying reagentc /enable reports that the Windows RE image cannot be found, of course, since the recovery partition is seen as RAW.

Strangely, all my disk partitioning utilities report the same recovery partition as an NTFS fs.

I doubt if this is a problem with my SSD or drivers. I have tried the same procedure on two other computers of mine running the same Windows 11 Pro 22621.382 builds and both of the recovery partitions of each following reboot are reported by diskpart as RAW when, before the reboot after successfully completing your procedure, diskpart correctly lists the recovery partition fs as NTFS and reagentc /info reports enabled.

Perhaps this is a bug in this build of Win 11. I don't recall this problem occurring with Win 10.
 

My Computers

System One System Two

  • OS
    Windows 11 Pro 23H2 build 22631.2861
    Computer type
    PC/Desktop
    Manufacturer/Model
    Acer Aspire T3-715A
    CPU
    Intel(R) Core(TM) i7-6700 CPU @ 3.40GHz 3.40 GHz
    Motherboard
    Acer Aspire T3-715A
    Memory
    64 GBytes
    Graphics Card(s)
    AMD Radeon RX 7600
    Sound Card
    Intel Skylake PCH-H - High Definition Audio Controller
    Monitor(s) Displays
    Dual, Acer H236HL
    Screen Resolution
    1920x1080
    Hard Drives
    Samsung SSD 850 EVO 1TB
    Seagate ST2000DM001-1ER164
    WDC WD20NMVW-11AV3S2
    PSU
    500 Watt
    Case
    Tower
    Cooling
    Fan
    Keyboard
    Logitech K800
    Mouse
    Logitech M570
    Internet Speed
    125 Mbps, with VPN active
    Browser
    Brave
    Antivirus
    BitDefender Total Security
  • Operating System
    Windows 11 Pro 22H2 build 22621.382
    Computer type
    PC/Desktop
    Manufacturer/Model
    HP EliteDesk 705 G3 Microtower
    CPU
    AMD PRO A6-8570 R5, 8 COMPUTE CORES 2C+6G 3.50 Ghz
    Motherboard
    HP 8265
    Memory
    40.0 GB
    Graphics card(s)
    AMD Radeon RX 460
    Sound Card
    AMD Family 15h Models 60h-6Fh CPU
    Monitor(s) Displays
    Insignia NS-22E400NA14
    Screen Resolution
    1920x1080
    Hard Drives
    SAMSUNG SSD 860 EVO 1TB
    PSU
    650 Watt
    Case
    Tower
    Cooling
    Fan
    Mouse
    M570
    Keyboard
    Logitech K330
    Internet Speed
    125 Mbps, with VPN active
    Browser
    Brave
    Antivirus
    BitDefender Total Security
In Win10 I have found that before running setreimage you need to delete the ReAgent.xml because it will not update. Running the setreimage will recreate it with the correct path. This could be what is happening.
This solved it for me. The xml needed to be deleted so that when you set the reimage it will automatically create an updated xml.
 

My Computer

System One

  • OS
    Windows 11
This solved it for me. The xml needed to be deleted so that when you set the reimage it will automatically create an updated xml.
@RepairPC13 Glad this worked for you. I ran across this problem several years ago after I struggled with getting setreimage to work. I took me nearly 8 hours of experimentation and research to solve it. You never forget something like this!
 

My Computers

System One System Two

  • OS
    Windows 11 Pro
    Computer type
    PC/Desktop
    Manufacturer/Model
    Dell 8940 XPS
    CPU
    10th Gen Intel(R) Core(TM) i7-10700, 2.90GHz
    Motherboard
    Dell 0KV3RP (U3E1)
    Memory
    32GB, 2x16GB, DDR4, 2933Mhz
    Graphics Card(s)
    NVIDIA(R) GeForce(R) RTX 2060 SUPER(TM) 8GB GDDR6
    Sound Card
    Onboard, Realtek Codec, NVIDIA Hi Def Audio, Intel Display Audio
    Monitor(s) Displays
    Dell UltraSharp U3415W
    Screen Resolution
    3440x1440
    Hard Drives
    2TB M.2 PCIe NVMe SSD; 2TB Samsung SSD 860 EVO; 2TB Samsung SSD 860 EVO 2
    PSU
    500 W Dell
    Case
    Night Sky Bezel Chassis
    Cooling
    Dell
    Keyboard
    Logi Wireless
    Mouse
    Logi Wireless
    Internet Speed
    111 Mbps Download, 132 Mbps Upload
    Browser
    Edge, Chrome
    Antivirus
    Windows Defender, MalwareBytes
  • Operating System
    Windows 11 Pro
    Computer type
    PC/Desktop
    Manufacturer/Model
    Falcon Northwest Talon
    CPU
    Intel 13900K Core I9 24 Core LGA 1700
    Motherboard
    Asus ROG Z970 Maximus Hero
    Memory
    32GB (2x16) Kingston Fury Beast 6000MHZ DDR5
    Graphics card(s)
    nVidia 4090 Founders Edition
    Sound Card
    Motherboard
    Monitor(s) Displays
    Alienware 34” Curved OLED
    Screen Resolution
    4K
    Hard Drives
    SSD M.2 Kingston Renegade Fury 4 TB x 2; Western Digital Red Pro 8 TB SATA III
    PSU
    1000W ECGA Platinum Modular ATX
    Case
    Falcon NW Custom
    Cooling
    AIO Falcon NW 280mm Liquid Cooler
    Mouse
    Logitech G502
    Keyboard
    Logitech Pro Gamer
    Internet Speed
    111 Mbps Download, 132 Mbps Upload
    Browser
    Edge, Chrome
    Antivirus
    Windows Defender, MalwareBytes
    Other Info
    Noise Blocker Fans
If you have a valid partition with the correct files in it, you can set the path with
\\?\GLOBALROOT\device\harddisk1\partition5\Recovery\WindowsRE

Obviously change harddisk# and partition# to match what you need.

I don't understand the fascination with having a separate partition. WinRE works just fine from C:\Recovery or from the Windows installation USB flash drive.
A recovery image, if one is configured with WinRE is often the Windows partition itself.

If your WinRE is in the partition you are overwriting, and the recovery operation corrupts for some reason, you might end up in a bigger mess than what you started with. Regardless of having other ways to possibly recover from that situation, having the WinRE in a separate partition may still allow you to boot into a recovery environment even if the Windows partition has been destroyed.
 

My Computer

System One

  • OS
    Win10
I have been fighting this for 2 hours.

I have 3 different fail scenarios.

1 - If I run reagentc /enable it flat out fails with an error code 3 regardless if is a partition or not, so basically I cant even enable on my system partition.

In normal microsoft fashion a generic error code with no verbose details.

Code:
REAGENTC.EXE: Operation failed: 3

REAGENTC.EXE: An error has occurred.

2 - Created a partition with correct id and gpt flags, partition in its default state was raw, same error on the /enable command, and if I try to use /setreimage it then spits this out.

Code:
REAGENTC.EXE: The Windows RE image cannot be stored in the specified volume. Use the RETAIN command in DISKPART to prepare the volume and try again.

For verification of the correct flags.

Code:
Partition 1
Type    : de94bba4-06d1-4d40-a16a-bfd50179d6ac
Hidden  : Yes
Required: Yes
Attrib  : 0X8000000000000001
Offset in Bytes: 898086469632

  Volume ###  Ltr  Label        Fs     Type        Size     Status     Info
  ----------  ---  -----------  -----  ----------  -------  ---------  --------
* Volume 12    Y                RAW    Partition   1000 MB  Healthy    Hidden

I then formatted as ntfs as suggested here, then the new error is.

Code:
REAGENTC.EXE: The specified path was not found.

Feels like its broken flimsy code, as it seems pretty borked on my system. I havent done anything exotic either no 3rd party partition tools have touched the drive or anything like that.

At this point I would be ok with it on C: I just want to be able to enable it.
 

My Computer

System One

  • OS
    Windows 10
    Computer type
    PC/Desktop
    CPU
    9900k
    Motherboard
    Asrock Fatality K6 Z370
    Memory
    32 Gig 3200CL12
    Graphics Card(s)
    Nvidia 3800 RTX
    Sound Card
    Asus Xonar D2X
    Monitor(s) Displays
    LG 27GL850
    Screen Resolution
    2560x1440
    Hard Drives
    970 EVO 1TB
    860 EVO 1TB
    3 x 3TB WD Red
    2 x 4TB WD Red
    PSU
    Antec HCG 750
    Case
    Fractal Define R4
    Cooling
    Noctua NH-D15S
    Internet Speed
    80/20
    Antivirus
    Windows Defender
Sounds like you need to rebuild the recovery environment by mounting install.wim and extracting the recovery environment files from it.
 

My Computers

System One System Two

  • OS
    Windows 11
    Computer type
    PC/Desktop
    Manufacturer/Model
    Homebuilt
    CPU
    AMD Ryzen 7 3800XT
    Motherboard
    ASUS ROG Crosshair VII Hero (WiFi)
    Memory
    32GB
    Graphics Card(s)
    EVGA GeForce GTX 1080 Ti
  • Operating System
    Windows 11 Education
    Computer type
    Laptop
    Manufacturer/Model
    Dell Inspiron 7773
    CPU
    Intel i7-8550U
    Memory
    32GB
    Graphics card(s)
    Nvidia Geforce MX150
    Sound Card
    Realtek
    Monitor(s) Displays
    17"
    Screen Resolution
    1920 x 1080
    Hard Drives
    Toshiba 512GB NVMe SSD
    SK Hynix 512GB SATA SSD
    Internet Speed
    Fast!

My Computers

System One System Two

  • OS
    Win7
    Computer type
    PC/Desktop
    CPU
    i5-8400
    Motherboard
    gigabyte b365m ds3h
    Memory
    2x8gb 3200mhz
    Monitor(s) Displays
    benq gw2480
    PSU
    bequiet pure power 11 400CM
    Cooling
    cryorig m9i
  • Operating System
    win7
    Computer type
    PC/Desktop
    CPU
    pentium g5400
    Motherboard
    gigabyte b365m ds3h
    Memory
    1x8gb 2400
    PSU
    xfx pro 450

Latest Support Threads

Back
Top Bottom