This tutorial will show you different ways to Snap windows into zone layouts for your account in Windows 11.
You can use Snap windows in Windows 11 to automatically resize and arrange all your open windows into zone layouts using the mouse (drag), keyboard, or the Snap Assist feature.
Snap layouts are tailored to the current screen size and orientation, including support for three side-by-side windows on large landscape screens and top/bottom stacked windows on portrait screens.
When you snap a window, Snap Assist will show what you can snap next to it. Snap Assist significantly speeds up the process of snapping windows side-by-side by offering you a choice of windows to snap by just clicking on a window to snap it.
Starting with Windows 11 build 26100.4770 (24H2), improvements make it easier to learn and use Snap in Windows 11. Inline messages now appear when you accidentally open the Snap Bar by dragging an app to the upper center of your desktop or open the Snap menu by hovering over the Minimize or Maximize button. These messages provide helpful tips on Snap app windows and show keyboard shortcuts.
References:
Snap Your Windows - Microsoft Support
 support.microsoft.com

Support snap layouts for desktop apps on Windows 11 - Windows apps
To undo a snap, you can drag the snapped window by the title bar to restore it to how it was before snapped, and release.
- Option One: Snap a window using Keyboard
- Option Two: Snap a window by Dragging to Screen Edge
- Option Three: Snap a window using Snap Layouts
- Option Four: Snap a window using Task View
1 Select the window you want to snap, and press the keys you want below:
You can press and hold the Win  key and press the Arrow Keys to snap the current window to the layout you want, and release the Win key.
Keyboard Shortcut | Description |
|---|---|
| Win + Left Arrow | Snap the current active window to the left side of the screen. If you have multiple displays, then you can keep pressing to snap the window to the next available layout across the screens moving left. |
| Win + Left Arrow | Snap the current active window to the right side of the screen. If you have multiple displays, then you can keep pressing to snap the window to the next available layout across the screens moving right. |
| Win + Up Arrow | If the current active window isn't snapped, then this will maximize the window, or snap the window to the upper half of the screen if already maximized. If the current active window is snapped to a side, this will snap the window to the top corner of that side. |
| Win + Down Arrow | If the current active window isn't snapped, this will minimize the window. If the current active window is maximized, this will restore down the window. If the current active window is snapped to a side, this will snap the window to the bottom corner of that side. |
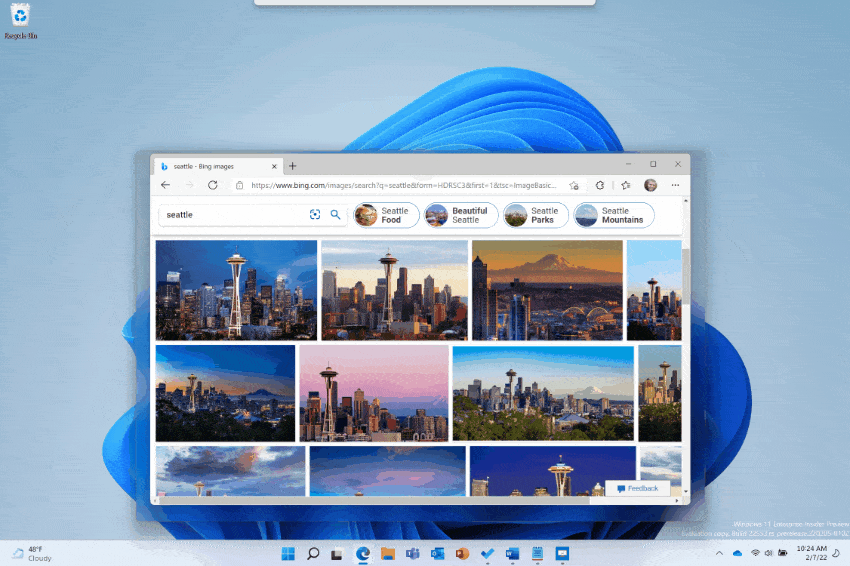
2 If you have Snap Assist turned on, you can click/tap on an open window you want to snap in available layouts next to this snapped windows from step 1. (see screenshot below)
Snap Assist appears after you’ve snapped a window but have a lot of available space on your screen. Any other open windows are displayed in that space as thumbnails.
To use Snap Assist, click the thumbnail of the window you want to open. If you have two windows displayed side-by-side, you can resize both windows simultaneously by selecting and dragging the dividing line. Resize the window on one side to the size you want it to be, and then release the mouse button. The other window will resize itself to fit alongside the first one, so you won't have any empty screen space.
If you do not want to use Snap Assist to snap other windows into layouts next to this snapped window from step 1, then click/tap on the snapped window from step 1 to close Snap Assist.
1 Select the title bar of the window you want to snap.
2 Drag the window by its title bar to the screen edge or corner you want.
3 An outline will show while dragging to indicate where the window will snap to when you drop it. (see screenshots below)
4 If you have Snap Assist turned on, you can click/tap on an open window you want to snap in available layouts next to this snapped windows from step 1. (see screenshot below)
Snap Assist appears after you’ve snapped a window but have a lot of available space on your screen. Any other open windows are displayed in that space as thumbnails.
To use Snap Assist, click the thumbnail of the window you want to open. If you have two windows displayed side-by-side, you can resize both windows simultaneously by selecting and dragging the dividing line. Resize the window on one side to the size you want it to be, and then release the mouse button. The other window will resize itself to fit alongside the first one, so you won't have any empty screen space.
If you do not want to use Snap Assist to snap other windows into layouts next to this snapped window from step 1, then click/tap on the snapped window from step 1 to close Snap Assist.
Displays that are larger than 24 inches and at 1920 effective pixels will see snap layouts with 3 columns of zones.
Displays smaller than 24 inches and at 1920 effective pixels will see snap layouts with 2 columns of zones.
1 Do step 2 (keyboard shortcut), step 3 (maximize button), or step 4 (top of screen) below for how you want to open the snap layouts flyout.
+ Z keys.You can select a snap layout in the flyout by either click/tap on it, or using the arrow keys and press Enter.
Numbers in the snap layouts flyout are only available starting with Windows 11 build 22593.
This step is only available starting with Windows 11 build 22557.
5 If you have Snap Assist turned on, you can click/tap on an open window you want to snap in available layouts next to this snapped windows from step 1. (see screenshot below)
Snap Assist appears after you’ve snapped a window but have a lot of available space on your screen. Any other open windows are displayed in that space as thumbnails.
To use Snap Assist, click the thumbnail of the window you want to open. If you have two windows displayed side-by-side, you can resize both windows simultaneously by selecting and dragging the dividing line. Resize the window on one side to the size you want it to be, and then release the mouse button. The other window will resize itself to fit alongside the first one, so you won't have any empty screen space.
If you do not want to use Snap Assist to snap other windows into layouts next to this snapped window from step 1, then click/tap on the snapped window from step 1 to close Snap Assist.
1 Open Task View (Win+Tab).
2 Right click or press and hold on a window you want to snap. (see screenshot below)
3 Click/tap on Snap left or Snap right for what you want.
That's it,
Shawn Brink
- Turn On or Off Snap windows in Windows 11
- Enable or Disable Snap Assist in Windows 11
- Enable or Disable Snap Layouts for Maximize Button in Windows 11
- Enable or Disable Snap Layouts on Top of Screen in Windows 11
- Enable or Disable Drag to Snap windows in Windows 11
- Enable or Disable Snap Window without Dragging All the Way to Screen Edge in Windows 11
- Enable or Disable Simultaneously Resize any Adjacent Snapped window in Windows 11
- Enable or Disable Show Snap Groups on Alt+Tab, Task View, and Taskbar in Windows 11