Unable to run oobe or msoobe on clean Win 11 install


Hopefully the above examples give you some ideas. If you have any specific questions related to this, let me know and I will try my best to answer.
Thanks for the samples, but I'll pass for now. I don't really need to do an unattended install. 😉
Easier to type a couple of commands to proceed with the normal OOBE install offline.
 

My Computer My Computer

At a glance

Windows 11 Pro 25H2Intel I9-9900K64GBNVIDIA RTX 2060
OS
Windows 11 Pro 25H2
Computer type
PC/Desktop
Manufacturer/Model
Dell XPS 8930
CPU
Intel I9-9900K
Memory
64GB
Graphics Card(s)
NVIDIA RTX 2060
Sound Card
NVIDIA High Definition Audio
Monitor(s) Displays
4k Samsung
Screen Resolution
3840 x 2160
Hard Drives
512GB NVMe, ADATA SU 800, 2TB HDD
Thanks for the samples, but I'll pass for now. I don't really need to do an unattended install. 😉
Easier to type a couple of commands to proceed with the normal OOBE install offline.
I often use them even when not performing an unattended install. For example, I will use one of these to do nothing more other than bypass Win 11 requirements and create a local user account. Ther remainder of the setup process is just as it would be when doing a manual install with no answer file involved at all.

But, the nice thing is that there are multiple ways to reach the same end goal, so choose whatever options work best for you :-).
 

My Computers My Computers

  • At a glance

    Win11 Pro 25H2 (RTM+)Intel i7-14650HX32 GBNo GPU - Built-in Intel Graphics
    OS
    Win11 Pro 25H2 (RTM+)
    Computer type
    PC/Desktop
    Manufacturer/Model
    Acemagic
    CPU
    Intel i7-14650HX
    Memory
    32 GB
    Graphics Card(s)
    No GPU - Built-in Intel Graphics
    Sound Card
    Integrated
    Monitor(s) Displays
    Varies as machine will often be moved to locations with different monitors
    Screen Resolution
    Varies
    Hard Drives
    1 x 1TB Gen 4 NVMe SSD
    PSU
    120W Power Brick
    Keyboard
    Corsair K70 Max RGB Magnetic Keyboard
    Mouse
    Logitech MX Master 3
    Internet Speed
    1Gb Up / 1 Gb Down
    Browser
    Edge
    Antivirus
    Windows Defender
  • At a glance

    Win11 Pro 25H2 (RTM+)Intel i7-1255U16 GBIntel Iris Xe Graphics
    Operating System
    Win11 Pro 25H2 (RTM+)
    Computer type
    Laptop
    Manufacturer/Model
    Lenovo ThinkBook 13x Gen 2
    CPU
    Intel i7-1255U
    Memory
    16 GB
    Graphics card(s)
    Intel Iris Xe Graphics
    Sound Card
    Realtek® ALC3306-CG codec
    Monitor(s) Displays
    13.3-inch IPS Display
    Screen Resolution
    WQXGA (2560 x 1600)
    Hard Drives
    2 TB 4 x 4 NVMe SSD
    PSU
    USB-C / Thunderbolt 4 Power / Charging
    Keyboard
    Backlit, spill resistant keyboard
    Mouse
    Buttonless Glass Precision Touchpad
    Internet Speed
    1Gb Up / 1Gb Down
    Browser
    Edge
    Antivirus
    Windows Defender
    Other Info
    WiFi 6e / Bluetooth 5.1 / Facial Recognition / Fingerprint Sensor / ToF (Time of Flight) Human Presence Sensor
I had the same issue. oobe/bypassnro did not work as advised. I was able to make it work as follows - Shift + F10 - In system 32 folder change directory to the OOBE directory - CD /oobe then run bypassnro and it worked.
 

My Computer My Computer

At a glance

Windows 11
OS
Windows 11
Computer type
PC/Desktop
Manufacturer/Model
Toshiba
I had the same issue. oobe/bypassnro did not work as advised. I was able to make it work as follows - Shift + F10 - In system 32 folder change directory to the OOBE directory - CD /oobe then run bypassnro and it worked.
It did not work because you used the wrong slash. You need a backslash like this:

oobe\bypassnro

You are entering a path and filename so the usual rules apply.
 

My Computers My Computers

  • At a glance

    Win11 Pro 25H2 (RTM+)Intel i7-14650HX32 GBNo GPU - Built-in Intel Graphics
    OS
    Win11 Pro 25H2 (RTM+)
    Computer type
    PC/Desktop
    Manufacturer/Model
    Acemagic
    CPU
    Intel i7-14650HX
    Memory
    32 GB
    Graphics Card(s)
    No GPU - Built-in Intel Graphics
    Sound Card
    Integrated
    Monitor(s) Displays
    Varies as machine will often be moved to locations with different monitors
    Screen Resolution
    Varies
    Hard Drives
    1 x 1TB Gen 4 NVMe SSD
    PSU
    120W Power Brick
    Keyboard
    Corsair K70 Max RGB Magnetic Keyboard
    Mouse
    Logitech MX Master 3
    Internet Speed
    1Gb Up / 1 Gb Down
    Browser
    Edge
    Antivirus
    Windows Defender
  • At a glance

    Win11 Pro 25H2 (RTM+)Intel i7-1255U16 GBIntel Iris Xe Graphics
    Operating System
    Win11 Pro 25H2 (RTM+)
    Computer type
    Laptop
    Manufacturer/Model
    Lenovo ThinkBook 13x Gen 2
    CPU
    Intel i7-1255U
    Memory
    16 GB
    Graphics card(s)
    Intel Iris Xe Graphics
    Sound Card
    Realtek® ALC3306-CG codec
    Monitor(s) Displays
    13.3-inch IPS Display
    Screen Resolution
    WQXGA (2560 x 1600)
    Hard Drives
    2 TB 4 x 4 NVMe SSD
    PSU
    USB-C / Thunderbolt 4 Power / Charging
    Keyboard
    Backlit, spill resistant keyboard
    Mouse
    Buttonless Glass Precision Touchpad
    Internet Speed
    1Gb Up / 1Gb Down
    Browser
    Edge
    Antivirus
    Windows Defender
    Other Info
    WiFi 6e / Bluetooth 5.1 / Facial Recognition / Fingerprint Sensor / ToF (Time of Flight) Human Presence Sensor
It did not work because you used the wrong slash. You need a backslash like this:

oobe\bypassnro

You are entering a path and filename so the usual rules apply.
No, it did work! I posted the syntax wrong.
 

My Computer My Computer

At a glance

Windows 11
OS
Windows 11
Computer type
PC/Desktop
Manufacturer/Model
Toshiba
No, it did work! I posted the syntax wrong.
Yes, I understand that you got it to work by changing into the oobe directory and then running the bypassnro command, I was merely pointing out that you could have done it in one line as well by reversing the direction of the slash :-)
 

My Computers My Computers

  • At a glance

    Win11 Pro 25H2 (RTM+)Intel i7-14650HX32 GBNo GPU - Built-in Intel Graphics
    OS
    Win11 Pro 25H2 (RTM+)
    Computer type
    PC/Desktop
    Manufacturer/Model
    Acemagic
    CPU
    Intel i7-14650HX
    Memory
    32 GB
    Graphics Card(s)
    No GPU - Built-in Intel Graphics
    Sound Card
    Integrated
    Monitor(s) Displays
    Varies as machine will often be moved to locations with different monitors
    Screen Resolution
    Varies
    Hard Drives
    1 x 1TB Gen 4 NVMe SSD
    PSU
    120W Power Brick
    Keyboard
    Corsair K70 Max RGB Magnetic Keyboard
    Mouse
    Logitech MX Master 3
    Internet Speed
    1Gb Up / 1 Gb Down
    Browser
    Edge
    Antivirus
    Windows Defender
  • At a glance

    Win11 Pro 25H2 (RTM+)Intel i7-1255U16 GBIntel Iris Xe Graphics
    Operating System
    Win11 Pro 25H2 (RTM+)
    Computer type
    Laptop
    Manufacturer/Model
    Lenovo ThinkBook 13x Gen 2
    CPU
    Intel i7-1255U
    Memory
    16 GB
    Graphics card(s)
    Intel Iris Xe Graphics
    Sound Card
    Realtek® ALC3306-CG codec
    Monitor(s) Displays
    13.3-inch IPS Display
    Screen Resolution
    WQXGA (2560 x 1600)
    Hard Drives
    2 TB 4 x 4 NVMe SSD
    PSU
    USB-C / Thunderbolt 4 Power / Charging
    Keyboard
    Backlit, spill resistant keyboard
    Mouse
    Buttonless Glass Precision Touchpad
    Internet Speed
    1Gb Up / 1Gb Down
    Browser
    Edge
    Antivirus
    Windows Defender
    Other Info
    WiFi 6e / Bluetooth 5.1 / Facial Recognition / Fingerprint Sensor / ToF (Time of Flight) Human Presence Sensor
Yes, I understand that you got it to work by changing into the oobe directory and then running the bypassnro command, I was merely pointing out that you could have done it in one line as well by reversing the direction of the slash :-)
I just tried a clean install with MS ISO 27718.1000 and oobe\bypassnro still works fine as expected. 😉🤷‍♂️
 

My Computer My Computer

At a glance

Windows 11 Pro 25H2Intel I9-9900K64GBNVIDIA RTX 2060
OS
Windows 11 Pro 25H2
Computer type
PC/Desktop
Manufacturer/Model
Dell XPS 8930
CPU
Intel I9-9900K
Memory
64GB
Graphics Card(s)
NVIDIA RTX 2060
Sound Card
NVIDIA High Definition Audio
Monitor(s) Displays
4k Samsung
Screen Resolution
3840 x 2160
Hard Drives
512GB NVMe, ADATA SU 800, 2TB HDD
Yep, basically for Windows or Microsoft, the slash is \ while for Unix or Unix like OSes including Mac OSX, the slash is /.
 

My Computer My Computer

At a glance

WindowsXP/7/8/8.1/10/11,Linux,Android,FreeBSD...Intel® Core™ i7-8750H 8th Gen 2.2Ghz up to 4....64GB using 2x32GB CL16 Mushkin redLine modulesIntel UHD 630 & NVIDIA GeForce GTX 1050 Ti wi...
OS
WindowsXP/7/8/8.1/10/11,Linux,Android,FreeBSD Unix
Computer type
Laptop
Manufacturer/Model
Dell XPS 15 9570
CPU
Intel® Core™ i7-8750H 8th Gen 2.2Ghz up to 4.1Ghz
Motherboard
Dell XPS 15 9570
Memory
64GB using 2x32GB CL16 Mushkin redLine modules
Graphics Card(s)
Intel UHD 630 & NVIDIA GeForce GTX 1050 Ti with 4GB DDR5
Sound Card
Realtek ALC3266-CG
Monitor(s) Displays
15.6" 4K Touch UltraHD 3840x2160 made by Sharp
Screen Resolution
3840x2160 4K UltraHD
Hard Drives
Samsung MZ-V9P4T0B/AM 990 PRO 4TB PCIe®4.0 NVMe™ M.2 SSD was Toshiba KXG60ZNV1T02 NVMe 1TB SSD
PSU
Dell XPS 15 9570
Case
Dell XPS 15 9570
Cooling
Stock
Keyboard
Stock
Mouse
SwitftPoint ProPoint
Internet Speed
Comcast/XFinity 1.44Gbps/42.5Mbps
Browser
Microsoft EDGE (Chromium based) & Google Chrome
Antivirus
Windows Defender that came with Windows
Saw this which is basically what I said in the above comment:
1729478245386.png
 

My Computer My Computer

At a glance

WindowsXP/7/8/8.1/10/11,Linux,Android,FreeBSD...Intel® Core™ i7-8750H 8th Gen 2.2Ghz up to 4....64GB using 2x32GB CL16 Mushkin redLine modulesIntel UHD 630 & NVIDIA GeForce GTX 1050 Ti wi...
OS
WindowsXP/7/8/8.1/10/11,Linux,Android,FreeBSD Unix
Computer type
Laptop
Manufacturer/Model
Dell XPS 15 9570
CPU
Intel® Core™ i7-8750H 8th Gen 2.2Ghz up to 4.1Ghz
Motherboard
Dell XPS 15 9570
Memory
64GB using 2x32GB CL16 Mushkin redLine modules
Graphics Card(s)
Intel UHD 630 & NVIDIA GeForce GTX 1050 Ti with 4GB DDR5
Sound Card
Realtek ALC3266-CG
Monitor(s) Displays
15.6" 4K Touch UltraHD 3840x2160 made by Sharp
Screen Resolution
3840x2160 4K UltraHD
Hard Drives
Samsung MZ-V9P4T0B/AM 990 PRO 4TB PCIe®4.0 NVMe™ M.2 SSD was Toshiba KXG60ZNV1T02 NVMe 1TB SSD
PSU
Dell XPS 15 9570
Case
Dell XPS 15 9570
Cooling
Stock
Keyboard
Stock
Mouse
SwitftPoint ProPoint
Internet Speed
Comcast/XFinity 1.44Gbps/42.5Mbps
Browser
Microsoft EDGE (Chromium based) & Google Chrome
Antivirus
Windows Defender that came with Windows
New member thanks for having us. Hope I'm not hijacking this thread I have done a search though cannot find a definitive answer.
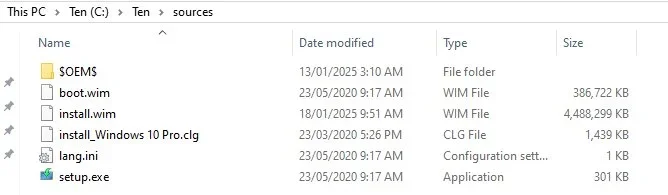
I do fresh install & they're always unattended. I never do upgrades. Using win 10 I have a minimal amount of files in the Sources Dir that produce a working desktop.
Can anyone advise what is the minimal file list in the sources Dir for a fresh install using Win 11?
see my win 10 list below.

Sources.webp
 

My Computer My Computer

At a glance

Win 10
OS
Win 10
Computer type
PC/Desktop
Manufacturer/Model
HP
New member thanks for having us. Hope I'm not hijacking this thread I have done a search though cannot find a definitive answer.
I do fresh install & they're always unattended. I never do upgrades. Using win 10 I have a minimal amount of files in the Sources Dir that produce a working desktop.
Can anyone advise what is the minimal file list in the sources Dir for a fresh install using Win 11?
see my win 10 list below.

View attachment 122513

First, welcome to ElevenForum.

Not sure that I understand why you would want to minimize the number of files in the SOURCE. You should include ALL files from the original source media.

If there is a reason for wanting to reduce the contents of the source, let me. It's entirely possible I'm just missing what the goal is that you have.
 

My Computers My Computers

  • At a glance

    Win11 Pro 25H2 (RTM+)Intel i7-14650HX32 GBNo GPU - Built-in Intel Graphics
    OS
    Win11 Pro 25H2 (RTM+)
    Computer type
    PC/Desktop
    Manufacturer/Model
    Acemagic
    CPU
    Intel i7-14650HX
    Memory
    32 GB
    Graphics Card(s)
    No GPU - Built-in Intel Graphics
    Sound Card
    Integrated
    Monitor(s) Displays
    Varies as machine will often be moved to locations with different monitors
    Screen Resolution
    Varies
    Hard Drives
    1 x 1TB Gen 4 NVMe SSD
    PSU
    120W Power Brick
    Keyboard
    Corsair K70 Max RGB Magnetic Keyboard
    Mouse
    Logitech MX Master 3
    Internet Speed
    1Gb Up / 1 Gb Down
    Browser
    Edge
    Antivirus
    Windows Defender
  • At a glance

    Win11 Pro 25H2 (RTM+)Intel i7-1255U16 GBIntel Iris Xe Graphics
    Operating System
    Win11 Pro 25H2 (RTM+)
    Computer type
    Laptop
    Manufacturer/Model
    Lenovo ThinkBook 13x Gen 2
    CPU
    Intel i7-1255U
    Memory
    16 GB
    Graphics card(s)
    Intel Iris Xe Graphics
    Sound Card
    Realtek® ALC3306-CG codec
    Monitor(s) Displays
    13.3-inch IPS Display
    Screen Resolution
    WQXGA (2560 x 1600)
    Hard Drives
    2 TB 4 x 4 NVMe SSD
    PSU
    USB-C / Thunderbolt 4 Power / Charging
    Keyboard
    Backlit, spill resistant keyboard
    Mouse
    Buttonless Glass Precision Touchpad
    Internet Speed
    1Gb Up / 1Gb Down
    Browser
    Edge
    Antivirus
    Windows Defender
    Other Info
    WiFi 6e / Bluetooth 5.1 / Facial Recognition / Fingerprint Sensor / ToF (Time of Flight) Human Presence Sensor
New member thanks for having us. Hope I'm not hijacking this thread I have done a search though cannot find a definitive answer.
I do fresh install & they're always unattended. I never do upgrades. Using win 10 I have a minimal amount of files in the Sources Dir that produce a working desktop.
Can anyone advise what is the minimal file list in the sources Dir for a fresh install using Win 11?

For a clean install (only) ISO, the minimal set of \sources files is the same as for W10:
$OEM$ (if needed)​
boot.wim​
install.wim​
lang.ini​
setup.exe​

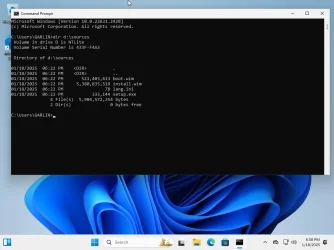
24H2 is probably different, because it's running the new Setup client which calls setupprep.exe & setuphost.exe.

To work around that: Mount boot.wim, and integrate this reg value to the SYSTEM hive:
Code:
[HKEY_LOCAL_MACHINE\SYSTEM\Setup]
"CmdLine"="X:\\sources\\setup.exe"

Not sure that I understand why you would want to minimize the number of files in the SOURCE. You should include ALL files from the original source media.

If there is a reason for wanting to reduce the contents of the source, let me. It's entirely possible I'm just missing what the goal is that you have.
Not everyone is performing a live upgrade, or wants to do Setup Dynamic Update.
 

Attachments

  • Windows 11 x64-2025-01-18-18-58-15.webp
    Windows 11 x64-2025-01-18-18-58-15.webp
    52.3 KB · Views: 1

My Computer My Computer

At a glance

Windows 7
OS
Windows 7
I can mount the boot.wim with dism no problem, how do I
integrate this reg value to the SYSTEM hive:
[HKEY_LOCAL_MACHINE\SYSTEM\Setup]<br>"CmdLine"="X:\\sources\\setup.exe"
 

My Computer My Computer

At a glance

Win 10
OS
Win 10
Computer type
PC/Desktop
Manufacturer/Model
HP
NOTE: Before you start to run any of the commands below, read the entire text. I am missing the specific details for the entry you want to add. If you can provide that to me, as described below, then I can nail down that one last command for you.


I know that you already know how to mount the boot.wim, but here is the command that I use:

DISM /mount-wim /wimfile:D:\Project\WinPE\boot.wim /index:1 /mountdir:D:\Project\Mount

Note that I am mounting to D:\Project\Mount. Modify to fit your needs. If you change this, make sure to also do so for the other commands that follow.

Next we load the registry "system" hive to a fictitious temp location, in this case I am using the name "offline"

reg load HKLM\offline D:\project\mount\windows\system32\config\system

Add the key:

Note: You may need to refine this next line slightly. My apologies, but I'm not sure I understand what the <br> is. The idea here is that you have the system hive loaded to "offline" now. So in any "reg add" command, you would add it using the exact same command as on a live Windows system but substitute "offline" for "system". Here is a sample of how I would add the entry that bypasses the TPMCheck:

EXAMPLE ONLY: reg add HKLM\offline\Setup\LabConfig /v BypassTPMCheck /t reg_dword /d 0x00000001 /f

Here then is your line, but I seem to be missing details like if this should be a dword, string value, etc. If you can provide the details on this entry then I can help with the exact command. Bottom line is that the command below is not accurate and needs to be modified:

reg add HKLM\offline\Setup\<br>"CmdLine"="X:\\sources\\setup.exe"

Now we need to unload the "offline" hive:

reg unload HKLM\offline

Finally, we unmount and commit the changes:

dism /unmount-image /mountdir:D:\project\mount /commit"

Below is an example, putting all the above together, showing how I load the keys that bypass Windows 11 system requirements. Note that I repeat the exact same thing for index 2 in the boot.wim. In other words, I run the commands below twice but the second time I replace "index:1" with "index:2":

DISM /mount-wim /wimfile:D:\Project\WinPE\boot.wim /index:1 /mountdir:D:\Project\Mount
reg load HKLM\offline D:\project\mount\windows\system32\config\system
reg add HKLM\offline\Setup\LabConfig /v BypassTPMCheck /t reg_dword /d 0x00000001 /f
reg add HKLM\offline\Setup\LabConfig /v BypassSecureBootCheck /t reg_dword /d 0x00000001 /f
reg add HKLM\offline\Setup\LabConfig /v BypassRAMCheck /t reg_dword /d 0x00000001 /f
reg unload HKLM\offline
dism /unmount-image /mountdir:D:\project\mount /commit"

Again, if you send me the exact details of the entry you are being asked to add, then I can nail down the exact command you need above for the "reg add" line.
 

My Computers My Computers

  • At a glance

    Win11 Pro 25H2 (RTM+)Intel i7-14650HX32 GBNo GPU - Built-in Intel Graphics
    OS
    Win11 Pro 25H2 (RTM+)
    Computer type
    PC/Desktop
    Manufacturer/Model
    Acemagic
    CPU
    Intel i7-14650HX
    Memory
    32 GB
    Graphics Card(s)
    No GPU - Built-in Intel Graphics
    Sound Card
    Integrated
    Monitor(s) Displays
    Varies as machine will often be moved to locations with different monitors
    Screen Resolution
    Varies
    Hard Drives
    1 x 1TB Gen 4 NVMe SSD
    PSU
    120W Power Brick
    Keyboard
    Corsair K70 Max RGB Magnetic Keyboard
    Mouse
    Logitech MX Master 3
    Internet Speed
    1Gb Up / 1 Gb Down
    Browser
    Edge
    Antivirus
    Windows Defender
  • At a glance

    Win11 Pro 25H2 (RTM+)Intel i7-1255U16 GBIntel Iris Xe Graphics
    Operating System
    Win11 Pro 25H2 (RTM+)
    Computer type
    Laptop
    Manufacturer/Model
    Lenovo ThinkBook 13x Gen 2
    CPU
    Intel i7-1255U
    Memory
    16 GB
    Graphics card(s)
    Intel Iris Xe Graphics
    Sound Card
    Realtek® ALC3306-CG codec
    Monitor(s) Displays
    13.3-inch IPS Display
    Screen Resolution
    WQXGA (2560 x 1600)
    Hard Drives
    2 TB 4 x 4 NVMe SSD
    PSU
    USB-C / Thunderbolt 4 Power / Charging
    Keyboard
    Backlit, spill resistant keyboard
    Mouse
    Buttonless Glass Precision Touchpad
    Internet Speed
    1Gb Up / 1Gb Down
    Browser
    Edge
    Antivirus
    Windows Defender
    Other Info
    WiFi 6e / Bluetooth 5.1 / Facial Recognition / Fingerprint Sensor / ToF (Time of Flight) Human Presence Sensor
NOTE: Before you start to run any of the commands below, read the entire text. I am missing the specific details for the entry you want to add. If you can provide that to me, as described below, then I can nail down that one last command for you.


I know that you already know how to mount the boot.wim, but here is the command that I use:

DISM /mount-wim /wimfile:D:\Project\WinPE\boot.wim /index:1 /mountdir:D:\Project\Mount

Note that I am mounting to D:\Project\Mount. Modify to fit your needs. If you change this, make sure to also do so for the other commands that follow.

Next we load the registry "system" hive to a fictitious temp location, in this case I am using the name "offline"

reg load HKLM\offline D:\project\mount\windows\system32\config\system

Add the key:

Note: You may need to refine this next line slightly. My apologies, but I'm not sure I understand what the <br> is. The idea here is that you have the system hive loaded to "offline" now. So in any "reg add" command, you would add it using the exact same command as on a live Windows system but substitute "offline" for "system". Here is a sample of how I would add the entry that bypasses the TPMCheck:

EXAMPLE ONLY: reg add HKLM\offline\Setup\LabConfig /v BypassTPMCheck /t reg_dword /d 0x00000001 /f

Here then is your line, but I seem to be missing details like if this should be a dword, string value, etc. If you can provide the details on this entry then I can help with the exact command. Bottom line is that the command below is not accurate and needs to be modified:

reg add HKLM\offline\Setup\<br>"CmdLine"="X:\\sources\\setup.exe"

Now we need to unload the "offline" hive:

reg unload HKLM\offline

Finally, we unmount and commit the changes:

dism /unmount-image /mountdir:D:\project\mount /commit"

Below is an example, putting all the above together, showing how I load the keys that bypass Windows 11 system requirements. Note that I repeat the exact same thing for index 2 in the boot.wim. In other words, I run the commands below twice but the second time I replace "index:1" with "index:2":

DISM /mount-wim /wimfile:D:\Project\WinPE\boot.wim /index:1 /mountdir:D:\Project\Mount
reg load HKLM\offline D:\project\mount\windows\system32\config\system
reg add HKLM\offline\Setup\LabConfig /v BypassTPMCheck /t reg_dword /d 0x00000001 /f
reg add HKLM\offline\Setup\LabConfig /v BypassSecureBootCheck /t reg_dword /d 0x00000001 /f
reg add HKLM\offline\Setup\LabConfig /v BypassRAMCheck /t reg_dword /d 0x00000001 /f
reg unload HKLM\offline
dism /unmount-image /mountdir:D:\project\mount /commit"

Again, if you send me the exact details of the entry you are being asked to add, then I can nail down the exact command you need above for the "reg add" line.
Perhaps Garlin can chime in & confirm the code?
 

My Computer My Computer

At a glance

Win 10
OS
Win 10
Computer type
PC/Desktop
Manufacturer/Model
HP
I'm trying to do a clean Win 11 install, completely clean of all the accumulated Windows 10 cruft from my old Wkindows. So the first thing I did with the Win 11 USB installer was wipe the drive clean. Then I started to do a clean install, and got as far as the screen "Let's connect you to a network." But I don't want to connect to a network. I have fresh, latest version drivers that i want to install BEFORE connecting to the web. When I was doing Win 10 installs, this was not an issue.

If it matters, I'm trying to install Win 11 on a system that already has a digital license for Win 10 Pro 64.

This tutorial Custom Install Windows 11 Tutorial says to use oobe \bypassnro or msoobe \bypassnro.

If you don't have an Internet connection and none of the above worked for you, then press the Shift + F10 keys to open a command prompt. Copy and paste the OOBE\BYPASSNRO command into the command prompt, and press Enter. This will restart the computer, and take you back to step 15. You should then be able to click/tap on I don't have internet when you get back to this step, and go to step 23D to set up a local account. (see bottom screenshot)

If the OOBE\BYPASSNRO command doesn't work for you, then copy and paste the MSOOBE\BYPASSNRO command into the command prompt, and press Enter. This will restart the computer, and take you back to step 15. You should then be able to click/tap on I don't have internet when you get back to this step, and go to step 23D to set up a local account. (see bottom screenshot)


However, neither command was recognized. Even plain oobe or msoobe was not recognized. What do I do now?

I'm posting this thread from a system still running Win 10 Pro.

Just had a similar issue and Bree kindly informed me that after hitting shift F10 to open the command window, you need to click on the command window before you can type anything. If that was the issue. And it's oobe\bypassnro
 

My Computers My Computers

  • At a glance

    Windows 11 Home 25H2Core i5-1035G132gb
    OS
    Windows 11 Home 25H2
    Computer type
    Laptop
    Manufacturer/Model
    HP Pavilion 14-ce3606sa
    CPU
    Core i5-1035G1
    Memory
    32gb
    Hard Drives
    Samsung 870 evo sata ssd
    Cooling
    Could be better
    Internet Speed
    50 mbps Starlink
    Browser
    Firefox
    Other Info
    Originally came installed with a 500gb H10 Optane ssd
  • At a glance

    Windows 11 HomeIntel Core i5-1035G116gb
    Operating System
    Windows 11 Home
    Computer type
    Laptop
    Manufacturer/Model
    HP Pavilion ce3606sa
    CPU
    Intel Core i5-1035G1
    Memory
    16gb
    Hard Drives
    Hynix Gold P31 2TB
    Internet Speed
    200mbps Starlink
    Browser
    Firefox
    Antivirus
    Defender
Perhaps Garlin can chime in & confirm the code?
If you're using a normal ISO as the base, WinPE (Setup) is image index #2 on boot.wim.

@hsehestedt is prolly using the Windows ADK as his base, which only has one boot image inside the wim (index #1).

Code:
DISM /Mount-Wim /wimfile:D:\sources\boot.wim /index:2 /mountdir:C:\Mount
reg load HKLM\TEMP C:\Mount\Windows\System32\config\SYSTEM
reg add HKLM\TEMP\Setup /v "CmdLine" /t REG_SZ /d "X:\\sources\\setup.exe" /f
reg unload HKLM\TEMP
DISM /Unmount-Wim /mountdir:C:\Mount /commit"
 

My Computer My Computer

At a glance

Windows 7
OS
Windows 7
If you're using a normal ISO as the base, WinPE (Setup) is image index #2 on boot.wim.

@hsehestedt is prolly using the Windows ADK as his base, which only has one boot image inside the wim (index #1).

Code:
DISM /Mount-Wim /wimfile:D:\sources\boot.wim /index:2 /mountdir:C:\Mount
reg load HKLM\TEMP C:\Mount\Windows\System32\config\SYSTEM
reg add HKLM\TEMP\Setup /v "CmdLine" /t REG_SZ /d "X:\\sources\\setup.exe" /f
reg unload HKLM\TEMP
DISM /Unmount-Wim /mountdir:C:\Mount /commit"
Thank you I will give this a go.
 

My Computer My Computer

At a glance

Win 10
OS
Win 10
Computer type
PC/Desktop
Manufacturer/Model
HP
@hsehestedt is prolly using the Windows ADK as his base, which only has one boot image inside the wim (index #1).

Actually, I am not using the ADK. Win PE with the ADK has 2 indices as well. As I noted, I suggested adding that to both index 1 and 2. I only do index 1 because I like the symmetry - I like to update both. But you are correct - setup only uses index 2 so you really only need to update index 2.
 

My Computers My Computers

  • At a glance

    Win11 Pro 25H2 (RTM+)Intel i7-14650HX32 GBNo GPU - Built-in Intel Graphics
    OS
    Win11 Pro 25H2 (RTM+)
    Computer type
    PC/Desktop
    Manufacturer/Model
    Acemagic
    CPU
    Intel i7-14650HX
    Memory
    32 GB
    Graphics Card(s)
    No GPU - Built-in Intel Graphics
    Sound Card
    Integrated
    Monitor(s) Displays
    Varies as machine will often be moved to locations with different monitors
    Screen Resolution
    Varies
    Hard Drives
    1 x 1TB Gen 4 NVMe SSD
    PSU
    120W Power Brick
    Keyboard
    Corsair K70 Max RGB Magnetic Keyboard
    Mouse
    Logitech MX Master 3
    Internet Speed
    1Gb Up / 1 Gb Down
    Browser
    Edge
    Antivirus
    Windows Defender
  • At a glance

    Win11 Pro 25H2 (RTM+)Intel i7-1255U16 GBIntel Iris Xe Graphics
    Operating System
    Win11 Pro 25H2 (RTM+)
    Computer type
    Laptop
    Manufacturer/Model
    Lenovo ThinkBook 13x Gen 2
    CPU
    Intel i7-1255U
    Memory
    16 GB
    Graphics card(s)
    Intel Iris Xe Graphics
    Sound Card
    Realtek® ALC3306-CG codec
    Monitor(s) Displays
    13.3-inch IPS Display
    Screen Resolution
    WQXGA (2560 x 1600)
    Hard Drives
    2 TB 4 x 4 NVMe SSD
    PSU
    USB-C / Thunderbolt 4 Power / Charging
    Keyboard
    Backlit, spill resistant keyboard
    Mouse
    Buttonless Glass Precision Touchpad
    Internet Speed
    1Gb Up / 1Gb Down
    Browser
    Edge
    Antivirus
    Windows Defender
    Other Info
    WiFi 6e / Bluetooth 5.1 / Facial Recognition / Fingerprint Sensor / ToF (Time of Flight) Human Presence Sensor
Back
Top Bottom