Solved Windows 11 TPM 2.0 Requirement


NavyLCDR

Well-known member
Pro User
VIP
Local time
5:52 AM
Posts
1,715
OS
Windows 11
NEVERMIND! DUH! I see the thread with the fix in it!

I tried to upgrade Windows 10 to Windows 11 on my gaming desktop which has an Asus ROG Crosshair VII Hero (WiFi) motherboard and Ryzen 7 3800XT CPU. I get the TPM 2.0 error. However, I was able to apply the Windows 11 image to a partition using dism and I am posting this from the same computer in Windows 11. I also just tried an in-place upgrade repair install and setup is complaining about TPM 2.0. Does anyone know a workaround that will let you run Windows 11 setup and bypass the check for TPM 2.0? I would really like to be able to upgrade, rather than have to do clean installs using the dism /apply-image method.

Thanks! And good to see all my TenForums friends here!

NEVERMIND! DUH! I see the thread with the fix in it!
 

My Computers

System One System Two

  • OS
    Windows 11
    Computer type
    PC/Desktop
    Manufacturer/Model
    Homebuilt
    CPU
    AMD Ryzen 7 3800XT
    Motherboard
    ASUS ROG Crosshair VII Hero (WiFi)
    Memory
    32GB
    Graphics Card(s)
    EVGA GeForce GTX 1080 Ti
  • Operating System
    Windows 11 Education
    Computer type
    Laptop
    Manufacturer/Model
    Dell Inspiron 7773
    CPU
    Intel i7-8550U
    Memory
    32GB
    Graphics card(s)
    Nvidia Geforce MX150
    Sound Card
    Realtek
    Monitor(s) Displays
    17"
    Screen Resolution
    1920 x 1080
    Hard Drives
    Toshiba 512GB NVMe SSD
    SK Hynix 512GB SATA SSD
    Internet Speed
    Fast!
Hello and welcome to ElevenForum!
Yes, it seems possible to modify the installer to bypass this check and allow upgrades however for now, this should not be necessary. The chart below is from Tenforums and I believe original source is MS. It seems they will allow installs and upgrades on unsupported hardware for as long as Windows 11 is testing,
By that time we should have an idea on why this check even exists and what are the consequences or losses when you run Windows 11 on an older machine without a TPM.
If all it takes is to disable/bypass this check then I believe it can and will be bypasssed. But I'm starting to think that MS did this on purpose and they have plans with it. I did not believe that TPM2.0 would be a requirement as of the leaked build but since it is a requirement in the insider build announced today, well... we shall see!


HardwareChannels6_24-final.png
 

My Computers

System One System Two

Welcome, NavyLCDR. Great to see you here.

Looking forward to your sage advice in this forum!
 

My Computers

System One System Two

  • OS
    Win11 Pro 23H2
    Computer type
    PC/Desktop
    Manufacturer/Model
    Home Built
    CPU
    Intel i7-11700K
    Motherboard
    ASUS Prime Z590-A
    Memory
    128GB Crucial Ballistix 3200MHz DRAM
    Graphics Card(s)
    No GPU - CPU graphics only (for now)
    Sound Card
    Realtek (on motherboard)
    Monitor(s) Displays
    HP Envy 32
    Screen Resolution
    2560 x 1440
    Hard Drives
    1 x 1TB NVMe Gen 4 x 4 SSD
    1 x 2TB NVMe Gen 3 x 4 SSD
    2 x 512GB 2.5" SSDs
    2 x 8TB HD
    PSU
    Corsair HX850i
    Case
    Corsair iCue 5000X RGB
    Cooling
    Noctua NH-D15 chromax.black cooler + 10 case fans
    Keyboard
    CODE backlit mechanical keyboard
    Mouse
    Logitech MX Master 3
    Internet Speed
    1Gb Up / 1 Gb Down
    Browser
    Edge
    Antivirus
    Windows Defender
    Other Info
    Additional options installed:
    WiFi 6E PCIe adapter
    ASUS ThunderboltEX 4 PCIe adapter
  • Operating System
    Win11 Pro 23H2
    Computer type
    Laptop
    Manufacturer/Model
    Lenovo ThinkBook 13x Gen 2
    CPU
    Intel i7-1255U
    Memory
    16 GB
    Graphics card(s)
    Intel Iris Xe Graphics
    Sound Card
    Realtek® ALC3306-CG codec
    Monitor(s) Displays
    13.3-inch IPS Display
    Screen Resolution
    WQXGA (2560 x 1600)
    Hard Drives
    2 TB 4 x 4 NVMe SSD
    PSU
    USB-C / Thunderbolt 4 Power / Charging
    Mouse
    Buttonless Glass Precision Touchpad
    Keyboard
    Backlit, spill resistant keyboard
    Internet Speed
    1Gb Up / 1Gb Down
    Browser
    Edge
    Antivirus
    Windows Defender
    Other Info
    WiFi 6e / Bluetooth 5.1 / Facial Recognition / Fingerprint Sensor / ToF (Time of Flight) Human Presence Sensor
I have gotten past the TPM warning thing with a little bit of file replacing. I have put it on my main machine (on a new HDD) and it has been a little bit of a learning curve. It is definitely faster, in MY opinion. Can't wait until a few issues are fixed and a release of a RTM :)
 

My Computer

System One

  • OS
    Windows 11 21H2 22000.160
    Computer type
    PC/Desktop
    Manufacturer/Model
    Own Build
    CPU
    i 4790K
    Motherboard
    GA 97X G3
    Memory
    32gb
    Graphics Card(s)
    960
    Monitor(s) Displays
    32 inch Phillips
    Screen Resolution
    1920x1080
    Hard Drives
    Samsung 870Evo 1TB
    PSU
    750W
    Case
    NZXT 630
Hi there
For the moment if you create a VM you can with some VM systems have sec boot / uefi, emulate a TPM in the VM's config and "jig the CPU topography" so it will install W11 from which you can get a REAL Hardware W11 system.

Emullated TPM works so even if you have a real one its simple in teh VM to use the emulated version before creating the real machine. You can use various VM systems - HYPER-V , KVM are two that work.

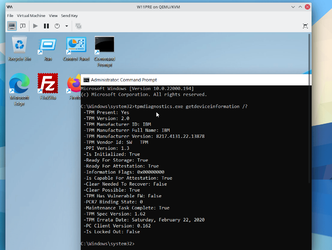
Here's the emulated TPM device working (in Windows in the settings choose install optional features and select TPMDIAGNOSTICS

Screenshot_20210917_114502.png


When you've done that the simplest way is then to (from WITHIN the VM is to :

1) ensure you have a copy of the iso of the build you want to install - I assume you've already got that as you must have created the VM in the first place.

2) attach a USB device to the VM as a "physical Disk" -- not a "Virtual hard disk and also have the iso image available in the VM (as a DATA image -- not as a mounted Virtual CD/DVD image..

3) In rufus click on the List USB devices and select your USB disk.

4) Browse the iso image in rufus

5) Now select "WindowstoGO". -- You can select the "Standard Windows installation but you'd then need to physically swap the HDD with an internal one after Rufus has done its work -- It's easier to stick with the WindowstoGo one and then convert to internal HDD after you are up and running.

6) when the process ends boot the USB and complete Windows install (on the real machine) .

7) You'll be missing a few drivers -- simply use a previous W11 or W10 disk or "Macrium image. Go down the relevant devices -->update driver-> browse computer and from your previous W10 / W11 image select folder windows->system32->Driverstore which will fix.

8) Now clone this system, to internal HDD

9) fix boot if required via Macrium "Fix Windows boot problems".

If the system has no TPM and Windows starts looking for it you are going to be hosed in any case -- however most systems even as far back as 2026 I believe had a TPM chip or built in TPM on their mobos. Should be enableable in the BIOS.

Why do this some ask :

Where a lot of machines fail the install test is in the CPU requirements - but some older and even recent CPU's are pretty good and fast -- there's no reason why these shouldn't run W11 for a forsseable time yet --it will be ages before any "New CPU" instructions will be built into the Windows kernels - there isn't a big enough user base to engineer tht sort of change in the kernel yet. So if you have a decent CPU and TPM and want to run W11 it's worth taking a little bit of time rather than rushing out replacing expensive decent hardware with even more expensive only marginally better hardware !!!!.


Cheers

Jimbo
 

My Computer

System One

  • OS
    Windows XP,7,10,11 Linux Arch Linux
    Computer type
    PC/Desktop
    CPU
    2 X Intel i7
Hi there
For the moment if you create a VM you can with some VM systems have sec boot / uefi, emulate a TPM in the VM's config and "jig the CPU topography" so it will install W11 from which you can get a REAL Hardware W11 system.

Emullated TPM works so even if you have a real one its simple in teh VM to use the emulated version before creating the real machine. You can use various VM systems - HYPER-V , KVM are two that work.

Here's the emulated TPM device working (in Windows in the settings choose install optional features and select TPMDIAGNOSTICS

View attachment 8157


When you've done that the simplest way is then to (from WITHIN the VM is to :

1) ensure you have a copy of the iso of the build you want to install - I assume you've already got that as you must have created the VM in the first place.

2) attach a USB device to the VM as a "physical Disk" -- not a "Virtual hard disk and also have the iso image available in the VM (as a DATA image -- not as a mounted Virtual CD/DVD image..

3) In rufus click on the List USB devices and select your USB disk.

4) Browse the iso image in rufus

5) Now select "WindowstoGO". -- You can select the "Standard Windows installation but you'd then need to physically swap the HDD with an internal one after Rufus has done its work -- It's easier to stick with the WindowstoGo one and then convert to internal HDD after you are up and running.

6) when the process ends boot the USB and complete Windows install (on the real machine) .

7) You'll be missing a few drivers -- simply use a previous W11 or W10 disk or "Macrium image. Go down the relevant devices -->update driver-> browse computer and from your previous W10 / W11 image select folder windows->system32->Driverstore which will fix.

8) Now clone this system, to internal HDD

9) fix boot if required via Macrium "Fix Windows boot problems".

If the system has no TPM and Windows starts looking for it you are going to be hosed in any case -- however most systems even as far back as 2026 I believe had a TPM chip or built in TPM on their mobos. Should be enableable in the BIOS.

Why do this some ask :

Where a lot of machines fail the install test is in the CPU requirements - but some older and even recent CPU's are pretty good and fast -- there's no reason why these shouldn't run W11 for a forsseable time yet --it will be ages before any "New CPU" instructions will be built into the Windows kernels - there isn't a big enough user base to engineer tht sort of change in the kernel yet. So if you have a decent CPU and TPM and want to run W11 it's worth taking a little bit of time rather than rushing out replacing expensive decent hardware with even more expensive only marginally better hardware !!!!.


Cheers

Jimbo
I used this method which is simpler to install the Windows 11 developer version on my 7 year old Dell laptop which has no TPM support and has a non-compliant CPU:
  1. Installed W11 in Hyper V on my laptop having Windows 10 Pro
  2. Created a spare 30GB partition and cloned the Hyper V Windows 11 .vhdx file to that partition using Reflect
  3. Set the new W11 drive / partition as a boot menu option
  4. Booted to the W11 drive. W11 then installed all the laptop drivers needed.
  5. Activated the installation using the generic W10 key VK7JG-NPHTM-C97JM-9MPGT-3V66T. Windows then decided to activate the Windows 11 with a digital licence linked to my MS account.
I now have the PC dual booting Windows 10 and 11 fine and both versions are activated. I have no idea whether Windows 11 will keep working after the official release date.
 

My Computer

System One

  • OS
    Windows 11 Pro
    Computer type
    PC/Desktop
    CPU
    Core i7-13700K
    Motherboard
    Asus TUF Gaming Plus WiFi Z790
    Memory
    64 GB Kingston Fury Beast DDR5
    Graphics Card(s)
    Gigabyte GeForce RTX 2060 Super Gaming OC 8G
    Sound Card
    Realtek S1200A
    Monitor(s) Displays
    Viewsonic VP2770
    Screen Resolution
    2560 x 1440
    Hard Drives
    Kingston KC3000 2TB NVME SSD & SATA HDDs & SSD
    PSU
    EVGA SuperNova G2 850W
    Case
    Nanoxia Deep Silence 1
    Cooling
    Noctua NH-D14
    Keyboard
    Microsoft Digital Media Pro
    Mouse
    Logitech Wireless
    Internet Speed
    15 Mb / s
    Browser
    Chrome
    Antivirus
    Defender
I used this method which is simpler to install the Windows 11 developer version on my 7 year old Dell laptop which has no TPM support and has a non-compliant CPU:
  1. Installed W11 in Hyper V on my laptop having Windows 10 Pro
  2. Created a spare 30GB partition and cloned the Hyper V Windows 11 .vhdx file to that partition using Reflect
  3. Set the new W11 drive / partition as a boot menu option
  4. Booted to the W11 drive. W11 then installed all the laptop drivers needed.
  5. Activated the installation using the generic W10 key VK7JG-NPHTM-C97JM-9MPGT-3V66T. Windows then decided to activate the Windows 11 with a digital licence linked to my MS account.
I now have the PC dual booting Windows 10 and 11 fine and both versions are activated. I have no idea whether Windows 11 will keep working after the official release date.
A variation on this, to upgrade to W11 on unsupported pc, is to clone existing installation to a vhd including hidden partitions (vhd cannot be on a drive or partition being clone), then mount vhd on a hyper-V vm, then upgrade to W11 inside VM (TPM emulation on etc).

Once upgraded, closedown Hyper-V and mount vhd and create dial boot entry. This way you have updated host version to w11 and have all drivers.
 

My Computer

System One

  • OS
    Windows 10 Pro + others in VHDs
    Computer type
    Laptop
    Manufacturer/Model
    ASUS Vivobook 14
    CPU
    I7
    Motherboard
    Yep, Laptop has one.
    Memory
    16 GB
    Graphics Card(s)
    Integrated Intel Iris XE
    Sound Card
    Realtek built in
    Monitor(s) Displays
    N/A
    Screen Resolution
    1920x1080
    Hard Drives
    1 TB Optane NVME SSD, 1 TB NVME SSD
    PSU
    Yep, got one
    Case
    Yep, got one
    Cooling
    Stella Artois
    Keyboard
    Built in
    Mouse
    Bluetooth , wired
    Internet Speed
    72 Mb/s :-(
    Browser
    Edge mostly
    Antivirus
    Defender
    Other Info
    TPM 2.0
A variation on this, to upgrade to W11 on unsupported pc, is to clone existing installation to a vhd including hidden partitions (vhd cannot be on a drive or partition being clone), then mount vhd on a hyper-V vm, then upgrade to W11 inside VM (TPM emulation on etc).

Once upgraded, closedown Hyper-V and mount vhd and create dial boot entry. This way you have updated host version to w11 and have all drivers.
Hi there

Booted an old version of W10 and followed above instructions -- also works a treat for those on Windows Hosts. !!

Interesting to see how long these "Work arounds" will continue to function. Actually mount the vhd and have it in the boot entry is a good idea --I'm going to see if this trick also works on a "WintoGo" system -- then one could have a tiny base Windows boot and run everything from the Windows system on the vhd .

Cheers
jimbo
 

My Computer

System One

  • OS
    Windows XP,7,10,11 Linux Arch Linux
    Computer type
    PC/Desktop
    CPU
    2 X Intel i7
Back
Top Bottom