Cannot boot on my old S4 tower


jgt1942

Well-known member
Local time
1:08 PM
Posts
6
OS
Windows 11
Several months ago, I replaced my old Win11 desktop (S4) with a new Win11 desktop (S5). Recently, I decided to pass the old S5 tower on to a family member. But before passing on, I decided to check it out and ensure everything was OK. Much to my surprise I could not boot the system. I created a Rufus Win11 install thumb drive. I needed to use Rufus because Windows will not install (TPM failure).

I removed the SSD boot drive and attached it to my new Win11 tower (S5). Using HD Sentinel, I noticed that it reported the drive health as 1%. I replaced the SSD drive with a spare. However, before installing the drive in S4,, I attached it via USB port and used Macrium Reflect X to restore the boot drive. After the restore completed (no issues were reported), I installed the SSD in S4 and attempted to boot. The boot failed. I never saw windows attempting to run.

On the S5 system I created a Macrium Restore thumb drive and an Acronis restore thumb drive and a Win11 thumb drive. When I used the Win11 thumb drive on S4, it failed to pass the TMP test. I tried the Macrium restore thumb drive, it failed but did not issue any error. It just seemed run but never started Macrium. When I used the Acronis restore Thumb Drive, it ran and I was able to get use Acronis that was on the Thumb Drive. However, I currently do not have a backup produced by Acronis for the S4 system. BTW, when using the Thumb Drives in S4, during the power on, I could get into the startup Boot Menu and ensure the Thumb Drive was the boot drive. Also, I've plugged the Thumb Drive into a USB 2.0 port on the back of the tower.

I have NOt attempted to use a restore from a backup created on my S5 system. The old S4 has AMD processor and the new tower (S5) has an Intel processor. I have no idea if using a backup from S5 to restore the SSD for S4 will create issues. In the new S5 I have a M.2 SSD and in the old S4 the SSD is a 2.5 inche drive.

Earlier today, I created a Rufus Win11 (I downloaded the lates Win11 from the Microsoft website) Thumb Drive, and installed it in the S4 system, USB 2,0 port on the back of the S4 tower. I powered on the system, went into the BIOS/EUFI menu and changed the boot to utilize the Thumb Drive. Now when I boot I see the following:
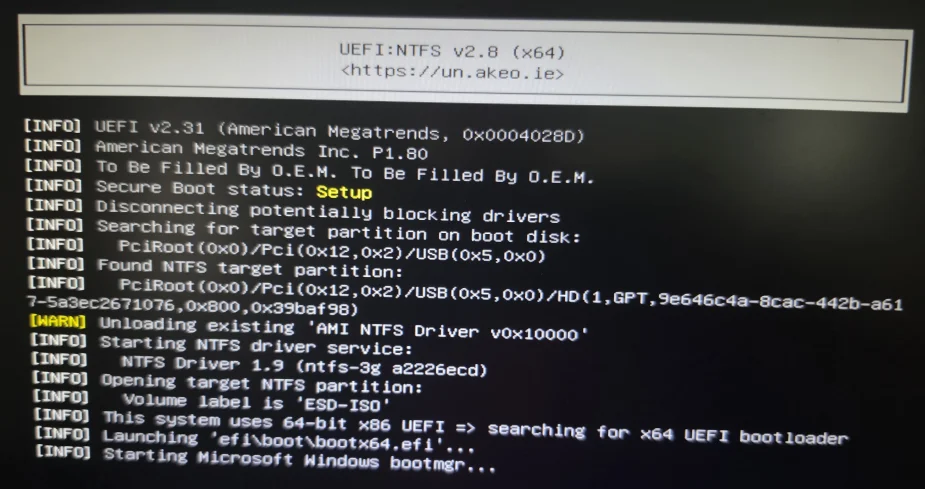
1790920477625.webp

This will be displayed on the monitor for several minutes (I'm guessing 30+ minutes), then the screen will go black for about 3 minutes and again I see the above image.

I've gone beyond my skill level, and now I'm totally lost as to what the heck I should do, nor do I understand what the above image is telling me.
If you have suggestions, please give me instructions at the dummy level.
 
Windows Build/Version
25H2

My Computer My Computer

At a glance

Windows 11
OS
Windows 11
please try
go in to your BIOS setup and disable secure boot
save settings and restart your system

then see if Windows boots to the desktop.
best of luck Steve ..
 

My Computers My Computers

  • At a glance

    Windows 11 HomeRyzen 7 5825u64GB DDR4 3200Ryzen 7 5825u
    OS
    Windows 11 Home
    Computer type
    PC/Desktop
    Manufacturer/Model
    HP 24" AiO
    CPU
    Ryzen 7 5825u
    Motherboard
    HP
    Memory
    64GB DDR4 3200
    Graphics Card(s)
    Ryzen 7 5825u
    Sound Card
    Realtek External 5w speaker bar.
    Monitor(s) Displays
    24" HP AiO
    Screen Resolution
    1920 x 1080 @60 Hz
    Hard Drives
    1TB WD Blue SN580 M2 SSD Partitioned C:/D: drives.
    2x 1TB USB HDD External Backup/Storage.
    all VeraCrypt encrypted.
    PSU
    90W external power brick
    Case
    24" All in One
    Cooling
    Default Air Cooling
    Keyboard
    Dell WiFi UK extended
    Mouse
    Dell WiFi 3 Button
    Internet Speed
    1GB full fibre
    Browser
    Vivaldi Browser/Email/Calendar
    Antivirus
    AVG Internet Security/Windows Defender
    Other Info
    Mainly Open Source Software
  • At a glance

    Ubuntu 22.04.5 LTSi5 7200u16GB DDR4Intel
    Operating System
    Ubuntu 22.04.5 LTS
    Computer type
    Laptop
    Manufacturer/Model
    Dell 13" Latitude 2017
    CPU
    i5 7200u
    Motherboard
    Dell
    Memory
    16GB DDR4
    Graphics card(s)
    Intel
    Sound Card
    Intel
    Monitor(s) Displays
    13" Dell Laptop
    Hard Drives
    250GB Crucial 2.5" SSD
    Mouse
    Generic WiFi 3 button
    Internet Speed
    WiFi only
    Browser
    Firefox
    Antivirus
    ClamAV TK
    Other Info
    Mainly Open Source Software
Note: I refer to my old tower as S4 and the new tower as S5, I noticed that at least one time I goofed in the above. I attempted to edit my post but could not.
 

My Computer My Computer

At a glance

Windows 11
OS
Windows 11
Also replace the CMOS battery and load BIOS defaults since a low battery can cause boot problems
 

My Computer My Computer

At a glance

Windows 11 ProCore i7-13700K64 GB Kingston Fury Beast DDR5Gigabyte GeForce RTX 2060 Super Gaming OC 8G
OS
Windows 11 Pro
Computer type
PC/Desktop
Manufacturer/Model
Self build
CPU
Core i7-13700K
Motherboard
Asus TUF Gaming Plus WiFi Z790
Memory
64 GB Kingston Fury Beast DDR5
Graphics Card(s)
Gigabyte GeForce RTX 2060 Super Gaming OC 8G
Sound Card
Realtek S1200A
Monitor(s) Displays
Viewsonic VP2770 & Dell (secondary)
Screen Resolution
2560 x 1440
Hard Drives
Kingston KC3000 2TB NVME SSD & SATA HDDs & SSD
PSU
EVGA SuperNova G2 850W
Case
Nanoxia Deep Silence 1
Cooling
Noctua NH-D14
Keyboard
Microsoft Digital Media Pro
Mouse
Logitech Wireless
Internet Speed
80 Mb / s
Browser
Chrome
Antivirus
Defender, Malwarebytes Free & AdwCleaner
Image below: Rufus supports booting from NTFS in pure UEFI mode through its UEFI:NTFS feature. When Rufus uses NTFS, it creates a small FAT partition labeled RUFUS_BOOT (previously UEFI_NTFS) containing the UEFI:NTFS bootloader. The firmware boots from this small FAT partition; UEFI:NTFS then loads an NTFS driver and launches the Windows UEFI bootloader from the main NTFS partition. This allows Rufus to use NTFS for Windows installation media when the ISO contains an install.esd or install.wim larger than FAT32's 4 GB maximum file size.

The Media Creation Tool works differently: when it creates a FAT32 USB flash drive, it can split a large Windows image into install.swm, install2.swm, and so on. This keeps each split image file below FAT32's 4 GB maximum file size.

Disk Management.webp


1790920477625.webp


"ChatGPT can make mistakes. Check important info."

That Rufus screen is not showing an error.

Notice this line in the Rufus screen:

Secure Boot status: Setup

That is significant. Rufus's UEFI:NTFS code distinguishes among Disabled, Enabled, and Setup; it is deliberately reporting Setup mode, not Enabled. Under the UEFI specification, Setup Mode means there is no enrolled Platform Key, so this is not the normal Secure Boot enforcement state.

Also, the UEFI bootloader and NTFS driver used by current versions of Rufus are Secure Boot signed, so Secure Boot normally does not need to be disabled to use UEFI.

The last two lines are the important ones:

Launching 'efi\boot\bootx64.efi'...
Starting Microsoft Windows bootmgr...

They mean that Rufus/UEFI:NTFS has successfully accessed the main NTFS partition containing the Windows installation files and launched Microsoft's Windows UEFI bootloader. In other words, Rufus/UEFI:NTFS has done its job. Whatever is going wrong is occurring after UEFI:NTFS launches Microsoft's \efi\boot\bootx64.efi and hands control over to the Windows Setup boot environment.

The warning

Unloading existing 'AMI NTFS Driver v0x10000'

is not an indication of a failure. Your American Megatrends UEFI firmware had already loaded its own NTFS driver. UEFI:NTFS deliberately unloads that driver and substitutes the NTFS driver supplied by Rufus. Rufus does this because the AMI UEFI NTFS driver has known problems.

The following line,

Starting NTFS driver service:
NTFS Driver 1.9 (ntfs-3g ...)

shows UEFI:NTFS proceeding with its own NTFS driver. The subsequent messages show that it successfully opened the NTFS partition, so the warning line is not the cause of the boot failure.

Image below: In VMware Workstation Pro (with Secure Boot enabled), I booted from a Windows 11 26H2 installation USB flash drive created with Rufus.

VMware + Rufus.webp
 
Last edited:

My Computers My Computers

  • At a glance

    Windows 11 ProAMD Ryzen 9 9950X3DKingston FURY Beast 64GB (2x32GB) DDR5 6000MT/sASUS TUF Gaming Radeon RX 9070 OC Edition 16G...
    OS
    Windows 11 Pro
    Computer type
    PC/Desktop
    CPU
    AMD Ryzen 9 9950X3D
    Motherboard
    ASRock B650E Taichi Lite
    Memory
    Kingston FURY Beast 64GB (2x32GB) DDR5 6000MT/s
    Graphics Card(s)
    ASUS TUF Gaming Radeon RX 9070 OC Edition 16GB GDDR6
    Hard Drives
    Solidigm P44 Pro 2TB M.2 NVMe SSD
  • At a glance

    Windows 11 HomeIntel Core Ultra 9 275HX64GB (2x 32GB) DDR5-6400NVIDIA GeForce RTX 5080 16GB GDDR7 Laptop GPU
    Operating System
    Windows 11 Home
    Computer type
    Laptop
    Manufacturer/Model
    Lenovo Legion Pro 7i Gen 10 16"
    CPU
    Intel Core Ultra 9 275HX
    Memory
    64GB (2x 32GB) DDR5-6400
    Graphics card(s)
    NVIDIA GeForce RTX 5080 16GB GDDR7 Laptop GPU
    Hard Drives
    2x 1TB M.2 NVMe SSD (SK Hynix)
Steve, thanks for the FB. I just went into the BIOS and it looks like Secure Boot was already disabled. I'm assuming I looked in the correct location.
1790952233764.webp

BTW when I created the Rufus Thumb Drive I followed the instructions in the YouTube video >>

As a test, I disconnected the SSD drive and a normal HD from the old tower (S4). Thus, I now have NO drives connected to the system except for the Rufus thumb drive which is connected via a USB 2.0 port on the back of the tower.

As the system is booting up I press F11 and get into the EUFI setup utility and view the boot options, as in the following.
1790956933851.webp

If I select the 3rd option as the system boots I see the following and the system does NOT go any further.
1790957325214.webp

If I select the 2nd option I see the followng and the system does not go any further
1790957474296.webp

If I select the first option I see the following
1790957763504.webp


I checked the ASRock website, and the latest BIOS is v1.8. I do have a copy of this BIOS, thus I could flash the system with it, if necessary. I just need to read my notes and determine the HOW. I had not planned to do this but I'm just making wild guesses about possible things I could do.

I'm open to suggestions regarding next steps.
 

Attachments

  • 1790957556756.webp
    1790957556756.webp
    20.1 KB · Views: 3

My Computer My Computer

At a glance

Windows 11
OS
Windows 11
You made the Rufus drive as UEFI.

It should be MBR.
 

My Computer My Computer

At a glance

Windows 11 Pro 26H2
OS
Windows 11 Pro 26H2
Computer type
Laptop
Manufacturer/Model
Toshiba
Antivirus
Defender
Also replace the CMOS battery and load BIOS defaults since a low battery can cause boot problems
Steve, thanks. I changed the battery and attempted to boot; same results as before. If something changed, I don't see it.
 

My Computer My Computer

At a glance

Windows 11
OS
Windows 11

Celery, I put the Rufus thumb drive in my new tower (S5) and opened Disk Management and see the following:​

1790961373686.webp

As I understand all is OK with the Rufus thumb drive. However, I could be wrong (LOL), I will admit, I'm confused!
 

My Computer My Computer

At a glance

Windows 11
OS
Windows 11

My Computer My Computer

At a glance

Windows 11 Pro 26H2
OS
Windows 11 Pro 26H2
Computer type
Laptop
Manufacturer/Model
Toshiba
Antivirus
Defender
You made the Rufus drive as UEFI.

It should be MBR.
Well darn!!!! I thought that MBR was for legacy systems, e.g. pre UEFI. This one is about 3 feet over my head and I cannot piece it together. I just ran a Google search and see this: >

Choose GPT for modern computers with UEFI firmware (required for Windows 11) and MBR for older computers using legacy BIOS. [1, 2]
When using Rufus to create a bootable thumb drive, matching the partition scheme to your target computer's boot mode is essential to prevent boot errors. [1, 2]
GPT (GUID Partition Table)
• Target System: Modern motherboards and laptops built after roughly 2011 supporting UEFI. YouTube- Andriy Mikhail +1
• Requirements: Mandatory if you are installing Windows 11 or running modern Linux distributions on UEFI hardware. &
• Key Benefits: Supports nearly unlimited drive sizes (beyond 2TB), allows up to 128 partitions, and stores backup copies of partition data for better error recovery and data integrity. &
MBR (Master Boot Record)
• Target System: Older PCs and legacy motherboards using traditional BIOS. &
• Requirements: Needed if your target PC does not support UEFI or has UEFI set strictly to legacy/CSM mode. @ Quora
• Key Benefits: Offers maximum compatibility with older operating systems (like Windows 7 or 10 on vintage hardware) and older BIOS configurations, s YouTube Go Dynamic IT
Quick Summary Checklist
• Choose GPT + UEFI for any PC made in the last decade or for Windows 11. YouTube-Go Dynamic IT+1
• Choose MBR + BIOS (or UEFI/CSM) only when reviving or installing an OS on an older legacy machine. @ Quora
 

My Computer My Computer

At a glance

Windows 11
OS
Windows 11
The screenshot in post #6 of the error booting from Rufus tells you exactly what went wrong, and what to do about it.
 

My Computer My Computer

At a glance

Windows 11 Pro 26H2
OS
Windows 11 Pro 26H2
Computer type
Laptop
Manufacturer/Model
Toshiba
Antivirus
Defender
Your ASRock motherboard is currently offering both legacy BIOS/CSM and native UEFI boot options for the USB flash drive. That is why the Kingston drive appears in the boot menu both as:

USB: KingstonDataTraveler...
UEFI: KingstonDataTraveler...

CSM (Compatibility Support Module) provides legacy BIOS compatibility:
- Enabled: Both legacy BIOS/CSM and native UEFI booting are available.
- Disabled: Only native UEFI booting is available.

Windows Setup automatically uses the appropriate partition style (GPT for UEFI or MBR for legacy BIOS) based on the mode in which the Windows installation USB flash drive was booted.


Option 1 - UEFI/GPT (recommended for Windows 11)

When creating the Windows 11 USB flash drive with Rufus, select:

Partition scheme: GPT

Then boot the USB flash drive in UEFI mode. In the one-time boot menu, select the Kingston entry beginning with:

UEFI: KingstonDataTraveler...

If you instead select the legacy entry:

USB: KingstonDataTraveler...

you are attempting to boot the UEFI-only Rufus media in legacy BIOS/CSM mode. Rufus will then display:

ERROR: BIOS/LEGACY BOOT OF UEFI-ONLY MEDIA

That message does not mean the USB flash drive is defective. It means that it was created for UEFI booting but was selected from the firmware's legacy BIOS/CSM boot path.


Option 2 - Legacy BIOS/MBR

If you deliberately want to boot and install in legacy BIOS/CSM mode, recreate the USB flash drive in Rufus using:

Partition scheme: MBR

Then select the legacy boot entry:

USB: KingstonDataTraveler...


However, for Windows 11 on a UEFI-capable computer, I would use Option 1 - UEFI/GPT.

I have an ASRock B650E Taichi Lite motherboard, and CSM is disabled by default (see the image below).

On modern motherboards, CSM is either disabled by default (e.g. AMD X870) or not included at all (e.g. Intel Z890).

ASRock B650E Taichi.webp
 
Last edited:

My Computers My Computers

  • At a glance

    Windows 11 ProAMD Ryzen 9 9950X3DKingston FURY Beast 64GB (2x32GB) DDR5 6000MT/sASUS TUF Gaming Radeon RX 9070 OC Edition 16G...
    OS
    Windows 11 Pro
    Computer type
    PC/Desktop
    CPU
    AMD Ryzen 9 9950X3D
    Motherboard
    ASRock B650E Taichi Lite
    Memory
    Kingston FURY Beast 64GB (2x32GB) DDR5 6000MT/s
    Graphics Card(s)
    ASUS TUF Gaming Radeon RX 9070 OC Edition 16GB GDDR6
    Hard Drives
    Solidigm P44 Pro 2TB M.2 NVMe SSD
  • At a glance

    Windows 11 HomeIntel Core Ultra 9 275HX64GB (2x 32GB) DDR5-6400NVIDIA GeForce RTX 5080 16GB GDDR7 Laptop GPU
    Operating System
    Windows 11 Home
    Computer type
    Laptop
    Manufacturer/Model
    Lenovo Legion Pro 7i Gen 10 16"
    CPU
    Intel Core Ultra 9 275HX
    Memory
    64GB (2x 32GB) DDR5-6400
    Graphics card(s)
    NVIDIA GeForce RTX 5080 16GB GDDR7 Laptop GPU
    Hard Drives
    2x 1TB M.2 NVMe SSD (SK Hynix)
The old S4 has AMD processor and the new tower (S5) has an Intel processor.

Could you go to the Main tab in the ASRock UEFI and post a photo of that screen? It should show us the motherboard/UEFI information and, most importantly, the exact AMD processor installed in S4.

This matters because Windows 11 24H2 (and newer) requires POPCNT and SSE4.2 CPU instructions that some older AMD processors don't have. This CPU instruction-set requirement cannot be bypassed.

As a test, I disconnected the SSD drive and a normal HD from the old tower (S4). Thus, I now have NO drives connected to the system except for the Rufus thumb drive which is connected via a USB 2.0 port on the back of the tower.

As another test, I suggest creating a second Windows 11 installation USB flash drive using Microsoft's Media Creation Tool instead of Rufus.

The Media Creation Tool automatically creates a Windows 11 installation USB flash drive that is bootable in both legacy BIOS/CSM and native UEFI modes.

Boot that USB in UEFI mode by selecting the entry beginning with UEFI: in the one-time boot menu (F11 on ASRock motherboards).

For the moment, don't worry about whether Windows 11 will pass the TPM requirements. The first thing I would like to establish is whether the Microsoft-created USB can successfully boot into Windows Setup on S4.

If Windows Setup starts but subsequently says that the PC does not meet the Windows 11 requirements, those Setup checks can be dealt with separately.

For example:

You can also bypass the Windows 11 system requirements check during a clean installation as follows:

Create a .reg file with the following content:

Code:
Windows Registry Editor Version 5.00

[HKEY_LOCAL_MACHINE\SYSTEM\Setup\LabConfig]
"BypassTPMCheck"=dword:00000001
"BypassSecureBootCheck"=dword:00000001
"BypassRAMCheck"=dword:00000001

- Copy this file to your Windows 11 installation USB flash drive.
- Boot from a Windows 11 installation USB flash drive.
- When you reach the "Select setup option" screen, press Shift + F10 to open Command Prompt. On some laptops, you may need to press Shift + Fn + F10.
- Type regedit and press Enter to open the Registry Editor.
- In Registry Editor, click File > Import, locate your .reg file on the USB flash drive, and select it.
- Close the Registry Editor and the Command Prompt.

If I select the 2nd option I see the followng and the system does not go any further

For some reason, two UEFI: KingstonDataTraveler... boot entries are visible. This may be because your ASRock/AMI firmware has its own NTFS UEFI driver.

If you connect only the USB flash drive created with the Media Creation Tool to the computer, do one or two UEFI: KingstonDataTraveler... entries appear in the one-time boot menu?
 
Last edited:

My Computers My Computers

  • At a glance

    Windows 11 ProAMD Ryzen 9 9950X3DKingston FURY Beast 64GB (2x32GB) DDR5 6000MT/sASUS TUF Gaming Radeon RX 9070 OC Edition 16G...
    OS
    Windows 11 Pro
    Computer type
    PC/Desktop
    CPU
    AMD Ryzen 9 9950X3D
    Motherboard
    ASRock B650E Taichi Lite
    Memory
    Kingston FURY Beast 64GB (2x32GB) DDR5 6000MT/s
    Graphics Card(s)
    ASUS TUF Gaming Radeon RX 9070 OC Edition 16GB GDDR6
    Hard Drives
    Solidigm P44 Pro 2TB M.2 NVMe SSD
  • At a glance

    Windows 11 HomeIntel Core Ultra 9 275HX64GB (2x 32GB) DDR5-6400NVIDIA GeForce RTX 5080 16GB GDDR7 Laptop GPU
    Operating System
    Windows 11 Home
    Computer type
    Laptop
    Manufacturer/Model
    Lenovo Legion Pro 7i Gen 10 16"
    CPU
    Intel Core Ultra 9 275HX
    Memory
    64GB (2x 32GB) DDR5-6400
    Graphics card(s)
    NVIDIA GeForce RTX 5080 16GB GDDR7 Laptop GPU
    Hard Drives
    2x 1TB M.2 NVMe SSD (SK Hynix)
However, for Windows 11 on a UEFI-capable computer, I would use Option 1 - UEFI/GPT.

I have an ASRock B650E Taichi Lite motherboard, and CSM is disabled by default (see the image below).

On modern motherboards, CSM is either disabled by default (e.g. AMD X870) or not included at all (e.g. Intel Z890).

View attachment 185091

How can I take such a HD screenshot during boot? Is it a VM or something else?
 

My Computer My Computer

At a glance

Windows 10
OS
Windows 10
Computer type
PC/Desktop
Manufacturer/Model
Asus
How can I take such a HD screenshot during boot? Is it a VM or something else?

You probably mean a screenshot of the UEFI bootloader on the Rufus-created USB, not a screenshot of the ASRock motherboard's BIOS.

On ASRock motherboards that support this feature, you can take a screenshot of the UEFI setup screen by pressing F12. The screenshot is automatically saved to a FAT32-formatted USB flash drive connected to the computer. Modern ASUS, Gigabyte, and MSI motherboards also have a similar feature. Check the motherboard manual for the correct key.


The screenshots of Windows Setup shown in forum guides are usually taken in a virtual machine booted from a Windows ISO file.

Screenshot below: Windows Setup running in a virtual machine.

Select location to install Windows 11.webp


If you want to take screenshots while booting from physical USB installation media, you can do so using VMware Workstation Pro. The instructions apply only to UEFI booting, not legacy BIOS booting.

How to perform a clean install of Windows 11 in VMware Workstation Pro using a physical USB flash drive as the boot device
  1. VM > Power > Power On to Firmware
  2. VM > Removable Devices > the name of your USB > Connect (Disconnect from Host)
  3. Boot Manager > Enter setup > Boot from a file
  4. Select the correct entry:
    • USB created using the Media Creation Tool: ESD-USB
    • Rufus: RUFUS_BOOT
    • Ventoy (Secure Boot must be disabled): VTOYEFI
  5. Navigate to the /EFI/BOOT directory.
  6. Select the BOOTX64.EFI file.
Note that the USB flash drive takes longer than usual to boot.


Screenshot below: USB installation media created using the Media Creation Tool.

Select location to install Windows 11 - MCT.webp


Screenshots below: USB installation media created using Rufus.

Rufus UEFI-NTFS bootloader.webp


Select location to install Windows 11 - Rufus.webp


Screenshots below: USB installation media created using Ventoy.

Ventoy.webp


Select location to install Windows 11 - Ventoy.webp
 
Last edited:

My Computers My Computers

  • At a glance

    Windows 11 ProAMD Ryzen 9 9950X3DKingston FURY Beast 64GB (2x32GB) DDR5 6000MT/sASUS TUF Gaming Radeon RX 9070 OC Edition 16G...
    OS
    Windows 11 Pro
    Computer type
    PC/Desktop
    CPU
    AMD Ryzen 9 9950X3D
    Motherboard
    ASRock B650E Taichi Lite
    Memory
    Kingston FURY Beast 64GB (2x32GB) DDR5 6000MT/s
    Graphics Card(s)
    ASUS TUF Gaming Radeon RX 9070 OC Edition 16GB GDDR6
    Hard Drives
    Solidigm P44 Pro 2TB M.2 NVMe SSD
  • At a glance

    Windows 11 HomeIntel Core Ultra 9 275HX64GB (2x 32GB) DDR5-6400NVIDIA GeForce RTX 5080 16GB GDDR7 Laptop GPU
    Operating System
    Windows 11 Home
    Computer type
    Laptop
    Manufacturer/Model
    Lenovo Legion Pro 7i Gen 10 16"
    CPU
    Intel Core Ultra 9 275HX
    Memory
    64GB (2x 32GB) DDR5-6400
    Graphics card(s)
    NVIDIA GeForce RTX 5080 16GB GDDR7 Laptop GPU
    Hard Drives
    2x 1TB M.2 NVMe SSD (SK Hynix)

Latest Support Threads

Latest Tutorials

Back
Top Bottom